Table of Contents
Advertisement
Quick Links
Advertisement
Table of Contents
Troubleshooting

Related Manuals for Maxx Ice MIM150N


Summary of Contents for Maxx Ice MIM150N
- Page 1 SERVICE, INSTALLATION, AND INSTRUCTION MANUAL MANUEL D’UTILISATION, D’INSTALLATION ET D’ENTRETIEN MIM150N - MIM150NH MIM200N - MIM200NH MIM260N - MIM260NH MIM320N - MIM320NH AUTOMATIC COMMERCIAL ICE CUBE MACHINE PLEASE READ CAREFULLY MACHINE À GLAÇONS COMMERCIALE VEUILLEZ LIRE ATTENTIVEMENT 061617...
-
Page 2: Table Of Contents
CONTENTS ICE MAKER SAFETY IMPORTANT SAFEGUARDS 3 - 4 TECHNICAL INFORMATION COMPONENT LOCATIONS ICE MAKER INSTALLATION 6 - 10 Unpacking Installing the Adjustable Feet Installing the Stability Brackets Location Requirements 7 - 8 Electrical Requirements Leveling the Ice Maker Water Supply Installation Types OPERATION 11 - 12... -
Page 3: Ice Maker Safety
SERVICE AND INSTALLATION MANUAL www.maxxfoodservice.com ICE MAKER SAFETY We have provided many important safety messages in this manual and on your appliance Always read and obey all safety messages DANGER This is the Safety Alert Symbol This symbol alerts you to potential hazards that can injure or kill you and others All safety messages will follow the Safety Alert Symbol and either WARNING the words “DANGER”, “WARNING”... -
Page 4: Important Safeguards
IMPORTANT SAFEGUARDS Before the ice maker is used, it must be properly positioned and installed as described DANGER in this manual, so read the manual carefully We strongly recommend that you have a professional install your new machine The warranty may be affected or voided WARNING by an incorrect installation. -
Page 5: Technical Information
Extension Cord Because of potential safety hazards under certain conditions, it is strongly recommended that you do not use an extension cord with this ice maker Technical Information MIM260N/260NH MIM320N/320NH MODEL MIM150N/150NH MIM200N/200NH Electrical input 115VAC/60Hz 115VAC/60Hz 115VAC/60Hz 115VAC/60Hz Power consumption... -
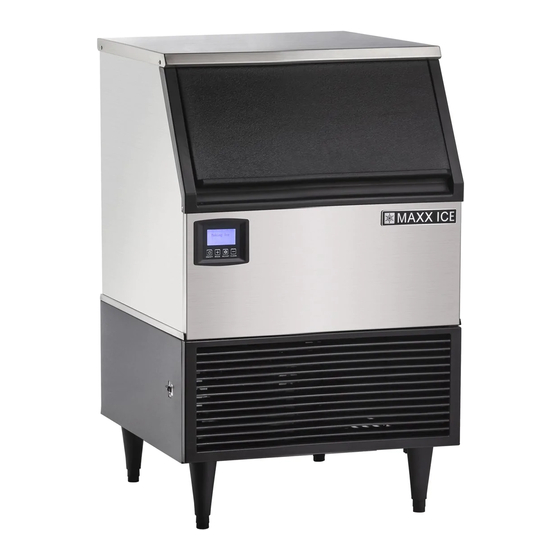
Page 6: Component Locations
Component Information Top panel Door Evaporator (ice mold) Bin full probe Water tank Water tank screw nut (MIM320N(H) without) Ice storage bin Control panel Front bottom louver Adjustable foot Power switch BACK VIEW TOP VIEW Water inlet 3/8” FPT Power supply line Drain 1/2”... -
Page 7: Ice Maker Installation
SERVICE AND INSTALLATION MANUAL www.maxxfoodservice.com Ice Maker Installation DANGER UNPACKING WARNING Excessive Weight Hazard CAUTION Use two or more persons to move and install ice maker Failure to do so can result in back or other injury REMOVE PACKAGING MATERIALS IMPORTANT: Do not remove any permanent instruction labels or the data label on your ice maker. -
Page 8: Installing The Stability Brackets
Ice Maker Installation INSTALLING THE STABILITY BRACKETS This operation requires at least two persons If you wish to install the ice maker in a free-standing mode rather than enclosed, it is necessary to attach the two metallic stability brackets that can be found packed inside the ice storage bin Keeping the machine tilted to the right, but not more than 45˚,... -
Page 9: Electrical Requirements
SERVICE AND INSTALLATION MANUAL www.maxxfoodservice.com DANGER Ice Maker Installation WARNING CAUTION Normal operating ambient temperature should be between 40˚F (4.4˚C) and 110˚F (43.3˚C). Normal operating water temperature should be between 40˚F (4.4˚C) and 90˚F (32˚C). Operation of the ice maker for extended periods outside of these normal temperature ranges may affect production capacity •... -
Page 10: Leveling The Ice Maker
Ice Maker Installation LEVELING THE ICE MAKER Under block Once the ice cube machine is set in its enclosure, if the base is not level, you Turning the under block can adjust the feet by rotating the under counter-clockwise reduces block (see below) until the machine is the machine’s height up level... -
Page 11: Installation Types
SERVICE AND INSTALLATION MANUAL www.maxxfoodservice.com Ice Maker Installation INSTALLATION TYPES This ice cube machine has been designed to be enclosed (as under a cabinet) It can also be free- standing (using the supplied stability brackets) or built-in (sealed to the floor). In every case, there must be adequate air space around the unit for ventilation purposes Enclosed Installation: An enclosed installation will allow you to install the ice cube machine under a counter or in a kitchen... -
Page 12: Operation
Operation FINAL CHECK LIST BEFORE OPERATION 1 Have all packing materials and tape been removed from the interior and exterior of the ice maker 2 Did you clean the ice storage bin 3 Have the installation instructions been followed, including connecting the machine to water and electricity 4 Has the machine been leveled º... -
Page 13: How The Machine Makes Ice
2 Disconnect the water supply line from the water inlet 3 Shut off the power supply at the main electrical power source 4. MIM150N(H)/200N(H)/260N(H): Screw off the water tank screw nut and drain out water completely, Note: Don't forget to screw the nut back into place again tighten the nut after fnishing. -
Page 14: Cleaning And Maintenance
DANGER WARNING Cleaning and Maintenance CAUTION If the ice maker is left unused for a long time, before the next use it must be thoroughly cleaned Follow carefully any instructions provided for cleaning or use of sanitizing solution Do not leave any solution inside the ice maker after cleaning Periodic cleaning and proper maintenance will ensure efficiency, top performance, and long life. -
Page 15: Water Distribution Tube Cleaning
SERVICE AND INSTALLATION MANUAL www.maxxfoodservice.com Cleaning and Maintenance D ANGER WATER DISTRIBUTION TUBE CLEANING When you find that the ice cubes are incompletely formed or the output of ice cubes is low, the water distribution tube may be blocked Set the power switch to OFF Unscrew the six screws holding the top panel and remove the panel You will see the water distribution tube Rotate the water distribution tube so that the holes in it are facing up Using a toothpick or similar tool, dredge the holes, then rotate the water distribution tube back to its original position If the tube is badly blocked, clean it as follows:... -
Page 16: Control Panel
Control Panel (located at the left side of front panel) You will find the control panel at the left side of front panel. This control panel offers four pressure sensitive buttons and a LCD display screen. ON/ OFF Button. Powers the ice machine. Bin Full Process: When the words of "Bin Full"... - Page 17 SERVICE AND INSTALLATION MANUAL www.maxxfoodservice.com 6. When ice cubes are removed from from the ice storage bin, clearing the bin full probe, the machine will judge the status for three minutes. During this period, the LCD screen will display the words of “Bin Full Release”...
-
Page 18: Troubleshooting
ICE BRIDGE SIZE ADJUSTMENT GUIDE: Press and hold the “ADJUST" button for at least 3 seconds The unit will enter the Ice Size Adjustment mode and the words "Ice Adjust" display on the LCD Screen. While in the Ice Size Adjustment mode, press the “Clean” button or the “Mode” button for the desired ice size. -
Page 19: Troubleshooting Guide
SERVICE AND INSTALLATION MANUAL www.maxxfoodservice.com Troubleshooting Guide PROBLEM POSSIBLE CAUSE PROBABLE CORRECTION The ice maker is unplugged Plug the ice maker in The fuse is blown Replace fuse--if it happen, call for service to check for a short circuit in the ice maker The machine doesn't operate... -
Page 20: Notes
NOTES:...
Need help?
Do you have a question about the MIM150N and is the answer not in the manual?
Questions and answers