
Related Manuals for Vecow EIC-1000


Summary of Contents for Vecow EIC-1000
- Page 1 USER USER EIC-1000 Manual Manual Arm-based Edge AI Computing System Dual Cortex-A72, Quad Cortex-A53 Processor, 9V to 55V, 0°C to 70°C Operation 1.0.0 Edition 20211207...
- Page 2 Record of Revision Version Date Remark Page Description 1.00 2021/12/7 Official Release ©Vecow EIC-1000 User Manual...
- Page 3 This manual is released by Vecow Co., Ltd. for reference purpose only. All product offerings and specifications are subject to change without prior notice. It does not represent commitment of Vecow Co., Ltd. Vecow shall not be liable for direct, indirect, special, incidental, or consequential damages arising out of the use of the product or documentation or any infringements upon the rights of third parties, which may result from such use.
- Page 4 Order Information Part Number Description EIC-1000, Rockchip RK3399, Pre-installed with Debian 9.0, EIC-1000-DB 1 GigE LAN, 1 USB 3.0, 1 USB 2.0, 1 Digital Display, 2 COM, 0°C to 70°C EIC-1000, Rockchip RK3399, Pre-installed with Android 7.1, EIC-1000-AD 1 GigE LAN, 1 USB 3.0, 1 USB 2.0, 1 Digital Display, 2 COM, 0°C to 70°C...
- Page 5 Terminal Block, Wide Temperature -30°C to +70°C 60W, 12V, 90V AC to 264V AC Power Adapter with 3-pin PWA-60WP3-WT-12V Terminal Block, Wide Temperature -30°C to +70°C DIN-RAIL DIN Rail Kit for EIC-1000 WiFi & Bluetooth WiFi & Bluetooth Module with Antenna ©Vecow EIC-1000 User Manual...
-
Page 6: Table Of Contents
1.3 Product Specification 1.3.1 Specifications of EIC-1000-DB 1.3.2 Specifications of EIC-1000-AD 1.4 Mechanical Dimensions of EIC-1000 CHAPTER 2 GETTING TO KNOW YOUR EIC-1000 2.1 Packing List 2.2 Front Panel I/O & Functions 2.3 Rear Panel I/O Functions 2.4 Main Board Connectors & Jumper Locations CHAPTER 3 SYSTEM SETUP 3.1 How to Open Your EIC-1000... - Page 7 4.6 Camera 4.7 Storage 4.8 Display 4.9 Audio APPENDIX A : POWER CONSUMPTION ©Vecow EIC-1000 User Manual...
-
Page 8: Chapter 1 General Introduction
Cortex-A53 processor and runs on Arm Mali-T860MP4 GPU. To meet the market demand for increased storage capabilities within digital signage and smart retail, EIC-1000 offers 2GB DDR3 SDRAM, 32GB eMMC and 1 external Micro SD and supports digital display at up to 4K resolution. Furthermore, the EIC-1000 supports Android and Linux operating system, which allows users to work seamlessly across industries. -
Page 9: Features
• 1 GigE LAN, 1 USB 3.1, 1 USB 2.0 • 2 COM RS-232/422/485, Audio Mic-in and Line-out • 1 Half-size Mini PCIe for WiFi/Bluetooth • DC 9V to 55V wide range power input • Fanless, 0°C to 70°C Operating Temperature ©Vecow EIC-1000 User Manual GENERAL INTRODUCTION... -
Page 10: Product Specification
1.3 Product Specification 1.3.1 Specifications of EIC-1000-DB System Rockchip RK3399 Arm Dual-core Cortex-A72 + Quad-core Processor Cortex-A53 Memory 1 DDR3L 1066MHz SDRAM, 2GB eMMC 1 eMMC, 32GB • Linux Debian 9.0 • Supports bootup from eMMC Graphics Interface 1 Digital Display, up to 4Kx2K @60fps... - Page 11 Operating Temperature 0°C to 70°C (32°F to 131°F) Storage Temperature -40°C to 85°C (-40°F to 185°F) Humidity 5% to 95% Humidity, non-condensing Relative Humidity 95% at 70°C Shock IEC 60068-2-27 Vibration IEC 60068-2-64 CE, FCC, EN50155, EN50121-3-2 ©Vecow EIC-1000 User Manual GENERAL INTRODUCTION...
-
Page 12: Specifications Of Eic-1000-Ad
1.3.2 Specifications of EIC-1000-AD System Rockchip RK3399 Arm Dual-core Cortex-A72 + Quad-core Processor Cortex-A53 Memory 1 DDR3L 1066MHz SDRAM, 2GB eMMC 1 eMMC, 32GB • Android 7.1 • Supports bootup from eMMC Graphics Interface 1 Digital Display, up to 4Kx2K @60fps... - Page 13 Operating Temperature 0°C to 70°C (32°F to 131°F) Storage Temperature -40°C to 85°C (-40°F to 185°F) Humidity 5% to 95% Humidity, non-condensing Relative Humidity 95% at 70°C Shock IEC 60068-2-27 Vibration IEC 60068-2-64 CE, FCC, EN50155, EN50121-3-2 ©Vecow EIC-1000 User Manual GENERAL INTRODUCTION...
-
Page 14: Mechanical Dimensions Of Eic-1000
1.4 Mechanical Dimensions of EIC-1000 162.0 (6.38) Unit : mm (inch) 147.0 (5.79) 136.0 (5.35) 5.0 (0.20) 134.0 (5.28) ©Vecow EIC-1000 User Manual GENERAL INTRODUCTION... -
Page 15: Chapter 2 Getting To Know Your Eic-1000
GETTING TO KNOW YOUR EIC-1000 2.1 Packing List Item Description EIC-1000 Arm-based Edge AI Computing System (According to the configuration of you order, EIC-1000 series may contain Micro SD and M.2 module. Please verify these items if necessary.) Item Description... -
Page 16: Front Panel I/O & Functions
2.2 Front Panel I/O & Functions In Vecow EIC-1000 series, all of the I/O connectors are located on the front and rear panels. Most of the general connections to computer devices, such as USB, LAN, Digital Display and COM port are placed on the front panel. - Page 17 MUST be ensured that the system is powered off. insert the card, 2.2.4 USB 2.0 The USB interface supports 480Mbps transfer rate complied with high speed USB specification Rev. 2.0. ©Vecow EIC-1000 User Manual GETTING TO KNOW YOUR EIC-1000...
- Page 18 Please refer to Section 4.2 for details. 2.2.6 Digital Display Port Onboard Digital Display Port supports DDC channel mode. The connection supports up to 3840 x 2160 resolution at 60Hz. ©Vecow EIC-1000 User Manual GETTING TO KNOW YOUR EIC-1000...
- Page 19 1000Mbps Ethernet network; The right LED will keep twinkling/ off when Ethernet data packets are being transmitted/received. LED Location LED Color 10/100 Mbps 1000Mbps Left Red/Green Solid Red Solid Green Right Green Twinkling Green Twinkling Green ©Vecow EIC-1000 User Manual GETTING TO KNOW YOUR EIC-1000...
- Page 20 The pin assignments are listed in the following table : Serial Port Pin No. RS-232 RS-422 RS-485 TXD- DATA- TXD+ DATA+ RXD+ ----- RXD- ----- 1 to 2 ----- ----- ----- ----- ----- ----- ----- ----- ©Vecow EIC-1000 User Manual GETTING TO KNOW YOUR EIC-1000...
-
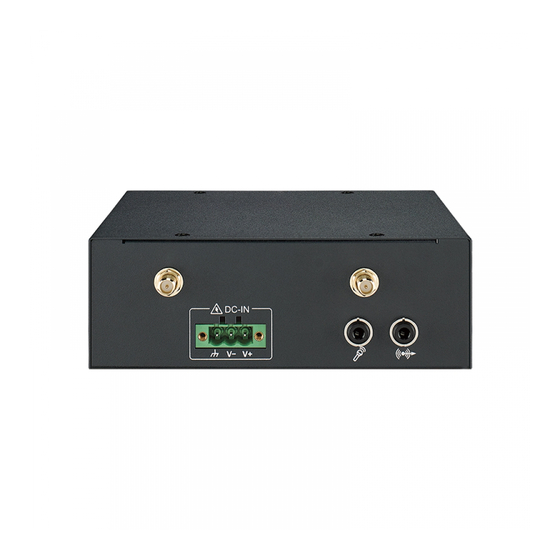
Page 21: Rear Panel I/O Functions
Chassis Ground 2.3.2 Audio Codec Interface (H10) There are 2 audio connectors, Mic-in and Line-out, in the rear side of EIC-1000. Onboard Realtek ALC5640 low power stereo codec supports speaker amplifiers 1.5W per channel into 8Ω or 2W per channel into 4Ω. -
Page 22: Main Board Connectors & Jumper Locations
2.4 Main Board Connectors & Jumper Locations 2.4.1 Top View (Component Side) of EIC-1000 Main Board with Connector Location 2.4.2 Bottom View (Solder Side) of EIC-1000 Main Board with Connector Location ©Vecow EIC-1000 User Manual GETTING TO KNOW YOUR EIC-1000... - Page 23 2.4.3 H15 : Power Switch Short pin 1 and pin 2 of H15 to power up EIC-1000. Pin Assignments of H15 are listed in the following table : Pin No. Status Description Open Power off Close Power on Leave Open For factory use only 2.4.4 W4 : Power Input...
- Page 24 Pin No. Definition LIGHT_INT_L (3.3V), GPIO (3.3V) Reserved Low active COMP_INT_L (3.3V), GSENSOR_INT_L (3.3V), Low active Low active GYR_INT_L (3.3V), USB_GND Low active USB Data + USB Data - VBUS (+5V) ©Vecow EIC-1000 User Manual GETTING TO KNOW YOUR EIC-1000...
- Page 25 ADC0-IN-1.8V 2.4.8 W12 : PoE Power Connector EIC-1000 supports optional PoE function for the Gigabit Ethernet on the front with Mode A and B. Mode A delivers power on the data pairs of Pin 1, 2, 3, 6. Mode B delivers power on the Pin 4, 5, 7, 8.
- Page 26 Pin Assignments of H10 are listed in the following table : Pin No. Description Pin No. Description HP_R MIC_IN HP_L HP_GND HP_detect SPK_R- SPK_R+ SPK_L- SPK_L+ Stereo_MIC_R Stereo_MIC_L LINE_OUT_L LINE_OUT_R Reserved Reserved Reserved ©Vecow EIC-1000 User Manual GETTING TO KNOW YOUR EIC-1000...
- Page 27 2.4.10 J9 : Mini PCIe EIC-1000 has 1 standard half-size mini PCIe slot. Pin Assignments of J9 are listed in the following table : Pin No. Definition Pin No. Definition PCIe_Wake# 3.3V 1.5V PCIe_CREFCLKM PCIe_CREFCLKP PCIe_DIS# PCIe_RST# PCIe_CRXM 3.3V PCIe_CRXP 1.5V...
- Page 28 Panasonic CR2032 190mAh lithium battery. It is not recommended that you replaced the lithium battery on your own. If the battery needs to be changed, please contact the Vecow RMA service team. Pin Assignments of W1 are listed in the following table : Pin No.
- Page 29 Pin Assignments of W19 are listed in the following table : Pin No. Description Pin No. Description DC3.3V/25mA-Out Wifi LED: Out, Low active BT LED: Out, Low active Reset: In, Low active Buzzer- Buzzer+ ©Vecow EIC-1000 User Manual GETTING TO KNOW YOUR EIC-1000...
- Page 30 2.5.1 Top View (Component Side) of SMX-300 with Connector Location 2.5.2 W10 : USB Input Pin Assignments of W10 are listed in the following table : Pin No. Definition Pin No. Description USB-5V USB-DM USB-DP ©Vecow EIC-1000 User Manual GETTING TO KNOW YOUR EIC-1000...
- Page 31 Pin Assignments of J12 and J13 are listed in the following table : Serial Port Pin No. RS-232 RS-422 RS-485 TXD- DATA- TXD+ DATA+ RXD+ ----- RXD- ----- 1 to 2 ----- ----- ----- ----- ----- ----- ----- ----- ©Vecow EIC-1000 User Manual GETTING TO KNOW YOUR EIC-1000...
-
Page 32: Chapter 3 System Setup
SYSTEM SETUP 3.1 How to Open Your EIC-1000 Remove eight pcs F-M3x4L screws and pick up top cover. ©Vecow EIC-1000 User Manual SYSTEM SETUP... -
Page 33: Installing Sd Card
3.2 Installing SD Card Step 1 Remove one pcs PH-M3x4L screw and install SD Card. Step 2 Install SD Cover on front panel. ©Vecow EIC-1000 User Manual SYSTEM SETUP... -
Page 34: Installing Mini Pcie
3.3 Installing Mini PCIe Install MiniPCIe card into the Mini PCIe slot and fasten two PHILLPIS M2x4L screws. ©Vecow EIC-1000 User Manual SYSTEM SETUP... -
Page 35: Installing Antenna Cable
3.4 Installing Antenna Cable Step 1 Remove the rubber corks on the rear panel. Step 2 Put antenna cable connector into the hole on panel. Step 3 Fasten washer on the antenna cable connector. ©Vecow EIC-1000 User Manual SYSTEM SETUP... -
Page 36: Mount Your Eic-1000
3.5 Mount Your EIC-1000 Wall Mount Install wall mount bracket then fasten four pcs F-M3x4L screws. ©Vecow EIC-1000 User Manual SYSTEM SETUP... - Page 37 Din Rail (The wall mount bracket must be installed first.) Install din rail kit then fasten screws. ©Vecow EIC-1000 User Manual SYSTEM SETUP...
-
Page 38: Chapter 4 Software Setup
For Android C++ developer, please install termux (com.termux_116.apk) software package (terminal). Download the package at https://f-droid.org/en/ packages/com.termux/ You will find the "Termux" software icon shown as below after installation. Termux has the same function as Linux terminal. ©Vecow EIC-1000 User Manual SOFTWARE SETUP... - Page 39 Click the arrow to open the search app page. ©Vecow EIC-1000 User Manual SOFTWARE SETUP...
-
Page 40: Usb Debug Bridge
4.2 USB Debug Bridge 4.2.1 Android Debug Bridge (ADB) The EIC-1000 USB 3.0 port is set as host mode in default. To use the ADB function, the USB 3.0 port must be set to device mode by following steps. Step 1 Enter Settings and select "About Tablet". - Page 41 Step 3 A new item "Developer Options" should appear in the system block. Step 4 Select the "Developer Options" to turn on the USB debugging function. Note : Please do not change any others settings unless you know what you are doing. ©Vecow EIC-1000 User Manual SOFTWARE SETUP...
- Page 42 Step 5 Go back to Settings and select "USB". Step 6 Select "ADB/HOST" and set USB 3.0 as ADB. ©Vecow EIC-1000 User Manual SOFTWARE SETUP...
- Page 43 USB 3.0 port and find the "Android ADB" Interface in the device manager. 4.2.2 Android APK Software Installation Step 1 To install APK software, you can use the built-in "apkinstaller" App or through USB. Please download the "Android Tool" Software Package at https://www.t-firefly.com/doc/download/53.html ©Vecow EIC-1000 User Manual SOFTWARE SETUP...
- Page 44 Step 2 Connect the EIC-1000 USB 3.0 port with Windows PC. Step 3 Begin APK software installation through Window PC command prompt. adb install xxxxx.apk Enter Terminal Mode: $adb shell Exit Terminal Mode: $exit Shutdown System: $reboot –p Reboot System: $reboot ©Vecow EIC-1000 User Manual...
- Page 45 Step 3 Check SSH service status. sudo service sshd status Step 4 If installed successfully, the systems will response as below. Active: active (running) since Sun 20xx-xx-xx xx:xx:xx CST; 15s ago ©Vecow EIC-1000 User Manual SOFTWARE SETUP...
-
Page 46: Gpio
PIN 10 3.3V Power supply 4.3.2 GPIOs control method You can write or read value by The GPIOs with the Linux command echo/cat by debug port. For Android, please use the following adb.exe command. ©Vecow EIC-1000 User Manual SOFTWARE SETUP... -
Page 47: Serial Port
$./set_mode /ttyUSB0 0 4.4.2 Android Serial Port Step 1 Enter the following adb.exe command. Step 2 Enter serial port read/write test command. $ read -t 3 serialport1 < /dev/ttyUSB1 $ echo "serial port test" > /dev/ttyUSB1 ©Vecow EIC-1000 User Manual SOFTWARE SETUP... -
Page 48: Ethernet
4.5 Ethernet Step 1 Enter setting and select "More" in the wireless & networks section. Step 2 Select Ethernet. ©Vecow EIC-1000 User Manual SOFTWARE SETUP... - Page 49 Step 3 Edit Ethernet settings. 4.6 Camera EIC-1000 supports USB Web CAM, you can use the built-in camera software for the camera functions. ©Vecow EIC-1000 User Manual SOFTWARE SETUP...
- Page 50 4.7 Storage 4.7.1 USB Storage Step 1 Click the upper-left icon on the desktop. Step 2 Click "Explore" to open file manager. ©Vecow EIC-1000 User Manual SOFTWARE SETUP...
- Page 51 Step 3 Click the corresponding device icon to access the files. 4.7.2 Internal Storage (eMMC) Step 1 Click the upper-left icon on the desktop. ©Vecow EIC-1000 User Manual SOFTWARE SETUP...
- Page 52 Step 2 Click "Explore" to open file manager. Step 3 Right click and select "Show internal storage" ©Vecow EIC-1000 User Manual SOFTWARE SETUP...
- Page 53 Step 4 Click the corresponding device icon to access the files. 4.7.3 SD Card You can configure the SD card as portable or internal storage device. ©Vecow EIC-1000 User Manual SOFTWARE SETUP...
- Page 54 Step 1 Click the upper-left icon on the desktop. ©Vecow EIC-1000 User Manual SOFTWARE SETUP...
- Page 55 Step 2 Click "Explore" to open file manager. ©Vecow EIC-1000 User Manual SOFTWARE SETUP...
- Page 56 4.8 Display Step 1 Enter Settings and select "Display". Step 2 Select "HDMI". ©Vecow EIC-1000 User Manual SOFTWARE SETUP...
- Page 57 Step 3 The settings of the display, e.g., resolution and rotation, can be changed in this section. ©Vecow EIC-1000 User Manual SOFTWARE SETUP...
- Page 58 4.9 Audio You can use the built-in software (Music & Sound Recorder) for the audio function. To adjust volume, go to "Settings" and select "Sound". ©Vecow EIC-1000 User Manual SOFTWARE SETUP...
- Page 59 $ sudo apt-get install gcc $ unzip tinyalsa-master.zip $ cd tinyalsa-master $ sudo make install $ tinymix -D 1 set 31 1 $ tinymix -D 1 set 43 1 $ tinymix -D 1 set 44 1 ©Vecow EIC-1000 User Manual SOFTWARE SETUP...
- Page 60 Run BurnInTest/Stress-ng Test Input Current Consumption Current Consumption 0.434A 03.91W 0.975A 08.78W 0.320A 03.84W 0.726A 08.71W RK3399 Dual Cortex-A72 & 0.180A 04.32W 0.349A 08.38W Quad Cortex-A53 Processor 0.131A 04.72W 0.263A 09.47W 0.094A 05.17W 0.175A 09.63W ©Vecow EIC-1000 User Manual Appendix A...
- Page 61 No part of this publication may be reproduced in any form or by any means, electric, photocopying, or recording, without prior authorization from the publisher. The rights of all the brand names, product names, and trademarks belong to their respective owners. © Vecow Co., Ltd. 2021. All rights reserved.
Need help?
Do you have a question about the EIC-1000 and is the answer not in the manual?
Questions and answers