Table of Contents
Advertisement
Quick Links
Advertisement
Table of Contents

Related Manuals for CDVI CDV-471IP


Summary of Contents for CDVI CDV-471IP
- Page 1 YEAR WARRANTY CDV-471IP 2EASY IP, 7” Screen Intercom Monitor...
-
Page 2: Table Of Contents
CDV-471IP 2EASY IP, 7” Screen Intercom Monitor 1] CONTENTS Title Page 2] PARTS AND FUNCTIONS 3] MOUNTING 4] MAIN MENU 5] ANSWERING A CALL 6] MONITORING 7] CALLING FUNCTIONS 8] VIEW CALL RECORD 9] DO NOT DISTURB FUNCTION 10] DIVERT CALL... -
Page 3: Parts And Functions
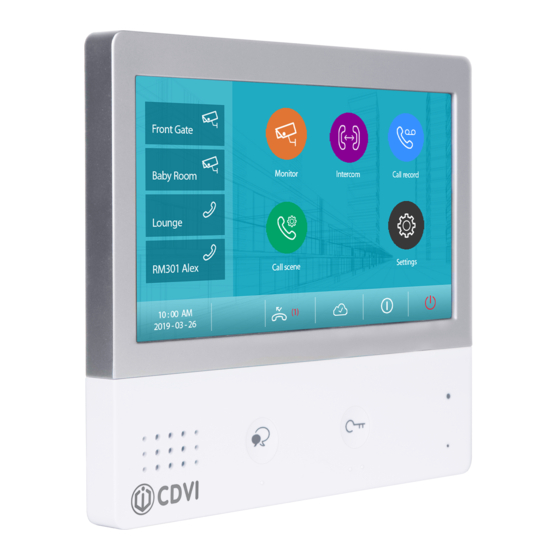
CDV-471IP 2EASY IP, 7” Screen Intercom Monitor 2] PARTS AND FUNCTIONS LCD Screen Power/No Disturb Indicator Speaker Microphone Talk/Mon Button Unlock Button Terminal connector Lan connector Item Description Speaker For audio, ring tones, and alerts. Talk/Mon button Touch to communicate hands-free with visitors. -
Page 4: Main Menu
CDV-471IP 2EASY IP, 7” Screen Intercom Monitor The recommended installation height is 145-160cm. 1. Use screws to fasten the mounting bracket to the wall with a standard single gang flush lightswitch box. 2. Connect the two-wire cables to the unit. -
Page 5: Answering A Call
CDV-471IP 2EASY IP, 7” Screen Intercom Monitor Status bar icons Icon Description Missed call Displays when there is a missed call. Touch to review the missed call. Do not disturb Indicates the device is in “Do Not Disturb” mode. Call transfer Indicates the device is in “Divert Call”... -
Page 6: Monitoring
CDV-471IP 2EASY IP, 7” Screen Intercom Monitor Notes: 1. Receiving a call while talking with a door station A call from different door station is not possible as the system is busy. You will have to end the current call to answer the new call-in. -
Page 7: View Call Record
CDV-471IP 2EASY IP, 7” Screen Intercom Monitor Using the namelist for calls 1. From the main menu, tap the Intercom icon. - A list of available items is displayed. 2. Select Namelist. - A list of names is displayed (if set up in the system). -
Page 8: Do Not Disturb Function
CDV-471IP 2EASY IP, 7” Screen Intercom Monitor Play pictures and videos You can record camera images/videos manually while talking to a visitor or monitoring camera images/videos. Follow these steps to play the recorded pictures/videos. 1. From the main menu, tap the Call Record icon. -
Page 9: Divert Call
CDV-471IP 2EASY IP, 7” Screen Intercom Monitor Notes: • The No Disturb indicator turns from green to red, to indicate that the no disturb function has been activated. • This function will activate immediately if selected, and the status bar on the main menu interface will show the icon. - Page 10 CDV-471IP 2EASY IP, 7” Screen Intercom Monitor 1. From the main menu, tap the Setting icon. The setting list will be displayed. 2. Select the desired setting category. 3. Select the desired sub-setting. 4. Change the settings as desired. 5. Tap the icon to save the new setting.
-
Page 11: Address Set Up
CDV-471IP 2EASY IP, 7” Screen Intercom Monitor 12] ADDRESS SET UP 1. From the main menu, tap the Settings icon. - A list of available settings is displayed. 2. Select Installer, and then tap Call_Nbr. 3. Input the password if required (66666666 by default). -
Page 12: Upgrade
[Input IP address] 3. SD card Copy upgrade firmware before upgrade. After tapping Download Code and inputting the code, contact CDVI to get the code when the device needs to be updated. Touch Check to load the upgrade information from the source. -
Page 13: Download & Setup Vdp Connect App
CDV-471IP 2EASY IP, 7” Screen Intercom Monitor Otherwise the device will upgrade automatically. Do not power off the device during upgrades. 14] DOWNLOAD & SETUP VDP CONNECT APP 1. Scan the following QR code and 2. Permit “VDP Connect” with permissons: download VDP Connect app, or search On IP monitor, tap the “Cloud”... -
Page 14: Specifications
CDV-471IP 2EASY IP, 7” Screen Intercom Monitor GATE 16] SPECIFICATIONS Feature Description Power Source PoE (IEEE 802.3af Class 0) LAN Interface 10 BASE-T / 100 BASE-TX Ethernet (RJ-45) Monitor Screen 7inch digital colour TFT Display Resolution 800 x 480 Wire Type... - Page 15 CDV-471IP 2EASY IP, 7” Screen Intercom Monitor Notes...
- Page 16 +39 (0) 321 90 573 www.cdvi.it CDVI MAROC +212 (0) 5 22 48 09 40 www.cdvi.ma CDVI SWEDEN [SWEDEN - DENMARK - NORWAY - FINLAND] +46 (0) 31 760 19 30 www.cdvi.se CDVI UK [UNITED KINGDOM - IRELAND] +44 (0) 1628 531300 www.cdvi.co.uk...
Need help?
Do you have a question about the CDV-471IP and is the answer not in the manual?
Questions and answers