Table of Contents
Advertisement
Quick Links
Advertisement
Table of Contents

Related Manuals for CDVI CDV4791


Summary of Contents for CDVI CDV4791
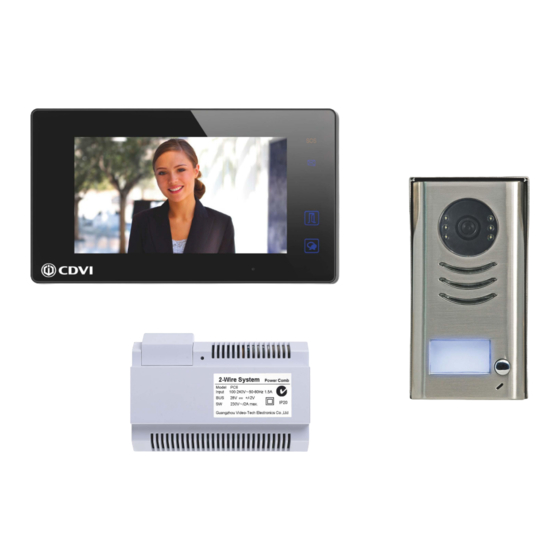
- Page 2 5. Schematics & Wiring: 5.1: Wiring distances & cables. 5.2: Basic wiring configurations. 5.3: Electric lock connections 7: Specifications. 8: Precautions. 1. CDV4791/2 KIT CONTENTS: 1 x CDV91/CDV92 1 or 2 Button Video Entry Panel 1 x CDV-PC6 Power/Bus Combiner 1 x CDV-47MG...
-
Page 3: Terminal Descriptions
2 Easy 1 User Video Entry Kit CDV4791/2 2: CDV91/92 Parts and Functions Camera Lens Rain Cover 2.1: Terminal Descriptions Main Connection Port S 2 + S - P L S 1 + B U S... -
Page 4: Installation & Adjustments
2 Easy 1 User Video Entry Kit CDV4791/2 2.2: Installation & Adjustments Mounting Without Rain Cover 160-165cm Mounting With Rain Cover 160-165cm... - Page 5 2 Easy 1 User Video Entry Kit CDV4791/2 Fitting The Name Label From the rear of the metal section of the CDV91/92 unclip the plastic cover to open the transparent name plate, insert a name label and replace the plastic cover.
- Page 6 2 Easy 1 User Video Entry Kit CDV4791/2 2: Terminal Descriptions: 1 2 3 100~240 Vac BUS(IM) BUS(DS) Earth ground terminal. AC input terminal. AC input terminal. LED: Power indicator, on when power connected. Bus control terminal. BUS(IM): Indoor monitor connection terminal.
- Page 7 2Easy 1 User Video Entry Kit CDV4791/2 4: CDV47 Parts and Functions 4.1: Terminals & Installation Terminal description L1,L2: Bus line terminal (green Connector). SW+,SW-: Door bell call button connection port. Ring,GND: Extra buzzer connection port. 1 2 3 4 5 6...
-
Page 8: Screen Functions
2Easy 1 User Video Entry Kit CDV4791/2 4.2: Screen Functions Main Menu The Main menu is the starting point for using all the applications on the monitor. The Main menu can be customised to display a chosen logo. Touch anywhere of the screen on monitor in standby mode, the Main menu will appear as fol-... - Page 9 2Easy 1 User Video Entry Kit CDV4791/2 Manual Input Address The address can also be entered manually . • A total of 32 numbers can be set, from 00~31 • When multiple monitors are installed in one apartment, the monitors should be set to thsame user code and the master/slave mode should be set on the monitor.
-
Page 10: Entering Installer Setup
2 Easy 1 User Video Entry Kit CDV4791/2 4.4: Installer Set Up Touch the screen anywhere on monitor in standby mode, the main menu page will be shown as follows: Entering installer setup • On main menu page, touch [Logo] icon to enter the About page. -
Page 11: Setting Monitor Time
2 Easy 1 User Video Entry Kit CDV4791/2 Setting the slave monitor video on : In default mode, when receive a calling the master and slave monitors will ring at the same time, however the master monitor will display the image while the slave monitors will not. - Page 12 2 Easy 1 User Video Entry Kit CDV4791/2 5: Schematics & Wiring 5.1: Wiring & Cable Distances: The maximum cable distance of the wiring is limited. Using different cables will also affect the maximum distance available from the 2Easy system.
- Page 13 2 Easy 1 User Video Entry Kit CDV4791/2 5.2 Basic Wiring Configurations BUS(IM) BUS(DS) L1 L2 PL S1+ S2+ S- DIP Switches 1 2 3 4 5 6 'Daisy' Chain Connection: monitor monitor monitor monitor ID=00...
- Page 14 2 Easy 1 User Video Entry Kit CDV4791/2 Star Connection with CDV-DBC4A: monitor monitor Impedance OFF ON switch DIP=on,off,off monitor monitor ID=00 Multi ple Door Station Connection L1 L2 PL S1+ S2+ S- L1 L2 PL S1+ S2+ S- L1 L2 PL S1+ S2+ S-...
- Page 15 2 Easy 1 User Video Entry Kit CDV4791/2 5. 3 Electric Lock Connection Lock connection using internal power output: Note: 1. Electric locks must be Power-on-to-unlock. 2. The door lock output is limited to 12V with holding current maximum of 250mA.
-
Page 16: Specifications
2 Easy 1 User Video Entry Kit CDV4791/2 Lock connection using external power supply: Note: The external power supply must be rated according to the lock consumption. 2. The jumper must be removed before connecting. Set up the unlock mode for the monitor for lock type:... - Page 17 2Easy 1 User Video Entry Kit CDV4791/2 CDV-PC6A Input Voltage: 100~240Vac Working Temperature: C~50 C SW CDV-47M Input Power: 20-28vdc Standby Current: 12.4mA Operating Current: 270mA Screen: 7" digital colour LCD Display Resolution: 800 x 3(RGB) x 480 pixels Video Signal:...
- Page 18 2Easy 1 User Video Entry Kit CDV4791/2 Precautions 1) All components should be protected from shock or vibration, prevent impacts and sharp knocks. Do not drop 2) Please clean with a soft cotton cloth, please do not use a chemical cleaning agent. If necessary, please use a little pure water or dilute soapy water to clean.
Need help?
Do you have a question about the CDV4791 and is the answer not in the manual?
Questions and answers