Table of Contents
Advertisement
Quick Links
Advertisement
Table of Contents

Related Manuals for ADJ WIFLY PAR QA5


Summary of Contents for ADJ WIFLY PAR QA5
- Page 1 WIFLY PAR QA5 User Manual...
- Page 2 ©2021 ADJ Products, LLC all rights reserved. Information, specifications, diagrams, images, and instructions herein are subject to change without notice. ADJ Products, LLC logo and identifying product names and numbers herein are trademarks of ADJ Products, LLC. Copyright protection claimed includes all forms and matters of copyrightable materials and information now allowed by statutory or judicial law or hereinafter granted.
-
Page 3: Table Of Contents
Maintenance Guidelines Features DMX Setup Operation Primary-Secondary Configuration Power Cord Daisy-Chain WiFly Setup WiFly Primary-Secondary Configuration ADJ RFC Operation DMX Traits Battery Status & Charging Photometric Chart Dimmer Curve Chart Battery Replacement Initialize the Unit Modify the Battery Capacity Specifications... -
Page 4: General Information
G E N E R A L I N F O R M AT I O N INTRODUCTION Please read and understand all instructions in this manual carefully and thoroughly before attempting to operate these products. These instructions contain important safety and use information. UNPACKING The products in this kit have been thoroughly tested and have been shipped in perfect operating condition. - Page 5 All shipping charges must be pre-paid. If the requested repairs or service (including parts replacement) are within the terms of this warranty, ADJ Products, LLC will pay return shipping charges only to a designated point within the United States. If the entire instrument is sent, it must be shipped in its original package. No accessories should be shipped with the product.
-
Page 6: Safety Guidelines
This device is a sophisticated piece of electronic equipment. To guarantee a smooth operation, it is important to follow all instructions and guidelines in this manual. ADJ PRODUCTS, LLC. is not responsible for injury and/or damages resulting from the misuse of this device due to the disregard of the information printed in this manual. -
Page 7: Safety Guidelines - Battery
S A F E T Y G U I D E L I N E S - B AT T E R Y Do Not Short Circuit the Battery Short circuiting the battery generates a very high current that could overheat the battery and result in electrolyte gel leakage, harmful fumes, or an explosion. - Page 8 Battery Replacement For battery replacement, please contact ADJ customer support at (800) 322-6337. Do Not use a damaged Battery The battery could be damaged during shipping, caused by shock. DO NOT use the battery if it is damaged, or there is any damage to the plastic casing, battery package deformation, an electrolyte odor, electrolyte gel leakage, et cetera.
-
Page 9: Maintenance Guidelines
M A I N T E N A N C E G U I D E L I N E S DISCONNECT POWER BEFORE PERFORMING ANY MAINTENANCE! CLEANING Frequent cleaning is recommended to insure proper function, optimized light output, and an extended life. -
Page 10: Features
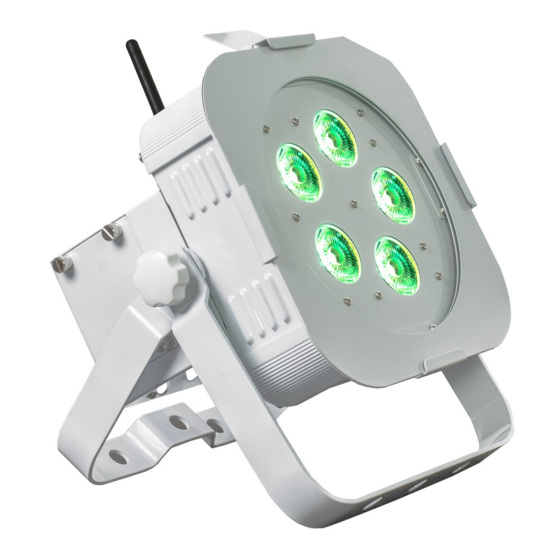
F E AT U R E S The ADJ WiFLY PAR QA5 is a battery powered, flicker free, compact wash fixture with electronic dimming of zero to 100%. Perfect for those parts of the stage or club where wiring and other ways for power are inconvenient or just unsafe: •... -
Page 11: Dmx Setup
D M X S E T U P Power Supply: Before plugging your unit in, be sure the source voltage in your area matches the required voltage for your ADJ WiFly PAR QA5. Only use the included power supply to power WiFly PAR QA5. - Page 12 2 and 3 of a male XLR connector (DATA + and DATA -). This unit is inserted in the female XLR connector of the last unit in your daisy chain to terminate the line. Using a cable terminator (ADJ part number Z-DMX/T) will decrease the possibilities of erratic behavior. 3-Pin to 5-Pin Cable Adapter Some manufactures use 5-pin DMX- 512 data cables for DATA transmission in place of 3-pin.
-
Page 13: Operation
“FS.15” (fastest flash). Sound Active Mode: In this mode the WiFly Par QA5 will react to sound, and chase through the different colors. 1. Plug the fixture in and press the MODE button until “SoXX” is displayed. “XX” represents the sound active mode (01-16) currently displayed. - Page 14 Auto Run Mode: In this mode the WiFly Par QA5 will run an auto program. There are 3 types of Auto Run Modes to choose from; Color Fade, Color Change, and a combined mode. The running speed is adjustable in all 3 modes.
- Page 15 ADJ RFC: This function is used to activate and deactivate the ADJ RFC (Remote Control). When this function is activated you can control the fixture using the ADJ RFC. Please see the next page for ADJ RFC controls and functions.
-
Page 16: Primary-Secondary Configuration
3. After you have set the WiFly address, follow the DMX instructions on pages 12-13 to select your desired DMX Channel mode and set your DMX address. 4. Apply power to the ADJ WiFly Transceiver. The fixture must be set up first before you apply power to WiFly Transceiver. -
Page 17: Wifly Primary-Secondary Configuration
The ADJ RFC remote (sold separately) has many different functions and al- lows you to control your WiFly Par QA5 from long distance. The ADJ RFC remote can control your system up to 150 ft. To use the RFC you must first activate the fixtures receiver. -
Page 18: Dmx Traits
D M X T R A I T S : C H A N N E L F U N C T I O N S A N D VA L U E S CHANNEL FUNCTION VALUE 1CH 2CH 3CH 4CH 5CH 6CH 7CH 8CH COLOR MACROS / PROGRAMS / SOUND ACTIVITY 0-15 16-31... - Page 19 CHANNEL FUNCTION VALUE 1CH 2CH 3CH 4CH 5CH 6CH 7CH 8CH Note that MODE determines channel selection functions COLOR MACRO MODE 0-255 (See 1 Channel DMX mode for colors) COLOR CHANGE MODE 0-15 COLOR CHANGE 1 16-31 COLOR CHANGE 2 32-47 COLOR CHANGE 3 48-63...
-
Page 20: Battery Status & Charging
B AT T E R Y S TAT U S & C H A R G I N G Battery Status: This function is used to check the life status of the battery. Plug the fixture in and press the MODE button until “bXXX”... -
Page 21: Dimmer Curve Chart
D I M M E R C U R V E C H A R T DMX Delay Trise(ms) Tdown(ms) Delay Mode dr-0 dr-1 1300 dr-2 1010 1560 dr-3 1200 1950 dr-4 1280 2600... -
Page 22: Battery Replacement
B AT T E R Y R E P L A C E M E N T 1. Unplug the unit from any power source, turn off both switches, then unscrew the four thumbscrews to remove the battery panel. 2. Remove the battery from the compartment, and enough of the battery cable to access and disconnect the cable connectors. -
Page 23: Initialize The Unit
I N I T I A L I Z E T H E U N I T After replacing either the PCB or the battery, you must perform the following steps to initialize the unit. If the unit is not initialized after replacing either of these parts, the unit battery life will be inaccurate in future use. -
Page 24: Modify The Battery Capacity
M O D I F Y T H E B AT T E R Y C A PA C I T Y 1. After replacing either the PCB or the battery, you must perform the following steps to initialize the unit. If the unit is not initialized after replacing either of these parts, the unit battery life will be inaccurate in future use. -
Page 25: Specifications
Low profile case design • Compatible with ADJ’s WiFLY Transceiver Wireless DMX onboard • Compatible with ADJ RFC wireless remote control (sold separately) • 8 DMX Channel modes: 1, 2, 3, 4, 5, 6, 7 or 8 channel modes •...
Need help?
Do you have a question about the WIFLY PAR QA5 and is the answer not in the manual?
Questions and answers