SitOnit Seating Parallon Assembly Instructions Manual
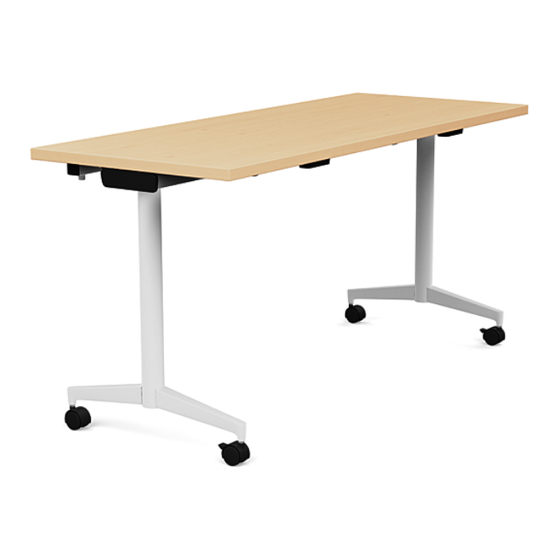
Flip-top table
Hide thumbs
Also See for Parallon:
- Assembly instructions manual (27 pages) ,
- Assembly instructions manual (24 pages) ,
- Assembly instructions manual (16 pages)
Advertisement
Quick Links
Parallon
FLIP-TOP TABLE ASSEMBLY INSTRUCTIONS
Everything to the table.
When you want cohesion in spaces large, small, shared or separate, there's
Parallon. It's a single collection with a singular look, offering an array of
choices for a variety of environments—and all the features to fit.
Ensure design is never a distraction in the places where everyone needs to
focus. Our Parallon line of training tables provides a unified and streamlined
look from room to room.
C6553 Rev A
|
www.sitonit.net
|
1
Advertisement

Related Manuals for SitOnit Seating Parallon


Summary of Contents for SitOnit Seating Parallon
- Page 1 Everything to the table. When you want cohesion in spaces large, small, shared or separate, there’s Parallon. It’s a single collection with a singular look, offering an array of choices for a variety of environments—and all the features to fit.
- Page 2 Parallon FLIP-TOP TABLE ASSEMBLY INSTRUCTIONS To report any issues with this product, contact our customer experience team at: (866) 764-4111 or shopcx@sitonit.net. CAUTION Please read all assembly instructions before installing. Failure to follow instructions could result in product failure or potential injury.
- Page 3 Parallon FLIP-TOP TABLE ASSEMBLY INSTRUCTIONS Recommended Tools • • Non-Marring Mallet/Hammer ⁄ " Combination Wrench • • ¼" or ⁄ " Drive Ratchet Wrench Cordless Drill/Driver • • Socket Extension #3 Phillips Bit • Flex Socket Adapter • ⁄ " Hex Bit •...
-
Page 4: Table Of Contents
Parallon FLIP-TOP TABLE ASSEMBLY INSTRUCTIONS Parts: Top and Frame • • Pack A: Tabletop (1) • • #12 × 1" Screw (19) Top Support (2) • Pack C: • Linking Support (1) • ¼" × 1" Screw (8) • Counterweight (1) •... - Page 5 Parallon FLIP-TOP TABLE ASSEMBLY INSTRUCTIONS Parts: Columns and Feet • Column (2) • Foot (4) • Caster (4, Optional) • Pack B: Casters (Optional) • ⁄ " × 1 ⁄ " Bolt (4) • ⁄ " Nut (4) • Foot Attachment Plate (4)
-
Page 6: Tabletop
Parallon FLIP-TOP TABLE ASSEMBLY INSTRUCTIONS Step 1: Attach the counterweight to the tabletop. Attachment Hardware #12 × 1" Screw Tabletop Screws 48" 60" 72" Counterweight Pilot Hole 1:1 HARDWARE TOOLS #3 Phillips Bit #12 x 1" Screw (Pack A) Magnetic Bit Holder C6553 Rev A www.sitonit.net... - Page 7 Parallon FLIP-TOP TABLE ASSEMBLY INSTRUCTIONS Step 2: Insert the end cap into the open side of the counterweight. Counterweight End Cap TOOLS Non-Marring Hammer C6553 Rev A www.sitonit.net...
- Page 8 Parallon FLIP-TOP TABLE ASSEMBLY INSTRUCTIONS Step 3: Slide the bolt through the foot attachment plate and column. This step is repeated on each foot. Foot Attachment Plate ⁄ ⁄ " Bolt Hole Column 1:1 HARDWARE ⁄ ⁄ " Bolt (Pack B) C6553 Rev A www.sitonit.net...
- Page 9 Parallon FLIP-TOP TABLE ASSEMBLY INSTRUCTIONS Step 4: Slide the foot over the bolt. This step is repeated on each foot. ⁄ ⁄ " Bolt Foot Column C6553 Rev A www.sitonit.net...
- Page 10 Parallon FLIP-TOP TABLE ASSEMBLY INSTRUCTIONS Step 5: Hold the bolt in place and tighten the nut. This step is repeated on each foot. 1:1 HARDWARE TOOLS ⁄ " Combination Wrench ⁄ " Hex Socket Socket Extension ⁄ Nut (Pack B) Flex Socket Adapter ¼"...
-
Page 11: Top Support
Parallon FLIP-TOP TABLE ASSEMBLY INSTRUCTIONS Step 6: Attach the top support to the columns. ⁄ " x 1" Screw Top Support Column Align the top support and feet. 1:1 HARDWARE 1:1 HARDWARE TOOLS TOOLS ⁄ " x 1" Screw (Pack C) ⁄... - Page 12 Parallon FLIP-TOP TABLE ASSEMBLY INSTRUCTIONS Step 7: Set a leg assembly on the tabletop and slide together the two leg assembly with the linking support. Alignment Sticker Use the alignment stickers to correctly orient the leg assembly and linking support.
-
Page 13: Linking Support
Parallon FLIP-TOP TABLE ASSEMBLY INSTRUCTIONS Step 8: Center the linking support between the two leg assemblies and attach the linking support and leg assemblies together. ⁄ " × ⁄ " Screw Leg Assembly Linking Support 1:1 HARDWARE TOOLS ⁄ " ×... -
Page 14: Hinge Sleeve
Parallon FLIP-TOP TABLE ASSEMBLY INSTRUCTIONS Step 9: Slide or snap the hinge brackets over hinge sleeves. This step is repeated on both hinges. SLIDE Hinge Sleeve Top Support SNAP Top Support SNAP! Hinge Sleeve C6553 Rev A www.sitonit.net... -
Page 15: Hinge Bracket
Parallon FLIP-TOP TABLE ASSEMBLY INSTRUCTIONS Step 10: Attach hinge brackets to the top support. This step is repeated on both hinges. #12 x 1" Screw Center Hole Hinge Bracket Pilot Hole Sleeve Protrusion The center hole of the hinge bracket must... - Page 16 Parallon FLIP-TOP TABLE ASSEMBLY INSTRUCTIONS Step 11: Place the pull handle on the pilot holes and insert shoulder screw into the pull handle's slot. This step is repeated on both pull handles. Pilot Hole Slot #12 x 1" Shoulder Screw...
- Page 17 Parallon FLIP-TOP TABLE ASSEMBLY INSTRUCTIONS Step 12: Attach the pull handle to the underside of the tabletop. This step is repeated on both pull handles. #12 x 1" Screw Pull Handle 1:1 HARDWARE TOOLS #12 x 1" Screw (Pack E2)
- Page 18 Parallon FLIP-TOP TABLE ASSEMBLY INSTRUCTIONS Step 13: Pull the pull handle forward to reveal two more holes and finish attaching it. This step is repeated on both pull handles. #12 x 1" Screw Pull Handle 1:1 HARDWARE TOOLS #3 Phillips Bit #12 x 1"...
- Page 19 Parallon FLIP-TOP TABLE ASSEMBLY INSTRUCTIONS Step 14: Unscrew the glides to level as needed. Alternately, insert the optional casters into the feet and tighten the nuts. Brake Install the two casters with brakes on the same side as the pull handles.
- Page 20 Parallon FLIP-TOP TABLE ASSEMBLY INSTRUCTIONS Step 15: Turn the table upright with the help of another person and if applicable, press the optional grommets into the cutouts. Grommet Cutout USAGE To flip the tabletop: Pull the pull handles forward and lift up on the tabletop C6553 Rev A www.sitonit.net...
Need help?
Do you have a question about the Parallon and is the answer not in the manual?
Questions and answers