Advertisement
Quick Links
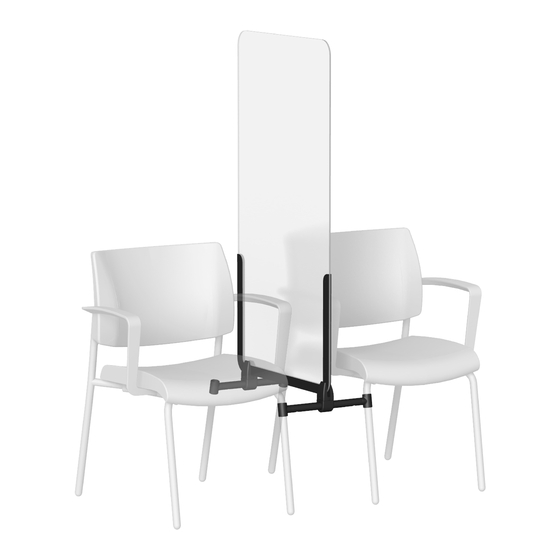
ACRYLIC SEATING SCREEN ASSEMBLY
INSTRUCTIONS FOR AVIERA
Now more than ever, our welcoming spaces should be safe—free from contagions,
concern and anything that gets in the way of interacting. This collection of seating screens
provides the privacy, protection and peace of mind you need to wait with confidence.
Patent-Pending:
www.sitonit.net/patents
SECTOR
C6499 Rev. A
Advertisement

Related Manuals for SitOnit Seating SECTOR


Summary of Contents for SitOnit Seating SECTOR
- Page 1 SECTOR ACRYLIC SEATING SCREEN ASSEMBLY INSTRUCTIONS FOR AVIERA Now more than ever, our welcoming spaces should be safe—free from contagions, concern and anything that gets in the way of interacting. This collection of seating screens provides the privacy, protection and peace of mind you need to wait with confidence.
- Page 2 SECTOR ACRYLIC SEATING SCREEN WARNING TO MINIMIZE RISK OF INJURY: • Do not sit or stand on brackets • Use only with provided divider • Do not use with casters • Do not use with stools or hip chairs • Immediately remove from service if you see any damage or loose parts •...
-
Page 3: Component List
SECTOR ACRYLIC SEATING SCREEN ASSEMBLY COMPONENT LIST REQUIRED TOOLS • Sector Acrylic Seating Screen (1) • U-Bracket (4 Halves) • Gasket (4) 5 mm Hex L-Key • Mounting Plates (2) • M6 × 30 mm Screw (2) • M4 × 6 mm Screw (4) •... - Page 4 SECTOR ACRYLIC SEATING SCREEN ASSEMBLY STEPS 1. Attach one side of the U-bracket (side A) to one mounting plate using two M4 × 6 mm screws and a #2 Phillips screwdriver. Repeat on the second mounting plate. 2. Apply one gasket to each side of the U-bracket.
- Page 5 SECTOR ACRYLIC SEATING SCREEN ASSEMBLY STEPS 4. Align the mounting plates over the pre-drilled holes in the Aviera frame. Insert two ¾" screws on each end of both mounting plates, fastening them to the Aviera chair frames. Ensure both U-brackets are facing the same direction.
- Page 6 SECTOR ACRYLIC SEATING SCREEN ASSEMBLY STEPS 5. Insert the screen into the assembled mounts, aligning the back of the screen with the backs of the chairs. Close the U-brackets by tightening the M6 × 30 mm screws with the 5 mm hex L-key.
- Page 7 SECTOR ACRYLIC SEATING SCREEN ASSEMBLY INSTRUCTIONS FOR FREELANCE AND FOCUS SIDE Now more than ever, our welcoming spaces should be safe—free from contagions, concern and anything that gets in the way of interacting. This collection of seating screens provides the privacy, protection and peace of mind you need to wait with confidence.
- Page 8 SECTOR ACRYLIC SEATING SCREEN WARNING TO MINIMIZE RISK OF INJURY: • Do not sit or stand on brackets • Use only with provided divider • Do not use with casters • Do not use with stools or hip chairs • Immediately remove from service if you see any damage or loose parts •...
- Page 9 SECTOR ACRYLIC SEATING SCREEN ASSEMBLY COMPONENT LIST REQUIRED TOOLS • Sector Acrylic Seating Screen (1) • U-Bracket (4 Halves) • Gasket (4) • Mounting Tube (2) #2 Phillips 5 mm Hex L-Key • Leg Clamp (4) Screwdriver or Bit (Included) •...
- Page 10 SECTOR ACRYLIC SEATING SCREEN ASSEMBLY FOR LARGE GLIDES 12" 12" STEPS 1. Slide one leg clamp onto the front and back leg of both chairs to a height of 12", facing toward the screen. If glides are too large (preventing installation), open and close clamp onto chair leg.
- Page 11 SECTOR ACRYLIC SEATING SCREEN ASSEMBLY STEPS 2. Insert one M8 nut into the hex-shaped slots on each leg clamp. Then, using a 5 mm hex key, thread one M8 × 14 mm screw through each nut from the opposite side of the clamp.
- Page 12 SECTOR ACRYLIC SEATING SCREEN ASSEMBLY STEPS 3. Apply one gasket to each side of the U-brackets. 4. Attach one side of the U-bracket (side A) to one tube adapter using two M4 × 6 mm screws and a #2 Phillips screwdriver. Repeat for second tube adapter.
- Page 13 SECTOR ACRYLIC SEATING SCREEN ASSEMBLY STEPS 5. Slide U-bracket and tube adapter assemblies onto mounting tubes. To report any issues with this product, please contact our customer service department at (888) 274-8664. For more information, visit www.sitonit.net Patent-Pending: www.sitonit.net/patents...
- Page 14 SECTOR ACRYLIC SEATING SCREEN ASSEMBLY STEPS 6. Slide mounting tubes with U-bracket and tube adapter assemblies onto leg clamps. Ensure both U-brackets are facing the same direction. Note: For Focus Side models, ensure the shorter mounting tube is placed towards the rear of the seat.
- Page 15 SECTOR ACRYLIC SEATING SCREEN ASSEMBLY STEPS 7. Thread one M10 × 10 mm screw through each end of both tubes, securing them with the four leg clamps. Ensure each screw is snug, being careful not to overtighten. Center the U-bracket and tube adapter assemblies along the mounting tube. Use a level to ensure both U-brackets are level with each other.
- Page 16 SECTOR ACRYLIC SEATING SCREEN ASSEMBLY STEPS 8. Slide the B sides of the U-brackets onto the A sides. Attach the two sides together using one M6 × 30 mm screw per U-bracket assembly and a 5 mm hex L-key. Do not close. Make sure to leave a gap for the screen.
- Page 17 SECTOR ACRYLIC SEATING SCREEN ASSEMBLY STEPS 9. Insert the screen into the U-brackets, aligning the back of the screen with the backs of the chairs. Close the U-brackets by tightening the M6 × 30 mm screws with the 5 mm hex L-key.
Need help?
Do you have a question about the SECTOR and is the answer not in the manual?
Questions and answers