AudioCodes C455HD Series User's And Administrator's Manual
Hide thumbs
Also See for C455HD Series:
- User's and administrator's manual (141 pages) ,
- Quick manual (11 pages) ,
- Release notes (107 pages)

Related Manuals for AudioCodes C455HD Series


Summary of Contents for AudioCodes C455HD Series
- Page 1 User's and Administrator's Manual AudioCodes 400HD IP Phone Series C455HD IP Phone Microsoft Teams Application Version 1.15 ...
- Page 2 Customer Support Customer technical support and services are provided by AudioCodes or by an authorized AudioCodes Service Partner. For more information on how to buy technical support for ...
- Page 3 Notice C455HD | Users & Administrator's Manual Document Name Device Manager Deployment Guide https://docs.microsoft.com/en-us/MicrosoftTeams/phones-for-teams - iii -...
-
Page 4: Table Of Contents
Google Play Services Running Android in Kiosk Mode Screen Lock AudioCodes Private Key Android Debug Bridge (ADB) App Signing Web Browser Remote Configuration Management AudioCodes Device Manager Validation Sandboxing Device File System Keystore Device Certificate Data Protection Debugging Interface Android Security Updates... - Page 5 Content C455HD | Users & Administrator's Manual Automatic Lock Unlock Teams Application Signing In Multi-Cloud Sign-in Remote Provisioning and Sign-in from Teams Admin Center Getting Acquainted with the Phone Screen Enabling Google Talkback Opting in or out of Call Queues Setting Status Hot Desking Changing Presence Status...
- Page 6 Adding a Speed Dial Performing Administrator-Related Operations Updating Phone Firmware Manually Downloading 802.1x Certificates AudioCodes Teams IP Phone Utility Manually Performing Recovery Operations Removing Devices from Intune Management Updating Microsoft Teams Devices Remotely Applying Firmware to a Phone from a USB Disk...
-
Page 7: Overview
CHAPTER 1 Overview C455HD | Users & Administrator's Manual Overview The AudioCodes C455HD IP phone is a high-end, native Microsoft Teams executive IP phone with a large, color 5” touch screen, integrated Bluetooth and Wi-Fi, and optional connectivity to a color touch screen Expansion Module. Feature highlights: Full duplex speakerphone and headset connectivity ■ ■ Graphical 5” color capacitive touch screen (1280 X 720 resolution) ■ Multi-lingual support Dual GbE support ■ ■ PoE or external power supply USB port for USB headset ■ ■ Applicable to part number C455HD-DBW: ● Integrated Bluetooth and Wi-Fi (contact your local AudioCodes representative for more information about regional availability of Wi-Fi / Bluetooth) ● Optional Expansion Module support with a graphical 5” color capacitive touch screen, 480 X 854 resolution (the Expansion Module is purchased separately) See also here a guide to AudioCodes devices. See also here a 'How to' presentation, including a video clip. See also here an advanced 'How to' video blog. Specifications The following table summarizes the phone's software specifications. Table 1-1: Software Specifications... - Page 8 Calendar and Presence (roadmap feature) (Calendar Access and ■ Meeting Details; Presence Integration; Exchange Calendar Integration; Contact Picture Integration; Corporate Directory Access) ■ Meetings (roadmap feature) (One-click Join for Meetings; Join Skype for Business meetings; Meeting Call controls [Mute/unmute, hold/resume, hang up, add/remove participant]; Meeting Details. See also here for related Microsoft documentation. Configuration Teams admin center (TAC) ■ and ■ OVOC / Device Manager Management Debugging AudioCodes' Teams IP Phone Utility (see Teams IP Phone Utility on ■ Tools page 94) ■ Log upload to Microsoft server (certification for 3rd party Skype for Business clients) ■ Remote logging via Syslog SSH Access ■ ■ Capturing the phone screen ■ TCPdump Company Portal (Intune) logs ■ ■ Audio Debug recording logs Media logs (*.blog) ■...
- Page 9 CHAPTER 1 Overview C455HD | Users & Administrator's Manual Feature Details an intuitive user interface. Wired connectivity: ■ ✔ Two RJ-45 [Gigabit Ethernet (GbE)] (10/100/1000BaseT Ethernet) ports: LAN and PC port ✔ USB port for USB headset C455HD with DBW suffix flavor: ● White USB port - host port for USB headset ● Black USB port - default port but can be configured to host port. To configure device / host port: setup_usbport2_mode.sh host (from device to host) setup_usbport2_mode.sh device (from host to device) It can alternatively be configured by setting the configuration file parameter 'management/usbport2/mode' to the value of USB_HOST_MODE/USB_DEVICE_MODE ✔ RJ-11 interface Survivable Branch Appliance (SBA) ✔ ■ Wireless connectivity (applies to PNs TEAMS-C455HD-DBW and ...
-
Page 10: Allowing Urls, Ports (Security)
This section shows network administrators which URLs/Ports to allow when deploying Teams phones (security). From the device point of view, the following table summaries the ports the phone uses. See also Microsoft's guide to the ports the phone uses. Table 1-2: URLs / Ports to Allow when Deploying Teams Phones (Security) Server Role Service Name Port Protocol Notes DNS Server All 53 AudioCodes AudioCodes 443 HTTPS AudioCodes device Device management server Manager AudioCodes AudioCodes 443 HTTPS AudioCodes redirect service Redirect ... -
Page 11: Security Guidelines For Android-Based Native Teams Devices
Database called tz or zoneinfo) Microsoft Package Microsoft will be requested for Apps Artifacts manager the protocol and port and server FQDN. These URLs are provided by the Admin agent. Security Guidelines for Android-based Native Teams Devices AudioCodes' Android-based Native Teams devices are purpose-built and customized for Microsoft Teams calling and meeting. Customers might perceive Android-based products as vul- nerable to security issues but security is less of an issue on devices purpose-built and cus- tomized for Microsoft Teams calling and meeting. Security is in fact enhanced on these devices as part of their default use. When analyzing device security, two levels must be addressed: Authentication and security with respect to Teams connectivity and use ■ ■ Android level / system of the device AudioCodes recommends the following: ■ Use the sign-in mode Sign-in with other device option. In this mode, users do not type the ... -
Page 12: Android-Level Security Hardening
CHAPTER 1 Overview C455HD | Users & Administrator's Manual Android-Level Security Hardening Major Android- level system- level developments have been incorporated into AudioCodes' Native Teams devices to improve security: See Google Play Services below ■ ■ See Running Android in Kiosk Mode below See Screen Lock on the next page ■ ■ See AudioCodes Private Key on the next page See Android Debug Bridge (ADB) on the next page... -
Page 13: Screen Lock
Screen Lock AudioCodes Native Teams devices use a screen lock mechanism to prevent any malicious user/users from gaining access to Calendar information and / or Active Directory list of ... -
Page 14: Audiocodes Device Manager Validation
CHAPTER 1 Overview C455HD | Users & Administrator's Manual Microsoft Teams Admin Center (for Native Teams devices) over HTTPS protocols, enabled ■ after a successful sign-in authentication process. ■ AudioCodes Device Manager (part of AudioCodes' OVOC suite) over HTTPS. Debugging interface over SSH. Note that SSH must be disabled by default and enabled only ■ per specific case for debugging purposes only. AudioCodes Device Manager Validation The AudioCodes Native Teams devices validate the AudioCodes Device Manager identity using a known Root CA: ■ The device is shipped with known Root CAs installed. See AudioCodes Root CA Certificate on the next page. For the initial connection, the AudioCodes Device Manager accesses devices using a known ■ Once a successful secured connection has been established between the device and the ■ Device Manager, the user can replace the Root CA on the Device Manager and on the phone, and re-establish the connection leveraging any Private Root CA. Sandboxing AudioCodes Native Teams devices use Android Application Sandbox so that each application can access its own data and is isolated from other applications. This prevents a malicious app from accessing the code or the data of other applications in the system. Device File System The AudioCodes Native Teams device's file system is encrypted on 455HDdevices. Customers may enforce a policy of device encryption via Microsoft's cloud-based Intune service. -
Page 15: Data Protection
Admin Center or AudioCodes' Device Manager (OVOC). ■ When a device - or multiple devices - needs to be debugged, users can enable SSH on it / them, access SSH with the new Admin password for the debugging phase, and disable SSH once debugging is finished. SSH is by default disabled and can be enabled with Administrator permissions in the phone screen (Device Administration > Debugging > SSH). Android Security Updates AudioCodes regularly adopts and integrates Android security updates. For reference, see here. AudioCodes Root CA Certificate The following figure shows the AudioCodes Root CA Certificate. - 9 -... - Page 16 CHAPTER 1 Overview C455HD | Users & Administrator's Manual -----BEGIN CERTIFICATE----- MIIDMTCCAhmgAwIBAgIBATANBgkqhkiG9w0BAQsFADAfMQwwCgYDVQQKE wNBQ0wx DzANBgNVBAMTBlJvb3RDQTAeFw0wMDAxMDEwMDAwMDBaFw0zMDAxMD EwMDAwMDBa MB8xDDAKBgNVBAoTA0FDTDEPMA0GA1UEAxMGUm9vdENBMIIBIjANBgkqh kiG9w0B AQEFAAOCAQ8AMIIBCgKCAQEA6GK495KUCXAm/UE17G4/cjnZN4LNaxYEYz bfZL0a EhgSKYt/LQ+iUcDhojsneusNgrcGkpwKklKsGsvGWmSRNULV01CW+TX2VJN7 3+hh V0uzhyOIYAUhbDaoqNM6Kp5b7sJ1ew4Ig9kfd/ma9Czl5koESLlw/inLj/r+rD96 - 10 -...
- Page 17 CHAPTER 1 Overview C455HD | Users & Administrator's Manual mUcPElWrKspv7Qy4I14fsK/yMArixRopTL1munVVPpSFM9Jh8IY3JHyr5CQJXKK EhGAJsnHaRqsR2Su3X/WtslgEF+cvP34pxhlhFL29nMfnaFATSS3rgGaFlSvl1ZS esLMqkWjp9cqGYrvt7K61sYnvMMb+o/KbWqVokXb+Fr7bwIDAQABo3gwdjAMB HRMEBTADAQH/MB0GA1UdDgQWBBQDXySn9hz15lDraZ+iXddZGReB+zBHB gNVHSME QDA+gBQDXySn9hz15lDraZ+iXddZGReB+6EjpCEwHzEMMAoGA1UEChMDQU NMMQ8w DQYDVQQDEwZSb290Q0GCAQEwDQYJKoZIhvcNAQELBQADggEBAI0rUywo mmWWJnH3 JOfKiS3+VnX5hJITZymvWanMXUz/6FonHccPXEBYTrUYwhiWx3dwELAFXDFK kxMp 0KKWZ4F39cAOLRjqhzya+xUeeJ9HQZCXYAJ6XgvTfN2BtyZk9Ma8WG+H1hNv vTZY QLbWsjQdu4eFniEufeYDke1jQ6800LwMlFlc59hMQCeJTenRx4HdJbJV86k1gBU A7fJT1ePrRnXNDRz6QtADWoX3OmN7Meqen/roTwvLpEP22nYwvB28dq3JetlQ XC4gwI/o8K2wo3pySLU9Y/vanxXCr0/en5l3RDz1YpYWmQwHA8jJIu8rxdhr+VNQ Zv6R/Ys= -----END CERTIFICATE---- - 11 -...
-
Page 18: Setting Up The Phone
Setting up the Phone Unpacking When unpacking, make sure the items listed in the phone's Quick Guide are present and undamaged. If anything appears to be missing or broken, contact the distributor from whom you purchased the phone for assistance. For detailed information, see the phone's Quick Guide shipped with the device or available from AudioCodes. - 12 -... -
Page 19: Device Description
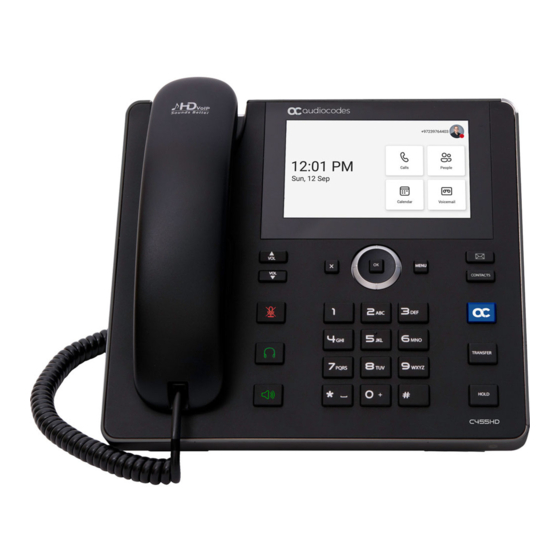
CHAPTER 2 Setting up the Phone C455HD | Users & Administrator's Manual Device Description Use the following graphics to identify and familiarize yourself with the device's hardware functions. Front View The front view of the phone is shown in the figure and described in the table. ... - Page 20 CHAPTER 2 Setting up the Phone C455HD | Users & Administrator's Manual Item # Label/Name Description ■ Red: Answered call TFT touch screen Thin Film Transistor touch screen, a type of LCD (Liquid Crystal Display) interactive screen which displays calling information and lets you configure phone features by touching the glass. Navigation Control Press the button's upper rim to scroll up menus/items. ■ / OK ■ Press the button's lower rim to scroll down. Press the button's left or right rim to move the cursor ■ left or right (when editing a contact number for example). ■ Press OK to select a menu/item/option. Voicemail Retrieves voicemail messages. CONTACTS Accesses the People screen. MENU Accesses the Settings screen. AC key – for future use – currently used as home key. ...
- Page 21 CHAPTER 2 Setting up the Phone C455HD | Users & Administrator's Manual Item # Label/Name Description 'Back' key Returns you to the previous screen. - 15 -...
-
Page 22: Rear View
CHAPTER 2 Setting up the Phone C455HD | Users & Administrator's Manual Rear View The ports located on the rear of the phone are described in the table. Figure 2-2: Rear View Table 2-2: Rear View Description Label Description Handset jack, i.e., port RJ-9, to connect the handset. RJ-45 port to connect to the Ethernet LAN cable for the LAN connection (uplink - 10/100/1000 Mbps). If you're using Power over Ethernet (PoE), power to the phone is supplied from the Ethernet cable (draws power from either a spare line or a signal line). RJ-45 port to connect the phone to a PC (10/100/1000 Mbps downlink). 12V DC power jack that connects to the AC power adapter. Headset jack, i.e., RJ-9 port that connects to an external headset. - 16 -... -
Page 23: Cabling
See the phone's Quick Guide shipped with the device and also available from AudioCodes for detailed information on how to cable the phone. Mounting the Phone The phone can be mounted on a: ■ Desk (see Desktop Mounting below) Wall (see Wall Mounting below) ■ See the phone's Quick Guide shipped with the device and also available from AudioCodes for detailed information on how to mount the phone. See also here f or a clip showing the principle of how to mount an AudioCodes IP phone. The principle is the same across all AudioCodes IP phones. Desktop Mounting The following documentation shows how to mount the phone on a flat surface like a desk. ➢ To mount the phone on a flat surface like a desk: Off-hook the handset (if on-hook) and place the phone upside down, i.e., base-up, on your desktop. On the phone's stand, identify outer notches. On the phone's base, identify outer rails. Invert the stand and align its outer notches with the base's outer rails. Insert the stand's outer notches into the base's outer rails and slide the notches along the ... -
Page 24: Installing The Expansion Module (Sidecar)
CHAPTER 2 Setting up the Phone C455HD | Users & Administrator's Manual If the phone model you have has an Expansion Module attached, wall mounting isn't supported. ➢ To mount the phone on a wall: Attach the stand of the phone for the purpose of a wall mounting: Detach the base. Attach it again as you did for a desktop mounting (see Desktop Mounting on the previous page) only now make sure that it's flatly aligned to lie flush against the wall, i.e., slide the inner rails of the phone stand onto the phone base's inner notches. Connect the AC power adapter, LAN and PC/laptop cords. In the wall, drill two horizontal holes at a distance of 4 7/8 inches (123.8 mm) from one ... -
Page 25: Before Using Audiocodes Devices
CHAPTER 2 Setting up the Phone C455HD | Users & Administrator's Manual Before Using AudioCodes Devices AudioCodes recommends frequently cleaning devices' screens especially screens on devices in common use areas such as conference rooms and lobbies. ➢ To clean a device's screen: Disconnect all cables. Spray onto a clean, dry, microfiber duster a medicinal isopropyl alcohol and water solution of 70:30. Don't oversaturate the duster. If it's wet, squeeze it out. Lightly wipe the screen of the device. Wait for the screen to dry before reconnecting cables. - 19 -... -
Page 26: Starting Up
CHAPTER 3 Starting up C455HD | Users & Administrator's Manual Starting up Here's how to start up the phone. ➢ To start up: Connect the phone to the network (or reset it); the language selection screen is displayed by default. Select the language of your choice and then configure device settings to suit specific requirements. It will be necessary to repeat this only if the phone is restored to default settings. Configuring Device Settings The section familiarizes you with the phone’s settings. Phones are delivered to customers configured with their default settings. Customers can customize these settings to suit specific ... - Page 27 CHAPTER 3 Starting up C455HD | Users & Administrator's Manual View the settings under 'User'. Select a setting to open it. Use the table following as reference. [To view settings related to the network administrator, scroll down and open 'Device administration']. Table 3-1: Device Settings Setting Description User Display Opens the ‘Display’ screen [Brightness level]. The phone's screen supports different brightness levels. Choose the level that suits your requirements. ■ Sleep ■ Screen saver - 21 -...
- Page 28 CHAPTER 3 Starting up C455HD | Users & Administrator's Manual Setting Description ■ Font size Sound Allows you to customize phone volume for a friendlier user experience. Ring volume at n% Date & time Date and time are automatically retrieved from the deployed Network Time Protocol (NTP) server. - 22 -...
- Page 29 CHAPTER 3 Starting up C455HD | Users & Administrator's Manual Setting Description Use 24-hour format [Allows you to select the Time format] Wi-Fi The phone can connect to an Access Point via Wi-Fi. See the phone's Quick Guide for detailed information on setting up Wi-Fi. See also Configuring Wi-Fi on page 33 in this document for information about configuring the feature. Accessibility Allows making the screen reader-friendlier. See also Enabling Google Talkback on page 49. Bluetooth Hands free profile where the phone is able to connect to Bluetooth headset or speaker. See the phone's Quick Guide for detailed information on setting up Bluetooth. Power Saving Allows users to contribute to power saving in the enterprise. Enable power saving Start time [The device consumes minimal energy before the user arrives at the office] End time [The device consumes minimal energy after the user leaves the office] Debugging Enables users to reboot the device. - 23 -...
- Page 30 CHAPTER 3 Starting up C455HD | Users & Administrator's Manual Setting Description Log in as Administrator for more debugging settings to be available. Security Helps secure the enterprise telephony network against breaches. Screen lock [The phone automatically locks after a configured period to secure it against unwanted use. If left unattended for 10 minutes (default), it automatically locks and is inaccessible to anyone who doesn't know its lock code.] Make passwords available Touch screen Allows users to disable the phone’s touch screen. Languages Allows users to customize inputting to suit personal requirements. & input - 24 -...
- Page 31 CHAPTER 3 Starting up C455HD | Users & Administrator's Manual Setting Description About Enables users to determine device information. [Android 7.1.2] To determine the device’s IP address, select the ‘Status’ option. To get information about the version, select ‘Version info’. - 25 -...
- Page 32 CHAPTER 3 Starting up C455HD | Users & Administrator's Manual Setting Description To get information about the Android version, select ‘Android version’. Device administration Device Allows the user to log in as Administrator, necessary for some of the administration debugging options. It is password protected. Default password: 1234 (or 1111 in early versions). After logging in as an Administrator, the user can log out | change password. Select Login and then in the Login screen that opens, select the 'Enter password' field and use the virtual keyboard to enter the password (1234 or 1111). Note that the virtual keyboard pops up for all ‘Settings’ fields to allow inputting characters and / or numbers. Two virtual keyboard types can be displayed: Numeric o r QWERTY. The virtual keyboard is also displayed when the network administrator needs to enter an IP address to debug, or when they need to enter their PIN lock for the security tab. After logging in, scroll down in the Settings screen to the section 'Device administration'. - 26 -...
- Page 33 CHAPTER 3 Starting up C455HD | Users & Administrator's Manual Setting Description Modify network Enables the Admin user to determine network information and to modify network settings. IP Address [Read Only] IP Settings [DHCP or Static IP] Network state [Read Only] Enable PC port Enable PC port mirror Proxy 802.1x Settings VLAN Settings. Allows you to configure the VLAN mode Manual, CDP only or LLDP only. - 27 -...
- Page 34 CHAPTER 3 Starting up C455HD | Users & Administrator's Manual Setting Description Proxy The phone can be configured with an HTTP Proxy server by an Admin user in two ways: ■ Manually. T he Admin user can use this method to configure HTTP proxy server parameters through the Teams application: Log in as Administrator and select Modify network. Select the Proxy option and then configure the proxy host name and port: Over DHCP with Option 252. It's recommended that the Admin ■ user uses this method when provisioning multiple phones. Option 252 provides a DHCP client with a URL to use to configure its proxy settings: - 28 -...
- Page 35 CHAPTER 3 Starting up C455HD | Users & Administrator's Manual Setting Description The proxy setting is provided in a Proxy Auto-Configuration (PAC) file that contains a set of rules coded in JavaScript which allows a web browser to determine whether to send web traffic directly to the Internet or to be sent via a proxy server. PAC files control how the phone handles HTTP, HTTPS and FTP traffic. Example of a basic PAC file: function FindProxyForURL(url, host) return "PROXY 10.13.2.40:3128"; If the enterprise features a proxy server that requires user authentication, the network administrator can use the PAC file and DHCP Option 252 to configure it. Alternatively, the administrator can configure it using the following parameters: http_client/fwd_proxy/ip=0.0.0.0 http_client/fwd_proxy/password= http_client/fwd_proxy/port=8080 http_client/fwd_proxy/username= 802.1x Settings 802.1X Authentication is the IEEE Standard for Port-based Network Access Control (PNAC). See https://1.ieee802.org/security/802-1x/ for more information. To configure an 802.1X Authentication method: From the ‘Modify Network’ screen (as an Admin), access the ...
- Page 36 CHAPTER 3 Starting up C455HD | Users & Administrator's Manual Setting Description ✔ Password root certificate (not required for every method) ✔ ✔ client certificate (not required for every method) Select the Save softkey VLAN Settings Select the menu option VLAN Settings. Select VLAN Discovery mode. ■ Cisco Discovery Protocol (CDP) is a Cisco proprietary Data Link Layer protocol ■ Link Layer Discovery Protocol (LLDP) is a standard, layer two discovery protocol Select the mode you require and then select OK. If you select Manual configuration, this screen opens: - 30 -...
- Page 37 CHAPTER 3 Starting up C455HD | Users & Administrator's Manual Setting Description Select VLAN Interval. The 'VLAN interval' refers to CDP/LLDP advertisements' periodic interval. D efault: 30 seconds. You can increase or decrease the intervals between the CDP/LLDP packets that are sent, based on network traffic and topology. Region Select the menu option Region preference. preference This option allows you to define the country in which the phone is located. The setting determines which regional tone the phone will use. Call Progress Tones (CPTs) are country-specific; the behavior and parameters of analog telephones lines vary from country to country. - 31 -...
- Page 38 CHAPTER 3 Starting up C455HD | Users & Administrator's Manual Setting Description Select Regional Tone Settings and select the country in which the phone is located. Debugging Allows the Admin user to perform debugging for troubleshooting purposes. Available after logging in as Admin. Log settings Remote Logging (see under Remote Logging (Syslog) on page 101 for more information) Diagnostic Data (see under Getting Diagnostics on page 102 for more information) Reset configuration Restart Teams app Company portal login Debug Recording (for Media/DSP debugging) (see under Remote Logging (Syslog) on page 101 for more information) - 32 -...
-
Page 39: Configuring Wi-Fi
CHAPTER 3 Starting up C455HD | Users & Administrator's Manual Setting Description Switch to Teams Compatible Factory data reset (the equivalent of restore to defaults; including logout and device reboot) ADB (Android Debug Bridge command-line tool used to debug the Teams app); the setting is disabled by default. The device does not allow access to ADB. Screen Capture. By default, this setting is enabled. If it's disabled, the phone won't allow its screens to be captured. Configuring Wi-Fi Network administrators can configure Wi-Fi parameters for the phone. The parameters are concealed from the user's view. Use the following table as reference. Table 3-2: Wi-Fi Parameters Parameter Description Values network/wifi_enabled Enables/disables the Wi-Fi feature. 0 (disable, default) 1 (enable) network/wifi_pc_bridge Enables network connectivity for the PC 0 (disable, behind the phone; for debugging purposes. -
Page 40: Restoring The Phone To Default Settings
CHAPTER 3 Starting up C455HD | Users & Administrator's Manual Parameter Description Values 15]/ssid network/wifi/[0- Saves the password for some authentication 15]/password methods which need it, e.g., WPAPERSONAL,WPA2PERSONAL network/wifi/[0- Saves the Access Point’s authentication method: 15]/security • WPAPERSONAL • WPA2PERSONAL • WPAENTERPRISE • WPA2ENTERPRISE network/wifi/[0- Configure this parameter to reconnect this SSID 1 (default, 15]/auto_reconnect automatically. enable) 0 (disable) network/wifi/[0- Saves the identity for some authentication 15]/identity methods that need it, e.g., WPAPERSONAL, WPA2PERSONAL network/wifi/[0- Saves the anonymous identity for some 15]/anonymous_ authentication methods that need it, e.g., identity WPAENTERPRISE, WPA2ENTERPRISE, etc. -
Page 41: Performing A Hard Restore
CHAPTER 3 Starting up C455HD | Users & Administrator's Manual Performing a Hard Restore You can either: ■ perform a hard restore while the phone is up and running (see below) restore the phone’s settings to their defaults when the phone is not connected (see below) ■ ➢ To perform a hard restore while the phone is up and running: Long-press the HOLD key on the phone (more than 15 seconds); the screen shown below is displayed and the device performs a restore to default factory settings. After the restore, the phone automatically reboots and goes through the Wizard and sign- in process. Select OK; the sign-in screen is displayed (see Signing In on page 38 for more information). ➢ To restore the phone’s settings to their defaults when the phone is not connected: Press the OK + MENU keys simultaneously and keeping them pressed, unplug the power ... -
Page 42: Recovery Mode
CHAPTER 3 Starting up C455HD | Users & Administrator's Manual Select the Factory data reset option; the device performs a restore to default factory settings. Recovery Mode If a phone goes into recovery mode, you can boot it using its hard keys as shown in Performing a Hard Restore on the previous page. Locking and Unlocking the Phone As a security precaution, the phone can be locked and unlocked. The feature includes: ■ Unlock (see Unlock below) Automatic lock (Automatic Lock below) ■ Automatic Lock Users can lock their phones as a security precaution. Configure the phone with any of the lock options before attempting to lock it. If an option isn't configured, the action won't function. ➢ To lock the phone: ■ Press the back key on the phone for at least three seconds for the device to automatically lock. Unlock ➢... - Page 43 CHAPTER 3 Starting up C455HD | Users & Administrator's Manual When the phone detects the unlock code, it unlocks. - 37 -...
-
Page 44: Teams Application
CHAPTER 4 Teams Application C455HD | Users & Administrator's Manual Teams Application The following describes functions related to the phone’s Microsoft Teams application. Signing In Using TeamsIPPhonePolicy, network administrators can create the following users who can then sign in to the phone: ● UserSignin: All features are available, i.e., calls, meetings and voicemail ●... - Page 45 CHAPTER 4 Teams Application C455HD | Users & Administrator's Manual [Recommended] I f the DHCP server offers Timezone Options (100/101), the phone will set ■ the obtained time zone and display the correct time on the screen; the time will be calculated based on an embedded Time Zone database, factoring in DST. If the DHCP server offers Time Offset Option only (2), the phone will assign the obtained ■ time offset to the first matched region in the list but there is a good chance it won’t reflect the actual geographical location, therefore the displayed time might be incorrect in some cases. For example, if the given time offset is GMT-5 and the phone is located in Mexico, the phone will get the time (and the DST setting) from central time and not from Mexico because in GMT-5 there is also Central Daylight Time. The network administrator must make sure the phone can access the following URLs (to check connectivity with the internet): https://www.google.com/generate_204 http://connectivitycheck.gstatic.com/generate_204 http://www.google.com/gen_204 If the internet connectivity check fails, a ‘No Internet Access’ warning pops up on the phone screen. Figure 4-1: Internet Connectivity Check - No Internet Access This can point to a problem that is preventing the phone from fully functioning in a Teams environment. The user can ignore the message if the Teams application is fully functioning, or can report a problem if the Teams application is not fully functioning.
- Page 46 CHAPTER 4 Teams Application C455HD | Users & Administrator's Manual Open your browser and point it to https://microsoft.com/devicelogin as instructed in the preceding screen. Enter the code and then click Next. Click the account. - 40 -...
- Page 47 CHAPTER 4 Teams Application C455HD | Users & Administrator's Manual Enter your password (it's the same password as the Windows password on your PC) and then click Sign in. Close the window shown in the preceding figure. Observe that the phone returns to the initial code screen. In that screen, select Sign in on this device. Select the 'Email, phone or username' field; a virtual keyboard pops up. Enter one of them and then choose Sign in. The 'home' screen opens. ● If you opt to Sign in from another device, complete authentication from your PC or smart phone. This is recommended if you’re using Multi Factor Authentication (MFA). - 41 -...
-
Page 48: Multi-Cloud Sign-In
CHAPTER 4 Teams Application C455HD | Users & Administrator's Manual Figure 4-2: Sign-in from PC / Smart Phone In the browser on your PC or smart phone, enter the URL indicated in the ◆ preceding screen and then in the phone’s Web interface that opens, perform sign- in (as noted previously, this option is recommended if using MFA). LLDP- MED (Link Layer Discovery Protocol – Media Endpoint Discovery) is a standard link layer protocol used by network devices to advertise their identity, capabilities, and neighbors on a local area network based on IEEE802 technology, principally wired Ethernet. -
Page 49: Remote Provisioning And Sign-In From Teams Admin Center
CHAPTER 4 Teams Application C455HD | Users & Administrator's Manual Remote Provisioning and Sign-in from Teams Admin Center Network administrators can remotely provision and sign in to a Teams device. To provision a device remotely, the admin needs to upload the MAC IDs of the devices being p rovisioned and create a verification code. The entire process can be completed remotely from the Teams admin center. - Page 50 CHAPTER 4 Teams Application C455HD | Users & Administrator's Manual Upload a file to add a device MAC address From the Awaiting Activation tab, select Upload MAC IDs. Download the file template. Enter the MAC ID and location, and then save the file. Select the file, and then select Upload. ➢ Step 2: Generate a verification code You need to generate a verification code for the devices. The verification code is generated in bulk or at the device level and is valid for 24 hours. From the Awaiting Activation tab, select an existing MAC ID. A password is created for the MAC address and is shown in the Verification Code column. You'll need to provide the list of MAC IDs and verification codes to the field technicians. You can export the detail directly in a file and share the file with the technician who is doing the actual installation work.
- Page 51 CHAPTER 4 Teams Application C455HD | Users & Administrator's Manual The technician is then expected to enter the device-specific Verification code that was provided in the Teams admin center on the phone’s user interface. Once the device is provisioned successfully, the tenant name will be available on the sign in page.
- Page 52 CHAPTER 4 Teams Application C455HD | Users & Administrator's Manual When the tenant admin is signing in from Teams Admin Center, the user interface on the device is blocked to prevent other actions on the phone. - 46 -...
-
Page 53: Getting Acquainted With The Phone Screen
CHAPTER 4 Teams Application C455HD | Users & Administrator's Manual Getting Acquainted with the Phone Screen The following gets you acquainted with the phone’s user interface. The figure below shows the phone's home screen, aka the phone's idle screen. The following figure shows the phone's Calls screen. The following table describes the phone's home screen. - 47 -... - Page 54 CHAPTER 4 Teams Application C455HD | Users & Administrator's Manual Table 4-1: Calls Screen Item Description The phone menu. Select it to open the menu shown in the figure following this table. Calls Select the tab to open the Calls screen. The screen shown in the figure preceding this table opens. People Select the tab to open the People, shown under Using the People Screen on page 57 opens. Allows you to easily connect and collaborate with teammates, colleagues, friends and family. Through this screen, you can see all your contacts and create and manage contact groups to organize your contacts. The screen provides a simple user experience and aligns with the contacts on the Teams desktop client. If a contact has multiple numbers, the phone screen allows the user to select from a drop-down menu the intended contact method. Calendar Select to open the Calendar screen, shown under Setting up a Meeting on page 56 opens. Voicemail Select the tab to open the Voicemail screen, shown under Accessing Voicemail on page 58 opens. The following figure shows the user's presence status screen. Use this table as reference. Table 4-2: Menu Item Descriptions Item Description Presence status...
-
Page 55: Enabling Google Talkback
Connect a device See Connecting a Device for more information. Hot desk See Hot Desking on page 51 for more information. Settings See Configuring Teams Application Settings on page 53 for more information. Sign Out See Signing Out on page 59 for more information. Enabling Google Talkback AudioCodes’ Native Teams Android devices feature Google TalkBack, an accessibility service that allows blind and low-vision users to interact with their devices by giving them spoken feedback so they can use their devices without looking at the screen. The feature improves the experience of these users. ➢ To enable the feature: Open the Accessibility screen (Settings > Device settings > Accessibility). Select the TalkBack option shown in the preceding figure. Click OK to switch the feature on as shown in the preceding figures. Listen to the audio tutorial that begins playing. The tutorial explains how to interact with the device. ● After TalkBack is switched on, operations are performed by touching to select and then double-touching to activate. -
Page 56: Opting In Or Out Of Call Queues
CHAPTER 4 Teams Application C455HD | Users & Administrator's Manual Select the phone icon; audio informs you that you can activate the person's profile. Double- touch the icon; the person's profile screen opens displaying their name, position, email, hyperlinked work phone number and hyperlinked mobile phone number. Select the star icon; audio informs you that you can add to Favorites; double-touch to activate it. Opting in or out of Call Queues Call queue agents can opt out of call queues or opt in based on settings a vailable on the Teams phones. Setting Status You can set a status message to add more substance to your presence status. For example, a status message such as 'Working from home' adds more substance to the presence status of 'Available'. ➢ To set presence status: In the home screen, select the user (avatar) picture. Select Set status message. - 50 -... -
Page 57: Hot Desking
CHAPTER 4 Teams Application C455HD | Users & Administrator's Manual Select the field under 'Set status message' and in the Virtual Keypad that pops up, type in the message you want to show other people, for example, 'Working from home'. The text you type in will replace 'Set status message' in the screen shown in the preceding figure. Optionally, switch on 'Show when people message me'. When people message or @mention you, they'll view the status message you set. Select 'Clear after' and choose when you want the message to stop displaying. Options are: ● Never clear ● 1 hour ● 4 hours ● Today ● This week ● Custom (set a date and time in the calendar that pops up) Hot Desking The hot desk feature allows a user to sign in to a phone that is already signed in to by another user without signing out the original user to whom the phone was assigned for primary use. Any phone in the enterprise network that is enabled with this feature allows any user in the enterprise to temporarily sign into it, make calls, attend meetings and access their calendar and call log. After finishing using these phone functions, the user can sign out to end their hot desk session; call logs and history will automatically be removed from the device. ➢ To set up a phone as a shared device for hot desking: Select the user's photo or avatar picture, and then from the menu, select the Hot desk option. Alternatively, in the Calls screen (or People screen, Calendar screen or Voicemail ... -
Page 58: Changing Presence Status
CHAPTER 4 Teams Application C455HD | Users & Administrator's Manual Figure 4-3: Hot desk Touch t he field 'Email, phone or username'. Figure 4-4: Email, phone or username Use the Virtual Keyboard to type in your email, phone or user name and then select Done; the phone is enabled for hot desk. Changing Presence Status You can assign a presence status to control whether you want people to contact you or not. By default, your status is based on your Microsoft Teams server. ● After n minutes (configured in the Teams server by your administrator), presence status automatically changes to ‘Inactive’. -
Page 59: Configuring Teams Application Settings
CHAPTER 4 Teams Application C455HD | Users & Administrator's Manual Table 4-3: Presence Statuses Presence Icon Description Status Available You're online and available for other contacts to call. Busy You’re busy and don’t want to be interrupted. Do not You don’t want to be disturbed. Stops the phone from ringing disturb when others call you. If DnD is activated, callers hear a tone indicating that your phone is busy; the call is blocked and your phone's screen indicates 'Missed Calls'. Be Right You'll be away briefly and you'll return shortly. Back Away You want to hide your status and appear to others you're currently away. Offline You're going on vacation (for example). Reset Resets the status. status Configuring Teams Application Settings The following describes the Teams application's settings. In the home screen, select the user ... - Page 60 CHAPTER 4 Teams Application C455HD | Users & Administrator's Manual Use this table as reference: Table 4-4: Idle Screen Description Item Description Dark Theme Dark Theme can be enabled to suit user preference. To enable Dark Theme: Drag the ‘Dark Theme’ setting slider to the ‘on’ position; the fol- lowing prompt is displayed: Choose Restart and then verify after the Teams application restarts that all screens (Teams application and Device Settings) are dark themed: - 54 -...
- Page 61 CHAPTER 4 Teams Application C455HD | Users & Administrator's Manual Item Description Profile Opens the user's email address and photo / avatar picture. Calling Opens the Calls screen. Incoming Calls ■ Call forwarding. Enables automatically redirecting an incoming call to another destination. ■ Forward to. Only displayed if the previous setting is enabled. Defines the destination to which to forward incoming calls.
-
Page 62: Setting Up A Meeting
CHAPTER 4 Teams Application C455HD | Users & Administrator's Manual Item Description incoming calls. Select either Off, Voicemail, Contact or number, or Call group. Caller ID ■ Hide your phone number when dialing people who are outside of Microsoft Teams Block Calls Block calls with no caller ID. Enables blocking calls that do not have ... -
Page 63: Using The People Screen
CHAPTER 4 Teams Application C455HD | Users & Administrator's Manual You can join calendered meetings and / or you can select to add a new event to the calendar. Using the People Screen The People screen allows users to easily connect and collaborate with teammates, colleagues, friends and family. Through the screen, users can see all their contacts and create and manage contact groups to organize their contacts. The screen provides a simple user experience and aligns with the contacts on the Teams desktop client. In addition to accessing the People screen from the menu, the screen can also be accessed from the hard CONTACTS button on the phone. If a user creates a contact within Microsoft Outlook, their information appears under the People app on the phone screen. Contacts in Microsoft Outlook are available in read-only mode. -
Page 64: Accessing Voicemail
CHAPTER 4 Teams Application C455HD | Users & Administrator's Manual Accessing Voicemail From the phone's home screen, select the Voicemail tab. Using Audio Devices Use one of the following audio devices on the phone for speaking and listening: ■ Handset: To make a call or answer a call, lift the handset off the cradle. ■ Speaker (hands-free mode) ● To activate it, press the speaker key during a call or when making a call. ● To deactivate it, press the speaker key again. Headset (hands-free mode). When talking on the phone, you can relay audio to a ■ connected headset. ● To enable it, press the headset key. ● To disable it, press it again. You can easily change audio device during a call. To change from speaker/headset to handset: Activate speaker/headset and pick up the ■ handset; the speaker/headset is automatically disabled. -
Page 65: Transferring Calls And Meetings Across Devices
CHAPTER 4 Teams Application C455HD | Users & Administrator's Manual Transferring Calls and Meetings across Devices If a user joins a meeting on their PC, they’ll view a prompt suggesting adding their Teams device to split the audio and video, or transferring completely. The feature enables the user to move away from their PC while seamlessly staying connected. The phone recognizes the user is in a call on another device and prompts them to transfer or add, letting them start their call from elsewhere and transfer to their desk phone. Signing Out You can optionally sign out of the phone application and sign in as another user. ➢ To sign out: Under Settings, navigate to and select the Sign out option. Alternatively, in the Calls screen (or People screen, Calendar screen or Voicemail screen), select the phone menu , select the Settings option. - Page 66 CHAPTER 4 Teams Application C455HD | Users & Administrator's Manual Network administrators can alternatively sign out from devices using Microsoft Teams admin center (TAC). Network administrators can also remotely sign in and provision devices from Microsoft's TAC. - 60 -...
-
Page 67: Performing Teams Call Operations
CHAPTER 5 Performing Teams Call Operations C455HD | Users & Administrator's Manual Performing Teams Call Operations The following documentation shows how to perform basic operations with the phone. Making a Call Calls can be made in multiple ways, for example, you can press the digit keys on the phone’s dial pad to enter the phone number or URL. Alternatively, select a call listed in the Calls screen, and then touch . Touching in the Calls screen allows you to make a call by entering the name of a contact. ● You need to touch the ‘To: Search for people' field to launch the soft keyboard. ●... -
Page 68: Redialing
CHAPTER 5 Performing Teams Call Operations C455HD | Users & Administrator's Manual ➢ To end a call before it's answered at the other end ■ Touch ➢ To dial a URL: Press the speaker key or lift the handset and then touch the ‘Place call’ field. Enter a URL address. To delete (from right to left), touch the clear key. Redialing You can redial a number you previously dialled. ➢ To redial: Press the REDIAL hard key on the phone; the first call listed in the Calls screen is redialled. ■ Dialing a Missed Call The phone logs all missed calls. The screen in idle state displays the number of missed calls ... -
Page 69: Answering Calls
CHAPTER 5 Performing Teams Call Operations C455HD | Users & Administrator's Manual ➢ To dial the service from the locked idle screen either: ■ Select the EMERGENCY softkey shown in the preceding figure of the locked idle screen and then enter the emergency number. -OR- Dial from the locked idle screen without needing to use the EMERGENCY key: ■ Dial 911. Activate the speaker button on the phone. View the ‘Emergency call’ screen displaying the dialed emergency number. When the phone detects that 911 was requested, it automatically dials that number. Answering Calls The phone indicates an incoming call by ringing and displaying Caller X is calling you. The LED located in the upper right corner of the phone flashes red, alerting you to the incoming call. ... -
Page 70: Ending An Established Call
CHAPTER 5 Performing Teams Call Operations C455HD | Users & Administrator's Manual ➢ To answer: ■ Pick up the handset -OR - activate the headset key on the phone (make sure the headset is connected to the phone) -OR- activate the speaker key on the phone -OR- select the Accept softkey (the speaker is automatically activated). Ending an Established Call You can end an established call in a few ways. ➢ To end an established call: Return the handset to the phone cradle if it was used to take the call -or- activate the ■ headset key on the phone -or - activate the speaker key on the phone -or- select the End softkey. Managing Calls You can view a history of missed, received and dialed calls. Each device reports every call from | to that user to the server. All devices that a user signs into are synchronized with the server. -
Page 71: Managing Teams Meetings
CHAPTER 5 Performing Teams Call Operations C455HD | Users & Administrator's Manual The user on the other device enters the code communicated to them and then selects the Pick up button to pick up the call. Managing Teams Meetings Multi- party conference meetings based on the Teams server (remote conference) can be calendered and initiated from the phone. ... - Page 72 CHAPTER 5 Performing Teams Call Operations C455HD | Users & Administrator's Manual Touch NEXT. Touch Add participants. Touch the ‘To’ field and then use the soft keyboard to enter the first letter of the name of the participant to add. If you're searching for Alex (for example), touch the letter A on the soft keyboard, then l, etc.; the name you’re searching for will be promoted to the top of the list of Corporate Directory entries displayed. - 66 -...
-
Page 73: Using Live Captions
CHAPTER 5 Performing Teams Call Operations C455HD | Users & Administrator's Manual The feature lets you quickly and easily navigate to any employee listed in the Corporate Directory. Using Live Captions The phone can detect what's said in a meeting, group call or 1:1 call, and presents the text on the screen in real-time (live) captions. ● Captions are currently only available in English (US). ● Captions are currently unavailable for phones within government clouds. For more information, see here. - 67 -... -
Page 74: Raising A Hand During A Meeting
CHAPTER 5 Performing Teams Call Operations C455HD | Users & Administrator's Manual Raising a Hand During a Meeting During a meeting, you can raise a virtual hand from your phone to let people know you want to contribute without interrupting the conversation. Everyone in the meeting will see that you've got your hand up. For more information, see here. Hiding Names and Meeting Titles for Individual Devices Names and meeting titles can be hidden for individual devices. ➢ To hide names and meeting titles per device: Access the Meetings screen (More > Settings > Meetings) (the figure is for illustrative purposes only). -
Page 75: Viewing And Playing Voicemail Messages
CHAPTER 5 Performing Teams Call Operations C455HD | Users & Administrator's Manual Viewing and Playing Voicemail Messages If you hear a stutter dial tone when you pick up the handset, new messages are in your voicemail box. The phone also provides a visual indication of voicemail messages. -
Page 76: Adjusting Ring Volume
CHAPTER 5 Performing Teams Call Operations C455HD | Users & Administrator's Manual Adjusting Ring Volume The volume of the phone's ring alerting you to an incoming call can be adjusted to suit personal preference. ➢ To adjust ring volume: When the phone is in idle state, select the VOL or VOL key on the phone. After adjusting, the volume bar disappears from the screen. Adjusting Tones Volume The phone's tones, including dial tone, ring-back tone and all other call progress tones, can be adjusted to suit personal preference. ➢ To adjust tones volume: Off-hook the phone (using handset, speaker or headset). Select the VOL or VOL key to adjust the volume. After adjusting, the volume bar disappears from the screen. Adjusting Handset Volume Handset volume can be adjusted to suit personal preference. The adjustment is performed ... -
Page 77: Playing Incoming Call Ringing Through Usb Headset
CHAPTER 5 Performing Teams Call Operations C455HD | Users & Administrator's Manual ➢ To adjust the headset volume: During a call, activate the headset key on the phone. Press the VOL or VOL key; the volume bar is displayed on the screen. Playing Incoming Call Ringing through USB Headset The phone features the capability to ring via a USB headset in addition to via the phone speaker. ... -
Page 78: Adding A Speed Dial
CHAPTER 5 Performing Teams Call Operations C455HD | Users & Administrator's Manual ➢ To view the details of a meeting: Scroll down if necessary to the meeting whose details you want to view and select it. Select See details and view in the right pane the details of the meeting. ➢ To join a meeting: ■ In the meeting you want to join, select the See details link and then select Join online meeting. Adding a Speed Dial ● Applies only to the C455HD phone with Expansion Module (sidecar). ●... - Page 79 CHAPTER 5 Performing Teams Call Operations C455HD | Users & Administrator's Manual Add it from the C455HD phone using one of the following options: ■ Via the Calls > Recent tab. Select a user and then select the ‘star’ icon to add them to the speed dial list: Via the People tab using + > Add from Directory and then add the users to the speed dial. - 73 -...
- Page 80 CHAPTER 5 Performing Teams Call Operations C455HD | Users & Administrator's Manual The sidecar displays the user’s speed dial list. The list is synchronized on all devices under the same user account. The order on the sidecar corresponds to the order of the speed dial list.
-
Page 81: Performing Administrator-Related Operations
■ ■ Managing Phones with the Device Manager on page 87 Updating Phone Firmware Manually AudioCodes' Teams IP Phone Utility allows network administrators to manually update a phone's firmware. ➢ To manually update a phone's firmware: From the PC's Start menu, select the app icon or click the application's exe file in the folder ... - Page 82 CHAPTER 6 Performing Administrator-Related Operations C455HD | Users & Administrator's Manual In the 'Teams IP-Phone Address' field, enter the IP address of the device . Click SSH Connect; a connection with the device is established. Under the Operations section of the screen next to the field 'Firmware file', click the Browse button and navigate to and select the candidate image file. Click the Submit button; a firmware upgrade process starts; the phone is automatically rebooted; a notification pops up when the process finishes. The phone notifies you that it's being updated and rebooted. The above is also displayed when the phone is upgraded remotely from Microsoft Admin Portal or from AudioCodes' Device Manager. - 76 -...
-
Page 83: Downloading 802.1X Certificates
Teams IP Phone Utility on page 94 ● The client certificate files must be named dot1x_cert.crt and dot1x_pkey.key ● The CA certificate file must be named factory_ca.pem AudioCodes Teams IP Phone Utility 802.1x certificates can be downloaded using AudioCodes' Teams IP Phone Utility. ➢ To download certificates to a single Teams device: In the Teams IP Phone Utility (see Teams IP Phone Utility on page 94 for detailed information about the application), enter the phone's IP address and click SSH Connect. Click theBrowse button next to the field 'Certs Folder' and navigate to and select the ... -
Page 84: Manually Performing Recovery Operations
Android phones also feature a ‘hardware watchdog’. This feature resets the phone if Android is stacked and doesn’t respond (though Android stacking is unlikely); there’s no recovery process; the phone is only reset. All AudioCodes devices for Microsoft Teams have a reset key or a combination of keys on the keypad to reset it. The C455HD device features a two-key combination to activate each action. To activate an action, simultaneously press the two keys for three seconds. -
Page 85: Removing Devices From Intune Management
CHAPTER 6 Performing Administrator-Related Operations C455HD | Users & Administrator's Manual Switch from Teams Compatible to Teams Native and vice versa - simultaneously press the ■ ‘back’ key + the OK key; the phone’s LED lights up red + green. ■ Restore the phone to its default settings - Long-press the reset key for 25 seconds or simultaneously press the OK key + the MENU key; the device’s LED lights up green + blue. You can also restore a device to its default settings while the phone is already powered up and functioning, by long-pressing the HOLD key for 15 seconds. Removing Devices from Intune Management You can remove from Intune devices that are no longer needed, that are being repurposed, or that have gone missing. ➢ To remove devices from Intune: Go to Microsoft 365 Admin Centre [portal.office.com] and log in with an Administration account. Navigate to Endpoint Manager. - 79 -... - Page 86 CHAPTER 6 Performing Administrator-Related Operations C455HD | Users & Administrator's Manual The Endpoint Manager service is licensed according to individual terms. Con- sequently, not all network administrators will be able to navigate to it. Check if the license you're using includes the service or not. Click Devices.
- Page 87 CHAPTER 6 Performing Administrator-Related Operations C455HD | Users & Administrator's Manual Click Android. - 81 -...
- Page 88 CHAPTER 6 Performing Administrator-Related Operations C455HD | Users & Administrator's Manual Click Android Devices > Bulk Device Actions. - 82 -...
- Page 89 CHAPTER 6 Performing Administrator-Related Operations C455HD | Users & Administrator's Manual Select: OS > Android (Device Administrator) Device Action > Delete and then Next. Select Devices to include and search for the user for which enrolled devices are to be removed. - 83 -...
- Page 90 CHAPTER 6 Performing Administrator-Related Operations C455HD | Users & Administrator's Manual Select all the devices to be removed and click Select icon. After the devices are selected, click Next. - 84 -...
- Page 91 CHAPTER 6 Performing Administrator-Related Operations C455HD | Users & Administrator's Manual Click Create; a task to delete all the selected devices enrolled with a particular account is created. - 85 -...
-
Page 92: Updating Microsoft Teams Devices Remotely
CHAPTER 6 Performing Administrator-Related Operations C455HD | Users & Administrator's Manual Once the action is created, the admin receives notification. It may take some time to completely sync the devices with the account so after delet- ing the devices wait for 30 minutes before signing in. Updating Microsoft Teams Devices Remotely For instructions on how to update Microsoft Teams devices remotely, see ... -
Page 93: Applying Firmware To A Phone From A Usb Disk
➢ To apply the firmware from the USB disk: Enter recovery mode by simultaneously pressing the ‘back’ key + the MENU key; the device’s LED lights up red. Insert the USB disk with the target firmware. Figure 6-1: Apply update from a USB disk Select the ‘Apply update from USB disk’ option and then choose the correct firmware image from the disk. Managing Phones with the Device Manager AudioCodes' Device Manager manages Android-based Teams phones in a similar way to UC- type phones. Teams phones' configuration parameters are in the same format as UC phones. A .cfg configuration file is defined for each device. Device Manager version 7.8.2000 a nd later supports Android-based Teams devices. Zero Touch Provisioning is supported in a non-tenant aware manner; each local DHCP Option 160 must be configured with a fully-specified URL pointing to dhcpoption160.cfg as shown here: Table 6-1: DHCP Option 160 URL This URL is displayed in the Device Manager page under Setup > DHCP Options Configuration. ... -
Page 94: Configuring A Periodic Provisioning Cycle
C455HD | Users & Administrator's Manual default tenant as a ‘lobby’ for the new devices. The above URL can also be configured in AudioCodes' Redirect Server. Android-based Teams devices currently support: ■... -
Page 95: Configuring Timezone And Daylight Savings
Configuring TimeZone and Daylight Savings Network administrators can configure TimeZone and Daylight Savings to suit enterprise require- ments. AudioCodes' Teams phones feature a Automatic Time Zone Detection mechanism that allows the device to automatically detect the time zone via geographical location. If time zone is not configured, this feature is implemented. -
Page 96: Managing Devices With Https
➢ To establish an HTTPS connection: ■ The server certificate must be signed by a well-known Certificate Authority -OR- ■ A root/intermediate CA certificate must be loaded to the device’s trust store either via 802.1x or configuration parameter ‘ /security/ca_certificate/[0-4]/uri’ ➢ To maintain backward compatibility with devices previously running UC versions: ■ Configure parameter '/security/SSLCertificateErrorsMode' to Ignore Supported Parameters Listed here are the configuration file parameters currently supported by Android-based Teams devices. They're in AudioCodes’ UC version format. The parameters are comprised of Microsoft configuration profile settings and AudioCodes’ device-specific parameters. ■ general/silent_mode = 0 (default)/1 general/power_saving = 0 (default)/1 ■ ■ phone_lock/enabled = 0 (default)/1 ■ phone_lock/timeout = 900 (default) (in units of seconds) phone_lock/lock_pin = 123456 ■... - Page 97 CHAPTER 6 Performing Administrator-Related Operations C455HD | Users & Administrator's Manual network/dhcp_enabled = 0/1 ■ ■ network/ip_address = ■ network/subnet_mask = network/default_gateway = ■ ■ network/primary_dns = network/pecondary_dns = ■ ■ network/pc_port = 0/1 office_hours/start = 08:00 ■ ■ office_hours/end = 17:00 ■ logging/enabled = 0/1 logging/levels = VERBOSE, DEBUG, INFO, WARN, ERROR, ASSERT, SILENT ■ ■ admin/default_password = 1234 admin/ssh_enabled=0/1 (default) ■ ■ security/SSLCertificateErrorsMode = IGNORE, NOTIFICATION, DISALLOW (default) security/ca_certificate/[0-4]/uri – uri to download costumer’s root-ca ■ ■...
-
Page 98: Troubleshooting
CHAPTER 7 Troubleshooting C455HD | Users & Administrator's Manual Troubleshooting DSCP The phone's Teams application supports DS (Differentiated Services) containing a differentiated Services Code Point (DSCP) value and an ECN (Explicit Congestion Notification) value, for monitoring Quality of Service (QoS). DSCP is part of the IP header that defines the type of routing service to tag outgoing voice packets originated from the phone. It informs routers that this packet must receive a specific QoS. Values can be set in decimal (e.g., 184) or hexadecimal (e.g., 0xb8). The default value is ... -
Page 99: Users
CHAPTER 7 Troubleshooting C455HD | Users & Administrator's Manual Figure 7-3: Audio Users Read the following if an issue with your phone occurs. Contact your network administrator if necessary. Network administrators can also use this documentation as reference. Table 7-1: Troubleshooting Symptom Problem Corrective Procedure Phone is off Phone is not Make sure the AC/DC power adapter is attached ■ (no screen receiving firmly to the DC input on the rear of the phone. displays and power Make sure the AC/DC power adapter is plugged into ■ LEDs) the electrical outlet. ■ Make sure the electrical outlet is functional. If using Power over Ethernet (PoE), contact your ■ network administrator to check that the switch is powering the phone. Phone is not ... -
Page 100: Network Administrators
Teams IP Phone Utility AudioCodes' Teams IP phone is by default accessed via Secure Shell (SSH) cryptographic network protocol after the network administrator signs in. SSH is by default disabled and can be enabled with Administrator permissions in the phone screen (Device Administration >... - Page 101 CHAPTER 7 Troubleshooting C455HD | Users & Administrator's Manual In the 'Teams IP-Phone Address' field, enter the IP address of the device (get it by pressing the MENU hard key > About phone > Status > IP Address). Click SSH Connect; a connection with the device is established. - 95 -...
-
Page 102: Capturing The Phone Screen
CHAPTER 7 Troubleshooting C455HD | Users & Administrator's Manual Next to the field 'PC folder', click the Browse button and navigate to and select the folder to which to send data to use for debugging. Capturing the Phone Screen AudioCodes' screen-capturing application Teams IPP GUI Tool allows network administrators to effectively collaborate and debug issues. ➢ To capture the phone screen: From your PC's Start menu, open the AudioCodes Teams IPP GUI Tool application. - 96 -... - Page 103 CHAPTER 7 Troubleshooting C455HD | Users & Administrator's Manual In the 'Teams IP-Phone Address' field, enter the IP address of the device (get it by pressing the MENU hard key > About phone > Status > IP Address). Click SSH Connect; a connection with the device is established. - 97 -...
-
Page 104: Running Tcpdump
CHAPTER 7 Troubleshooting C455HD | Users & Administrator's Manual Next to the field 'PC folder', click the Browse button and navigate to and select the folder to which to send the screen captures. Click the Screen Capture button; the phone's screen is captured and the screenshot is saved and sent to the folder. On your PC, navigate to the folder and retrieve the screenshot. Default filename: screencap.png. Rename it to a name related to the screen you captured. If you don't rename it, it will be overwritten the next time you take a screenshot. Running Tcpdump Tcpdump is a common packet analyzer that allows network administrators to display TCP/IP and other packets transmitted or received over the IP telephony network, for debugging purposes. -
Page 105: Getting Information About Phones
-w rtp.pcap After running TCPDump, reproduce the issue. Press Ctrl+C to stop TCPDump. Execute the following command from your PC command prompt (cmd): scp -r admin@%deviceIp%:/storage/emulated/0/recording/ %FolderOnPc% Getting Information about Phones Network administrators can get information about phones using AudioCodes' SSH protocol based Teams IP Phone Utility. SSH is by default disabled and can be enabled with Administrator permissions in the phone screen (Device Administration > Debugging > SSH). - 99 -... - Page 106 CHAPTER 7 Troubleshooting C455HD | Users & Administrator's Manual ➢ To get information from the phone: Open the Teams IP Phone Utility (see Teams IP Phone Utility on page 94 for more information about the application) and click Get Version (after entering the phone's IP address, clicking SSH Connect and browsing to a folder on the PC to which to send the information). Alternatively: ● To get firmware information, in the 'Command' field enter the following and then click Send: getprop ro.build.id ● To get Bootloader information using SSH protocol, in the utility's 'Command' field enter the following and then click Send: getprop ro.bootloader ● To get DSP information using SSH protocol, in the utility's 'Command' field enter the following and then click Send: getprop ro.ac.dsp_version ●...
-
Page 107: Remote Logging (Syslog)
CHAPTER 7 Troubleshooting C455HD | Users & Administrator's Manual getprop ro.portal.version ● To get the Microsoft Admin version using SSH protocol, in the utility's 'Command' field enter the following and then click Send: getprop ro.agent.version Remote Logging (Syslog) Remote Logging via Syslog provides the same log level as Device Diagnostics (performed via the Microsoft Admin Center) with some additional information that may be relevant to device issues (not Teams application issues). Device Diagnostics via the Microsoft Admin Center are ... -
Page 108: Getting Diagnostics
CHAPTER 7 Troubleshooting C455HD | Users & Administrator's Manual Configure the ‘Remote IP address’ and ‘Remote port’ and enable ‘Remote Logging’; the device starts sending logs to the Syslog server. Network administrators can also enable Syslog using Secure Shell (SSH) protocol. ➢ To enable Syslog using SSH protocol, type the following command at the shell prompt: setprop persist.ac.rl_address <syslog_server_ip>:<port>. ➢ To disable Syslog using SSH, type the following command at the shell prompt: setprop persist.ac.rl_address ""... - Page 109 CHAPTER 7 Troubleshooting C455HD | Users & Administrator's Manual Click Get Diagnostics. After a short period, view in the results pane a 'Finished' indication. Open the folder on the PC to which you commanded the application to send the information and locate and open the sub-folder 'logs'. Open the txt files to view the diagnostics. - 103 -...
- Page 110 CHAPTER 7 Troubleshooting C455HD | Users & Administrator's Manual Network administrators who need to get diagnostics from the device can alternatively dump the logs to the phone’s Secure Digital (SD) Card and then later collect them using Secure Copy Protocol (SCP) based on Secure Shell (SSH) protocol. Whenever an issue occurs, the administrator can dump the logs into the SD Card.
-
Page 111: Getting A Bug Report
Get the logs using SCP notation as follows: scp -r admin@host_IP:/sdcard/logs/ . ■ Following are the relevant logs (version and ID may be different to those shown here): dmesg.log ✔ ✔ dumpstate-TEAMS_1.3.16-undated.txt dumpstate_log-undated-2569.txt ✔ ✔ logcat.log Getting a Bug Report Getting a Bug Report is identical to Getting Diagnostics on page 102 with these exceptions: ■ A Bug Report can be on many phones; Diagnostics is on one A Bug Report is in zip file format; Diagnostics are not ■ ■ A Bug Report is formatted differently to Diagnostics ➢ To get a Bug Report: In the AudioCodes Teams IP Phone Utility (see Teams IP Phone Utility on page 94 for more information), enter the phone's IP address, click SSH Connect and browse to a folder on the PC to which to send the information. - 105 -... -
Page 112: Activating Dsp Recording
C455HD | Users & Administrator's Manual Click Get Bugreport; after a short period, view in the results pane a 'Finished' indication. Open the folder on the PC to which you commanded the application to send the information. Unzip the zipped files and open the txt files to view the report. Activating DSP Recording Network administrators can activate DSP recording using AudioCodes' SSH protocol based Teams IP Phone Utility. SSH is by default disabled and can be enabled with Administrator permissions in the phone screen (Device Administration > Debugging > SSH). ➢ To activate DSP Recording: In the AudioCodes Teams IP Phone Utility (see Teams IP Phone Utility on page 94 for more ... -
Page 113: Deactivating Dsp Recording
DSP recording can be activated on the fly without requiring the network administrator to reset the phone. Deactivating DSP Recording Network administrators can deactivate DSP recording using AudioCodes' SSH protocol based Teams IP Phone Utility. SSH is by default disabled and can be enabled with Administrator permissions in the phone screen (Device Administration > Debugging > SSH). -
Page 114: Ssh
CHAPTER 7 Troubleshooting C455HD | Users & Administrator's Manual DSP recording can be deactivated on the fly without requiring the network admin- istrator to reset the phone. The phone can be accessed via Secure Shell (SSH) cryptographic network protocol after the network administrator signs in. SSH is by default disabled and can be enabled with Administrator permissions in the phone screen (Device Administration >... -
Page 115: Microsoft Admin Center
CHAPTER 7 Troubleshooting C455HD | Users & Administrator's Manual pm install -r -d /data/teams.apk Remove the .apk from /data rm /data/teams.apk Microsoft Admin Center The Microsoft Admin Center allows network administrators to troubleshoot issues encountered with the phone. Collecting Logs Network administrators can download all logs from the Microsoft Admin Center. Logs that administrators can download include device diagnostics (Logcat), dumpsys, ANRs, Client Log, Call Policies File, Call Log Info File, Sky lib Log Files, Media Log Files, and CP. The logs can help debug Teams application issues and also for issues related to the device. ➢ To collect logs: Reproduce the issue. Access Microsoft Admin Center and under the Devices tab click the Diagnostics icon. Figure 7-4: Microsoft Teams Admin Center - Diagnostics - 109 -... - Page 116 CHAPTER 7 Troubleshooting C455HD | Users & Administrator's Manual Applies to all AudioCodes phones for Microsoft Teams even though a specific model is shown in the figures here. Click the Diagnostics icon and in the 'Device diagnostics' prompt that pops up, click Proceed; log files are retrieved from the devices and uploaded to the server. Figure 7-5: Microsoft Teams Admin Center – Logs Upload to Server Click the History tab.
-
Page 117: Getting Company Portal Logs
CHAPTER 7 Troubleshooting C455HD | Users & Administrator's Manual Click Download to download the logs. Getting Company Portal Logs Company Portal logs can be helpful to network administrators when there are issues with signing in to Teams from the phone. ... -
Page 118: Getting Logs Using Uuid
CHAPTER 7 Troubleshooting C455HD | Users & Administrator's Manual Company portal logs are copied to: sdcard/Android/data/com.microsoft.windowsintune.companyportal/files/ To pull the logs, use the ssh: scp -r admin@hosp_ ip:/sdcard/android/data/com.microsoft.windowsintune.companyportal/files/ Files are quite heavy so you may need to pull them one by one. Getting Logs using UUID Many different kinds of generators are available on the internet that enable you to generate a Universally Unique Identifier (UUID), a.k.a., GUID (Globally Unique Identifier), which can be used to get Company Portal logs. ➢ To get logs using a UUID generator: Use an online generator such as https://www.uuidgenerator.net/ Copy the UUID number. In the example shown in the preceding figure, click Copy adjacent to the UUID. Execute the command adb shell or ssh shell. - 112 -... - Page 119 UPLOAD_LOGS --es SessionID <0d23126e-0e2f-4b5b-92de- f07521f92e48> -n com.microsoft.windowsintune.companyportal/.omadm.IPPhoneReceiver After running the command, the logs are saved in 'Intune', Microsoft's cloud-based service for mobile device management (MDM) and mobile application management (MAM). Send AudioCodes the UUID number. Getting Logs using UUID over SSH SSH (Secure Shell) cryptographic network protocol can also be used to secure getting Company Portal logs via UUID. SSH is by default disabled and can be enabled with Administrator permissions in the phone screen (Device Administration > Debugging > SSH).
-
Page 120: Getting Audio Debug Recording Logs
Replace <Generated UUID> with the number that you copied, for example: am broadcast -a com.microsoft.windowsintune.companyportal.intent.action.IPPHONE_ UPLOAD_LOGS --es SessionID <0d23126e-0e2f-4b5b-92de- f07521f92e48> -n com.microsoft.windowsintune.companyportal/.omadm.IPPhoneReceiver After running the command, the logs are saved in 'Intune', Microsoft's cloud-based service for mobile device management (MDM) and mobile application management (MAM). Send AudioCodes the UUID number. Getting Audio Debug Recording Logs Network administrators can opt to get Audio Debug Recording logs from the phone screen. The purpose of these logs is for issues related to media. ➢ To enable Audio Debug Recording logs: Log in as Administrator. Open the Settings screen and scroll down to Debug. Select Debug and then scroll down to Debug Recording. Configure the remote IP address and port. - 114 -... -
Page 121: Collecting Media Logs (*.Blog) From The Phone
CHAPTER 7 Troubleshooting C455HD | Users & Administrator's Manual Enable ‘Voice record’. Start Wireshark on your PC to capture the Audio traffic. Collecting Media Logs (*.blog) from the Phone Network administrators can collect Media Logs (*.blog) from the phone. ➢ To collect Media Logs (*.blog) from the phone Access the phone via SSH. SSH is by default disabled and can be enabled with Administrator permissions in the phone screen (Device Administration >... -
Page 122: Port Mirroring Network Monitoring
CHAPTER 7 Troubleshooting C455HD | Users & Administrator's Manual View all the interfaces on the phone and choose your preferred interface with which to capture packets. Port Mirroring Network Monitoring The phone now supports the port mirroring network monitoring technique of copying and sending network packets transmitted as input from a phone port, to another port of a monitoring device for enhanced analysis and debugging capability. ... - Page 123 CHAPTER 7 Troubleshooting C455HD | Users & Administrator's Manual This page is intentionally left blank. - 117 -...
- Page 124 International Headquarters 1 Hayarden Street, Airport City Lod 7019900, Israel Tel: +972-3-976-4000 Fax: +972-3-976-4040 AudioCodes Inc. 200 Cottontail Lane Suite A101E Somerset NJ 08873 Tel: +1-732-469-0880 Fax: +1-732-469-2298 Contact us: https://www.audiocodes.com/corporate/offices-worldwide Website: https://www.audiocodes.com/ Documentation Feedback: https://online.audiocodes.com/documentation- feedback ©2022 AudioCodes Ltd. All rights reserved. AudioCodes, AC, HD VoIP, HD VoIP Sounds Better, IPmedia, Mediant, MediaPack, What’s Inside Matters, OSN, SmartTAP, User Management Pack, VMAS, VoIPer- fect, VoIPerfectHD, Your Gateway To VoIP, 3GX, VocaNom, AudioCodes One Voice, AudioCodes Meeting Insights, AudioCodes Room Experience and CloudBond are trademarks or registered trademarks of Audi- oCodes Limited. All other products or trademarks are property of their respective owners. Product spe- cifications are subject to change without notice. Document #: LTRT-13297 ...
Need help?
Do you have a question about the C455HD Series and is the answer not in the manual?
Questions and answers
Is it possible to adjust the number of rings before the call is transferred to voicemail