AudioCodes C455HD Quick Manual
Hide thumbs
Also See for C455HD:
- User's and administrator's manual (141 pages) ,
- Quick manual (11 pages) ,
- Release notes (107 pages)
Advertisement
Quick Links
AudioCodes C455HD IP Phone for Microsoft® Teams™
1. Before Installing
Congratulations on purchasing your AudioCodes C455HD for Microsoft Teams IP Phone!
Before installing your phone, make sure the following items are included in the shipped box / boxes:
C455HD IP Phone
Expansion Module (optional, supported on C455HD models whose CPN suffix is DBW and purchased
separately).
AC power adapter (optional)
Cat 5e Ethernet cable
Handset
Handset cord
Desktop stand
Wall mount
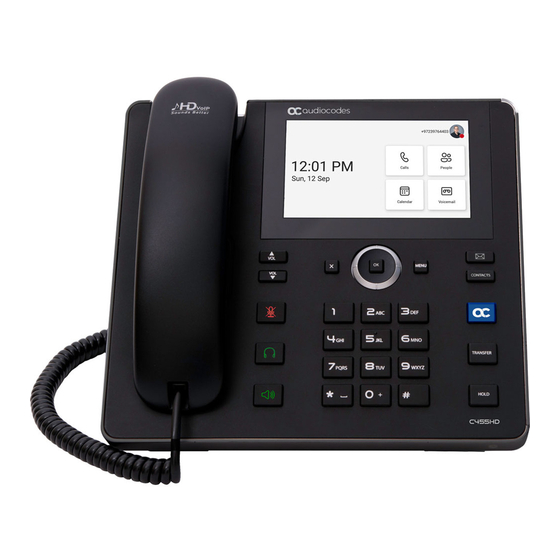
2. Physical Description
Navigation Control
Back Key
Volume Keys
Mute Key
Headset Key
Speakerphone Key
Quick Guide
Alphanumerical
Keypad
P a g e
| 1
Touch Screen
MENU
VOICEMAIL
CONTACTS
HOME
TRANSFER
HOLD
Microphone
Advertisement

Related Manuals for AudioCodes C455HD


Summary of Contents for AudioCodes C455HD
- Page 1 Before installing your phone, make sure the following items are included in the shipped box / boxes: C455HD IP Phone Expansion Module (optional, supported on C455HD models whose CPN suffix is DBW and purchased separately). AC power adapter (optional) ...
- Page 2 Module Note: The Expansion Module option is purchased separately as a standalone unit. For instructions on how to connect it to the phone, see the C450HD and C455HD Expansion Module Installation Guide. Warning: Prior to connecting power, refer to the Compliancy and Regulatory Information document at https://www.audiocodes.com/library/technical-documents.
- Page 3 4. Mounting the Phone on a Desktop or Wall Desktop: Slide the L-shaped stand's short or long edge slots onto these rails. Wall: Slide the wall mount fitting onto these rails. Desk Mount P a g e...
- Page 4 Wall Mount 5. Signing in To sign in to your account: Connect the device to the network. P a g e...
- Page 5 https://microsoft.com/devicelogin Point your browser to as instructed. In the browser, enter the code as shown and click Next. P a g e...
-
Page 6: Changing Your Presence Status
Click the account, close the ‘Microsoft Authentication Broker’ window, and then Continue. View the home screen; you’ve successfully signed in. 6. Changing your Presence Status To change your presence status: Swipe right, touch the current presence status, and then select the status you require. - Page 7 8. Connecting to a Router via Wi-Fi Note: This section is applicable only to models with Wi-Fi functionality (models whose CPN suffix is DBW). The phone can connect to an Access Point via Wi-Fi. The Wi-Fi interface can be used to make VoIP calls over Wi-Fi when the phone is installed in an environment free of LAN/cables.
-
Page 8: Configuring Bluetooth
9. Enabling or Disabling Wi-Fi To enable Wi-Fi: Turn Wi-Fi on by moving the switch in the upper right corner (Wi-Fi is disabled by default). After enabling Wi-Fi, "Searching for Wi-Fi networks…" is displayed. The phone then displays the available Wi-Fi Access Points. - Page 9 In the Settings screen, select the Bluetooth option, and then in the Bluetooth screen, move the switch to On to start Bluetooth scanning. Select the desired Bluetooth device to pair. If prompted for the Bluetooth Pairing code, enter it, and then touch Pair. Once successfully paired, the Bluetooth audio device appears under the ‘Paired devices’...
-
Page 10: Notice Information
Information contained in this document is believed to be accurate and reliable at the time of printing. However, due to ongoing product improvements and revisions, AudioCodes cannot guarantee accuracy of printed material after the Date Published nor can it accept responsibility for errors or omissions. Updates to this document can be downloaded from https://www.audiocodes.com/library/technical-documents.
Need help?
Do you have a question about the C455HD and is the answer not in the manual?
Questions and answers