
Related Manuals for Ruckus Wireless ZF7761CM


Summary of Contents for Ruckus Wireless ZF7761CM
- Page 1 ™ Ruckus Wireless ™ ZoneFlex 7761CM Dual Band 802.11n Outdoor Access Point with Integrated Cable Modem Installation Guide Part Number 800-70290-001 Published March 2010 www.ruckuswireless.com...
-
Page 3: Table Of Contents
Contents About This Installation Guide ..........1 Related Documentation . - Page 4 Contacting Ruckus Wireless Support ........
-
Page 5: About This Installation Guide
Web interface. Using ZoneDirector to Manage the CMAP If you are planning to use a Ruckus Wireless ZoneDirector to manage the CMAP, this guide describes the required steps that will enable the access point to report to and communicate with ZoneDirector successfully. -
Page 6: Unpacking The Cmap
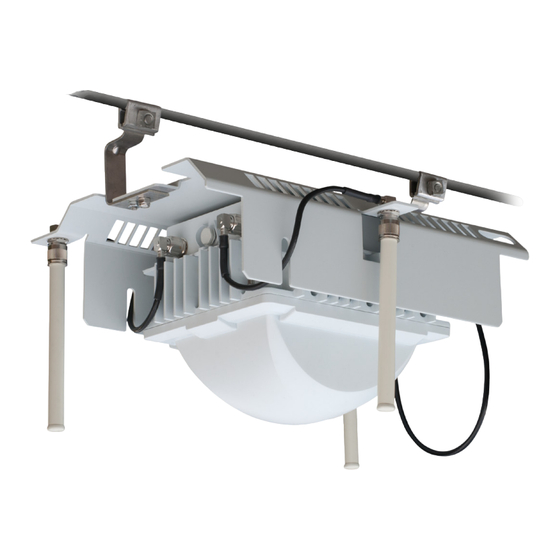
Cable Modem (or CM): The cable modem component of the Cable Modem Access ■ Point (CMAP). Cable Modem Access Point (or ZF7761CM): The whole unit, which includes the CM ■ and AP, as well as the power supply. Unpacking the CMAP 1. - Page 7 Unpacking the CMAP Package Contents Figure 1. The CMAP comes preassembled with the cable strand interface Cable Strand Interface Access Point...
-
Page 8: Preparing For Installation
Wireless ZoneDirector or Ruckus Wireless FlexMaster. Preconfiguring the Access Point (Standalone Only) If you are deploying the access point as a standalone device, Ruckus Wireless strongly recommends that you preconfigure (or “stage”) the unit before mounting it. It is more convenient to connect the administrative computer to the access point and configure the device in the lab than when the device is already mounted on the cable strand. -
Page 9: Step 1: Prepare The Administrative Computer
Preparing for Installation Preconfiguring the Access Point (Standalone Only) Step 1: Prepare the Administrative Computer NOTE: The following procedures are applicable if the administrative computer is running on Windows XP. If you are using a different operating system, refer to the documentation that was shipped with your operating system for information on how to modify the computer’s IP address settings. - Page 10 Preparing for Installation Preconfiguring the Access Point (Standalone Only) Figure 2. Sample configuration in the Internet Protocol Version 4 (TCP/IPv4) Properties dialog box On Microsoft Windows XP 1. Click Start > Control Panel > Network Connections. 2. When the Network Connections window appears, right-click the icon for Local Area Connection, and then click Properties.
- Page 11 Preparing for Installation Preconfiguring the Access Point (Standalone Only) 5. Click Use the following IP address, and then configure the IP address settings with the values listed in Table 2. For a sample configuration, refer to Figure Table 2. Configure your computer’s IP address settings IP address 192.168.100.77 (or any address in the 192.168.100.x network —...
-
Page 12: Step 2: Supply Power To The Cmap
Preparing for Installation Preconfiguring the Access Point (Standalone Only) Step 2: Supply Power to the CMAP In this step, you will connect the CMAP to the administrative computer, and then you will power it on using 12 VDC power. NOTE: Before starting this procedure, you must have already obtained a DC power supply, such as 705-60224-002 shown in Figure To supply DC power to the CMAP... -
Page 13: Step 3: Log Into The Access Point's Web Interface
Preparing for Installation Preconfiguring the Access Point (Standalone Only) Table 3. DC switching adapter components Number Description Connector for the 12VDC connector on the CMAP Reset switch Step 3: Log Into the Access Point’s Web Interface 1. On the administrative computer, open a Web browser window. 2. -
Page 14: Step 4: Configure The Wireless Settings
Preparing for Installation Preconfiguring the Access Point (Standalone Only) Step 4: Configure the Wireless Settings To complete this step, you will need to configure the settings on the Common tab and at least one Wireless # tab. These are the essential wireless settings that will enable wireless devices on the network to associate with the access point. - Page 15 Preparing for Installation Preconfiguring the Access Point (Standalone Only) Table 5. Common wireless configuration Setting Recommended Value Country Code • If you purchased the access point in the United States, this value is fixed to United States at the factory and is not user-configurable.
- Page 16 4. Clear the SSID box, and then type a unique and descriptive name that you want to call this wireless network. For example, you can type Ruckus Wireless AP. This SSID is the name that will help users identify this wireless network in their wireless network connection application.
- Page 17 Preparing for Installation Preconfiguring the Access Point (Standalone Only) Figure 8. Type the FlexMaster server URL...
-
Page 18: Step 5: Disconnect The Cmap From The Administrative Computer
Preparing for Installation Pointing the CMAP to ZoneDirector Step 5: Disconnect the CMAP from the Administrative Computer 1. Disconnect the CMAP from the DC power source. 2. Verify that all LEDs are off. 3. Disconnect the Ethernet cable from the administrative computer’s Ethernet port. Step 6: Restore the Administrative Computer’s Network Settings 1. -
Page 19: Use Ssh To Set The Zonedirector Ip Address On The Cmap
Preparing for Installation Pointing the CMAP to ZoneDirector Use SSH to Set the ZoneDirector IP Address on the CMAP You can use SSH to set the IP address of the ZoneDirector device that you want to use to manage the CMAP. Before starting this procedure, you must obtain the IP address of the ZoneDirector device to which you want to assign the CMAP. -
Page 20: Configure Option 43 On The Dhcp Server (Zonedirector Management Only)
Preparing for Installation Pointing the CMAP to ZoneDirector Configure Option 43 on the DHCP Server (ZoneDirector Management Only) You can configure the DHCP server on your CMTS backbone to ensure that the CMAP will successfully discover its parent ZoneDirector on the network. To customize your DHCP server, you need to configure DHCP Option 43 (043 Vendor Specific Info) with the IP address of the ZoneDirector device on the network. - Page 21 Preparing for Installation Pointing the CMAP to ZoneDirector Figure 9. In the ASCII area, type the IP address of the ZoneDirector device The hexadecimal equivalent of the ZoneDirector IP address appears in the Binary text area. NOTE: If there are multiple ZoneDirector devices on the network, type all the IP addresses in the ASCII text area.
- Page 22 Preparing for Installation Pointing the CMAP to ZoneDirector If Only ZoneDirector Exists on the Network (With ZoneDirector Subcode) 1. From Control Panel > Windows Administrative Tools, open DHCP, and then select the DHCP server you want to configure. 2. If the Scope folder is collapsed, click the plus (+) sign to expand it. 3.
- Page 23 Preparing for Installation Pointing the CMAP to ZoneDirector Figure 11. After the ZoneDirector subcode, type the hexadecimal equivalent of the ZoneDirector IP address length 8. Position the cursor under the ASCII text area, and then type the ZoneDirector IP address. If you typed the hexadecimal equivalent of the ZoneDirector IP address, there should be two bytes (represented by two periods) already filled under the ASCII text area.
- Page 24 Preparing for Installation Pointing the CMAP to ZoneDirector Figure 12. In the ASCII text area, type the ZoneDirector IP address 9. Click Apply to save your changes. 10. Click OK to close the Scope Options dialog box. You have completed configuring DHCP Option 43 to provide supported APs with the ZoneDirector IP address.
- Page 25 Preparing for Installation Pointing the CMAP to ZoneDirector The table below lists the FlexMaster URL and ZoneDirector IP address that are used as examples in this procedure, including their length in decimal and hexadecimal values. Table 6. URL/IP address values that are used as examples in this procedure URL / IP Address Decimal Length Hexadecimal Length FlexMaster...
- Page 26 Preparing for Installation Pointing the CMAP to ZoneDirector Figure 13. Type 01, the subcode for FlexMaster 7. Under the Binary text area, position the cursor after the 01 subcode, and then type 21 – the hexadecimal equivalent of the FlexMaster server URL length that is used as the example in this procedure.
- Page 27 Preparing for Installation Pointing the CMAP to ZoneDirector Figure 14. After the 01 subcode for FlexMaster, type 21 – the hexadecimal equivalent of the FlexMaster server URL length 8. Position the cursor under the ASCII text area, and then type the FlexMaster server URL. In the example below, the FlexMaster server URL is http://192.168.10.1/intune/server.
- Page 28 Preparing for Installation Pointing the CMAP to ZoneDirector Figure 15. In the ASCII text area, type the FlexMaster server URL 9. Position your cursor again after the last octet (in this example, 72) under the Binary text area, and then type 03 (the subcode for ZoneDirector).
- Page 29 Preparing for Installation Pointing the CMAP to ZoneDirector Figure 16. Under the Binary text area, type 03 (the subcode for ZoneDirector) 10. After the ZoneDirector subcode (03), type the hexadecimal equivalent of the length of the ZoneDirector IP address length. For example, if the ZoneDirector IP address is 192.168.10.2, the length in decimal is 12 and the hexadecimal equivalent is 0C.
- Page 30 Preparing for Installation Pointing the CMAP to ZoneDirector Figure 17. After the ZoneDirector subcode, type the hexadecimal equivalent of the ZoneDirector IP address length 11. Position the cursor under the ASCII text area after the FlexMaster server URL, and then type the ZoneDirector IP address.
- Page 31 Preparing for Installation Pointing the CMAP to ZoneDirector Figure 18. In the ASCII text area, type the ZoneDirector IP address (two bytes after the FlexMaster server URL) There should be a two- byte gap between the FlexMaster URL and ZoneDirector IP address 12.
-
Page 32: Hardware Features
CMAP features that are relevant to the installation and mounting instructions that this guide provides. Before you begin the installation process, Ruckus Wireless recommends that you first become familiar with these features. Figure 19. CMAP parts and connectors (Connector side) - Page 33 Hardware Features Pointing the CMAP to ZoneDirector Table 7. Parts and connectors on the CMAP Label Description Ethernet Port RJ45 port that supports 10/100Mbps connections and provides Power over Ethernet (PoE) power to compliant devices. Antenna Connector One of the three connectors for the three 5GHz antennas supplied with the CMAP.
-
Page 34: Weight And Dimensions
Hardware Features Weight and Dimensions Figure 20. CMAP parts and connectors (LED side) Antenna Connectors LEDs Table 8. LEDs and connectors on the CMAP Label Description Antenna Connectors Two of the three connectors for the 5GHz antennas. The other connector is located on the other side of the unit (see Figure 19). -
Page 35: Connectors
Three N-type antenna connectors: Connects to the three 5GHz antennas supplied with ■ the CMAP. DC power supply (Ruckus Wireless part number 705-60244-002): Connected through ■ a 4-pin connector, which is normally unused. It may be used to supply DC power to the unit for testing or configuration purposes. - Page 36 Hardware Features LEDs the access point’s MAC address. If you are unable to find the access point, then it is very likely to be in standalone mode. If you have multiple ZoneDirector devices on the network, make sure you check each one of them. Table 9 describes the behavior of the LEDs on the CMAP when it is in CM, AP standalone, and AP ZoneDirector modes.
-
Page 37: Supported Power Sources
The heaters are enabled by default. If preferred, the access point heater can be disabled from the Web interface. The cable modem heater cannot be disabled. Before You Begin Before installing and setting up the CMAP, Ruckus Wireless recommends that you first complete the following pre-installation tasks. Prepare the Required Hardware and Tools You must supply the following tools and equipment: A notebook computer running Windows 7/Vista/XP with one wireless 802.11b/g/n... -
Page 38: Perform A Site Survey
Before You Begin Perform a Site Survey Perform a Site Survey Before installing the CMAP, perform a site survey to determine the optimal access point placement for maximum range, coverage, and network performance. When performing a site survey, consider the following factors: Data rates: Range is generally inversely proportional to data rates. -
Page 39: Powering The Cmap
Powering the CMAP Using DC Power (Staging or Debugging Only) Powering the CMAP The CMAP supports both POC (AC) and DC power. Depending on whether you are have access to 45 to 90 VAC on the CMTS CATV cable or would prefer to power it with 120-240 VAC and a 12 VDC adaptor, follow the relevant procedure below. -
Page 40: Verifying Access Point Operation
“Step 4: Configure the Wireless Settings” on page 10. For example, if you set the SSID to Ruckus Wireless AP, click the wireless network named Ruckus Wireless AP. If ZoneDirector is managing the access point, the wireless settings would have been included in the configuration file that the access point downloaded when it registered with ZoneDirector. -
Page 41: Using The Ap's Web Interface To Switch To Cm Mode
Switching LEDs to Cable Modem Mode Using the AP’s Web Interface to Switch to CM Mode When the access point boots up, the LEDs are in CM Mode. Once it completes the bootup process, the LEDs alternate between CM Mode and AP Mode. The LEDs are color-coded to enable you to quickly identify the current LED mode: If you see an orange LED, the LEDs are in AP Mode. -
Page 42: Using Snmp To Switch To Cm Mode
Use SNMP to set MIB values on the CMAP that control the LED mode. NOTE: Before starting this procedure, you must first obtain the related MIBs from Ruckus Wireless. Contact your authorized Ruckus Wireless sales representative or Ruckus Wireless Support. Visit http://support.ruckuswireless.com/contacts for contact information. - Page 43 Switching LEDs to Cable Modem Mode Using SNMP to Switch to CM Mode NOTE: If you see an orange LED, this indicates that the LEDs are still in AP Mode. You have completed switching the LEDs to CM Mode using SNMP.
-
Page 44: Resetting The Access Point To Factory Default Settings
Resetting the Access Point to Factory Default Settings Using the Reset Switch on the DC Power Supply Resetting the Access Point to Factory Default Settings There are two ways to reset the access point to factory default settings: Using the Reset Switch on the DC Power Supply ■... -
Page 45: Using Snmp To Reset The Access Point
The IP address that is assigned to the access point that you want to reset to factory ■ default settings. You can obtain this information from the DHCP server on the network. Obtain the related MIBs from Ruckus Wireless. Contact your authorized Ruckus ■ Wireless sales representative or Ruckus Wireless Support. For the Ruckus Wireless Support contact information, visit the following Web address: http://support.ruckuswireless.com/contacts... - Page 46 Resetting the Access Point to Factory Default Settings Using SNMP to Reset the Access Point 4. In the MIB browser, specify the IP address of the access point that you want to reset to factory default settings. 5. Find the OID 1.3.6.1.4.1.25053.3.1.4.7.3 (ruckusZF7761CMControlLED). 6.
-
Page 47: Resetting The Cm To Factory Default Settings
The IP address that is assigned to the access point that you want to reset to factory ■ default settings. You can obtain this information from the DHCP server on the network. Obtain the related MIBs from Ruckus Wireless. Contact your authorized Ruckus ■ Wireless sales representative or Ruckus Wireless Support. For the Ruckus Wireless Support contact information, visit the following Web address: http://support.ruckuswireless.com/contacts... -
Page 48: Mounting The Cmap
Mounting the CMAP Using SNMP to Reset the Access Point Mounting the CMAP To mount the CMAP assembly on a cable strand, you need to secure the cable clamps that are attached to the strand interface bracket to the cable strand. NOTE: The CMAP must be installed on a cable strand by a professional cable installer. -
Page 49: Installing The Antennas
After you mount the CMAP on the cable strand, the next step is to install the three 5GHz antennas that are supplied with the CMAP. To avoid damaging the antennas, Ruckus Wireless strongly recommends that CAUTION: you install the antennas only after you mount the CMAP on the cable strand and have attached the strand coaxial cable to Connector B. -
Page 50: What To Do Next
Change the Administrative Password What to Do Next The following are some of the post-installation tasks that Ruckus Wireless recommends. Refer to the ZoneFlex 7761CM Dual Band 802.11n Outdoor Access Point with Integrated Cable Modem User Guide for more information on configuring and managing the access point. -
Page 51: How Radio Frequency Scanning Works
0.6 seconds, a full scan is done every 281 second (a little under 5 minutes). Contacting Ruckus Wireless Support For assistance in troubleshooting other issues that are not described in this guide, contact Ruckus Wireless technical support (see below): Email: support@ruckuswireless.com ■ Web Site: http://support.ruckuswireless.com/... - Page 52 Troubleshooting Contacting Ruckus Wireless Support Support Forum: http://forums.ruckuswireless.com/ ■...
Need help?
Do you have a question about the ZF7761CM and is the answer not in the manual?
Questions and answers