Techni Mobili RTA-8404 Assembly Instructions Manual
Hide thumbs
Also See for RTA-8404:
- Assembly instructions manual (12 pages) ,
- Assembly instructions manual (16 pages)
Advertisement
Quick Links
Advertisement

Related Manuals for Techni Mobili RTA-8404


Summary of Contents for Techni Mobili RTA-8404
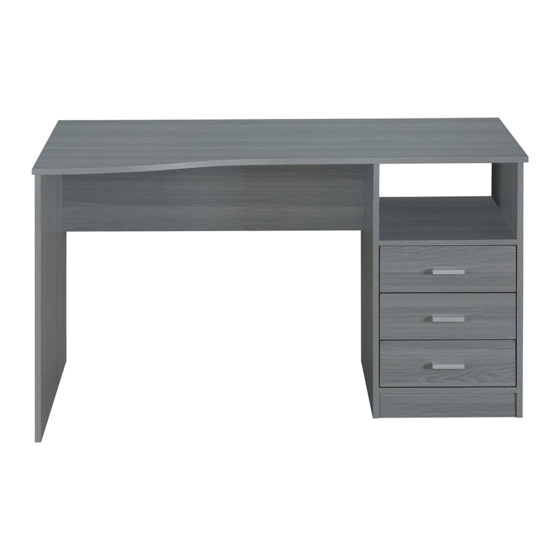
- Page 1 MODEL RTA-8404 ASSEMBLY INSTRUCTIONS Thank you for purchasing our product REV-022021-1...
- Page 2 RTA-8404 • Please read carefully the assembly instructions before the installation. • Do not discard this manual or any of the packaging material until the unit has been completely assembled. • Might require two people.
- Page 3 RTA-8404 Tabletop Back Panel Left Panel Right Panel Middle Panel Drawer front panel Bottom Panel Partition Panel Drawer left panel Leg Panel Drawer back panel Drawer right panel Back panel Drawer bottom panel...
- Page 4 RTA-8404 LIST OF HARDWARE, SCREWS AND FITTINGS MAIN PARTS LAYOUT (FOR REFERENCE):...
- Page 5 RTA-8404 ☛ This unit uses cam bolts and locks. The following explains how to use them. This is not an assembly step; it is a guide for when you are actually doing the assembly using this kind of hardware. Cam Bolt Cam Lock 1.
- Page 6 RTA-8404 BEFORE YOU START THE ASSEMBLY, PLEASE READ THE FOLLOWING TIPS AND WARNINGS. ❼ ❶ To avoid Do a quick inventory misalignments, always to make sure the leave the screws loose package contains all the and tighten them until all...
-
Page 7: Assembly Steps
RTA-8404 ASSEMBLY STEPS STEP 1 ATTENTION: DO NOT JOIN ANY PARTS IN THIS STEP! Hardware Insert the wooden pins 1 into the corresponding holes of panels B, C, D, E, F, G, I, J and K as shown. Make sure to insert in the correct holes as some are intended for other purposes in other steps.. - Page 8 RTA-8404 STEP 3 Grab the Metal Sliders 7 and group them by their shape (Flat or L shaped). All the L shaped sliders will be used until step 12, so please Hardware: set them aside. With the panels D and E positioned as shown, assemble the flat sliders using screws 2 as shown.
- Page 9 RTA-8404 Insert and align the cam locks 5 into the corresponding holes on panels F STEP 5 and G, and assemble them to E as shown and as explained in page 4. Hardware: FRONT (NOT INCLUDED) STEP 6 Insert back panel N and leg panel I as shown.
- Page 10 RTA-8404 STEP 7 Insert and align the cam locks 5 into the corresponding holes on panels G and F, and assemble to them the panel D as shown and as Hardware: explained in page 4. Attach the Plastic Feet 8 to the bottom of panels C, D and E as shown.
- Page 11 RTA-8404 P.10 P.10 Attach the Z bracket 9 to the upper corners of the back panel N using STEP 9 screws 3. Then Install the hole covers 6 over the cam locks on the Hardware: places indicated. (NOT INCLUDED) First insert and align the cam locks 5 in the drawer side panels J and...
- Page 12 RTA-8404 P.11 P.11 Assemble the drawer back panel L to the side panels J and K using STEP 11 screws 4 as shown. Hardware/Tools: (NOT INCLUDED) STEP 12 Assemble the L shaped sliders 7 to the bottom of the drawer using screws 11 as shown.
- Page 13 RTA-8404 P.12 P.12 Install the Handle 10 to the drawer front panel using its own screws, STEP 13 then cover the cam lock holes on panel J and K with 6 as shown. Hardware/Tools: 1 Set REPEAT STEPS 10-13 FOR THE OTHER 2 DRAWERS.
- Page 14 RTA-8404 P.13 P.13 ALL DONE! Give yourself a nice pat on the back. You did a great job!
- Page 15 RTA-8404 P.14 P.14 AFTER THE ASSEMBLY IS DONE, PLEASE READ CAREFULLY THE FOLLOWING CARE AND MAINTENANCE WARNINGS: MAXIMUM WEIGHT CAPACITIES 90 LBS 19 LBS 10 LBS • Do not exceed the indicated weight limits. • Do not expose the surfaces to direct sunlight or to extreme environmental conditions.
- Page 16 RTA-8404 P.15 P.15 TECHNI MOBILI WARRANTY DESKS/LAPTOP CARTS/FILE CABINETS: LIMITED 5-YEAR WARRANTY TV Stand/Entertainment Center: 2 YEAR WARRANTY RTA Products, LLC warrants to the Original Purchaser who acquired a new product from RTA Products or its authorized resellers that this product will be free from defects in its workmanship and materials, under normal use and service conditions, as described herein.
- Page 17 RTA-8404 P.16 P.16...
Need help?
Do you have a question about the RTA-8404 and is the answer not in the manual?
Questions and answers