RGBlink mini User Manual
Hide thumbs
Also See for mini:
- Quick start manual (35 pages) ,
- Product faqs (9 pages) ,
- Quick start manual (28 pages)
Table of Contents
Advertisement
Advertisement
Table of Contents

Related Manuals for RGBlink mini


Summary of Contents for RGBlink mini
- Page 1 User Manual Article NO: RGB-RD-UM-mini E000 Version NO: V1.0...
-
Page 2: Table Of Contents
3.3 Switch Source.........................22 Chapter 4 Streaming.......................24 4.1 OBS Streaming....................... 24 4.2 vMix Streaming......................27 Chapter 5 XPOSE mini Operation...................29 5.1 Connect mini and computer..................29 5.2 Using XPOSE mini......................32 5.3 Upgrade......................... 36 Chapter 6 Ordering Codes...................... 39 6.1 Product Code......................... 39 Chapter 7 Support........................ -
Page 3: Declarations
30 days after the transfer of risks. In the event of justified notice of compliant, RGBlink can repair the fault or provide a replacement at its own discretion within an appropriate period. If this measure proves to be impossible or unsuccessful, the purchaser can demand a reduction in the purchase price or cancellation of the contract. -
Page 4: Operators Safety Summary
To protect users from electric shock, ensure that the chassis connects to earth via the ground wire provided in the AC power Cord. The AC Socket-outlet should be installed near the equipment and be easily accessible. mini User Manual... - Page 5 If there is damage, notify the shipping carrier immediately for all claims adjustments. Site Preparation The environment in which you install your product should be clean, properly lit, free from static, and have adequate power, ventilation, and space for all components. mini User Manual...
-
Page 6: Chapter 1 Your Product
Power Adapter supplied as standard according to destination market. For computers/phones/pads without HDMI port but with Type C interface, you can convert Type C to HDMI.Be sure that the Type C interface shall meet the USB 3.1 standard. mini User Manual... -
Page 7: Product Overview
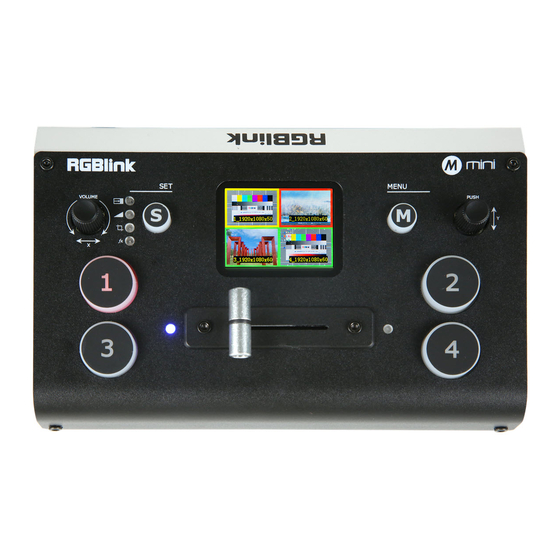
1.2 Product Overview mini is a “mini” signal switcher and mixer which is able to stream 6-picture PVW or PGM from any one out of the 4 HDMI inputs to any live broadcasting platform via third party live streaming software such as OBS. It adopts compact design, equipped with a 2 inch TFT screen to preview the 4 inputs in real time. - Page 8 2. static green: signal is standing by, 3. flashing green: ready to be switched, 4. No light: input source is not supported T-Bar Manual switch, push to left end or right end to switch signal to PGM mini User Manual...
- Page 9 USB3.0 output, capture signal via third party streaming software and push to live broadcasting websites AUDIO IN/OUT AUDIO In, analog audio input port, connect to microphone with power AUDIO OUT, analog audio output port, connect to loudspeaker mini User Manual...
-
Page 10: Dimension
1.3 Dimension Following is the dimension of mini for your reference: 180mm×113mm×49mm mini User Manual... -
Page 11: Chapter 2 Install Your Product
2.3 Connect HDMI Input You can use any camera, computer or other HDMI device as the input source of the mini. It supports up to 1080P standard and 4 sources of different formats and resolutions at the same time. If you are using interlaced signal,mini supports one de-interlacement to all interlaced signals. -
Page 12: Connect Hdmi Output
Note: The HDMI cable is not included in the mini package and needs to be purchased separately. Some camcorders use a mini HDMI port, you need to buy a mini HDMI-HDMI cable separately when you use these camcorders. 2.4 Connect HDMI Output In the mini, you can choose to use HDMI output as the pre-monitoring interface to achieve 16:9 6-picture split pre-monitoring, and we also provide a preset function. -
Page 13: Connect Microphone And External Monitoring Devices
2.6 Connect USB as a Network Signal Source You can use the mini's USB port to use the mini as a webcam source, and you can recognize the webcam signal from the mini on live streaming platforms like Zoom,YouTube, Facebook, Twitch, OBS,etc. -
Page 14: Connect Computer And Mini
Software control:connect computer and mini with CAT6 cable Record and Stream:connect mini’s USB-A and mini’s USB 3.0 port with USB3.0 cable (Note:the color of USB3.0 port is blue) Note:The IP address of the mini must be in the same WLAN segment as the computer. mini User Manual... -
Page 15: Chapter 3 Use Your Product
Chapter 3 Use Your Product 3.1 Menu Main Menu After mini is powered on, push button M to enter the main menu. Main Menu include:Input, HDMI, USB 3.0. Audio, Logo Overlay, Ip Setting, Language, Reset 3.1.1 Input The input menu displays the information of the Push「M」button(MENU) to enter main menu... - Page 16 PGM output for HDMI. enter the third menu item<USB3.0> Output:Choose PGM or PVW 3.1.4 Audio Format:1920×1080@60 「Y」 2.Rotate 「Y」knob to select 1.Push MENU,rotate and push knob to enter the fourth menu item<AUDIO> Audio Source:AFV or LINE IN Audio Bar:ON/OFF mini User Manual...
- Page 17 Select each segment with the「Y」knob, then Select DHCP and set to ON,manual setting is di press to enter and set the value of each segment sabled, and the IP Address for mini is set from by pressing the knob again. the network.
- Page 18 2.Rotate and push「Y」knob to select YES or enter the eighth menu item<RESET> 、 3.1.8 INFO Push MENU and rotate and push「Y」 knob to enter the ninth menu item<INFO> INFO shows Device SN,IP address,MAC address,MAC address,MCU version,Video version. mini User Manual...
-
Page 19: S Button
3.2 S Button When you want to personalize your live show, you can use the mini's 14 built-in switching effects and control the timing of the switch via T-BAR. 1. Push S button once to enter mode switch menu<MODE> and the LED indicator beside will light up 2. - Page 20 Push S button twice to enter <MODE>menu,and rotate 「Y」knob to select FAST or T-BAR After selecting Quick Cut, you need to select the switching time: from 0.5s to 5.0s. The steps are as follows. 1.Press the "S" button twice to enter the Mode include Fast and T-Bar mode interface. mini User Manual...
- Page 21 (When the letter is A, it means background signal) 3.Rotate 「 Y 」 button to select layout you 4.Push「X」button first and then push signal want and confirm by Pressing. button for sub-picture, when letter is B meaning sub-picture. mini User Manual...
-
Page 22: Switch Source
After transition effect (MIX) and transition mode (MODE) is selected In FAST+Time Mode: 1.Press a source button (1, 2, 3, or 4) - Page 23 1.Press a source button (1, 2, 3, or 4) 2.Slide T-Bar from left end to right end that is green. or reversely. Note: Source selection is locked when T-BAR is in transition (not entirely docked at a left or right position) mini User Manual...
-
Page 24: Chapter 4 Streaming
Chapter 4 Streaming 4.1 OBS Streaming Video Capture mini is compatible with many third party steaming software, we recommend OBS, which is available to https://obsproject.com/download. download on Download the software and update to the latest version. Click”+”icon choose video capture device Click video capture device to open up setting page Choose :RGBlink USB 3.0 Capture... - Page 25 Choose Audio, click Setting and choose audio device (Mic/Auxiliary Audio Device) Synchronize Video with External Audio When the video itself doesn’t have embedded audio and need insert external audio.Here are the steps. 1. Set the audio source Setting→Audio→Mic/Auxiliary Audio Devices mini User Manual...
- Page 26 3. Click “+”under Audio/Video Filters and choose Video Delay (Async) 4.You can custom the filter name in the pop-up window. Click OK to confirm the filter name. 5.Input delay value in ms, the value need to adjusted until the video and audio is synchronous. mini User Manual...
-
Page 27: Vmix Streaming
5. Click “Start Streaming”. 6. Go back to live broadcast website and check the broadcasting. 4.2 vMix Streaming mini streaming via vMix steps are as follow: 1. Click a new blank, then click the “Add Input” button. mini User Manual... - Page 28 Note: vMix does not support automatic recognition of the output resolution of mini. Every time the output resolution of mini is modified, the picture on vMix will pause. The user needs to re-select RGBlink USB3.0 Capture and manually input the current output resolution of mini.
-
Page 29: Chapter 5 Xpose Mini Operation
Android, iOS, MacOS, Windows. You can either connect the mini directly to your computer via the LAN port provided by the mini, or link the mini to your router and the computer to the Wi-Fi emitted by your wireless router. - Page 30 5.1.2 Static Direct Connection To ensure that XPOSE mini can connect in different classes of subnet masks, if you find that you cannot connect to the mini series by searching, please try to use the direct connection method. The direct connection feature was added after XPOSE mini was updated to version V1.0.0.9.
- Page 31 5.1.3 Connect Wirelessly with Your Router The mini provides wireless control, so you can control it from a greater distance when the mini is not in your immediate vicinity. A wireless router is required to use this feature. The computer receives the wi-fi signal from the wireless router you connect the mini to.
-
Page 32: Using Xpose Mini
XPOSE mini simulates the mini's real world appearance and the operations you can control with XPOSE mini are very similar to those you can do with the mini's hardware. XPOSE mini has put all the functions in the "M" button. - Page 33 If it is the first time for you to use XPOSE mini, we suggest you watch our User Guide video. 5.2.1 User Guide Click the drop down arrow and click to play the User Guide video.
- Page 34 If you have used XPOSE mini before,you can direct click MENU to set as on mini. Following sections are dedicated to the additional features of XPOSE mini. 5.2.2 Live Streaming Device Capture:choose RGBlink USB3.0 Capture H.265: When it is ON, users can watch 4 inputs streaming back on XPOSE software.
- Page 35 XPOSE mini, and when you control the interface again, you need to enter the password to control it. Note: If you have forgotten your password, please restore the factory settings on the mini mini User Manual...
-
Page 36: Upgrade
2.2xEnsure that your computer is on the same network as the mini. The default IP address of mini is 192.168.0.99, in which case your computers IP address should be in the range 192.168.0.xxx (xxx cannot be the same as mini or other device on the network) to enable connection between the mini and your computer. - Page 37 If the XTOOL app has been installed previously, use the Modify option to complete the setup. XTOOL is a universal updater application for RGBlink products, as such has a number of features in support of the full range of RGBlink devices that are not utilised for mini updates in this guide.
- Page 38 Connect to mini Step 1. Click on Connection Step 2. check the Net Comm option box Step 3. enter the IP Address of the mini(as example above, default mini IP is 192.168.0.99) remember computer and mini MUST be on the same subnet Step 4.
-
Page 39: Chapter 6 Ordering Codes
Chapter 6 Ordering Codes 6.1 Product Code 230-0001-01-0 mini mini User Manual... -
Page 40: Chapter 7 Support
Chapter 7 Support 7.1 Contact US mini User Manual... -
Page 41: Chapter 8 Appendix
1024×768@60 | 1280×720@60 | 1280×1024@60 | 1360×768@60 | 1920×1080@60 Supported HDMI Standards H.265 ITU-T H.265/ ISO/IEC 23008-2 Power Input Voltage DC 12V/1.5A Contact Power 13.2W Max Power Environment Temperature 0 ℃ ~70 ℃ Humidity 10%~85% Physical Weight 0.5kg Package 1.25kg Dimension 180mm×112.5mm×48.7mm Package 255mm×145mm×85mm mini User Manual... -
Page 42: Terms & Definitions
●HDMI: High Definition Multimedia Interface: An interface used for the transmission of uncompressed high definition video, up to 8 channels of audio, and control signals, over a single cable. ●HDMI 1.3: Released on June 22 2006, and increased the maximum TMDS clock to 340 MHz (10.2 Gbit/s). Support mini User Manual... - Page 43 ●Optical Fiber Connector: Terminates the end of an optical fiber, and enables quicker connection and disconnection than splicing. The connectors mechanically couple and align the cores of fibers so light can pass. 4 most common types mini User Manual...
- Page 44 ● USB 3.2: Super Speed USB with 3 varieties of 3.2 Gen 1(original name USB 3.0), 3.2Gen 2(original name USB 3.1), 3.2 Gen 2x2 (original name USB 3.2) with speed up to 5Gbps,10Gbps,20Gbps respectively. USB version and connectors figure: Type Type B Mini Mini Micro- Micro Type C USB 2.0...
- Page 45 The protocol is used for establishing and controlling media sessions between end points. ●MPEG: Moving Picture Experts Group is a working group formed from ISO and IEC developing standards that allow audio/video digital compression and Transmission. mini User Manual...
- Page 46 The less white in a colour, the truer the colour or the greater its saturation. Saturation is the amount of pigment in a colour, and not the intensity. ●Gamma: The light output of a CRT is not linear with respect to the voltage input. The difference between what mini User Manual...
- Page 47 ●EDID: Extended Display Identification Data. EDID is a data structure used to communicate video display information, including native resolution and vertical interval refresh rate requirements, to a source device. The source device will then output the provided EDID data, ensuring proper video image quality. mini User Manual...
-
Page 48: Revision History
0000# Release Sylvia All information herein is Xiamen RGBlink Science & Technology Co Ltd. excepting noted. is a registered trademark of Xiamen RGBlink Science & Technology Co Ltd. While all efforts are made for accuracy at time of printing, we reserve the right to alter otherwise make change without notice.
Need help?
Do you have a question about the mini and is the answer not in the manual?
Questions and answers
Can this be used with a dell laptop?