RGBlink mini Quick Start Manual
Сompact streaming switcher
Hide thumbs
Also See for mini:
- User manual (48 pages) ,
- Quick start manual (35 pages) ,
- Product faqs (9 pages)
Table of Contents
Advertisement
Quick Links
Quick Start
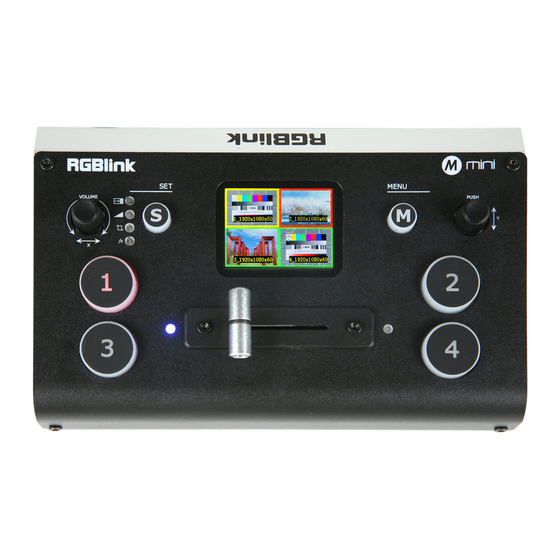
● USB3.0 streaming output
● 4CH HDMI inputs
● 2''TFT display on board to Live preview four inputs
● Auto cut and manual switch (T-Bar)
● 14 transition effects on T-Bar
● Support PIP (Picture-In-Picture)
● Audio offers embedded or external source to select
● Support switch between 6-Picture PVW and PGM to HDMI Out
● Control by PC or mobile phone (via APP)
● Compact design
Advertisement
Table of Contents

Related Manuals for RGBlink mini


Summary of Contents for RGBlink mini
- Page 1 Quick Start ● USB3.0 streaming output ● 4CH HDMI inputs ● 2’’TFT display on board to Live preview four inputs ● Auto cut and manual switch (T-Bar) ● 14 transition effects on T-Bar ● Support PIP (Picture-In-Picture) ● Audio offers embedded or external source to select ●...
-
Page 2: Table Of Contents
MIX................................9 MODE................................9 PIP................................10 Switch Source..............................10 XPOSE mini Operation............................11 OBS Streaming..............................16 OBS Setting..............................16 Streaming Setting............................19 Upgrade................................20 Contact Information..............................27 © Xiamen RGBlink Science & Technology Co., Ltd. 1 / 29 Ph: +86 592 5771197 | support@rgblink.com www.rgblink.com... -
Page 3: Product Introduction
Product Introduction mini is a “mini” signal switcher and mixer which is able to stream 6-picture PVW or PGM from any one out of the 4 HDMI inputs to any live broadcasting platform via third party live streaming software such as OBS. It adopts compact design, equipped with a 2 inch TFT screen to preview the 4 inputs in real time. -
Page 4: Packing Configuration
Packing Configuration USB3.0 Cable Power Adapter Note: Power Adapter supplied as British and Australian standards. © Xiamen RGBlink Science & Technology Co., Ltd. 3 / 29 Ph: +86 592 5771197 | support@rgblink.com www.rgblink.com... -
Page 5: Hardware Orientation
T-Bar Manual switch, push to left end or right end to switch signal to PGM. © Xiamen RGBlink Science & Technology Co., Ltd. 4 / 29 Ph: +86 592 5771197 | support@rgblink.com... -
Page 6: Interface Panel
AUDIO OUT, analog audio output port, connect to loudspeaker. Use Your Product MENU When mini is power on, the native TFT display show starting up page. © Xiamen RGBlink Science & Technology Co., Ltd. 5 / 29 Ph: +86 592 5771197 | support@rgblink.com... -
Page 7: Input
「Y」 Y」 HDMI means HDMI output, rotate 「 knob to select PVW output and PGM output for HDMI. Output:PVW or PGM Format:1920×1080@60 © Xiamen RGBlink Science & Technology Co., Ltd. 6 / 29 Ph: +86 592 5771197 | support@rgblink.com www.rgblink.com... -
Page 8: Usb3.0
「 Audio Source:AFV or LINE IN Audio Bar:ON/OFF Note: The mini can realize any one of five audio channels as the main IP Setting output. You can either fix one audio channel as the main output, so that the audio does not change when you switch the HDMI screen signal,or Push MENU and rotate and push 「Y」... -
Page 9: Language
Push MENU and rotate and push「Y」knob to enter the eighth menu item<INFO> INFO shows Device SN,IP address,MAC address,MAC address,MCU version,Video version. S Button © Xiamen RGBlink Science & Technology Co., Ltd. 8 / 29 Ph: +86 592 5771197 | support@rgblink.com www.rgblink.com... -
Page 10: Mix
When you want to personalize your live show, you can use the mini's 14 built-in switching effects and control the timing of the switch via T-BAR. Push S button to enter transition effect menu<MIX> and the LED indicator beside will light up;... -
Page 11: Pip
In FAST Mode: Press a source button (1, 2, 3, or 4) that is green. -
Page 12: Xpose Mini Operation
Right click the setup exe file . Choose Run as administrator to open the exe and install the software. © Xiamen RGBlink Science & Technology Co., Ltd. 11 / 29 Ph: +86 592 5771197 | support@rgblink.com... - Page 13 For example, clicking Button M can open up menu as on the device. If it is the first time for you to use mini, we suggest you watch our User Guide video. Click the drop down arrow and click to play the user guide video.
- Page 14 If you have use XPOSE mini before,then you can directly click and check sub menu. Following sections are dedicated to the additional features of XPOSE mini. Live Streaming Device Capture:choose RGBlink USB3.0 Capture H.265: When it is ON, users can watch 4 inputs streaming back on XPOSE software.
- Page 15 Password Protection In order to solve the problem of control conflicts caused by different devices controlling the same mini in the same LAN, XPOSE mini provides a © Xiamen RGBlink Science & Technology Co., Ltd. password protection function, as an administrator,...
- Page 16 The steps are as follow: 1. Turn on the T-Bar Calibration switch. 2. Push the T-Bar to the far right on the mini. 3. Turn on the "On" switch 4. Push the T-Bar to the far left on the mini.
-
Page 17: Obs Streaming
OBS Streaming OBS Setting mini is compatible with many third party streaming software, we recommend OBS, which is available to https://obsproject.com/download. download on Download the software and update to the latest version. 1.Click”+”icon 2.choose video capture device 3.Click video capture device to open up setting page 4.Choose :RGBlink USB 3.0 Capture... - Page 18 When there is no audio playing first check the video source see if the it is set in default value and then check the audio setting on OBS. © Xiamen RGBlink Science & Technology Co., Ltd. 17 / 29 Ph: +86 592 5771197 | support@rgblink.com...
- Page 19 1.Set Default for the audio source. 2. Audio setting on OBS. Choose Audio, click Setting and choose audio device (Mic/Auxiliary Audio Device) © Xiamen RGBlink Science & Technology Co., Ltd. 18 / 29 Ph: +86 592 5771197 | support@rgblink.com www.rgblink.com...
-
Page 20: Streaming Setting
Service. If the streaming service is in the list, choose it from the list. If choose Custom Service, just fill in URL and Stream Key. © Xiamen RGBlink Science & Technology Co., Ltd. 19 / 29 Ph: +86 592 5771197 | support@rgblink.com... -
Page 21: Upgrade
6. Go back to live broadcast website and check the broadcasting. Upgrade 1.Tools: Firmware ZIP upgrade package XTOOL (V1.0.1.10 or higher) -packaged in the ZIP Computer with network connection © Xiamen RGBlink Science & Technology Co., Ltd. 20 / 29 Ph: +86 592 5771197 | support@rgblink.com www.rgblink.com... - Page 22 2.2xEnsure that your computer is on the same network as the mini. The default IP address of mini is 192.168.0.99, in which case your computers IP address should be in the range 192.168.0.xxx (xxx cannot be the same as mini or other device on the network) to enable connection between the mini and your computer.
- Page 23 If the XTOOL app has been installed previously, use the Modify option to complete the setup. XTOOL is a universal updater application for RGBlink products, as such has a number of features in support of the full range of RGBlink devices that are not utilised for mini updates in this guide 1.
- Page 24 Step 2. check the Net Comm option box Step 3. enter the IP Address of the mini (as example above, default mini IP is 192.168.0.99) remember computer and mini MUST be on the same subnet Step 4. click Confirm Step 5.Review Connection Status at bottom left, to confirm indicator light is green and there is device...
- Page 25 Click the Select All check box which will enable all components to be updated to the latest versions Advanced updating allows single component upgrading Upgrade Step 1. Click Upgrade © Xiamen RGBlink Science & Technology Co., Ltd. 24 / 29 Ph: +86 592 5771197 | support@rgblink.com...
- Page 26 Step 2. Monitor the progress DO NOT DISCONNECT OR POWER DOWN while updating Step 2. Following update click Confirm in the pop-up window © Xiamen RGBlink Science & Technology Co., Ltd. 25 / 29 Ph: +86 592 5771197 | support@rgblink.com...
- Page 27 Step 3. Click Version to refresh, then review the main window to confirm upgrade versions now match Finish Step 1. Close XTOOL Step 2. Disconnect mini Step 3. mini is now upgraded and ready to use © Xiamen RGBlink Science & Technology Co., Ltd. 26 / 29 Ph: +86 592 5771197 | support@rgblink.com...
-
Page 28: Contact Information
All video products are designed and tested to the highest quality standard and backed by full 1 years parts and labor warranty. Warranties are effective upon delivery date to customer and are non-transferable. RGBlink warranties are only valid to the original purchase/owner. Warranty related repairs include parts and labor, but do not include faults resulting from user negligence, special modification, lighting strikes, abuse(drop/crush), and/or other unusual damages. - Page 29 © Xiamen RGBlink Science & Technology Co., Ltd. 28 / 29 Ph: +86 592 5771197 | support@rgblink.com www.rgblink.com...
Need help?
Do you have a question about the mini and is the answer not in the manual?
Questions and answers