RGBlink Mini Pro Quick Start Manual
Hide thumbs
Also See for Mini Pro:
- User manual (52 pages) ,
- Quick start manual (9 pages) ,
- Faq (3 pages)
Table of Contents
Advertisement
Quick Links
Advertisement
Table of Contents

Related Manuals for RGBlink Mini Pro


Summary of Contents for RGBlink Mini Pro
-
Page 2: Table Of Contents
Content Packing Configuration........................4 Product Introduction........................5 Key Features............................ 5 Front Panel............................6 Interface Panel..........................7 Dimension............................8 Install Your Product.......................... 9 Plug in Power............................9 Turn on Your mini-pro........................9 Input HDMI Signal Source......................9 Connecting HDMI Output......................10 Connecting Microphone and External Monitoring Devices............. 11 Connect USB as a Network Signal Source................11 Connect Computer.........................11 Use Your Product.......................... - Page 3 Appendix............................32 Specification........................... 32 Revision History..........................33 Support.............................. 34 Contact US............................34 mini-pro Quick Start...
-
Page 4: Packing Configuration
Packing Configuration USB3.0 Cable Type-C Cable Power Adapter Note: For computers/phones/pads without HDMI port but with Type C interface, you can convert Type C to HDMI.Be sure that the Type C interface shall meet the USB 3.1 standard. mini-pro Quick Start... -
Page 5: Product Introduction
Product Introduction mini-pro is a new generation of mini sized switcher developed by RGBlink for live streaming. Compared to mini+, mini-pro still keeps 4 HDMI input interfaces, but the first HDMI input is promoted to support up to 4K@60 and compatible with HDCP2.2. Besides video interface promotion, audio interface is also upgraded to support MIC and Line input. -
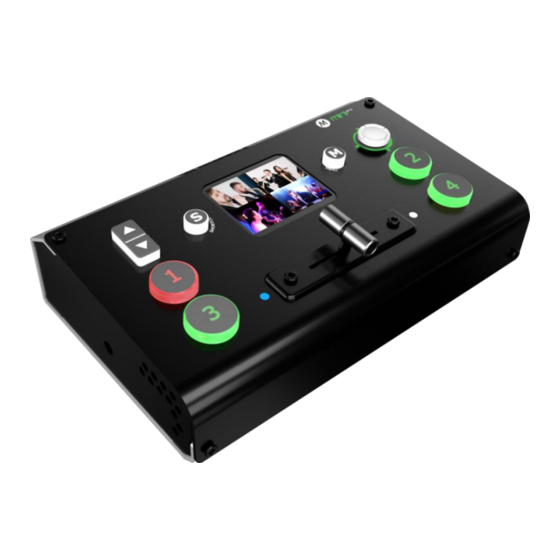
Page 6: Front Panel
Front Panel 1. Adjust volume of PGM when it is under Main menu 2. Proportionally adjust size of sub-picture when it is under position and Up/Down scale adjustment 3. Zoom in/out when PTZ control is enabled Shortcut button, push it and touch screen enter quick operation interface which includes 4 Preset to load, Audio,FTB(fade to black),Record on/off,Mute on/off,Logo on/off, Chroma Key on/off 1. -
Page 7: Interface Panel
Interface Panel HDMI OUT 1 HDMI Output port, connect to display to show Preview (6 pictures) or PGM. HDMI IN 4 HDMI Inputs, connect to input source from HD camera or PC Type C 1 Type C Jack for power input, connect to PD power adapter Power Switch on to power on mini-pro AUDIO OUT... -
Page 8: Dimension
Dimension Following is the dimension of mini-pro for your reference: 180mm×118.3mm×58.4mm mini-pro Quick Start... -
Page 9: Install Your Product
Install Your Product Plug in Power RGBlink mini-pro is packaged with a 12V power link cable and Type C power Adapter. When linking the power supply, please check the power supply standard used in your country/region. If you are using a power supply that does not have a lock, please tighten the power connector of the device to ensure the stability of the mini-pro's power supply. -
Page 10: Connecting Hdmi Output
Note: The HDMI cable is not included in the mini-pro package and needs to be purchased separately. Some camcorders use a mini HDMI port, you need to buy a mini HDMI-HDMI cable separately when you use these camcorders. Connecting HDMI Output You can use an HDMI cable to connect the HDMI output to a monitor with an HDMI input interface, so that you can monitor the input, output and audio display in real time. -
Page 11: Connecting Microphone And External Monitoring Devices
Note:If your computer only has a Type-C port, you can use a USB-A to Type-C cable to transmit the webcam signal. Please note that the Type-C cable you choose needs to support data transmission. The signal is Connect Computer recognized in Windows and MAC system as「RGBlink」. mini-pro Quick Start... - Page 12 Software control:connect computer and mini-pro with CAT6 cable Record and Stream:connect mini-pro’s USB-A and mini-pro’s USB 3.0 port with USB3.0 cable (Note:the color of USB3.0 port is blue) Minimum System Requirements for macOS ● macOS 11.0 Big Sur or later ●...
-
Page 13: Use Your Product
Use Your Product After system connection of mini-pro to power supply, input source devices(computer, MIC(camera) and output to HDMI display and USB 3.0 streaming which is recognized as webcam source on computer. Touch Screen Introduction There is a 2” touch screen on mini-pro operation board, through which most operation can be done, so let’s introduce this touch screen first. -
Page 14: Preset Menu
(3) enter the preset Load menu by swiping from top to bottom(same as the【S】key); (4) enter more settings of current function by swiping from right to left. When entering an operation item, such as adjusting the transition time, you can adjust it by sliding the time bar on the screen, or by pushing the up and down keys on the left of the operation board. -
Page 15: Switch Source
Method 2 (1) Tap【M】→【Settings】→【Shortcut】,as shown in the picture below (2) In the “Shortcut Interface”, besides customizing icon button function, icon size and numbers can be customized by selecting “layout”. (3) After setting is done, push【S】or【M】to exit the edit interface Switch Source The buttons ①②③④... -
Page 16: Switch Effect Setting
states: Steady green: The signal is recognized and no operation is performed; Flashing green: The currently selected signal is ready to be switched; Steady red: The current signal is in PGM output; Unlit: No signal source is connected or the resolution of the signal source connected is not accepted. -
Page 17: T-Bar Switch And Multi-Screen Preview
When standard time is selected, there is no customization value and when customized time is set, tick√behind standard time is hidden. T-Bar Switch and Multi-screen Preview mini-pro defaults to Fast Switching Mode, but on some important occasions, you may need to preview and preset the next scene to ensure the accuracy and stability of the screen.mini-pro provides T-Bar mode allow switch after editing and confirmation. -
Page 18: Pip
mini-pro defaults to single-screen switching. If you need to use PIP, push button【M】to return to the main menu, then find【PIP】, and tap the icon to enter the PIP setting interface. After entering the PIP setting interface, you can add a picture-in-picture preset by tapping the "+"... - Page 19 and the size of the layer can be quickly adjusted by the up and down keys. If detailed adjustment is required, tap the sub-screen and main-screen buttons at the bottom or return to PIP【Adjust】menu and tap【Sub Screen Adjust】or【Main Screen Adjust】. After entering the settings of the sub-screen, the first item is the signal source selection.
-
Page 20: Load And Save
Load and Save mini-pro save preset to View in real time. If you want to quickly load current preset next time, just save it to corresponding View. The View will save all the currently set parameters including PIP layout, Chroma Key setting, PTZ preset, therefore when you need to load any preset, just push corresponding View button in Shortcut interface. -
Page 21: Output Setting
sub screen size by pushing button Up/Down and position by joystick. All the setting is saved to in real time to make sure it can be used next time the device is turned on. (5) If you want the modified preset to be loaded from the View, you need to re-save it to the current View or a new View. -
Page 22: Usb3.0 Output
When the touch screen in 4-screen preview, use joystick left and right to switch between multi-screen PST and PGM, use joystick up and down to switch the 4 input source. USB3.0 Output USB 3.0 output recognized as WEBCAM on computer defaults to be PGM which can be changed to multi-screen PST or TP (Test Pattern). - Page 23 The audio input can be selected as MIC passive microphone input, or LINE input audio console or active microphone signal input according to needs. The four HDMI input ports all support embedded audio. Turn on the audio to always add the audio to PGM.
-
Page 24: Chroma Key
If you need to mute the PGM, please press button 【S】, find the mute button, touch to mute or touch again to restore audio output. Chroma Key mini-pro supports matting, the Chroma Key in the menu, removing the pure color background and overlaying it on another signal to realize the application of virtual reality. - Page 25 (4) Select the background color which is default in green to be removed and make adjustments. Similar to PIP, the size, position and cropping of the main/sub-screen can be set. (5) After the Chroma Key is set, the parameters can be saved directly on the device. Next time when the the device is on no matter on the dominant software XPOSE mini or the touch screen itself, users can directly load the preset.
-
Page 26: Logo
screen through the Up/Down buttons, adjust the position of the screen through the joystick, and all the re-adjusted settings will be Saved to the current View in real time. Logo mini-pro supports saving a picture as LOGO to the device, and the picture format can be JPG, PNG, BPM, GIF. -
Page 27: Record
When setting PTZ, use the signal key ①②③④ to select the corresponding PTZ camera signal to preview. On the PTZ menu interface , when the PTZ function is enabled, the rotation angle of the PTZ can be adjusted by the joystick, and the focal length adjusted by the Up/Down keys. Pushing signal keys can switch the signal source between different PTZ cameras. - Page 28 You can view the recording status in the preview window, and there will be a status indicator in the upper right corner of this small window. Green Formatted hard drive detected and ready to record Recording Slow flashing red Storage inadequate Quick flashing red Poor Storage performance cause frame skipping mini-pro...
-
Page 29: Streaming
Streaming YouTube Streaming 2. Then click “Go live”. 1. Create a video or post. 3. Enter Live streaming interface. And then 4. Click “More option”. create a title. 5. Set video audio 6. After finished all setting, click “NEXT”. Video/Audio device. mini-pro Quick Start... -
Page 30: Facebook Streaming
7. Go live. Facebook Streaming 1. Enter “Publishing Tools”. 2. Click ”Video” 4. Choose ”Use Camera” 3. Click ”+Live” 6. Add a title and description. 5. Set video and audio as USB 3.0 Video/Audio device. mini-pro Quick Start... -
Page 31: Zoom Streaming
7. Go Live. Zoom Streaming 1. Enter Zoom, click “Setting” icon. 2. Click “Video”, set Camera as “USB Video Device”. 4. Finished all setting, Start meeting/Live. 3. Click “Audio”, set Microphone as “USB Audio Device”. mini-pro Quick Start... -
Page 32: Appendix
Appendix Specification Connectors Input HDMI 2.0 1×HDMI-A HDMI 1.3 3×HDMI-A Output HDMI 1.3 1×HDMI-A USB 3.0 1×USB TypeA USB 2.0 1×USB TypeA 1×3.5mm Stereo Jack Audio 1×3.5mm Stereo Jack Communication 1×RJ45 Power 1×PD Type-C Performance Input Resolutions HDMI SMPTE 720p@50/60 |1080i@50 | 1080p@24/30/50/60 |2160p@60 1024×768@60 | 1280 ×... -
Page 33: Revision History
Release Sylvia All information herein is Xiamen RGBlink Science & Technology Co Ltd. excepting noted. is a registered trademark of Xiamen RGBlink Science & Technology Co Ltd. While all efforts are made for accuracy at time of printing, we reserve the right to alter otherwise make change without notice. -
Page 34: Support
Support Contact US mini-pro Quick Start... - Page 35 mini-pro Quick Start...
Need help?
Do you have a question about the Mini Pro and is the answer not in the manual?
Questions and answers