RGBlink mini Quick Start Manual
Hide thumbs
Also See for mini:
- User manual (48 pages) ,
- Quick start manual (35 pages) ,
- Product faqs (9 pages)
Table of Contents
Advertisement
Quick Links
Quick Start
●
4 HDMI inputs, 1 HDMI output
●
6 images multi-view, switch between preview and program
2.1 inch TFT full color screen
●
Support MIC and LINE audio input, multi-channel mix audio
●
Image scaling & croping
●
Support PIP,PBP
●
Support T-Bar switch
●
LOGO overlay
●
Support PC and APP control
●
●
Optimized heat dissipation performance
●
Integrated design, compact and portable
Advertisement
Table of Contents

Related Manuals for RGBlink mini


Summary of Contents for RGBlink mini
- Page 1 Quick Start ● 4 HDMI inputs, 1 HDMI output ● 6 images multi-view, switch between preview and program 2.1 inch TFT full color screen ● Support MIC and LINE audio input, multi-channel mix audio ● Image scaling & croping ● Support PIP,PBP ●...
-
Page 2: Table Of Contents
Factory Reset............................. 11 Info................................11 S Button................................12 MIX................................12 MODE................................ 12 PIP................................13 Switch Source..............................13 XPOSE mini Operation............................15 YouTube Streaming............................19 Contact Information..............................21 © Xiamen RGBlink Science & Technology Co., Ltd. 1 / 22 Ph: +86 592 5771197 | support@rgblink.com www.rgblink.com... -
Page 3: Product Introduction
With industry leading hardware performance and reliability, along with superior heat management and dissapation, mini is the must have mini streaming switcher. mini is light and robust at only 480gm thanks to an all new impact resistant, precision pressure cast ABS housing. -
Page 4: Packing Configuration
Packing Configuration Type-C cable Power Adapter USB3.0 Cable © Xiamen RGBlink Science & Technology Co., Ltd. 3 / 22 Ph: +86 592 5771197 | support@rgblink.com www.rgblink.com... -
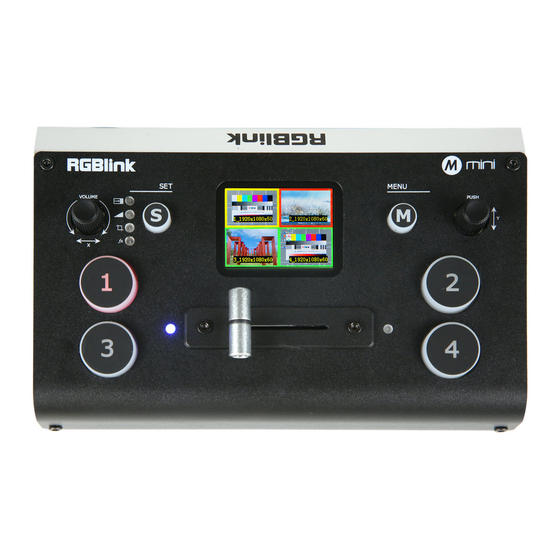
Page 5: Hardware Orientation
4. no light: input source is not supported T-Bar Manual switch, push to left end or right end to switch signal to PGM © Xiamen RGBlink Science & Technology Co., Ltd. 4 / 22 Ph: +86 592 5771197 | support@rgblink.com... -
Page 6: Interface Panel
Communication port to link dedicated software for control USB 3.0 output, capture signal via third party streaming software and push to live broadcasting websites © Xiamen RGBlink Science & Technology Co., Ltd. 5 / 22 Ph: +86 592 5771197 | support@rgblink.com... -
Page 7: Use Your Product
Use Your Product MENU When mini is power on, the native TFT display show starting up page. Main Menu After mini is powered on, push button M to enter the main menu. Main Menu include:INPUT, HDMI, USB 3.0. AUDIO, LOGO OVERLAY, IP SETTING, LANGUAGE, FAN, RESET, INFO ©... -
Page 8: Input
1.Push MENU and select the second menu item 「Y」 PGM output for HDMI. <HDMI> Output:PVW or PGM Push 「Y」 knob to enter <HDMI> menu. Format:1920×1080@60 © Xiamen RGBlink Science & Technology Co., Ltd. 7 / 22 Ph: +86 592 5771197 | support@rgblink.com www.rgblink.com... -
Page 9: Usb3.0
2.Rotate 「Y」knob to select Input Input: MIC, LINE or OFF Volumn: 1-100 HDMI 1/2/3/4 HDMI 1/2/3/4: MIC, LINE or OFF AFV: ON/OFF Volumn: 1-100 Column:ON/OFF © Xiamen RGBlink Science & Technology Co., Ltd. 8 / 22 Ph: +86 592 5771197 | support@rgblink.com www.rgblink.com... -
Page 10: Logo Overlay
Select each segment with the「Y」knob, then Select DHCP and set to ON,manual setting is di press to enter and set the value of each segment sabled, and the IP Address for mini is set from by pressing the knob again. the network. -
Page 11: Language
Fan Control 2.Rotate and push「Y」knob to select 1.Push MENU and rotate and push「Y」knob to Speed: 1-4 enter the seventh menu item<FAN> © Xiamen RGBlink Science & Technology Co., Ltd. 10 / 22 Ph: +86 592 5771197 | support@rgblink.com www.rgblink.com... -
Page 12: Factory Reset
Push MENU and rotate and push 「Y」 knob to enter the ninth menu item<INFO> INFO shows Device SN,IP address,MAC address,MAC address,MCU version,Video version. © Xiamen RGBlink Science & Technology Co., Ltd. 11 / 22 Ph: +86 592 5771197 | support@rgblink.com... -
Page 13: S Button
S Button When you want to personalize your live show, you can use the mini's 14 built-in switching effects and control the timing of the switch via T-BAR. Push S button to enter transition effect menu<MIX> and the LED indicator beside will light up;... -
Page 14: Pip
© Xiamen RGBlink Science & Technology Co., Ltd. - Page 15 Note: Source selection is locked when T-BAR is in transition (not entirely docked at a left or right position) © Xiamen RGBlink Science & Technology Co., Ltd. 14 / 22 Ph: +86 592 5771197 | support@rgblink.com...
-
Page 16: Xpose Mini Operation
After software is installed, click the icon XPOSE and login the software. Click Search to search mini device. After searching, all available mini devices in the sub-net can be found, up to 128 devices can found if there are. © Xiamen RGBlink Science & Technology Co., Ltd. - Page 17 For example, clicking Button M can open up menu as on the device. If it is the first time for you to use mini, we suggest you watch our User Guide video. Click the drop down arrow and click to play the user guide video.
- Page 18 Note: H.265 and OBS cannot work at the same time. User choose either H.265 or OBS, not both. Test Pattern To facilitate troubleshooting, XPOSE mini provides a test signal output, which can be used to troubleshoot the USB or HDMI output interface when there is no output signal from USB or HDMI.
- Page 19 The steps are as follow: 1. Turn on the T-Bar Calibration switch. 2. Push the T-Bar to the far right on the mini. 3. Turn on the "On" switch 4. Push the T-Bar to the far left on the mini.
-
Page 20: Youtube Streaming
YouTube Streaming 1. Create a video or post. 2. Then click “Go live”. 3.Enter Live streaming interface. And then create a title. © Xiamen RGBlink Science & Technology Co., Ltd. 19 / 22 Ph: +86 592 5771197 | support@rgblink.com www.rgblink.com... - Page 21 4. Click “More option”. 5. Set video and audio as USB 3.0 Video/Audio device. 6.After finished all setting, click “NEXT”. © Xiamen RGBlink Science & Technology Co., Ltd. 20 / 22 Ph: +86 592 5771197 | support@rgblink.com www.rgblink.com...
-
Page 22: Contact Information
All video products are designed and tested to the highest quality standard and backed by full 1 years parts and labor warranty. Warranties are effective upon delivery date to customer and are non-transferable. RGBlink warranties are only valid to the original purchase/owner. Warranty related repairs include parts and labor, but do not include faults resulting from user negligence, special modification, lighting strikes, abuse(drop/crush), and/or other unusual damages.
Need help?
Do you have a question about the mini and is the answer not in the manual?
Questions and answers