
Related Manuals for probst WEZ-2


Summary of Contents for probst WEZ-2
- Page 1 Betriebsanleitung Operating Instructions Winkelelementzange WEZ Grab for Angular Concrete Products WEZ WEZ-2 DE /GB 5310.0347...
- Page 2 Bitte beachten Sie, dass das Produkt ohne vorliegende Betriebsanleitung in Landessprache nicht eingesetzt / in Betrieb gesetzt werden darf. Sollten Sie mit der Lieferung des Produkts keine Betriebsanleitung in Ihrer Landessprache erhalten haben, kontaktieren Sie uns bitte. In Länder der EU / EFTA senden wir Ihnen diese kostenlos nach.
- Page 5 Betriebsanleitung Original Betriebsanleitung Winkelelementzange WEZ WEZ-2 5310.0347...
-
Page 6: Table Of Contents
Einstellung und Bedienung .......................... 16 Darstellung der Wechselautomatik ......................20 Wartung und Pflege .............................. 21 Wartung ................................. 21 6.1.1 Mechanik ..............................21 Störungsbeseitigung ............................ 22 Reparaturen ..............................22 Prüfungspflicht ............................. 23 Hinweis zum Typenschild ..........................24 Hinweis zur Vermietung/Verleihung von PROBST-Geräten ................ 24 5310.0347... -
Page 7: Eg-Konformitätserklärung
Sicherheit von Maschinen - Sicherheitsabstände gegen das Erreichen von Gefährdungsbereichen mit den oberen und unteren Gliedmaßen (ISO 13857:2008). Dokumentationsbevollmächtigter: Name: J. Holderied Anschrift: Probst GmbH; Gottlieb-Daimler-Straße 6; 71729 Erdmannhausen, Germany Unterschrift, Angaben zum Unterzeichner: Erdmannhausen, 19.12.2017................(M. Probst, Geschäftsführer) 5310.0347... -
Page 8: Sicherheit
Sicherheit 4 / 24 Sicherheit Sicherheitshinweise Lebensgefahr! Bezeichnet eine Gefahr. Wenn sie nicht gemieden wird, sind Tod und schwerste Verletzungen die Folge. Gefährliche Situation! Bezeichnet eine gefährliche Situation. Wenn sie nicht gemieden wird, können Verletzungen oder Sachschäden die Folge sein. Verbot! Bezeichnet ein Verbot. -
Page 9: Sicherheitskennzeichnung
Sicherheit 5 / 24 Sicherheitskennzeichnung VERBOTSZEICHEN Symbol Bedeutung Bestell-Nr.: Größe: 2904.0213 30 mm Es dürfen keine konischen Greifgüter gegriffen werden. 2904.0212 50 mm 2904.0211 80 mm 2904.0210 30 mm Niemals unter schwebende Last treten. Lebensgefahr! 2904.0209 50 mm 2904.0204 80 mm 2904.0216 30 mm Greifgüter niemals außermittig aufnehmen (stets im... -
Page 10: Persönliche Sicherheitsmaßnahmen
Sicherheit 6 / 24 Persönliche Sicherheitsmaßnahmen ● Jeder Bediener muss die Bedienungsanleitung für das Gerät mit den Sicherheitsvorschriften gelesen und verstanden haben. ● Das Gerät und alle übergeordneten Geräte in/an die das Gerät eingebaut ist, dürfen nur von dafür beauftragten und qualifizierten Personen betrieben werden. ●... -
Page 11: Sicherheit Im Betrieb
Sicherheit 7 / 24 Sicherheit im Betrieb 2.9.1 Allgemeines Die Arbeit mit dem Gerät darf nur in bodennahem Bereich erfolgen. Das Schwenken des Gerätes über Personen hinweg ist untersagt. Der Aufenthalt unter schwebender Last ist verboten. Lebensgefahr! Das manuelle Führen ist nur bei Geräten mit Handgriffen erlaubt. -
Page 12: Allgemeines
Allgemeines Bestimmungsgemäßer Einsatz Das Gerät Winkelelementzange (WEZ-2) kann an jedes beliebiges Trägergerät wie Ladekran, Bagger, Stapler etc. (mittels Schlupf, Kette oder direkt mit einem kompakten Kranhaken bis Gr. 5) angehängt werden und ist ausschließlich geeignet zum Greifen und anschließenden Versetzen von gängigen / marktüblichen asymmetrischen und symmetrischen Greifgütern wie L-Steinen, T-Elementen oder dergleichen mit parallelen,... - Page 13 Allgemeines 9 / 24 ACHTUNG: Das Arbeiten mit diesem Gerät darf nur in bodennahem Bereich erfolgen. NICHT ERLAUBTE TÄTIGKEITEN: Eigenmächtige Umbauten am Gerät oder der Einsatz von eventuell selbstgebauten Zusatzvorrichtungen gefährden Leib und Leben und sind deshalb grundsätzlich verboten!! Die Tragfähigkeit und Nennweiten/Greifbereiche des Gerätes dürfen nicht überschritten werden. Alle nicht bestimmungsgemäßen Transporte mit dem Gerät sind strengstens untersagt: ●...
-
Page 14: Übersicht Und Aufbau
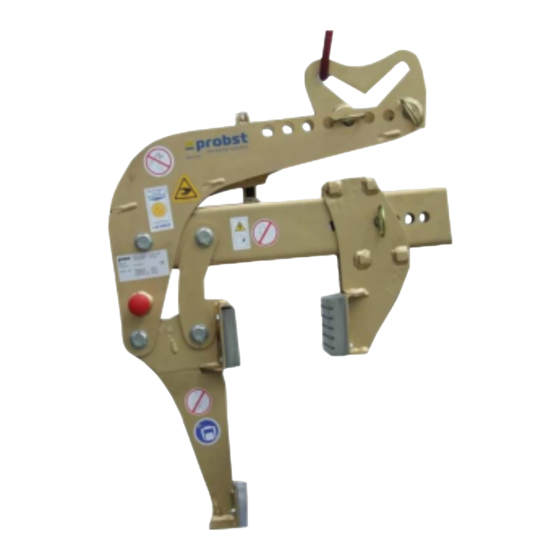
Allgemeines 10 / 24 Übersicht und Aufbau Einhängeöse für Kranhaken Aufhängung für Einhängeöse (mit Schwerpunktausgleich und Einhängeposition für Leer- u. Lasthub) Tragarm mit Verstelllöchern für Schwerpunktausgleich Wechselautomatik Handgriff Abstützprofil Greifbacken Auflageplatte Greifbacken (verschiebbar) Querholm mit Verstelllöchern für Greifbereichseinstellung Abb.1 Technische Daten ... -
Page 15: Installation
11 / 24 Installation Mechanischer Anbau Nur Original-Probst-Zubehör verwenden, im Zweifelsfall Rücksprache mit dem Hersteller halten. Die Tragfähigkeit des Trägergerätes/Hebezeuges darf durch die Last des Gerätes, der Anbaugeräte (Drehmotor, Einstecktaschen etc.) und die zusätzliche Last der Greifgüter nicht überschritten werden! Mechanische Greifgeräte müssen immer kardanisch aufgehängt werden, so dass sie in jeder Position frei... -
Page 16: Einstecktaschen (Optional)
Installation 12 / 24 4.2.2 Einstecktaschen (optional) Um eine Verbindung zwischen dem Gabelstapler und der Einstecktasche herzustellen, fährt man mit den Gabelstapler-Zinken in die Einstecktaschen hinein. Danach arretiert man diese entweder mittels der Arretierungsschrauben, welche durch eine vorzusehende Bohrung in den Zinken gesteckt wird, oder mittels einer Kette oder eines Seils, das durch die Öse an den Einstecktaschen und um den Gabelträger gelegt werden muss. -
Page 17: Bedienung
Bedienung 13 / 24 Bedienung Allgemein Vorsicht bei der Einstellung des Greifbereiches. Verletzungsgefahr der Hände! Schutzhandschuhe verwenden. Die meisten Greifgüter / Elemente (L-Steine) mit außermittigem Schwerpunkt können mit dem Gerät (WEZ) senkrecht versetzt werden (Bild 1). Es gibt jedoch Elemente mit extrem außermittigen Schwerpunkten, die nicht über den Schwerpunktausgleich (am Tragarm mit Verstelllöchern) eingestellt werden können. - Page 18 Bedienung 14 / 24 Bild 3 Bild 4 Bild 5 Bild 6 5310.0347...
- Page 19 Bedienung 15 / 24 Bild 8 Bild 7 Das Drehen, Aufstellen von liegenden Greifgütern / Elementen oder das Umlegen (Kippen) ist verboten! ( Bild 7 und Bild 8). Das Anheben von Greifgütern / Elementen in der Leerhubposition ( Bild 9) ist verboten! Bild 9 5310.0347...
-
Page 20: Einstellung Und Bedienung
Bedienung 16 / 24 Einstellung und Bedienung ● Zuerst die Dicke des vertikalen langen Schenkels des Greifgutes (L-Stein) messen. ● Danach das geöffnete (arretierte) Gerät (WEZ) mit dem verschiebbaren Greifbacken (9) am Querholm mit Verstelllöcher (10) die kleinstmögliche Greifweite einstellen. ●... - Page 21 Bedienung 17 / 24 ● Das Gerät (WEZ) hängt etwas schräg. Man fährt mit dem Abstützprofil gegen die Außenfläche des langen Schenkels des L-Steines und setzt das Gerät (WEZ 2) mittig ab. Bild C ● Beim Heben des ersten L-Steines müssen Sie testen, ob das Greifgut senkrecht hängt und dass die Auflageplatte (8) am Greifgut (L-Stein) aufliegt.
- Page 22 Bedienung 18 / 24 Beim Anhebevorgang des Gerätes mit Greifgut ist unbedingt zu beachten, dass sich der Tragarm (3) nicht über die Maximalstellung hinaus bewegt (siehe Bild F), da sonst die Spannkraft zu gering wird und das Greifgut herausfallen könnte. Unfallgefahr!!! Abhilfe kann geschafft werden, indem der Greifbereich durch Verschieben des verschiebbaren Greifbackens (9) nach innen vorgenommen wird.
- Page 23 Bedienung 19 / 24 Zum Transportieren des Gerätes ohne Greifgut erfolgt in der „Leerhub Position“ (siehe Bild I). Hierzu muss die Wechselautomatik (2) verriegelt sein (siehe Bild J 1). Dies wird erreicht, wenn das Greifgut abgesetzt ist und das leere Gerät (WEZ ohne Greifgut ) angehoben wird.
-
Page 24: Darstellung Der Wechselautomatik
Bedienung 20 / 24 Darstellung der Wechselautomatik Das Gerät ist mit einer Wechselautomatik ausgerüstet, d.h. das ÖFFNEN und SCHLIESSEN der Greifarme erfolgt durch das Absetzen und Anheben des Gerätes. Bildliche Darstellungen der Schaltpositionen der Wechselautomatik ● ● ●... -
Page 25: Wartung Und Pflege
Wartung und Pflege 21 / 24 Wartung und Pflege Wartung Um eine einwandfreie Funktion, Betriebssicherheit und Lebensdauer des Gerätes zu gewährleisten, sind die in der unteren Tabelle aufgeführten Wartungsarbeiten nach Ablauf der angegebenen Fristen durchzuführen. Es dürfen nur Original-Ersatzteile verwendet werden, ansonsten erlischt die Gewährleistung. Alle Arbeiten dürfen nur bei stillgelegtem Gerät erfolgen! Bei allen Arbeiten muss sichergestellt sein, dass sich das Gerät nicht unabsichtlich schließen kann. -
Page 26: Störungsbeseitigung
Wartung und Pflege 22 / 24 Störungsbeseitigung STÖRUNG URSACHE BEHEBUNG Die Klemmkraft ist nicht ausreichend, die Last rutscht ab (optional) Die Greifbacken sind abgenutzt Greifbacken erneuern (optional) Traglast ist größer als zulässig Traglast reduzieren (Greifbereichs-Einstellung) Greifbereich entsprechend der zu Es ist der falsche Greifbereich eingestellt (optional) transportierenden Güter einstellen Die Materialoberfläche ist verschmutzt... -
Page 27: Prüfungspflicht
Wartung und Pflege 23 / 24 Prüfungspflicht ● Der Unternehmer hat dafür zu sorgen, dass das Gerät mindestens jährlich durch einen Sachkundigen geprüft und festgestellte Mängel sofort beseitigt werden ( siehe BGR 500). ● Die dementsprechenden gesetzlichen Bestimmungen u. die der Konformitätserklärung sind zu beachten! ●... -
Page 28: Hinweis Zum Typenschild
Kettenzug, Gabelstapler, Bagger...) mit zu berücksichtigen. Beispiel: Hinweis zur Vermietung/Verleihung von PROBST-Geräten Bei jeder Verleihung/Vermietung von PROBST-Geräten muss unbedingt die dazu gehörige Original Betriebsanleitung mitgeliefert werden (bei Abweichung der Sprache des jeweiligen Benutzerlandes, ist zusätzlich die jeweilige Übersetzung der Original Betriebsanleitung mit zuliefern)! - Page 29 Wartungsintervalls muss unverzüglich dieser Wartungsnachweis (mit Unterschrift u. Stempel) an uns übermittelt werden 1). 1) per E-Mail an: service@probst-handling.de / per Fax oder Post Betreiber: _ _ _ _ _ _ _ _ _ _ _ _ _ _ _ _ _ Gerätetyp:...
- Page 33 Operating Instructions Translation of original operating instructions Grab for Angular Concrete Products WEZ WEZ-2 5310.0347...
- Page 34 Picture of the automatic release ......................... 20 Maintenance and care ........................... 21 Maintenance ................................21 Mechanical ..............................21 Trouble shooting ............................22 Repairs ................................22 Safety procedures ............................23 Hints to the type plate ..........................24 Hints to the renting/leasing of PROBST devices ..................24 5310.0347...
-
Page 35: Ec-Declaration Of Conformity
Safety of machinery - safety distances to prevent hazard zones being reached by upper and lower limbs (ISO 13857:2008) Authorized person for EC-documentation: Name: J. Holderied Address: Probst GmbH; Gottlieb-Daimler-Straße 6; 71729 Erdmannhausen, Germany Signature, information to the subscriber: Erdmannhausen, 19.12.2017................ -
Page 36: Safety
Safety 4 / 24 Safety Safety symbols Danger to life! Identifies imminent hazard. If you do not avoid the hazard, death or severe injury will result. Hazardous situation! Identifies a potentially hazardous situation. If you do not avoid the situation, injury or damage to property can result. -
Page 37: Safety Marking
Safety 5 / 24 Safety Marking PROHIBITION SIGN Symbol Meaning Order-No.: Size: 2904.0213 30 mm The transportation of non rectangular goods is not allowed! 2904.0212 50 mm 2904.0211 80 mm 2904.0210 30 mm It is not allowed to be under hanging loads. Danger to life! 2904.0209 50 mm 2904.0204... -
Page 38: Personal Safety Requirements
Safety 6 / 24 Personal safety requirements ● Each operator must have read and understood the operating instructions (and all safety instructions). ● Only qualified, authorized personal is allowed to operate the device and all devices which are connected (lifting device/carrier). ... -
Page 39: Safety Procedures
Safety 7 / 24 Safety procedures 2.9.1 General ● The use of the device is only permitted in proximity to the ground. Do not swing it over people heads. ● The stay under lifted load is forbidden. Danger to Life! ●... -
Page 40: General
General Authorized use The device Grab for Angular Concrete Products (WEZ-2) is exclusive suitable for the gripping and subsequent displacing of common / market asymmetrical and symmetrical gripping goods, like L-stones, T-elements or and similar products with parallel, flat and non-conical gripping surfaces and similar products and can be attached to any carrier (such as loading crane, excavator, forklift by chain, rope or directly with an compact crane hook up to size 5). - Page 41 General 9 / 24 ATTENTION: The use of this device is only permitted in proximity to the ground. NOT ALLOWED ACTIVITIES: Unauthorized alterations of the device and the use of any self-made additional equipment could cause danger and are therefore forbidden! Never exceed the carrying capacity/working load limit (WLL) and the nominal width/gripping range of the device.
-
Page 42: Survey And Construction
Ill.1 Technical Data Type: Carrying capacity/Workung load limit (WLL) Dead weight Gripping range WEZ-2 50 – 250 mm 2.000 kg 55 kg (2“ – 9 ¾“) (approx. 4,400 lbs) (approx. 120 lbs) The griping range specify the minimum and maximum product measurements of the gripping good, which can be gripped with this device. -
Page 43: Installation
Installation 11 / 24 Installation Mechanical connection Use only original accessories, in case of doubt consult the manufacturer. Take care that the carrying capacity / working load limit (WLL) of the lifting device/carrier is not exceeded, through the load of the device, the attaching devices (turning device, fork sleeves etc.) and the additional load of the gripping goods! Mechanical gripping devices always have to be gimballed, so they can swing freely in any position. -
Page 44: Fork Sleeves (Optional)
Installation 12 / 24 4.2.2 Fork sleeves (optional) To establish a mechanical connection between the fork lift truck and the fork sleeves you have to put the forks into the fork sleeves and fix it with the locking bolt or with a chain/rope, connected to the eyelet on the fork sleeves and the lift frame. -
Page 45: Operation
Operation 13 / 24 Operation General Caution while adjusting of the gripping range. There is danger of injuring the hands! Use safety gloves. THE Most gripping goods / elements (L-stones) with eccentric center of gravity can be moved vertically with the device (WEZ) (Fig. - Page 46 Operation 14 / 24 Fig. 3 Fig. 4 Fig. 5 Fig. 6 5310.0347...
- Page 47 Operation 15 / 24 Fig. 8 Fig. 7 The turning, setting up of lying gripping goods / elements or tilting is forbidden ( Fig. 7 and Fig. 8). The lifting of goods / elements in the empty stroke position ( Fig. 9) is forbidden! Fig.
-
Page 48: Adjustment And Operation
Operation 16 / 24 Adjustment and operation ● Measure first the thickness of the vertical blade of the gripping good (L-stone). ● Then adjust, with the opened (arrested) device (WEZ), at the displaceable rubber gripper (9) on the traverse spar (10) the smallest gripping range. ●... - Page 49 Operation 17 / 24 ● The device is hanging a little angular (incline). Move with the support profile against the outer surface of the long blade (of the L-stone) and set the device (WEZ) down centric. see Ill. C ●...
- Page 50 Operation 18 / 24 Note when lifting the device (WEZ) with gripping good (L-stone), that the supporting arm (3) does not move beyond the maximum position (see Ill. F). Otherwise the tension force will be low and the gripping good (L-stone), could fall down.
- Page 51 Operation 19 / 24 To transport the device without gripping goods, it is done in the "empty stroke position" (see Ill. I). For this the automatic release (2) must be locked (see Ill. J 1). This is achieved, when the gripping good is lowered on the ground and the empty device (WEZ) without gripping good) is lifted.
-
Page 52: Picture Of The Automatic Release
Operation 20 / 24 Picture of the automatic release The device is mounted with a automatic release, that means the opening and closing of the gripping arms results through the set down and lifting of the device. Pictures the positions of the automatic release ... -
Page 53: Maintenance And Care
Maintenance 21 / 24 Maintenance and care Maintenance To ensure the correct function, safety and service life of the device the following points must be executed in the maintenance interval. Used only original spare parts, otherwise the warranty expires. All operations may only be made in closed state of the device! For all operations you have to make sure, that the device will not close unintended. -
Page 54: Trouble Shooting
Maintenance 22 / 24 Trouble shooting ERROR CAUSE REPAIR The clamping-power is not big enough, the load is slipping out (optional) The grippers are worn Replace the grippers (optional) The maximum load is exceed Reduce the weight of. the load ... -
Page 55: Safety Procedures
Maintenance 23 / 24 Safety procedures It is the contractor’s responsibility to ensure that the device is checked by an expert in periods of max. 1 year and all recognized errors are removed ( see BGR 500). The corresponding legal regulations and the regulations of the declaration of conformity have to be observed! ... -
Page 56: Hints To The Type Plate
Example: Hints to the renting/leasing of PROBST devices With every renting/leasing of PROBST devices the original operating instructions must be included unconditionally (in deviation of the users country's language, the respective translations of the original operating instructions must be delivered additionally)! - Page 57 After each completed performance of a maintenance interval the included form must be fill out, stamped, signed and send back to us immediately 1) via e-mail to service@probst-handling.de / via fax or post Operator: _ _ _ _ _ _ _ _ _ _ _ _ _ _ _ _ _...
- Page 58 ca. 695 Die meisten Elemente mit aussermittigem Symmetrische Elemente, wie z.B. Schwerpunkt können mit der WEZ ÖW min. ca.28 T-Elemente dürfen mit der WEZ senkrecht versetzt werden, es gibt jedoch GW min. 50 versetzt werden, hängen aber bedingt Elemente mit extrem aussermittigen durch die Bauart nie senkrecht / Schwerpunkten, die nicht eingestellt ca.
- Page 59 43100915 30320050 30320050 43100912 40110040 siehe separate Liste 20400006 see separate list 20100019 29040632 33503274 20530038 29040631 20530019 21600002 30320050 32330060 20400006 43100911 20000096 20540036 21600002 20540024 43100914 20000008 20000008 20000096 33503274 20400006 32330060 36410154 20000008 20040005 43100913 36350002 © all rights reserved conform to ISO 16016 36410154 Datum Name...
- Page 60 40110154 20530050 40110054 © all rights reserved conform to ISO 16016 Datum Name Benennung Einsatz für WA-L,komplett Erst. 24.8.2011 Perumal.Hurth Gepr. 24.9.2013 Joerg.Werner Artikelnummer/Zeichnungsnummer Blatt E40110040 Zust. Urspr. N236-1 Ers. f. Ers. d.
- Page 61 A53100347 WEZ-2 29040631 29040056 29040632 29040638 29040631 29040632 Erstellt/Created: Zuletzt geändert/Last changed: Blatt / Sheet: 1 / 1 04.11.2016 / Krasnikov, Igor 07.06.2017 / Krasnikov, Igor Einige der Abbildungen sind möglicherweise optionales Zubehör des Gerätes/Some of pictures may be optional equipment of the device.
Need help?
Do you have a question about the WEZ-2 and is the answer not in the manual?
Questions and answers