
Related Manuals for probst VPH-100


Summary of Contents for probst VPH-100
- Page 1 Betriebsanleitung Operating Instructions Instructions d'emploi Instrucciones de uso Bedrijfshandleiding Istruzioni d’uso VPH-100+150-GREENLINE 52710008 DE/GB/FR/ES/NL/IT...
- Page 2 Bitte beachten Sie, dass das Produkt ohne vorliegende Betriebsanleitung in Landessprache nicht eingesetzt / in Betrieb gesetzt werden darf. Sollten Sie mit der Lieferung des Produkts keine Betriebsanleitung in Ihrer Landessprache erhalten haben, kontaktieren Sie uns bitte. In Länder der EU / EFTA senden wir Ihnen diese kostenlos nach.
- Page 5 Betriebsanleitung Operating Instructions VAKUUM-POWER-HANDY VPH-150-GREENLINE VPH-150-GREENLINE DE / GB 52710008/52710009...
- Page 9 Betriebsanleitung Original Betriebsanleitung VAKUUM-POWER-HANDY VPH-150-GREENLINE VPH-150-GREENLINE 52710008/52710009...
- Page 10 Bitte beachten Sie, dass das Produkt ohne vorliegende Betriebsanleitung in Landessprache nicht eingesetzt / in Betrieb gesetzt werden darf. Sollten Sie mit der Lieferung des Produkts keine Betriebsanleitung in Ihrer Landessprache erhalten haben, kontaktieren Sie uns bitte. In Länder der EU / EFTA senden wir Ihnen diese kostenlos nach.
-
Page 11: Table Of Contents
Inhalt 2 / 24 Inhalt EG-Konformitätserklärung ............................ 4 Sicherheit ................................5 Sicherheitshinweise ............................5 Begriffsdefinitionen ............................5 Definition Fachpersonal / Sachkundiger ......................5 Sicherheitskennzeichnung ..........................6 Persönliche Sicherheitsmaßnahmen ......................7 Schutzausrüstung ............................7 Unfallschutz ..............................7 Sicherheit im Betrieb ............................7 2.8.1 Allgemein .............................. - Page 12 Mechanik ............................... 18 Saugplatten / Reinigung ..........................19 Fehlersuche ..............................19 Reparaturen ..............................20 Prüfungspflicht ............................. 20 Hinweis zum Typenschild ..........................21 Hinweis zur Vermietung/Verleihung von PROBST-Geräten ................. 21 Vakuumpumpe ..............................22 Allgemein ..............................22 Sicherheitshinweise ............................22 Beschreibung ..............................23 8.3.1 Akku aufladen ............................
-
Page 13: Eg-Konformitätserklärung
Kompressoren und Vakuumpumpen; Sicherheitsanforderungen Teil 1 und 2. DIN EN 60204-1 (IEC 60204-1) Sicherheit von Maschinen - Elektrische Ausrüstung von Industriemaschinen - Teil 1: Allgemeine Anforderungen Dokumentationsbevollmächtigter: Name: J. Holderied Anschrift: Probst GmbH; Gottlieb-Daimler-Straße 6; 71729 Erdmannhausen, Germany Unterschrift, Angaben zum Unterzeichner: Erdmannhausen,07.01.2021................(Eric Wilhelm, Geschäftsführer) 52710008/52710009... -
Page 14: Sicherheit
Sicherheit 5 / 24 Sicherheit Sicherheitshinweise Lebensgefahr! Bezeichnet eine Gefahr. Wenn sie nicht gemieden wird, sind Tod und schwerste Verletzungen die Folge. Gefährliche Situation! Bezeichnet eine gefährliche Situation. Wenn sie nicht gemieden wird, können Verletzungen oder Sachschäden die Folge sein. Verbot! Bezeichnet ein Verbot. -
Page 15: Sicherheitskennzeichnung
Lastsicherungsketten dürfen niemals locker unter der Last hängen! 2904.0688 146 x 85 BEDIENUNGSHINWEISE Symbol Bedeutung Bestell-Nr. Größe Maximale Tragfähigkeit der Saugplatte (VPH-100) 2904.0575 80 x 40 mm Maximale Tragfähigkeit der Saugplatte (VPH-150) 2904.0207 80 x 35 mm 200 x 50 Aufkleber mit Gerätbezeichnung 2904.0129... -
Page 16: Persönliche Sicherheitsmaßnahmen
Sicherheit 7 / 24 Persönliche Sicherheitsmaßnahmen • Jeder Bediener muss die Bedienungsanleitung für das Gerät mit den Sicherheitsvorschriften gelesen und verstanden haben. • Das Gerät und alle übergeordneten Geräte in/an die das Gerät eingebaut ist, dürfen nur von dafür beauftragten und qualifizierten Personen betrieben werden. •... -
Page 17: Funktions- Und Sichtprüfung
Sicherheit 8 / 24 • Während des Betriebes ist der Aufenthalt von Personen im Arbeitsbereich verboten! Es sei denn es ist unerlässlich. Bedingt durch die Art der Geräteanwendung, z.B. durch manuelles Führen des Gerätes (an Handgriffen). • Der Aufenthalt unter schwebender Last ist verboten. Lebensgefahr! •... -
Page 18: Allgemeines
Allgemeines 9 / 24 Allgemeines Bestimmungsgemäßer Einsatz Das Gerät „VAKUUM-POWER-HANDY VPH-150-GREENLINE “ dient ausschließlich zum bodennahen Heben, Transportieren und Verlegen von Natursteinen- und Betonplatten, Großpflaster, Drainfugensteine, Blockstufen sowie Fliesen. Das zu hebende Gut darf keine porösen Oberflächen haben. Das Gerät ist mit einer Einhängeöse für Kranhaken ausgerüstet. Die angegebene Traglast wir nur bei einem Vakuumdruck von mind. - Page 19 • Standardsaugplatten sind nicht für den Transport von Glasscheiben geeignet! Es dürfen nur Saugplatten des Herstellers Probst verwendet werden! Einige der Saugplatten, die an das Gerät angebaut werden können, reduzieren seine Tragfähigkeit. Auf jeder Saugplatte ist die zulässige Tragfähigkeit angegeben.
-
Page 20: Übersicht Und Aufbau
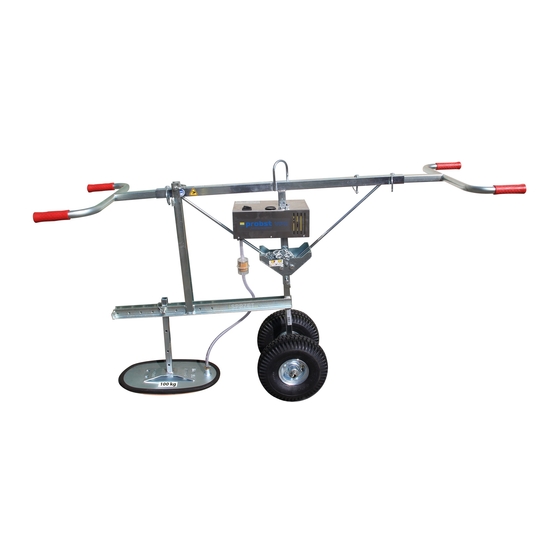
Allgemeines 11 / 24 Übersicht und Aufbau Handgriff Einhängeöse Akku-Adapterkabel mit Klemmen 4. Vakuumpumpe Manometer 6. Luftfilter Kettenkasten 8. Saugplatte 9. Radsatz VPH-RS, ermöglicht Bedienung durch eine Person (optional) 10. Anschlag für Radsatz VPH-RS-AS, für großformatige Fliesen (optional) Technische Daten Tragfähigkeit/WLL [kg] bei 0,5 bar Unterdruck Eigengewicht [kg] VPH-150-GREENLINE... -
Page 21: Installation
12 / 24 Installation Mechanischer Anbau Nur Original-Probst-Zubehör verwenden, im Zweifelsfall Rücksprache mit dem Hersteller halten. Die Tragfähigkeit des Trägergerätes/Hebezeuges darf durch die Last des Gerätes, der Anbaugeräte (Drehmotor, Einstecktaschen etc.) und die zusätzliche Last der Greifgüter nicht überschritten werden! Greifgeräte müssen immer kardanisch aufgehängt werden, so dass sie in jeder Position frei auspendeln... -
Page 22: Montage Des Radsatzes Vph-Rs
Installation 13 / 24 Montage des Radsatzes VPH-RS Montage Höhenverstellbarer Anschlag VPH-RS-AS 52710008/52710009... -
Page 23: Einstellungen
Einstellungen 14 / 24 Einstellungen Einstellung des VPH und des Zubehörs 52710008/52710009... -
Page 24: Bedienung
Bedienung 15 / 24 Bedienung Bedienelemente Hauptschalter - EIN/AUS - mit dem Hauptschalter können Sie die Pumpe ein- bzw. ausschalten. Achtung! beim Ausschalten wird automatisch die Saugleitung entlüftet. Beschreibung weiterer Bedienelemente siehe Anhang Betriebsanleitung Akku-Membranpumpe! Zum Ansaugen und Lösen der Last: Hauptschalter EIN Last ansaugen, halten Hauptschalter AUS... -
Page 25: Aufnahme, Transport Und Verlegung (Hebezeugbetrieb)
Bedienung 16 / 24 Aufnahme, Transport und Verlegung (Hebezeugbetrieb) Beim Verwenden des Gerätes im Hebezeugbetrieb muss die Lastsicherungskette im jeden Fall verwendet werden! Gerät direkt über der Last positionieren. Schrägziehen vermeiden und auf gleichmäßige Lastverteilung achten. Gerät auf die Last aufsetzen. Gerät mittels Hauptschalter EIN/AUS einschalten. -
Page 26: Aufnahme, Transport Und Verlegung (Handbetrieb)
Bedienung 17 / 24 Aufnahme, Transport und Verlegung (Handbetrieb) Gerät direkt über der Last positionieren. Schrägziehen vermeiden und auf gleichmäßige Lastverteilung achten. Gerät auf die Last aufsetzen. Gerät mittels Hauptschalter EIN/AUS einschalten. 4. Die Last wird angesaugt. Manometer beobachten. Sobald -0,5 bar Unterdruck erreicht sind, können Sie die Last anheben. Auf keinen Fall vorher heben, die Last würde herabfallen. -
Page 27: Beschädigung Der Saugplatte
Wartung und Pflege 18 / 24 Beschädigung der Saugplatte Verletzungsgefahr! Gefahr durch herabfallende Last aufgrund von beschädigter Gummidichtung! Zur Vermeidung von Beschädigungen (Risse, Materialabrieb) der Gummidichtung an der Saugplatte ist folgendes zu beachten: • Während dem Arbeitseinsatz muss darauf geachtet werden, dass die Saugplatte beim Anheben, Absetzen oder Transportieren von Lasten nicht an anderen Lasten oder sonstigen Gegenständen streift bzw. -
Page 28: Saugplatten / Reinigung
Wartung und Pflege 19 / 24 Saugplatten / Reinigung • Saugplatte mindestens einmal täglich von anhaftenden Gegenständen, Schmutz und Staub reinigen. Schwammgummi mit Druckluft und/oder Wasserstrahl reinigen. • (Sofern vorhanden: Nut in Dichtlippe mit Tuch auswischen und/oder mit Druckluft ausblasen.) •... -
Page 29: Reparaturen
• Die dementsprechenden gesetzlichen Bestimmungen u. die der Konformitätserklärung sind zu beachten! • Die Durchführung der Sachkundigenprüfung kann auch durch den Hersteller Probst GmbH erfolgen. Kontaktieren Sie uns unter: service@probst-handling.de • Wir empfehlen, nach durchgeführter Prüfung und Mängelbeseitigung des Gerätes die Prüfplakette „Sachkundigenprüfung / Expert inspection“... -
Page 30: Hinweis Zum Typenschild
Kettenzug, Gabelstapler, Bagger...) mit zu berücksichtigen. Beispiel: Hinweis zur Vermietung/Verleihung von PROBST-Geräten Bei jeder Verleihung/Vermietung von PROBST-Geräten muss unbedingt die dazu gehörige Original Betriebsanleitung mitgeliefert werden (bei Abweichung der Sprache des jeweiligen Benutzerlandes, ist zusätzlich die jeweilige Übersetzung der Original Betriebsanleitung mit zuliefern)! -
Page 31: Vakuumpumpe
Vakuumpumpe 22 / 24 Vakuumpumpe Allgemein Diese Vakuumpumpe ist mit einem Blei - Akku 12 Volt 6,5 Ah ausgerüstet die Pumpe wird mit dem eingebauten Blei - Akku betrieben. Über ein Ladekontroll - System kann man den Ladezustand des Blei - Akkus erkennen Sicherheitshinweise •... -
Page 32: Beschreibung
23 / 24 Beschreibung Das Gerät besteht im Wesentlichen wie folgt beschrieben: • robustes Aluminium - Gehäuse, mit Winkelhalter zur Befestigung an Probst-Ständer. • zwei Stück 12 Volt Membranpumpen. • Hauptschalter - Ein/Aus Funktion - mit dem Hauptschalter können Sie die Pumpe Ein- •... -
Page 33: Wartung
Vakuumpumpe 24 / 24 Wartung Grundsätzlich ist das Gerät wartungsfrei. Für die Vakuumpumpe sind alle erforderlichen Ersatzteile für Instandsetzung erhältlich. Reparaturen sollten nur durch einen autorisierten Fachbetrieb durchgeführt werden. Vor Beginn der Reparaturarbeiten Spannungsversorgung unterbrechen. Verschleißteile sind in erster Linie die Membrane. Beim Auswechseln der Membrane sind zweckmäßigerweise die Ventile und die Dichtungen auch zu ersetzten. - Page 34 (durch eine autorisierte Fachwerkstatt)! Nach jeder erfolgten Durchführung eines Wartungsintervalls muss unverzüglich dieser Wartungsnachweis (mit Unterschrift u. Stempel) an uns übermittelt werden 1). 1) per E-Mail an: service@probst-handling.de / per Fax oder Post Betreiber: _ _ _ _ _ _ _ _ _ _ _ _ _ _ _ _ _ Gerätetyp:...
- Page 37 Operating Instructions Translation of original operating instructions VAKUUM-POWER-HANDY VPH-150-GREENLINE VPH-150-GREENLINE 52710008/52710008...
- Page 38 Bitte beachten Sie, dass das Produkt ohne vorliegende Betriebsanleitung in Landessprache nicht eingesetzt / in Betrieb gesetzt werden darf. Sollten Sie mit der Lieferung des Produkts keine Betriebsanleitung in Ihrer Landessprache erhalten haben, kontaktieren Sie uns bitte. In Länder der EU / EFTA senden wir Ihnen diese kostenlos nach.
- Page 39 Contents 2 / 24 Contents EC-Declaration of Conformity ..........................4 Safety ..................................5 Safety symbols ..............................5 Explanation of basic concepts ........................5 Definition skilled worker / specialist ......................5 Safety Marking ..............................6 Personal safety requirements ........................7 Protective equipment............................. 7 Accident prevention ............................
- Page 40 Fault finding ..............................19 Repairs ................................20 Safety procedures ............................20 Hints to the type plate ........................... 21 Hints to the renting/leasing of PROBST devices ..................21 Vacuum pump ..............................22 General ................................22 Safety Advice ..............................22 Description ..............................23 8.3.1...
-
Page 41: Ec-Declaration Of Conformity
DIN EN 60204-1 (IEC 60204-1) Safety of machinery, electrical equipment of industrial machines. Part 1: General requirements. Authorized person for EC-documentation: Name: J. Holderied Address: Probst GmbH; Gottlieb-Daimler-Straße 6; 71729 Erdmannhausen, Germany Signature, information to the subscriber: Erdmannhausen, 07.01.2021................(Eric Wilhelm, Managing director) -
Page 42: Safety
Safety 5 / 24 Safety Safety symbols Danger to life! Identifies imminent hazard. If you do not avoid the hazard, death or severe injury will result. Hazardous situation! Identifies a potentially hazardous situation. If you do not avoid the situation, injury or damage to property can result. -
Page 43: Safety Marking
146 x 85 OPERATING INFORMATIONS Symbol Meaning Order-No. Size Maximum working load limit of the suction plate (VPH-100) 2904.0575 80 x 40 mm Maximum working load limit of the suction plate (VPH-150) 2904.0207 80 x 35 mm 200 x 50 Label with device title 2904.0129... -
Page 44: Personal Safety Requirements
Safety 7 / 24 Personal safety requirements Each operator must have read and understood the operating instructions (and all safety instructions). Only qualified, authorized personal is allowed to operate the device and all devices which are connected (lifting device/carrier). The manual guiding is only allowed for devices with handles. Protective equipment •... -
Page 45: Function Control
Safety 8 / 24 • While using the vacuum lifting device is the stay of persons in the working area forbidden. Except it is indispensable. Caused of the way of using the vacuum lifting device , e.g. if the device must be leaded by hand. -
Page 46: General
General 9 / 24 General Authorized use The device “VACUUM-POWER-HANDY VPH” is only for lifting, transporting and installing natural stone and concrete slabs, large slabs, drain joint stones, steps, as well as tiles in close proximity to the ground. The goods to be lifted must have no porous surfaces. - Page 47 • Standard suction plates are not suitable for the transport of glass plates! Only suction plates of the manufacturer PROBST shall be used!!! • Some suction plates which can be mounted to the device will reduce its carrying capacity. The maximum load is indicated on each suction plate.
-
Page 48: Survey And Construction
General 11 / 24 Survey and construction Handle Lifting eye Battery-adapter cable with terminals 4. Vacuum pump Pressure gauge 6. Air filter Chain box 8. Suction plate 9. Wheel Set VPH-RS, allow to use the device by one person (optionally) 10. -
Page 49: Installation
Installation 12 / 24 Installation Mechanical connection Use only original accessories, in case of doubt consult the manufacturer. Take care that the carrying capacity / working load limit (WLL) of the lifting device/carrier is not exceeded, through the load of the device, the attaching devices (turning device, fork sleeves etc.) and the additional load of the gripping goods! Gripping devices always have to be gimballed, so they can swing freely in any position. -
Page 50: Assembly Of The Wheel Set Vph-Rs
Installation 13 / 24 Assembly of the Wheel Set VPH-RS Assembly of Stop for Wheel Set VPH-RS-AS 52710008/52710009... -
Page 51: Adjustments
Adjustments 14 / 24 Adjustments Adjustment of VPH and the assembly 52710008/52710009... -
Page 52: Operation
Operation 15 / 24 Operation Operating Elements Main switch –on / off. This is to turn the pump on and off. Caution! The suction guide line is automatically bled when the VPH is switched off. For a description of the other elements, please refer to the Appendix: Operating Instructions for the Battery Diaphragm Pump! To suction and release the load: Main Switch ON... -
Page 53: Lifting, Transport And Installation (Hoist Operation)
Operation 16 / 24 Lifting, Transport and Installation (hoist operation) When using the device in hoist operation the safety chain has to be used in any case! Position the device directly above the load. Avoid pulling it diagonally, make sure the load is evenly distributed. Place the device onto the load. -
Page 54: Lifting, Transport And Installation (Manual Operation)
Operation 17 / 24 Lifting, Transport and Installation (manual operation) Position the device directly above the load. Avoid pulling it diagonally, make sure the load is evenly distributed. Place the device onto the load. Switch the device on using the main ON / OFF switch. 4. -
Page 55: Damages Of Suction Plate
Maintenance and care 18 / 24 Damages of suction plate Avoidance of damages: Otherwise the rubber seal on the suction plate could be damaged (danger of pressure loss). Product could fall down. Danger of accidents! To avoid damages of the rubber seal on the suction plate (chinks, abrasion) take notice, that: •... -
Page 56: Suction Plate
Maintenance and care 19 / 24 Suction plate • Clean the sealing lips with compressed air and/or water jet once per week to remove any objects and dirt such as sand, stone particles, dust etc. Clean slot in the sealing lip with a cloth and / or blow out with compressed air. -
Page 57: Repairs
• The corresponding legal regulations and the regulations of the declaration of conformity must be observed! • The expert inspection can also be done by the manufacturer Probst GmbH. Contact us at: service@probst-handling.de • We recommend affixing the inspection sticker "„Sachkundigenprüfung / Expert inspection" in a clearly visible place (order no.: 2904.0056+Tüv sticker with year number) after the inspection has been done. -
Page 58: Hints To The Type Plate
Example: Hints to the renting/leasing of PROBST devices With every renting/leasing of PROBST devices the original operating instructions must be included unconditionally (in deviation of the user´s country's language, the respective translations of the original operating instructions must be delivered additionally)! -
Page 59: Vacuum Pump
Vacuum pump 22 / 24 Vacuum pump General This vacuum pump is equipped with a rechargeable 12 Volt 6.5 Ah lead battery, and the pump is powered by an in-built lead battery. The recharging control system lets you see how charged up the battery is. Safety Advice •... -
Page 60: Description
23 / 24 Description The pump consist of the following parts: • Robust aluminium casing with a mounting to fix it onto the Probst stand. • Two 12 Volt diaphragm pumps. • Main switch – on / off function – using the main switch you can switch the pump on or off. By switching it off, the suction lead is automatically ventilated. -
Page 61: Maintenance
Vacuum pump 24 / 24 Maintenance The pump is basically maintenance-free. All necessary spare parts are available for the vacuum pump. Repaires should be only carried out by authorized experts. Disconnect from the mains before starting any repairs. The diaphragms are the parts which will wear out first. When replacing the diaphragms, the valves and the seals should also be replaced. - Page 62 After each completed performance of a maintenance interval the included form must be fill out, stamped, signed and send back to us immediately 1) via e-mail to service@probst-handling.de / via fax or post Operator: _ _ _ _ _ _ _ _ _ _ _ _ _ _ _ _ _...
- Page 65 Instructions d'emploi Traduction des instructions d'emploi originales VAKUUM-POWER-HANDY VPH-150-GREENLINE VPH-150-GREENLINE 52710008/52710009...
- Page 66 Description: 2 / 24 Sommaire CE-Déclaration de Conformité ..........................4 Sécurité ................................... 5 Instructions de sécurité ..........................5 Définitions des termes ........................... 5 Définition du personnel qualifié / expert ....................... 5 Signalisation de sécurité..........................6 Mesures de sécurité personnelle ........................7 Equipment de protection ..........................
- Page 67 Élimination des dérangements ........................19 Réparations ..............................20 Devoir de contrôle ............................20 Informations concernant la plaque signalétique ..................21 Remarque concernant la location/le prêt des engins PROBST ..............21 Pompe à vide ................................ 22 Généralités ..............................22 Consignes de sécurité ........................... 22 Description ..............................
-
Page 68: Ce-Déclaration De Conformité
DIN EN 60204-1 (IEC 60204-1) Sûreté de machines, équipement électrique de machines industrielles. Partie 1: E xigences générales. Personne autorise pour EC-documentation: Nom: J. Holderied Adresse: Probst GmbH; Gottlieb-Daimler-Straße 6; 71729 Erdmannhausen, Germany Signature, informations ou signataire: Erdmannhausen,07.01.2021................(Eric Wilhelm, Gérant) 52710008/52710009... -
Page 69: Sécurité
Sécurité 5 / 24 Sécurité Instructions de sécurité Danger mortel ! Indique un danger. Si elle n'est pas évitée, elle peut entraîner la mort et des blessures graves. Situation dangereuse ! Indique une situation dangereuse. Le fait de ne pas l'éviter peut entraîner des blessures ou des dommages matériels. -
Page 70: Signalisation De Sécurité
2904.0688 146 x 85 INSTRUCTIONS DE FONCTIONNEMENT Symbole Signification Réf. Taille Charge maximale de la platine d’aspiration (VPH-100) 2904.0575 80 x 40 mm Charge maximale de la platine d’aspiration (VPH-150) 2904.0207 80 x 35 mm 200 x 50 Autocollant avec désignation de l’appareil 2904.0129... -
Page 71: Mesures De Sécurité Personnelle
Sécurité 7 / 24 Mesures de sécurité personnelle • Chaque opérateur doit avoir lu et assimilé la notice d’instructions de l’appareil, ainsi que les règles de sécurité. • L'appareil et tous les appareils sur et dans lesquels l'appareil est monté ne peuvent être utilisés que par des personnes dûment mandatées, qualifiées et habilitées. -
Page 72: Essai De Fonctionnement Et Inspection Visuelle
Sécurité 8 / 24 • Pendant le fonctionnement de l’engin, le stationnement de personnes dans la zone de travail est interdit ! À moins qu’il ne soit indispensable. En raison de la nature de l’utilisation de l’appareil, comme le guidage manuel de l’appareil (sur les poignées). -
Page 73: Généralités
Généralités 9 / 24 Généralités Utilisation conforme L’appareil „VAKKUM-POWER-HANDY VPH“ est exclusivement conçu pour soulever, transporter à proximité du sol et poser les dalles en pierre naturelle ou en béton, les pavés grand format, les pavés drainants, les marches-blocs ainsi que le carrelage. - Page 74 Les platines d’aspiration standard ne sont pas adaptées pour transporter des vitres! Seules peuvent être utilisées les platines d’aspiration du fabricant PROBST ! Utilisez uniquement les plaques aspirantes adaptées à l’appareil ! N'excédez pas la charge admise des plaques aspirantes ! Danger: tomber de la charge (dalle) ! NON AUTORISÉ...
-
Page 75: Vue D´ensemble Et Structure
Généralités 11 / 24 Vue d´ensemble et structure Poignée Anneau de fixation Câble adaptateur pour accu avec pinces 4. Pompe à vide Manomètre 6. Filtre d'aspiration Coffre à chaînes 8. Platine d'aspiration 9. Jeu de roues VPH-RS, l’appareil peut être manoeuvré par une seule personne (option) 10. -
Page 76: Installation
Installation Montage sur l’appareil porteur N’utiliser que des accessoires Probst d’origine, en cas de doute prendre contact avec le fabricant. La charge admissible de l’appareil porteur /engin de levage ne doit pas être dépassée par la charge de l’appareil et des appareils rapportés (moteur vireur, poches à emboîter, etc.) ainsi que par la charge supplémentaire des objets à... -
Page 77: Montage Du Jeu De Roues Vph-Rs
Installation 13 / 24 Montage du jeu de roues VPH-RS Montage de la butée réglable en hauteur VPH-RS-AS 52710008/52710009... -
Page 78: Réglage
Réglage 14 / 24 Réglage Réglage de l’appareil VPH et des accessoires 52710008/52710009... -
Page 79: Maniement
Maniement 15 / 24 Maniement Eléments de commande Interrupteur principal - MARCHE/ARRET - l'interrupteur principal permet d'allumer ou d'éteindre la pompe. Attention ! La conduite d'aspiration est purgée automatiquement en cas de mise hors tension. Description des autres éléments de commande : voir annexe, notice d'instructions de la pompe à membrane ! Pour aspirer et déposer la charge : Interrupteur principal MARCHE aspirer et tenir une charge... -
Page 80: Aspirer, Transporter Et Poser La Charge (Engins De Levage)
Maniement 16 / 24 Aspirer, transporter et poser la charge (engins de levage) Positionner l'appareil directement au-dessus de la charge. Eviter de tirer une charge inclinée, veiller à une bonne répartition de la charge. Poser l'appareil sur la charge. Mettre l'appareil en marche avec l'interrupteur principal MARCHE/ARRET. 4. -
Page 81: Aspirer, Transporter Et Poser La Charge (Opération Manuelle)
Maniement 17 / 24 Aspirer, transporter et poser la charge (opération manuelle) Positionner l'appareil directement au-dessus de la charge. Eviter de tirer une charge inclinée, veiller à une bonne répartition de la charge. Poser l'appareil sur la charge. Mettre l'appareil en marche avec l'interrupteur principal MARCHE/ARRET. 4. -
Page 82: Dommages À La Plaque Aspirante
Maintenance et entretien 18 / 24 Dommages à la plaque aspirante Risque de blessure ! Danger de chute de charge due à un joint en caoutchouc endommagé ! Pour éviter d'endommager (fissures, abrasion du matériau) le joint en caoutchouc de la plaque d'aspiration, il faut respecter les points suivants : •... -
Page 83: Platine D'aspiration
Maintenance et entretien 19 / 24 Platine d'aspiration • Nettoyer la platine d'aspiration au moins une fois par jour, pour enlever les objets collés, les salissures et la poussière. • (Le cas échéant : essuyer la rainure du joint avec un chiffon et/ou nettoyer à l’air comprimé). •... -
Page 84: Réparations
• Observer les prescriptions correspondantes des associations professionnelles déclaration de conformité. • Le contrôle expert peut également être effectué par le fabricant Probst GmbH. Contactez-nous à : service@probst-handling.de • Lorsqu’un contrôle a été effectué et que les déficiences ont été réparées sur l´appareil, nous conseillons d’apposer la plaquette „CONTRÔLE DE SÉCURITÉ“... -
Page 85: Informations Concernant La Plaque Signalétique
Exemple: Remarque concernant la location/le prêt des engins PROBST Lors de chaque location/prêt d’un engin PROBST, les instructions d’emploi originales correspondantes doivent impérativement être jointes (si la langue n’est pas celle de l’utilisateur, une traduction des instructions d’emploi originales dans la langue adéquate doit être fournie) ! -
Page 86: Pompe À Vide
Pompe à vide 22 / 24 Pompe à vide Généralités La pompe à vide est équipée d'un accu au plomb 12 volts 6,5 Ah. La pompe est alimentée par l'accu au plomb intégré. Un système de contrôle du niveau de charge permet de vérifier le niveau de charge de l'accu au plomb. Consignes de sécurité... -
Page 87: Description
23 / 24 Description L'appareil est principalement composé des éléments suivants : • Boîtier robuste en aluminium, pouvant être fixé sur le support Probst. • Deux pompes à membrane 12 volts. • Interrupteur principal - fonction marche/arrêt - l'interrupteur principal permet d'allumer ou d'éteindre la pompe, la conduite d'aspiration est purgée automatiquement lors de la mise hors tension. -
Page 88: Maintenance
Pompe à vide 24 / 24 Maintenance L'appareil ne nécessite aucune maintenance. Toutes les pièces de rechange nécessaires pour réparer la pompe à vide sont disponibles. Les réparations doivent être réalisées par une entreprise qualifiée. Couper l'alimentation électrique avant le début des réparations. La membrane est la principale pièce d'usure. - Page 89 (par un atelier spécialisé et autorisé) ! Après la réalisation de travaux de maintenance périodiques, il faudra nous transmettre sans délai la présente attestation de maintenance (signée et revêtue de votre cachet) 1) par email à: service@probst-handling.de / par fax ou par courier. Opéateur: _ _ _ _ _ _ _ _ _ _ _ _ _ _ _ _ _ Modèle:...
- Page 93 Instrucciones de funcionamiento Traducción de las instrucciones de funcionamiento originales VAKUUM-POWER-HANDY VPH-150-GREENLINE VPH-150-GREENLINE 52710008/52710009...
- Page 94 Indicación: 2 / 25 Índice Declaración de conformidad CE ..........................4 Seguridad................................5 Instrucciones de seguridad ..........................5 Definiciones de términos..........................5 Definición de personal cualificado / experto ....................5 Señalización de seguridad ..........................6 Medidas de seguridad personales ......................... 7 Equipamiento de protección ..........................
- Page 95 Solución de problemas ..........................20 Reparaciones ..............................21 Obligación de comprobación ........................21 Observación sobre la placa tipo ........................22 Observación para el alquiler de aparatos PROBST ..................22 Bomba de vacío ..............................23 Generalidades ............................... 23 Indicaciones de seguridad ..........................23 Descripción ..............................
-
Page 96: Declaración De Conformidad Ce
DIN EN 60204-1 (IEC 60204-1) Seguridad de máquinas, equipos eléctricos de máquinas industriales. Parte 1: R equisitos generales. Persona autoriza por documentación: Nombre: J. Holderied Dirección: Probst GmbH; Gottlieb-Daimler-Straße 6; 71729 Erdmannhausen, Germany Firma, datos del firmante: Erdmannhausen,07.01.2021................. (Eric Wilhelm, Encargado) 52710008/52710009... -
Page 97: Seguridad
Seguridad 5 / 25 Seguridad Instrucciones de seguridad ¡Peligro mortal! Indica un peligro. Si no se evita, el resultado es la muerte y lesiones graves. ¡Situación peligrosa! Indica una situación peligrosa. Si no se evita, se pueden producir lesiones o daños a la propiedad. ¡Prohibición! Denota una prohibición. -
Page 98: Señalización De Seguridad
ADVERTENCIAS PARA EL MANEJO Símbolo Significado Nº de pedido Tamaño La capacidad de carga máxima de la placa de succión (VPH-100) 2904.0575 80 x 40 mm La capacidad de carga máxima de la placa de succión (VPH-150) 2904.0207 80 x 35 mm 200 x 50 Pegatina con la designación del dispositivo... -
Page 99: Medidas De Seguridad Personales
Seguridad 7 / 25 Medidas de seguridad personales • Únicamente debe manejar el aparato y todos los aparatos de orden superior en los que esté incorporado el aparato, el personal autorizado para ello que esté en posesión de las cualificaciones y los certificados necesarios. -
Page 100: Examen Visual Y Comprobación Del Funcionamiento
Seguridad 8 / 25 • Está prohibido que las personas permanezcan en el área de trabajo durante la operación! A menos que sea absolutamente necesario. Debido a la forma en que se utiliza la unidad, por ejemplo, guiando manualmente la unidad (en las asas). •... -
Page 101: Generalidades
Generalidades 9 / 25 Generalidades Empleo conforme al uso previsto El dispositivo "VAKKUM-POWER-HANDY VPH" se utiliza exclusivamente para levantar, transportar y colocar placas de piedra natural y hormigón, grandes adoquines, piedras de juntas de drenaje, escalones de bloque y baldosas cerca del suelo. - Page 102 Las placas de aspiración estándar no son apropiadas para el transporte de vidrios. Solamente se pueden utilizar placas de aspiración del fabricante PROBST!!! • Algunas de las placas de aspiración que se pueden montar en el aparato reducen su capacidad portante.
-
Page 103: Resumen Y Estructura
Generalidades 11 / 25 Resumen y estructura Manejar Ojo de suspensión Cable adaptador de batería con pinzas Bomba de vacío El quinto medidor de presión 6. Filtro de aire Caso de la cadena 8. Placa de succión 9. El juego de ruedas VPH-RS, permite la operación por una persona (opcional) 10. -
Page 104: Instalación
Instalación Montaje mecánico Utilice únicamente accesorios originales de Probst. En caso de duda, consulte al fabricante. La capacidad de carga del portador / polipasto no puede ser excedida por la carga del dispositivo, los accesorios (motor de torsión, bolsas de inserción, etc.) y la carga adicional del material de agarre. -
Page 105: Montar El Juego De Ruedas Vph-Rs
Instalación 13 / 25 Montar el juego de ruedas VPH-RS Montaje Tope de altura ajustable VPH-RS-AS 52710008/52710009... -
Page 106: Trabajos De Ajuste
Trabajos de ajuste 14 / 25 Trabajos de ajuste Ajustar el VPH y los accesorios 52710008/52710009... -
Page 107: Manejo
Manejo 15 / 25 Manejo Elementos de operación Interruptor principal - ON/OFF - con el interruptor principal puedes encender o apagar la bomba. ¡Atención! Al apagarse, la línea de succión se ventila automáticamente. Para la descripción de otros elementos de manejo, véase el apéndice de las instrucciones de manejo de la bomba de membrana de batería! Para la succión y liberación de la carga: Interruptor principal ON = succión de carga... -
Page 108: Recoger, Transportar Y Colocar (Operación De Elevación)
Manejo 16 / 25 Recoger, transportar y colocar (operación de elevación) Cuando se utiliza el dispositivo en la operación de elevación, la cadena de sujeción de la carga debe ser utilizada en cualquier caso! Coloca el dispositivo directamente sobre la carga. Evita tirar en ángulo y asegúrate de que la distribución de la carga sea uniforme. -
Page 109: Recoger, Transportar Y Colocar (Operación Manual)
Manejo 17 / 25 Recoger, transportar y colocar (operación manual) Coloca el dispositivo directamente sobre la carga. Evita tirar en ángulo y asegúrate de que la distribución de la carga sea uniforme. Coloca el dispositivo en la carga. Encienda la unidad con el interruptor principal ON/OFF. 4. -
Page 110: Daños En La Placa De Succión
Mantenimiento y conservación 18 / 25 Daños en la placa de succión ¡Peligro de lesiones! ¡Peligro por la caída de la carga debido a un sello de goma dañado! Para evitar daños (grietas, abrasión del material) en la junta de goma de la placa de succión, se debe observar lo siguiente: •... -
Page 111: Mecánica
Mantenimiento y conservación 19 / 25 7.1.1 Mecánica PERÍODO DE Trabajo a realizar MANTENIMIENTO • Inspección inicial después Compruebe o vuelva a apretar todos los tornillos de fijación (sólo puede hacerlo una persona cualificada). 25 horas de funcionamiento • Cada 50 horas de Vuelva a apretar todos los tornillos de fijación (asegúrese de que los tornillos se funcionamiento aprietan de acuerdo con los pares de apriete válidos de las clases de resistencia... -
Page 112: Solución De Problemas
Mantenimiento y conservación 20 / 25 Solución de problemas Error Porque Remedio No se ha alcanzado la presión La pieza de trabajo tiene grietas, La pieza de trabajo no es adecuada para la succión negativa de -0,5 bar hendiduras o es porosa con este dispositivo La gomaespuma está... -
Page 113: Reparaciones
(véase la norma DGUV 1-54 y la regla DGUV 100-500). • ¡Deben observarse las disposiciones correspondientes de la declaración de conformidad! • El fabricante Probst GmbH puede encargarse de realizar la inspección pericial. Contáctenos a través de la siguiente dirección: service@probst-handling.de •... -
Page 114: Observación Sobre La Placa Tipo
Observación para el alquiler de aparatos PROBST Cada vez que se alquilen aparatos PROBST se debe suministrar siempre el manual de operación correspondiente original (en caso de ser en un idioma diferente al del país de uso, se debe suministrar la traducción correspondiente del manual de operación original)! -
Page 115: Bomba De Vacío
Descripción El aparato está compuesto principalmente como sigue: • Carcasa robusta de aluminio, con soporte angular para su fijación al pie Probst. • 2 bombas de membrana de 12 voltíos • Interruptor principal – función encendido/apagado – con el interruptor principal se puede encender o apagar la bomba, cuando se desconecta se ventila automaticamente la tubería de aspiración. -
Page 116: Cargar La Bateria
Bomba de vacío 24 / 25 • → Bateria sobrecargada LED amarilla más de 14,5 voltíos de tensión • → Normal LED verde 11,5 hasta 14,5 voltíos de tensión • LED rojo por debajo de 11,5 voltíos de tensión → Batería descargada En la parte inferior del aparato se encuentra una clavija, mediante la cual se puede cargar la bateria sin desmontarla. -
Page 117: Mantenimiento
Bomba de vacío 25 / 25 Mantenimiento Normalmente el aparato está libre de mantenimiento. Para la bomba de vacío se pueden conseguir todas las piezas de repuesto necesarias para su reparación. Las reparaciones solamente se deben realizar por una empresa experta autorizada. Antes de comenzar los trabajos de reparación, desconectar la corriente. - Page 118 (por un taller autorizado)! Después de cada intervalo de mantenimiento, este certificado de mantenimiento (con firma y sello) debe ser enviado de inmediato 1) por correo electrónico a: service@probst-handling.de / por fax o correo Operador: _ _ _ _ _ _ _ _ _ _ _ _ _ _ _ _ _ Aparato modelo: _ _ _ _ _ _ _ _ _ _ _ _ _ _ _ _ Articulo-Nr.:...
- Page 121 Bedrijfshandleiding Vertaling van de originele bedieningshandleiding VAKUUM-POWER-HANDY VPH-150-GREENLINE VPH-150-GREENLINE 52710008/52710009...
- Page 122 Benaming: 2 / 24 Inhoud CE - Conformiteitsverklaring ..........................4 Veiligheid ................................5 Veiligheidsinstructies ............................5 Definities van termen ............................. 5 Definitie van gekwalificeerd personeel / deskundige ................... 5 Veiligheidsaanduidingen ..........................6 Persoonlijke veiligheidsmaatregelen ......................7 Beschermende uitrusting ..........................7 Ongevallenpreventie ............................
- Page 123 Zuigplaten / Reiniging ........................... 19 Problemen oplossen ............................. 19 Reparaties ..............................20 Controleplicht ............................... 20 Instructie m.b.t. het typeplaatje ........................21 Instructie m.b.t. verhuur/uitlenen van PROBST apparaten ................. 21 Vacuümpomp ............................... 22 Algemeen ..............................22 Veiligheidsinstructies ............................ 22 Beschrijving ..............................23 8.3.1...
-
Page 124: Ce - Conformiteitsverklaring
DIN EN 60204-1 (IEC 60204-1) Veiligheid van machines, elektrische uitrusting van industriële machines. Deel 1: Algemene aanvrage. Autoriseerde persoon voor EC-dokumentatie: Naam: J. Holderied Adres: Probst GmbH; Gottlieb-Daimler-Straße 6; 71729 Erdmannhausen, Germany Handtekening, gegevens over ondertekenaar: Erdmannhausen,07.01.2021................(Eric Wilhelm, directeur) -
Page 125: Veiligheid
Veiligheid 5 / 24 Veiligheid Veiligheidsinstructies Sterfelijk gevaar! Geeft een gevaar aan. Als dit niet wordt vermeden, zijn de dood en ernstige verwondingen het gevolg. Gevaarlijke situatie! Geeft een gevaarlijke situatie aan. Als dit niet wordt vermeden, kan dit leiden tot letsel of schade aan eigendommen. -
Page 126: Veiligheidsaanduidingen
Lastkettingen mogen nooit los onder de last hangen! 2904.0688 146 x 85 BEDIENINGSINSTRUCTIES Symbool Betekenis Bestelnummer: Formaat: Maximaal draagvermogen van de zuigplaat (VPH-100) 2904.0575 80 x 40 mm Maximaal draagvermogen van de zuigplaat (VPH-150) 2904.0207 80 x 35 mm 200 x 50 Sticker met apparaataanduiding 2904.0129... -
Page 127: Persoonlijke Veiligheidsmaatregelen
Veiligheid 7 / 24 Persoonlijke veiligheidsmaatregelen • Elk persoon die het apaparaat bedient moet van tevoren de bedieningshandleiding voor de Easy Clean met de veiligheidsvoorschriften hebben gelezen en begrepen. • Het apparaat en alle daarmee verbonden apparaten die in het appraat in/aangebouwd zijn, mogen enkel door door personeel worden bediend die hiervoor gekwalificeerd en gecertificeerd zijn. -
Page 128: Functionele En Visuele Controle
Veiligheid 8 / 24 • Het is verboden voor personen om tijdens het werk in het werkgebied te verblijven! Tenzij het absoluut noodzakelijk is. Door de manier waarop het apparaat wordt gebruikt, bijvoorbeeld door het apparaat handmatig te geleiden (op de handgrepen). •... -
Page 129: Algemeen
Algemeen 9 / 24 Algemeen Gebruik volgens de voorschriften Het apparaat "VAKKUM-POWER-HANDY VPH" wordt uitsluitend gebruikt voor het tillen, transporteren en leggen van natuursteen en betonplaten, grote straatstenen, drainagevoegstenen, bloktreden en tegels dicht bij de grond. De te hijsen goederen mogen geen poreuze oppervlakken hebben. De unit is voorzien van een ophangoog voor kraanhaken. - Page 130 • Standaardzuigplaten zijn niet geschikt voor het transport van glasruiten! Er mogen uitsluitend zuigplaten van fabrikant PROBST worden gebruikt! Sommige van de zuigplaten die aan het apparaat kunnen worden gemonteerd, reduceren de draagkracht ervan. Op iedere zuigplaat staat de toegestane draaglast aangegeven.
-
Page 131: Overzicht En Opbouw
Algemeen 11 / 24 Overzicht en opbouw Handvat Ophangoog Batterijadapterkabel met klemmen 4. Vacuümpomp Manometer 6. Luchtfilter Kettingkast 8. Zuigplaat 9. Wielstel VPH-RS, maakt bediening door één persoon mogelijk (optioneel) 10. Stop voor wielset VPH-RS-AS, voor groot formaat tegels (optioneel) Technische gegevens Belastbaarheid/WLL [kg] bij 0,5 bar vacuüm Dood gewicht [kg]... -
Page 132: Installatie
Installatie Mechanische montage Gebruik alleen origineel Probst-toebehoren en overleg bij twijfel met de fabrikant. Het draagvermogen van het draagapparaat/hefgereedschap mag niet door de last van het apparaat, de aangebouwde machines (roterende motor, insteektassen, etc.) en de extra last van de grijpgoederen... -
Page 133: Montage Van Het Vph-Rs-Wielstel
Installatie 13 / 24 Montage van het VPH-RS-wielstel Montage In hoogte verstelbare stop VPH-RS-AS 52710008/52710009... -
Page 134: Afstelwerkzaamheden
Afstelwerkzaamheden 14 / 24 Afstelwerkzaamheden Instellen van de VPH en accessoires 52710008/52710009... -
Page 135: Bediening
Bediening 15 / 24 Bediening Bedieningselementen Hoofdschakelaar - ON/OFF - met de hoofdschakelaar kunt u de pomp in- of uitschakelen. Let op! Bij het uitschakelen wordt de zuigleiding automatisch ontlucht. Zie voor de beschrijving van de overige bedieningselementen de bijlage Bedieningshandleiding accu- membraanpomp! Voor het aanzuigen en loslaten van de lading: Hoofdschakelaar AAN = lastafzuiging, vasthouden... -
Page 136: Hijsen, Transporteren En Leggen (Hijswerk)
Bediening 16 / 24 Hijsen, transporteren en leggen (hijswerk) Bij gebruik van het apparaat in het hijswerk moet in ieder geval de ketting voor het vastzetten van de lading worden gebruikt! Plaats het apparaat direct boven de lading. Vermijd het trekken onder een hoek en zorg voor een gelijkmatige verdeling van de belasting. -
Page 137: Ophalen, Transporteren En Leggen (Manuele Bediening)
Bediening 17 / 24 Ophalen, transporteren en leggen (manuele bediening) Plaats het apparaat direct boven de lading. Vermijd het trekken onder een hoek en zorg voor een gelijkmatige verdeling van de belasting. Plaats het apparaat op de lading. Schakel het apparaat in met de hoofdschakelaar AAN/UIT. 4. -
Page 138: Beschadiging Van De Zuigerplaat
Onderhoud en verzorging 18 / 24 Beschadiging van de zuigerplaat Gevaar voor letsel! Gevaar voor vallende lading door beschadigde rubberen afdichting! Om beschadigingen (scheuren, slijtage van het materiaal) aan de rubberen afdichting van de zuigerplaat te voorkomen, moet het volgende in acht worden genomen: •... -
Page 139: Zuigplaten / Reiniging
Onderhoud en verzorging 19 / 24 Zuigplaten / Reiniging • Maak de afzuigplaat ten minste eenmaal per dag schoon van vastzittende voorwerpen, vuil en stof. Reinig het sponsrubber met perslucht en/of waterstraal. • (Indien beschikbaar: Veeg de groef in de afdichtingslip af met een doek en/of blaas deze uit met perslucht). •... -
Page 140: Reparaties
• De desbetreffende wettelijke bepalingen en de bepalingen van de conformiteitsverklaring dienen in acht te worden genomen! • De keuring door een deskundige kan ook door de fabrikant Probst GmbH worden gedaan. Neem contact met ons op via: service@probst-handling.de •... -
Page 141: Instructie M.b.t. Het Typeplaatje
Voorbeeld: Instructie m.b.t. verhuur/uitlenen van PROBST apparaten Bij iedere uitlening/verhuur van PROBST apparaten moet absoluut de daarbij horende originele handleiding worden meegeleverd (indien de taal van het land van de betreffende gebruiker afwijkt, dient bovendien de desbetreffende vertaling van de originele handleiding te worden meegeleverd)! -
Page 142: Vacuümpomp
Vacuümpomp 22 / 24 Vacuümpomp Algemeen Deze vacuümpomp is uitgerust met een loodaccumulator 12 Volt 6,5 Ah - de pomp wordt bediend met de ingebouwde loodaccumulator. Met een laadcontrolesysteem kunt u de laadstatus van de loodbatterij bekijken. Veiligheidsinstructies • De spanning moet overeenkomen met de specificaties op het typeplaatje van de vacuümpomp. •... -
Page 143: Beschrijving
23 / 24 Beschrijving Het apparaat bestaat in wezen uit het volgende beschreven: • robuuste aluminium behuizing, met hoekbeugel voor montage op Probst statieven. • twee stuks 12 Volt membraanpompen. • Hoofdschakelaar - Aan/uit-functie - met de hoofdschakelaar kunt u de pomp in- en uitschakelen. -
Page 144: Onderhoud
Vacuümpomp 24 / 24 Onderhoud Het apparaat is in principe onderhoudsvrij. Voor de vacuümpomp zijn alle benodigde reserveonderdelen voor reparatie beschikbaar. Reparaties mogen alleen worden uitgevoerd door een geautoriseerd gespecialiseerd bedrijf. Schakel de stroomtoevoer uit voordat u met de reparatiewerkzaamheden begint. Slijtdelen zijn in de eerste plaats het diafragma. - Page 145 Na iedere onderhoudsbeurt moet het onderhoudsblad (met handtekening en stempel) onmiddellijk aan ons doorgestuurd worden 1) per e-mail aan: service@ probst-handling.de / per fax of post Gebruiker: _ _ _ _ _ _ _ _ _ _ _ _ _ _ _ _ _ Apparaatype: _ _ _ _ _ _ _ _ _ _ _ _ _ _ _ _ Artikel-Nr.:...
- Page 149 Istruzioni d’uso Traduzione delle istruzioni originali di funzionamento VAKUUM-POWER-HANDY VPH-GREENLINE VPH-150-GREENLINE 52710008/52710009...
- Page 150 Descrizione: 2 / 24 Indice Certificato di conformita´norme CE ........................4 Sicurezza ................................. 5 Istruzioni di sicurezza ............................. 5 Definizioni dei termini ............................ 5 Definizione di personale qualificato / esperto ....................5 Segni di sicurezza ............................6 Misure di sicurezza personali ......................... 7 Equipaggiamento antinfortunistico .......................
- Page 151 Errori ................................19 Riparazioni ..............................20 Procedure di sicurezza ..........................20 Indicazioni per l’etichetta identificativa ....................... 21 Indicazioni per il noleggio/leasing di attrezzature PROBST ................ 21 Pompa a vuoto ..............................22 Generale ................................ 22 Istruzioni di sicurezza ........................... 22 Descrizione ..............................23 8.3.1...
-
Page 152: Certificato Di Conformita´norme Ce
DIN EN 60204-1 (IEC 60204-1) Sicurezza della macchina, impianto elettrico a norme Parte 1: R equisiti generali Persona autorizzata per CE-documentazione: Nome: J. Holderied Indirizzo: Probst GmbH; Gottlieb-Daimler-Straße 6; 71729 Erdmannhausen, Germany Firma, dati del sottoscrivente: Erdmannhausen,07.01.2021................. (Eric Wilhelm, direzione) 52710008/52710009... -
Page 153: Sicurezza
Sicurezza 5 / 24 Sicurezza Istruzioni di sicurezza Pericolo per la vita! Indica un pericolo. Se non viene evitato, il risultato è la morte e le lesioni gravi. Situazione pericolosa! Indica una situazione di pericolo. Se non viene evitato, possono verificarsi lesioni o danni alle cose. Proibizione! Denota un divieto. -
Page 154: Segni Di Sicurezza
146 x 85 ISTRUZIONI PER L'USO Simbolo Significato Nr° Articolo: Dimensioni: Capacità di carico massima della piastra di aspirazione (VPH-100) 29040575 80 x 40 mm Capacità di carico massima della piastra di aspirazione (VPH-150) 29040207 80 x 35 mm 200 x 50... -
Page 155: Misure Di Sicurezza Personali
Sicurezza 7 / 24 Misure di sicurezza personali • Tutti gli operatori devono aver letto e compreso le istruzioni d’uso. • Solo apersonale qualificato ed autorizzato è concesso l’utilizzo del dispositivo e delle component collegate (dispositivo di sollevamento). • La guida manual è consentita solo su dispositive con maniglie. Altrimenti c'è... -
Page 156: Controllo Funzionale E Visivo
Sicurezza 8 / 24 • È vietata la presenza di persone nella zona di lavoro durante il funzionamento! A meno che non sia indispensabile. A causa del tipo di applicazione del dispositivo, ad esempio la guida manuale del dispositivo (su maniglie). •... -
Page 157: Aspetti Generali
Aspetti generali 9 / 24 Aspetti generali Uso autorizzato Il dispositivo "VACUUM-POWER-HANDY VPH-150-GREENLINE " è utilizzato esclusivamente per il sollevamento, il trasporto e la posa di lastre di pietra naturale e di calcestruzzo, grandi pavimentazioni, pietre per giunti di drenaggio, gradini in blocchi e piastrelle vicino al terreno. - Page 158 • I piatti di aspirazione standard non sono adatti per il trasporto di lastre in vetro! Si possono utilizzare solamente piatti prodotti da Probst!!! • Alcuni piatti d’aspirazione che possono essere montati sui dispositivi, possono ridurre la capacità di portata.
-
Page 159: Panoramica E Struttura
Aspetti generali 11 / 24 Panoramica e struttura maniglia occhio di sospensione cavo adattatore della batteria con morsetti 4. pompa a vuoto manometro 6. filtro dell'aria scatola della catena 8. piastra di aspirazione 9. set di ruote VPH-RS, consente il funzionamento da parte di una sola persona (opzionale) 10. -
Page 160: Montaggio
Montaggio 12 / 24 Montaggio Connessione meccanica Utilizare solamente accessori originali, in caso di dubbio contattar eil produttore. La capacità di portata/portata massima del dispositivo di sollevamento non deve essere superata. Tenere in considerazione sempre il peso del carico, della pinza di sollevamento e del dispositivo di aggancio. I dispositivi di presa devono sempre essere fissati in modo da poter oscillare liberamente in qualsiasi posizione. -
Page 161: Montaggio Del Set Di Ruote Vph-Rs
Montaggio 13 / 24 Montaggio del set di ruote VPH-RS Montaggio Fermo regolabile in altezza VPH-RS-AS 52710008/52710009... -
Page 162: Regolazioni
Regolazioni 14 / 24 Regolazioni Regolazione del VPH e degli accessori 52710008/52710009... -
Page 163: Funzionamento
Funzionamento 15 / 24 Funzionamento Elementi operativi Interruttore principale - ON/OFF - con l'interruttore principale è possibile accendere o spegnere la pompa. Attenzione: quando si spegne, il tubo di aspirazione viene automaticamente sfiatato. Per la descrizione di altri elementi di funzionamento, vedere l'appendice delle istruzioni per l'uso della pompa a membrana con accumulatore! Per l'aspirazione e il rilascio del carico: Interruttore principale... -
Page 164: Raccolta, Trasporto E Posa (Operazione Di Sollevamento)
Funzionamento 16 / 24 Raccolta, trasporto e posa (operazione di sollevamento) Quando si utilizza l'apparecchio in funzione di paranco, la catena di sicurezza del carico deve essere utilizzata in ogni caso! Posizionare il dispositivo direttamente sopra il carico. Evitare di tirare ad angolo e assicurare una distribuzione uniforme del carico. -
Page 165: Raccolta, Trasporto E Posa (Operazione Manuale)
Funzionamento 17 / 24 Attenzione: quando si spegne, la linea di aspirazione viene automaticamente sfiatata e quindi il vuoto si riduce. Tenere sempre i piedi fuori dalla zona di pericolo! Raccolta, trasporto e posa (operazione manuale) Posizionare il dispositivo direttamente sopra il carico. Evitare di tirare ad angolo e assicurare una distribuzione uniforme del carico. -
Page 166: Danni Alla Piastra Di Aspirazione
Cura e manutenzione 18 / 24 Danni alla piastra di aspirazione Pericolo di lesioni! Pericolo di caduta del carico a causa di una guarnizione di gomma danneggiata! Per evitare danni (crepe, abrasione del materiale) alla guarnizione in gomma della piastra di aspirazione, è necessario osservare quanto segue: •... -
Page 167: Piastre Di Aspirazione / Pulizia
Cura e manutenzione 19 / 24 Piastre di aspirazione / Pulizia • Pulire la piastra di aspirazione almeno una volta al giorno da oggetti aderenti, sporco e polvere. Pulire la gomma spugna con aria compressa e/o getto d'acqua. • (Se presente: Pulire la scanalatura del labbro di tenuta con un panno e/o soffiare con aria compressa). •... -
Page 168: Riparazioni
• Rispettare le disposizioni previste in materia dalle norme CE indicate nel certificato di conformità!! • L'ispezione peritale può essere eseguita anche dal produttore Probst GmbH. Contattateci all'indirizzo: service@probst-handling.de • Dopo l'esecuzione del controllo e l'eliminazione delle anomalie riscontrate sull'apparecchio raccomandiamo di applicare in un punto ben visibile la targhetta “Sachkundigenprüfung / Expert... -
Page 169: Indicazioni Per L'etichetta Identificativa
Esempio: Indicazioni per il noleggio/leasing di attrezzature PROBST Ad ogni noleggio/leasing delle attrezzature PROBST è obbligatorio includere le istruzioni d’uso originali (a seconda della lingua del paese dell’utilizzatore, verrà fornita in aggiunta la traduzione delle istruzioni d’uso originali)! -
Page 170: Pompa A Vuoto
Pompa a vuoto 22 / 24 Pompa a vuoto Generale Questa pompa per vuoto è dotata di una batteria al piombo 12 Volt 6,5 Ah. La pompa funziona con la batteria al piombo incorporata. Lo stato di carica della batteria al piombo può essere rilevato mediante un sistema di controllo della carica. Istruzioni di sicurezza •... -
Page 171: Descrizione
23 / 24 Descrizione Il dispositivo è costituito essenzialmente come descritto di seguito: • Robusta custodia in alluminio, con staffa angolare per il montaggio su stativi Probst. • due pompe a membrana a 12 volt. • Interruttore principale - funzione On/Off - con l'interruttore principale è possibile accendere e spegnere la pompa. -
Page 172: Manutenzione
Pompa a vuoto 24 / 24 Manutenzione Fondamentalmente, l'apparecchio non necessita di manutenzione. Tutti i pezzi di ricambio necessari per la pompa per vuoto sono disponibili per la riparazione. Le riparazioni devono essere effettuate esclusivamente da un'azienda specializzata autorizzata. Scollegare l'alimentazione prima di iniziare i lavori di riparazione. Le parti soggette ad usura sono principalmente i diaframmi. - Page 173 (presso un officina specializzata). Dopo ogni intervento di manutenzione il seguente modulo deve essere compilato, timbrato e firmato e spedito a noi immediatamente 1) via e-mail a: service@probst-handling.de / via fax o post Operatore: _ _ _ _ _ _ _ _ _ _ _ _ _ _ _ _ _ Modello apparecchio: _ _ _ _ _ _ _ _ _ _ _ _ _ _ Articolo N.:...
- Page 174 Optionales Zubehör Optional accessories AutomAtiklAder AL 800 Art.-Nr.: 2420.0004 www.h-tronic.de...
- Page 175 iNhAlt Bedienungsanleitung Gebruiksaanwijzing 1. Bestimmungsgemäßer Einsatz ..4 1. Gebruik ......... 35 2. Allgemeine Sicherheitshinweise ... 4 2. Gebruiksvoorwaarden ....36 3. Gefahren ......... 7 3. Veiligheidsopmerkingen .... 38 4. Vorbereitungen ......8 4. Voor de ingebruikname .... 38 5. Störungshinweise ....... 9 5.
- Page 176 AutomAtiklAder AL 800 dAS i-u-lAdepriNzip lädt deN BleiAkku zu Beginn mit Konstantstrom von 800 mA bis die Ladeschluss-Spannung für den entsprechenden Akku erreicht wird. Das Ladegerät erkennt dies, schaltet auf Konstant-Spannung um und regelt den Ladestrom zurück (Erhaltungsla- defunktion). Die Akkuspannung wird dadurch immer auf einem optimalen Stand gehalten.
-
Page 177: Bestimmungsgemäßer Einsatz
WArN- uNd SicherheitShiNWeiSe Die besonderen Anweisungen, die den sicheren Betrieb dieses Gerätes betreffen, sind am Anfang der Bedienungsanweisung zusammengefasst. Bitte lesen Sie diese Bedienungsanleitung aufmerksam durch, sie enthält viele wichtige Infor- ma tionen für Bedienung und Betrieb. Der Gesetzgeber fordert, dass wir Ihnen wichtige Hinweise für Ihre Sicherheit geben und Sie darauf hinweisen, wie Sie Schäden an Personen, am Gerät und anderen Einrichtungen vermeiden. -
Page 178: Allgemeine Sicherheitshinweise
2. AllGemeiNe SicherheitShiNWeiSe Beim Umgang mit Produkten, die mit elektrischer Spannung in Berührung kom- men, müssen die gültigen VDE-Vorschriften beachtet werden, insbesondere VDE 0100, VDE 0550/0551, VDE 0700, VDE 0711 und VDE 0860. – Werkzeuge dürfen an Geräten, Bauteilen oder Baugruppen nur be nutzt wer- den, wenn sichergestellt ist, dass die Geräte von der Ver sor gungs span nung getrennt sind und elektrische Ladungen, die in den im Gerät befind li chen Bauteilen gespeichert sind, vorher entladen wurden. - Page 179 – Um Feuergefahr und die Gefahr eines elektrischen Schlages zu vermeiden, darf das Gerät weder Regen noch Feuchtigkeit ausgesetzt werden. – Es darf keine Flüssigkeit, gleich welcher Art in das Gerät eindringen. – Lüftungsschlitze bzw. Gehäuse niemals zudecken. – Stellen Sie das Gerät nicht in die Nähe von Warmluftquellen wie Heizungen oder ähnliches! –...
-
Page 180: Gefahren
AchtuNG! Das Gerät darf nur zum Laden von Blei-Gel, Blei-Vlies und Blei-Säure-Batterien verwendet werden. Nicht aufladbare Batterien können mit diesem Ladegerät nicht aufgeladen werden. Der Betrieb unter widrigen Umgebungsbedingungen ist unter allen Umständen zu vermeiden. Widrige Umgebungsbedingungen sind: – Umgebungstemperaturen unter –25 °C oder über +50 °C –... -
Page 181: Vorbereitungen
AchtuNG! Batteriesäure ist stark ätzend. Säurespritzer auf der Haut oder Kleidung sofort mit Seifenlauge behandeln und mit viel Wasser nachspülen. Sind Säurespritzer in das Auge gekommen, sofort mit viel Wasser spülen und umgehend einen Arzt aufsuchen. 4. VorBereituNGeN 1. Sorgen Sie während des Ladens für ausreichende Belüftung des Raumes. 2. - Page 182 die schützende Isolierung des Netz- oder Ladekabels beschädigt (gequetscht, eingerissen, abgerissen usw.) ist. Für im FAhrzeuG eiNGeBAute BAtterieN Stellen Sie zunächst sicher, dass alle Stromverbraucher des Fahrzeuges, wie z. B. Zündung, Radio, Licht, Telefon, Handyladegeräte usw. ausgeschaltet sind. Gegebenenfalls ist der Bleiakku auszubauen oder abzuklemmen. Ladegerät immer vom Netz trennen, bevor Verbindung zur Batterie geschlossen oder geöffnet werden.
-
Page 183: Ladeabschaltung
ANSchluSS uNd lAdeN eiNer Nicht im FAhrzeuG eiN GeBAuteN BAtterie: Schließen Sie die rote Ladeklemme an den Pluspol und die schwarze Ladeklemme an den Minuspol der Batterie an (vorher Ladespannung auswählen). Wenn Sie sich überzeugt haben, dass die Ladekabel polungsrichtig angeschlossen sind, stecken Sie das Netzkabel des Ladegerätes in eine intakte Steckdose, die auch den VDE-Bestimmungen entspricht. - Page 184 Auch die Ladezeit bis zum Erreichen der Ladeschlussspannung hängt von mehreren Parametern ab, wie z.B.: – der Kapazität (Ah, je größer desto länger die Ladezeit) – dem Akkutyp – dem Ladezustand des Akkus (Voll, teilgeladen oder leer), – der Umgebungstemperatur –...
-
Page 185: Allgemeine Hinweise Und Informationen
Wird der Akku versehentlich falsch gepolt an das Ladegerät angeschlossen, so wird dies durch eine rote LED „Verpolt“ signalisiert und gleichzeitig der Ladestrom abgeschaltet. 8. AllGemeiNe hiNWeiSe uNd iNFormAtioNeN reinigen Zum Reinigen des Gehäuses verwenden Sie ein weiches Tuch und etwas mildes Reinigungsmittel. -
Page 186: Hinweise Zum Umweltschutz
Wir behalten uns eine Reparatur, Nachbesserung, Ersatzlieferung oder Rück- erstattung des Kaufpreises vor. Kosten und Risiken des Transports; Montage und Demontageaufwand, sowie alle anderen Kosten die mit der Reparatur in Verbindung gebracht werden können, werden nicht ersetzt. Die Haftung für Folgeschaden aus fehlerhafter Funktion des Gerätes –... - Page 187 AutomAtic chArGer AL 800 the i-u-chArGiNG coNcept charges the lead-battery with constant current of 800 mA (0,8A) until the end of charge voltage is reached for the respective battery. The charger recognises this and switches to constant current in order to adjust the charging current down (Maintenance charger). The battery charger is therefore maintained at an ideal level.
-
Page 188: Intended Use
Warnings and safety instructions Before using this device, please carefully read this manual and follow the instructions in it. It contains important information for the safe operation of the unit. The law requires that this manual contains important information for your safety and describes how the unit can be used safely, avoiding damages to the unit and other installments. -
Page 189: Getting Started
device has been disconnected from the mains and that all electric charges, that have been stored within the components, are discharged. – Cables or leads connecting the device or connecting components within the device should be examined thoroughly for faults in the insulation. –... - Page 190 – Do not expose the device to rain or moisture to avoid a fire hazard and the danger of an electric shock. – Do not allow liquids of any kind to penetrate into the device. – Never cover the ventilation slots or housing. –...
-
Page 191: Danger
combustible gases, solvents, vapours, dust, air humidity above 80 % as well as wetness. – The device may only be used in dry and closed rooms. – Do not leave packaging lying around; It can become a dangerous toy for children. -
Page 192: Before Initial Operation
5. BeFore iNitiAl operAtioN – Before each initial operation, check the charger as well as its leads for damages. – Do not start using the device under any circumstances if the protecting insulation of the mains or charger leads is damaged (squashed, ripped down or ripped off). -
Page 193: Charging
Before charging batteries with liquid acid, open the closing plug of the individual cells. Air the battery case for 2 minutes so inflammable gases can volatilise. Check the liquid level when charging and, if necessary, refill it. In addition, check the liquid regularly in case of longer charging time (hibernation). Use safety goggles. -
Page 194: Disconnection Of Charging Process
7. diScoNNectioN oF chArGiNG proceSS The charger is provided with an automatic switch-off control that ends the charging process automatically once the charging end voltage is reached and switches automatically to the conservation-charging mode. The yellow charging display switches off in the conservation-charging mode or if the charge current falls under 80mA. -
Page 195: Warranty
Towards the end of the charging process (battery is full), the yellow LED “Charging” usually switches off. Older or high-capacity batteries may show an extremely high self-discharge (approx. 1% of the battery capacity) and the plug connector may not recognize this elevated conservation charge current as a completed charging cycle (yellow LED-display is not switched off). - Page 196 In case of the following criteria the warranty does not apply neither will we repair the product: – changing and own repairing of the product – changes of the switches – during the construction not planned outsourcing of components – destruction of the PCB and soldering spots –...
- Page 197 Diese Bedienungsanleitung ist eine Publikation der H-TRONIC GmbH, Industriegebiet Dienhof 11, 92242 Hirschau. Alle Rechte einschließlich Übersetzung vorbehalten. Reproduktionen jeder Art, z.B. Fotokopie, Mikroverfilmung oder die Erfassung in EDV-Anlagen, bedürfen der schriftlichen Genehmigung des Herausgebers. Nachdruck, auch auszugsweise, verboten. Diese Bedienungsanleitung entspricht dem technischen Stand bei Drucklegung und ist Bestandteil dieses Gerätes.
- Page 199 Accessori opzionali Automatico AL 800 No. articolo: 2420.0004 www.h-tronic.de...
- Page 200 Contenuto Istruzioni per l'uso 1. Uso previsto ........4 2. Istruzioni generali di sicurezza ..4 3. Pericoli7 4. Preparativi ........8 5. Risoluzione dei problemi ....9 6. Connessione e messa in funzione .. 9 7. Taglio di carica ......10 8.
-
Page 201: Dati Tecnici
Caricatore automatico AL 800 Il principio di carica I-U carica inizialmente la batteria al piombo-acido con una corrente costante di 800 mA fino al raggiungimento della tensione di fine carica della batteria corrispondente. Il caricatore lo rileva, passa alla tensione costante e regola di nuovo la corrente di carica (funzione di carica di mantenimento). -
Page 202: Uso Previsto
Avvertenze e istruzioni di sicurezza Le istruzioni speciali riguardanti il funzionamento sicuro di questo dispositivo sono riassunte all'inizio delle istruzioni per l'uso. Si prega di leggere attentamente queste istruzioni per l'uso, esse contengono molte informazioni importanti per il funzionamento e l'uso. La legge ri c hi e de che vi diamo informazioni importanti per la vostra sicurezza e vi indichiamo come Evitare danni alle persone, al dispositivo e ad altre apparecchiature. -
Page 203: Istruzioni Generali Di Sicurezza
2 Istruzioni generali di sicurezza Quando si maneggiano prodotti che entrano in contatto con la tensione elettrica, si devono osservare le norme VDE applicabili, in particolare VDE 0100, VDE 0550/0551, VDE 0700, VDE 0711 e VDE 0860. – Gli utensili possono essere utilizzati su dispositivi, componenti o gruppi solo se ci si assicura che i dispositivi siano scollegati dalla tensione di alimentazione e che le cariche elettriche immagazzinate nei componenti situati nel dispositivo siano state scaricate prima. - Page 204 – Per ridurre il rischio di incendio o di scossa elettrica, non esporre questo apparecchio alla pioggia o all'umidità. – Nessun l i q ui d o di qualsiasi tipo deve entrare nel dispositivo. – Non coprire mai le fessure di ventilazione o gli alloggiamenti. –...
-
Page 205: Pericoli7
Attenzione. Il dispositivo può essere utilizzato solo per caricare batterie piombo-gel, piombo-fleece e piombo-acido. Batterie non ricaricabili non può essere caricato con questo caricabatterie. Il funzionamento in condizioni ambientali avverse deve essere evitato in ogni caso. Le condizioni ambientali avverse sono: –... - Page 206 Attenzione. L'acido della batteria è altamente corrosivo. Trattare gli schizzi di acido sulla pelle o sui vestiti immediatamente con acqua saponata e risciacquare con abbondante acqua. Se gli schizzi di acido entrano negli occhi, sciacquare immediatamente con molta acqua e consultare immediatamente un medico.
- Page 207 l'isolamento protettivo del cavo di rete o di ricarica è danneggiato (schiacciato, strappato, strappato, ecc.). Per le batterie installate nel veicolo In primo luogo, assicuratevi che tutti i consumatori di energia del veicolo, come z. Per esempio, l'accensione, la radio, le luci, il telefono, il caricatore del cellulare ecc.
- Page 208 Collegamento e ricarica di una batteria non installata nel veicolo: Collegare il terminale di carica rosso al polo positivo e il terminale di carica nero al polo negativo della batteria (selezionare prima la tensione di carica). Quando siete sicuri che i cavi di ricarica sono collegati con la polarità corretta, inserite il cavo di alimentazione del caricabatterie in una presa che sia anche conforme al l e norme VDE.
- Page 209 Il tempo di carica fino al raggiungimento della tensione di carica finale dipende anche da diversi parametri, come ad esempio: – la capacità (Ah, più è grande più è lungo il tempo di ricarica) – il tipo di batteria – lo stato di carica della batteria (pieno, parzialmente carico o vuoto), –...
-
Page 210: Note E Informazioni Generali
Se la batteria viene accidentalmente collegata al caricabatterie con la polarità sbagliata, questo viene indicato da un LED rosso "Reverse polarity" e la corrente di carica viene interrotta allo stesso tempo. 8 Note e informazioni generali Pulire Per pulire l'alloggiamento, usate un panno morbido e un po' di detergente delicato. -
Page 211: Note Sulla Protezione Dell'ambiente
Ci riserviamo il diritto di riparare, rettificare, sostituire o rimborsare il prezzo di acquisto. I costi e i rischi di trasporto, le spese di montaggio e smontaggio, così come tutti gli altri costi che possono essere associati alla riparazione, non saranno rimborsati. - Page 212 Queste istruzioni per l'uso sono una pubblicazione di H-TRONIC GmbH, Industriegebiet Dienhof 11, 92242 Hirschau. Tutti i diritti riservati, compresa la traduzione. Riproduzioni di qualsiasi tipo, ad esempio fotocopie, microfilm o registrazioni in sistemi EDP, richiedono il permesso scritto dell'editore. La ristampa, anche di estratti, è proibita. Queste istruzioni per l'uso corrispondono allo stato tecnico al momento della stampa e sono parte integrante di questo apparecchio.
- Page 213 DICHIARAZIONE DI CONFORMITÀ Produttore: H-Tronic GmbH H-Tronic GmbH Titolare della licenza: Zona industriale Dienhof Indirizz 11 D-92242 Hirschau Dichiariamo sotto la nostra responsabilità che il prodotto: Caricatore AL Tipo di attrezzatura: 2243218 Numero d'ordine è conforme alle seguenti norme o documenti EN55014-1 : 2006 + A2:2011 EN55014-2 : 2015 EN61000-3-2: 2014...
- Page 214 Tragfähigkeit / Working Load Limit WLL: kg / Eigengewicht / Dead Weight: 19,3 kg / 42,5 Product Name: VACUUM-POWER-HANDY VPH-100 1420 / 1565 / 1710 © all rights reserved conform to ISO 16016 Datum Name Benennung Vakuum-Power-Handy VPH100 Erst. 26.4.2018 M.Wunder...
- Page 215 20540040 31600006 21600016 31600005 20540040 42710098 siehe separate Liste see separate list 42710001 42700109 siehe separate Liste see separate list © all rights reserved conform to ISO 16016 Datum Name Benennung Vakuum-Power-Handy VPH100 Erst. 26.4.2018 M.Wunder Gepr. 26.4.2018 M.Wunder mit 2-Mann Traggriff Artikelnummer/Zeichnungsnummer Blatt E52710009...
- Page 216 21000261 20000248 20000248 20100014 33503991 33503990 20100016 20100016 33503991 20000126 Bei Änderungen Rücksprache TB ! Gewicht: 3,2 kg Schutzvermerk nach DIN 34 beachten! Nachdruck nur mit unserer Genehmigung! Benennung Datum Name Kettenspeicher für VPH / MJ II Erst. 4.6.2012 Michael.Wunder Gepr.
- Page 217 25290008 21570004 42700110 42730004 © all rights reserved conform to ISO 16016 Datum Name Benennung Saugplatte VPH-SPS-HP-100-26/21 Erst. 25.4.2018 M.Wunder Gepr. 26.4.2018 M.Wunder mit HP-Dichtung Artikelnummer/Zeichnungsnummer Blatt E42700109 Zust. Urspr. Ers. f. Ers. d.
- Page 218 167,5 567,53 886,5 717,5 718,5 1436 Tragfähigkeit / Working Load Limit WLL: kg / Eigengewicht / Dead Weight: kg / Product Name: Wheel Set VPH-RS © all rights reserved conform to ISO 16016 Datum Name Benennung VPH-Mobil, Radsatz für VPH, Erst.
- Page 219 21070146 33506086 20400002 20000011 20100015 20400002 33506085 42710156 20540024 20400002 20000010 20100015 © all rights reserved conform to ISO 16016 20400002 Datum Name Benennung Anschlag für Radsatz VPH Erst. 16.5.2018 M.Wunder VPH-RS-AS Gepr. 17.5.2018 M.Wunder Artikelnummer/Zeichnungsnummer Blatt E42710154 Zust. Urspr. Ers.
- Page 220 29040767 Auf beiden Seiten / On both sides 29040690 Auf beiden Seiten / VPH-150 | 52710008: VPH-100 | 52710009: On both sides 29040207 29040575 P 22.10.2018_V2 1 / 1 Einige der Abbildungen sind möglicherweise optionales Zubehör des Gerätes/Some of pictures may be optional equipment of the device.
Need help?
Do you have a question about the VPH-100 and is the answer not in the manual?
Questions and answers