Chapters
Table of Contents

Subscribe to Our Youtube Channel
Related Manuals for probst SH-2500


Summary of Contents for probst SH-2500
- Page 1 52400011 SH 2500 uni b (neue Warneinrichtung) SH 2500-UNI-B 5240.0011 Vacuum Lifting Device SH-2500 Operating Instructions Translation of original operating instructions Vacuum Lifting Device SH-2500 SH 2500-UNI-B 52400043...
- Page 2 Bitte beachten Sie, dass das Produkt ohne vorliegende Betriebsanleitung in Landessprache nicht eingesetzt / in Betrieb gesetzt werden darf. Sollten Sie mit der Lieferung des Produkts keine Betriebsanleitung in Ihrer Landessprache erhalten haben, kontaktieren Sie uns bitte. In Länder der EU / EFTA senden wir Ihnen diese kostenlos nach.
-
Page 3: Table Of Contents
Warning device (audible) ..........................17 Vacuum pump ..............................17 Suction pads ..............................17 Installation ................................18 Mechanical connection ..........................18 Initiation ................................18 Mounting the suction pad to the lifting device .................... 18 Optional Accessoires (SH-2500-RS and SH-2500-HGV) ................. 19 2 / 32... - Page 4 Vacuum filter ..............................30 10.7 Warning device (audible) ..........................30 10.8 Leak test ................................. 30 10.9 Safety procedures ............................31 10.10 Hints to the identification plate........................32 10.11 Hints to the renting/leasing of PROBST devices ................... 32 3 / 32...
-
Page 5: Ec-Declaration Of Conformity
Pos: 1.10 / 02 Konformitätserklär ung/5 neu_ Angaben zum Unterzeichner + D ok ubev ollmächtigt er @ 0\mod55_2.doc @ 53 41 @ Authorized person for EC-documentation: Name: J. Holderied Address: Probst GmbH; Gottlieb-Daimler-Str. 6; 71729 Erdmannhausen, Germany Signature, informations to the subscriber: Erdmannhausen, 18.01.2019................ -
Page 6: Safety
Operating Instructions Safety SH 2500-UNI-B Pos: 10 /= ===== ===== ===== ===== ===== ===== @ 0\m od8_2. doc @ 515 9 @ Pos: 11 /99 gerät espez. Modul e/PG2 Vak uum - Verlegesy steme/ gemeinsame M odule/ gemeinsame M odule Vak uum geräte/Ka p. Sicherheit ( Vorla ge) @ 1\m od472_2.doc @ 10889 @ 12223222322 Safety Safety Symbols Danger to life! - Page 7 Operating Instructions Safety SH 2500-UNI-B It is not allowed to position suction plates off-centre. 29040337 (optional) Load securing with the use of a spreader bar (TRA) on 29040688 the vacuum lifting device: (optional) The safety chains must fit tightly to the load Prohibition: safety chains must never hang loose under the load! WARNING SIGN...
- Page 8 Operating Instructions Safety SH 2500-UNI-B 29040444 30x60 mm Close the petrol cock when not in use, as gasoline may 29040624 58x50 mm escape if shaken during transport INFORMATIONS SIGNS First tighten the hose coupling before actuating the slide 29040392 70x65 mm valve (vacuum on-off).
-
Page 9: Function Control
Operating Instructions Safety SH 2500-UNI-B 3.1.1 Function Control ● Before using the device check the functions and the working condition. ● Maintenance and lubrication are only permitted when device is shut down! ● Do not use the device, until all faults which can cause safety hazards are removed. ●... -
Page 10: Instructions For The Company
Operating Instructions Safety SH 2500-UNI-B Instructions for the Company The lifting devices are manufactured according to current technical standards and are safe. However, they will present hazards ● if they are not operated by qualified or, at the least, trained staff, ●... -
Page 11: Special Hazards
Operating Instructions Safety SH 2500-UNI-B Special Hazards ● The operating range has to be covered for unauthorized persons, especially children. ● The workplace has to be sufficiently illuminated. ● Take care when handling wet, dirty and not solidified components. ● The working with the vacuum lifting device in case of atmospheric editions under 3°... -
Page 12: Testing The Safety Devices
Operating Instructions Safety SH 2500-UNI-B Testing the Safety Devices The lifting device is equipped with following safety equipment: ● pressure gauge (with red danger zone display) ● alarm signal (audio) Check this equipment ● at the beginning of each shift (when operating in shifts), ●... -
Page 13: Behaviour In Emergencies
Operating Instructions Safety SH 2500-UNI-B 3.11 Behaviour in Emergencies An emergency situation exists when ● power suddenly fails (device switches off), ● the vacuum pressure drops below -0.6 bar to the red section on the scale of the vacuum gauge. Lower the load immediately if possible. - Page 14 Operating Instructions Safety SH 2500-UNI-B Checking the Vacuum Hoses and Check all vacuum hoses and clamps for proper mounting and tighten the clamps if Hose Clamps: necessary. Checking the Vacuum Reservoir See “Testing for Leaks"“ in chapter “Maintenance“ Correct any faults before using the device. If faults occur during operation, switch the device off and correct the faults before continuing work with the device.
-
Page 15: General
Various suction plates can be fitted to the device (SH 2500 UNI B) via a quick release locating pin, enabling it to be used for many different purposes and with many different loads. ● The carrying capacity/working load limit (WLL) of the device (SH-2500-UNI-B) of 2.500kg must not be exceeded! ● This device is equipped with the following safety Safety vacuum storage tank (12,5 l). - Page 16 Operating Instructions General SH 2500-UNI-B • Some suction plates which can be mounted to the device will reduce its carrying capacity. The maximum load is indicated on each suction plate. • Use only suction plates which are approved for this device! •...
-
Page 17: Description
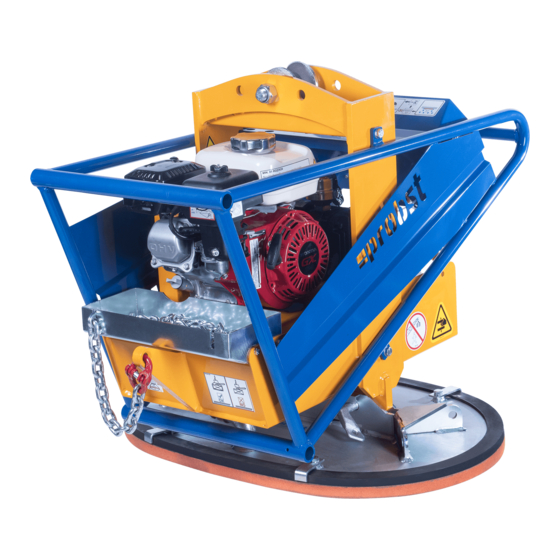
Operating Instructions Description SH 2500-UNI-B Pos: 15 /99 gerät espez. M odule/ PG2 Vak uum - Verle gesy steme/ SH UNI 25 00 b/Be schrei bung S H uni 25 00 b @ 0\m od173 _2.doc @ 8173 @ 122222 Description Components of the lifting device SH 2500 uni b Parts that have a safety function appear in bold type. -
Page 18: Technical Data
Operating Instructions Technical Data SH 2500-UNI-B Pos: 13 /99 gerät espez. M odule/ PG2 Vak uum- Verle gesy steme/ SH UNI 25 00 b/T echni sche Dat en S H uni 2500 b @ 0\m od172_2.doc @ 815 9 @ 1 Technical Data SH 2500 uni b Max. -
Page 19: Installation
Operating Instructions Installation SH 2500-UNI-B Pos: 17 /05 Installati on/KÜ_ Installation @ 0\m od15 _2.doc @ 5467 @ 1 Installation Pos: 18 / 05 Installation/ 01 Mecha nischer Anbau/ Ü_M echa nischer A nbau @ 0\mod105_2.doc @ 7347 @ Mechanical connection Pos: 19 / 99 geräte spez. -
Page 20: Optional Accessoires (Sh-2500-Rs And Sh-2500-Hgv)
Should be used when laying elements wider than 1 meter, in order to keep operators feet in safe distance from load. • Handle Extension SH-2500-HGV can be fitted at any time later to the structure of SH-2500-UNI by bolting it on with brackets. Refueling the engine ●... -
Page 21: Use Of The Spreader Bar With 2 (3) Suction Plates
Operating Instructions Installation SH 2500-UNI-B Use of the spreader bar with 2 (3) suction plates When using the crossbar with 2 suction plates only suction plates of the same design (carrying capacity, dimensions and form) may be used! The suction plates must always have the same distance (A) to the vertical centre axis of the crossbar (see figure 1). Unequal positioning of the suction plates is not permitted (see figure 2)! Take care that the load (stone slab) hangs always horizontal. -
Page 22: Attaching The Safety Chain (Of The Optional Spreader Bar)
Operating Instructions Installation SH 2500-UNI-B 7.6.1 Attaching the safety chain (of the optional spreader bar) ● Lift the device with the sucked load just a little (approx.. 20-30 cm) ● Then remove both safety chains from the chain cases of the spreader bar (TRA). ●... -
Page 23: Operating
Operating Instructions Operating SH 2500-UNI-B Pos: 22 /99 geräte spez. Modul e/PG2 Vakuum-Verlegesyst eme/S H UNI 2500 b/Bedi enung SH uni2500 b/ SH... @ 0\m od175_2. doc @ 8201 @ 1223333 Operating Safety Instructions ● Wear safety shoes and gloves. ●... -
Page 24: Lifting And Landing Loads
Operating Instructions Operating SH 2500-UNI-B Lifting and Landing Loads The following operating steps must be checked by a qualified mechanic before the operating staff can use the device. Correct faults before start-up. In order to ensure safe operation of the device, a battery test of the warning device must be carried out before each use of the device. -
Page 25: 8.2.2 Lowering Loads
Operating Instructions Operating SH 2500-UNI-B Fig. A 8.2.2 Lowering Loads: ● Lower the load to a safe and clear, level surface, to ensure that the load cannot slip or tip over. ● Shift the bushing (6) on the slide valve back. The load is released. 24 / 32... -
Page 26: 8.2.3 Lifting Wet Loads
Operating Instructions Operating SH 2500-UNI-B 8.2.3 Lifting wet loads ● The lifting device is not intended for picking up wet stone slabs. When picking up wet stone slabs, please observe the following: ● Remove water from the suction surface. ● Carry out the following points after working with damp parts: ●... -
Page 27: Troubleshooting
Operating Instructions Troubleshooting SH 2500-UNI-B Troubleshooting The device must be installed and maintained by qualified personnel such as mechanics and electricians only. After each repair or maintenance job check the safety equipment. Error Cause Remedy Pump does not run Engine is defective Check the engine/call customer service V-belt is broken/too loose Replace/restretch the V-belt... -
Page 28: Maintenance And Care
Operating Instructions Maintenance and care SH 2500-UNI-B Pos: 26 / 99 geräte spez. Module /PG2 Vakuum -Verl ege system e/S H UNI 2500 b/ Wartung S H uni 2500 b/S H... @ 0\mod177_2.doc @ 822 9 @ 1222222 Maintenance and care Pos: 31.2 /07 Wart ung und Pflege /01 Wart ung/ Ü_Wart ung+T ext allg. -
Page 29: 10.2 Maintenance Intervals
Operating Instructions Maintenance and care SH 2500-UNI-B 10.2 Maintenance intervals The yearly inspection must be performed by a qualified specialist. Interval Daily Weekly Monthly Every Yearly six months Inspect safety features (see chapter Sicherheit) • Vacuum gauge • Check that warning light flashes at correct underpressure/overpressure values •... -
Page 30: Vacuum Pump (Tfk 12)
Operating Instructions Maintenance and care SH 2500-UNI-B 10.3 Vacuum pump (TFK 12) See vacuum pump operating instructions (in appendix) 10.4 V-Belt ● Check the V-belt tension monthly. ● The V-belt must not protrude more than 1cm or it will need to be rest retched. ●... -
Page 31: Suction Pads/ Seals
Operating Instructions Maintenance and care SH 2500-UNI-B 10.5 Suction pads/ seals ● Remove items and contaminations such as adhesives, glue, saw dust, dust etc. from the seals at least once a week. Use glycerin to clean the seals. ● Immediately replace damaged seals (those with tears, holes, ripples). ●... -
Page 32: Safety Procedures
● The corresponding legal regulations and the regulations of the declaration of conformity must be observed! ● The expert inspection can also be done by the manufacturer Probst GmbH. Contact us at: service@probst-handling.com ● We recommend affixing the inspection sticker "„Sachkundigenprüfung / Expert inspection" in a clearly visible place (order no.: 2904.0056+Tüv sticker with year number) after the inspection has been done. -
Page 33: 10.10 Hints To The Identification Plate
10.11 Hints to the renting/leasing of PROBST devices With every renting/leasing of PROBST devices the original operating instructions must be included unconditionally (in deviation of the users country's language, the respective translations of the original operating instructions must be delivered additionally)! Pos: 31 /==== ===== ===== ===== ===== ===== == @ 0\mod8_2.doc @ 5159 @... - Page 35 Operating Instructions Warning Device SH 2500 uni-b, (audible, battery-operated) BA 30.12.01.00076 Last updated May 2010 / Index 00 Page 1/3 (42500190) 1. Safety Instructions for installation, maintenance and operating staff This unit should only be installed and maintained by qualified specialist personnel. All persons commissioned with the task of setting up, starting up, operating, maintaining and repairing the device at the company of the user must have read and understood the operating instructions, in particular the “Safety”...
- Page 36 Operating Instructions Warning Device SH 2500 uni-b, (audible, battery-operated) BA 30.12.01.00076 Last updated May 2010 / Index 00 Page 2/3 (42500190) To ensure that the warning device operates safely, always test the device for function before each use. While working, always watch the manometer attached to the lifting unit to aid the warning device in recognizing vacuum drops.
- Page 37 Operating Instructions Warning Device SH 2500 uni-b, (audible, battery-operated) BA 30.12.01.00076 Last updated May 2010 / Index 00 Page 3/3 (42500190) 5. Maintenance In order to maintain the device, perform the prescribed function test daily or before starting work. Remove the batteries from the device if it is to be idle for an extended period. The vacuum hoses must be checked for leaks and damage on a monthly basis.
- Page 39 Operating Manual - Vacuum Pump TFK 12 Vacuum Pump TFK 12...
- Page 40 Operating Manual - Vacuum Pump TFK 12 Contents Technical data..........................3 Performance curve (at 1400 RPM)....................3 General usage..........................4 Special technical features ......................4 General safety instructions......................5 Special safety instructions......................5 Installation ............................7 Operation .............................8 Fault finding..........................8 Service and cleaning ........................9 Vane service ..........................10 Guarantee ..........................10...
-
Page 41: Technical Data
Operating Manual - Vacuum Pump TFK 12 Technical data Pump data: All data in reference to speed of 1400 RPM max. Flow 12 m³/h max. Vacuum (abs.) 200 mbar max. Pressure 1 bar (intermittent only) Vacuum port 1 x G ¾ Pressure port 1 x G ¾... -
Page 42: General Usage
Operating Manual - Vacuum Pump TFK 12 General usage Theses pumps are designed for air only. They are not intended for other gases nor liquids. Operation is not permitted in potentially explosive areas (for example near gas tanks). Pumping flammable or explosive gases is also not permitted. Operate the pump only within the given pressure limits. - Page 43 Operating Manual - Vacuum Pump TFK 12 General safety instructions Read the operating Wear safety glasses Wear protective Wear ear protection instructions gloves Keep order in your working area! Disorder at the working place poses a great risk of accident. Take external influences into account.
- Page 44 Operating Manual - Vacuum Pump TFK 12 Read the complete operating instructions carefully and strictly adhere to the described regulations so that the pump can be operated safely. Each time before putting the appliance into operation check if the cable, the plug, the hose and the connections are damaged.
-
Page 45: Installation
Operating Manual - Vacuum Pump TFK 12 Installation Warning: During operation the pump surfaces become very hot. There is the danger of burning. Mount the pump on a solid horizontal surface. Couple the drive to the free shaft ensuring correct alignment. -
Page 46: Operation
Operating Manual - Vacuum Pump TFK 12 Operation Wear protective clothing during operation. Should the pump not provide sufficient performance check the system for leakages, pinched tubes etc. Any damaged should be repair by a qualified technician. Fault finding The following list summarises possible malfunctions and describes how to eliminate them. Should you not be able to eliminate the malfunction, please return the pump to the manufacturer for repair. -
Page 47: Service And Cleaning
Operating Manual - Vacuum Pump TFK 12 Service and cleaning Warning: During operation the pump surfaces become very hot. There is the danger of burning. Never oil any pump parts. All moving parts are service free and do not need lubrication. Oil / grease inside the pump can lead to failure. -
Page 48: Vane Service
Operating Manual - Vacuum Pump TFK 12 Vane service Disconnect the pump from the power supply. Mark the position of the cover to the housing and loosen the 4 M8 nuts on the pump head. Lift and remove the pump cover. Remove the vanes and measure the vane length (see diagram above). - Page 50 GX120 GX160 GX200 Serial number and engine type OWNER’S MANUAL 32ZH7620 00X32-ZH7-6201 HONDA EUROPE N.V.(EEC) www.honda-engines-eu.com...
- Page 51 Thank you for purchasing a Honda engine. This manual covers the operation and maintenance of your engine: GX120 GX160 GX200 All information in this publication is based on the latest product information available at the time of printing. Honda Motor Co., Ltd. reserves the right to make changes at any time without notice and without incurring any obligation.
- Page 52 SAFETY INSTRUCTIONS To ensure safe operation − Honda engine is designed to give safe and dependable service if operated according to instructions. Read and understand the Owner’s Manual before operating the engine. Failure to do so could result in personal injury or equipment damage. Always make a pre-operation inspection (page ) before you start the engine.
- Page 53 SAFETY INSTRUCTIONS To ensure safe operation − Do not place anything on the engine, as it may create a fire hazard. A spark arrester is available as an optional part for this engine. It is illegal in some areas to operate an engine without a spark arrester.
- Page 54 BATTERY CONNECTIONS (for electric starter) Use a 12 volt battery with an ampere-hour rating of at least 18 AH. Connect the battery positive ( ) cable to the starter solenoid + terminal, as shown. Connect the battery negative ( ) cable to an engine mounting bolt, −...
- Page 55 PRE-OPERATION CHECK Engine oil level Running the engine with insufficient oil can cause serious engine damage. Be sure to check the engine on a level surface with the engine stopped. Remove the oil filler cap and wipe the dipstick clean. Insert the dipstick into the oil filler neck, but do not screw it in.
- Page 56 Reduction gear oil Check reduction gear oil level. Fill with SG, SF rated engine oil, if necessary. 〈 1/2 reduction with automatic centrifugal clutch 〉 Remove the oil filler cap and wipe the dipstick clean. Insert the dipstick into the filler neck but do not screw it in. If the level is low, fill to the upper level mark with the same oil recommended for the engine (see engine oil recommendations on page...
- Page 57 Air cleaner Never run the engine without the air cleaner. Rapid engine wear will result. 〈 Dual element type 〉 Check the air cleaner elements to be ELEMENTS sure they are clean and in good con- dition. Clean or replace the elements if necessary (page (GX120/160) (GX120/160/200) 〈...
- Page 58 〈 Semi-dry type 〉 Check cleaner for dirt or obstruction of element (page ELEMENT 〈 Oil bath type 〉 Check the air cleaner element to be sure it is clean and in good condition. Clean or replace the element if necessary (page Check oil level and condition.
- Page 59 Fuel Use automotive gasoline (Unleaded or lowleaded is preferred to minimize combustion chamber deposits). FOR NEW SOUTH WALES ONLY: Use unleaded fuel only. Never use an oil/gasoline mixture or dirty gasoline. Avoid getting dirt, dust or water in the fuel tank. Gasoline is extremely flammable and is explosive under certain conditions.
- Page 60 GASOLINES CONTAINING ALCOHOL If you decide to use a gasoline containing alcohol (gasohol), be sure it’s octane rating is at least as high as that recommended by Honda. There are two types of ‘‘gasohol’’: one containing ethanol, and the other containing methanol. Do not use gasohol that contains more than 10% ethanol.
- Page 61 STARTING THE ENGINE Turn the fuel valve to the ON position. FUEL VALVE ……ON Move the choke lever to the CLOSED position. Do not use the choke if the engine is warm or the air temperature is high. CHOKE LEVER CLOSE……...
- Page 62 Move the throttle control lever slightly to the left. HIGH THROTTLE CONTROL LEVER Start the engine. With recoil starter: Turn the engine switch to the ON position. ENGINE SWITCH...
- Page 63 Pull the starter grip lightly until resistance is felt, then pull briskly. Do not allow the starter grip to snap back against the engine. Return it gently to prevent damage to the starter. With electric starter (where equipped): START Turn the engine switch to the START position and hold it there until the engine starts.
- Page 64 High altitude operation At high altitude, the standard carburetor air-fuel mixture will be ex- cessively rich. Performance will decrease, and fuel consumption will increase. High altitude performance can be improved by specific modifica- tions to the carburetor. If you always operate the engine at altitudes higher than 1,830 m (6,000 feet) above sea level, have your authorized Honda dealer perform these carburetor modifi- cations.
- Page 65 OPERATION As the engine warms up, gradually move the choke lever to the OPEN position. CHOKE LEVER ……OPEN Position the throttle control lever for the desired engine speed. THROTTLE CONTROL LEVER HIGH...
- Page 66 Oil alert system (Where equipped) The Oil Alert System is designed to prevent engine damage caused by an insufficient amount of oil in the crankcase. Before the oil level in the crankcase can fall below a safe limit, the Oil Alert System will automatically stop the engine (the engine switch will remain in the ON position).
- Page 67 STOPPING THE ENGINE To stop the engine in an emergency, turn the engine switch to the OFF position. Under normal conditions, use the following procedure: Move the throttle control lever fully to the right. THROTTLE CONTROL LEVER Turn the engine switch to the OFF position. ENGINE SWITCH Turn the fuel valve to the OFF position.
- Page 68 MAINTENANCE Shut off the engine before performing any maintenance. To prevent accidental start-up, turn OFF the engine switch key and disconnect the spark plug cap. The engine should be serviced by an authorized Honda dealer unless the owner has proper tools and service data and feels he is mechanically qualified.
- Page 69 Oil change Drain the oil while the engine is still warm to assure rapid and complete draining. Remove the oil filler cap and drain plug to drain the oil. Install the drain plug, and tighten it securely. Refill with the recommended oil (see page ) and check the oil level.
- Page 70 Air cleaner service A dirty air cleaner will restrict air flow to the carburetor. To prevent carburetor malfunction, service the air cleaner regularly. Service more frequently when operating the engine in extremely dusty areas. Never use gasoline or low flash point solvents for cleaning the air cleaner element.
- Page 71 〈 Cyclone type 〉 WING NUT Remove the wing nut and the air cleaner cover. Remove the PAPER GROOVE elements and separate them. ELEMENT Carefully check both elements for holes or tears and replace if damaged. Foam element: Clean in warm soapy water, rince and allow to dry thoroughly.
- Page 72 〈 Semi-dry type 〉 Unscrew the wing nut, remove the air WING NUT cleaner cover and remove the element. Wash the element in a nonflammable or high flash point solvent and dry it AIR CLEANER COVER thoroughly. Soak the element in clean engine oil and squeeze out the excess oil.
- Page 73 Sediment cup cleaning Gasoline is extremely flammable and is explosive under certain conditions. Do not smoke or allow flames or sparks in the area. After installing the sediment cup, check for leaks, and make sure the area is dry before starting the engine. Turn the fuel valve to OFF.
- Page 74 Visually inspect the spark plug. Discard the spark plug if there is apparent wear, or if the insulator is cracked or chipped. Clean the spark plug with a wire brush if it is to be reused. Measure the plug gap with a feeler gauge. Correct as necessary by bending the side electrode.
- Page 75 Spark arrester maintenance (optional part) If the engine has been running, the muffler will be very hot. Allow it to cool before proceeding. The spark arrester must be serviced every 100 hours to maintain its efficiency. Remove the two 4 mm screws from the exhaust deflector, and remove the deflector.
- Page 76 Carburetor idle speed adjustment Start the engine and allow it to warm up to normal operating temperature. With the engine idling, turn the throttle stop screw to obtain the standard idle speed. Standard idle speed: 1,400 ± rpm. THROTTLE STOP SCREW...
- Page 77 THROTTLE AND CHOKE CONTROL CABLE (optional part) The throttle and choke control levers are provided with holes for optional cable attachment. The following illustrations show installation examples for a solid wire cable and for a braided wire cable. If using a braided wire cable, add a return spring as shown. It is necessary to loosen the throttle lever friction nut when operating the throttle with a remote cable.
- Page 78 TRANSPORTING/STORAGE When transporting the engine, turn the fuel valve OFF and keep the engine level to prevent fuel spillage. Fuel vapor or spilled fuel may ignite. Befor storing the unit for an extended period; Be sure the storage area is free of excessive humidity and dust. Drain the fule…...
- Page 79 TROUBLESHOOTING Engine will not start using recoil starter: Is the engine switch in the ON position? Is there enough oil in the engine? Is the fuel valve ON? Is there fuel in the fuel tank? Is gasoline reaching the carburetor? To check,loosen the drain screw with the fuel valve ON? If any fuel is spilled, make sure the area is dry before testing the spark plug or starting the engine.
- Page 80 SPECIFICATIONS * Dimensions GX 120 GX 160 GX 200 Power equipment GC01 GC02 GCAE description code Length 300 mm (11.8 in) 305 mm (12.0 in) 313 mm (12.3 in) Width 345 mm (13.6 in) 365 mm (14.4 in) 376 mm (14.8 in) Height 320 mm (12.6 in) 335 mm (13.2 in)
- Page 81 With cyclone air cleaner * Dimensions GX 120 GX 160 GX 200 Power equipment GC01 GC02 GCAE description code Length 310 mm (12.2 in) 345 mm (13.6 in) 313 mm (12.3 in) Width 410 mm (16.1 in) 420 mm (16.5 in) 430 mm (16.9 in) Height 325 mm (12.8 in)
- Page 83 1034 Tragkraft 2500 kg Carrying Capacity 2500 kg Bei Änderungungen Rücksprache TB ! Gewicht: 99,3 kg Schutzvermerk nach DIN 34 beachten! Nachdruck nur mit unserer Genehmigung! Benennung Datum Name Vakuumgerät SH-Uni 2500 Erstellt 14.4.2003 Hurth mit Benzinmotor Gepr. Vacuum Lifting Device SH-uni 2500 with Petrol Engine Blatt Artikelnummer/Zeichnungsnummer Kunde:...
- Page 84 Ersatz- und Verschleißteile/ SH 2500 uni b Spare and consumable parts/ Pièces de rechangeet d’usure Für dieses Gerät übernehmen eine Gewährleistung gemäß unseren allgemeinen Verkaufs- und Lieferbedingungen. Das gleiche gilt für Ersatzteile, sofern es sich um von uns gelieferte Originalteile handelt. Für Schäden, die durch die Verwendung von anderen Originalersatzteilen...
- Page 85 21000014 21000321 20000026 20100015 33506483 33506486 20400002 20020008 33506484 42400612 20020008 33506482 20100015 42400613 20000040 20400006 33100286 © all rights reserved conform to ISO 16016 Datum Name Benennung Nachrüstsatz Kettensicherung SH2500 Erst. 27.6.2018 M.Wunder Gepr. 27.6.2018 M.Wunder 42400616 Artikelnummer/Zeichnungsnummer Blatt E42400611 Zust.
- Page 86 1760 1740 1500 min. Saugplatte-Mittenabstand 560 max. Saugplatten-Mittenabstand1450 Spreader bar 3500 for SH/VPM/PJ Applicable for 2 SPS suction plates spreading distance 560 - 1450 mm. Suction plates are 90° turnable. © all rights reserved conform to ISO 16016 Datum Name Benennung Traverse SH-TRA-3500, L=1740 Erst.
- Page 87 42500259 20200022 20190009 23200022 25200011 21050041 21050041 20420012 23220017 21000110 23220016 20390001 20390001 42500260 © all rights reserved conform to ISO 16016 Datum Name Benennung Traverse SH-TRA-3500, L=1740 Erst. 21.3.2016 M.Wunder Gepr. 7.4.2016 M.Wunder verschiebbar, für 2 Saugplatten, Mittenabs. 560-1450 mm Artikelnummer/Zeichnungsnummer Blatt E42500260...
- Page 88 Max. Saugplattenabstand 1460 Min. Saugplattenabstand 560 1510 1753 Spreader bar 3000 for SH/VPM Applicable for 2 SPS suction plates spreading distance 560 - 1450 mm. Suction plates are 90° turnable. Bei Änderungungen Rücksprache TB ! Gewicht: Schutzvermerk nach DIN 34 beachten! Nachdruck nur mit unserer Genehmigung! Benennung Datum...
- Page 89 20190009 20100019 20420012 23220017 21050041 23220016 25200011 21070037 23200022 42400197 20390001 42400040 Bei Änderungungen Rücksprache TB ! Gewicht: 38,5 kg Schutzvermerk nach DIN 34 beachten! Nachdruck nur mit unserer Genehmigung! Benennung Datum Name Traverse 3000 für SH / VPM Erst. 10.8.2005 TB-Praktikant Gepr.
- Page 90 A52400043 SH-2500-UNI-B 29040444 29040056 29040381 29040687 29040665 29040584 29040443 29040340 29040396 29040624 29040786 P 11.04.2019_V1 1 / 2 Einige der Abbildungen sind möglicherweise optionales Zubehör des Gerätes/Some of pictures may be optional equipment of the device.
- Page 91 A52400043 SH-2500-UNI-B 29040451 29040107 29040204 29040765 29040689 29040383 29040673 P 11.04.2019_V1 2 / 2 Einige der Abbildungen sind möglicherweise optionales Zubehör des Gerätes/Some of pictures may be optional equipment of the device.
- Page 92 After each completed performance of a maintenance interval the included form must be fill out, stamped, signed and send back to us immediately 1) via e-mail to service@probst-handling.com / via fax or post Operator: _ _ _ _ _ _ _ _ _ _ _ _ _ _ _ _ _...
Need help?
Do you have a question about the SH-2500 and is the answer not in the manual?
Questions and answers