Table of Contents
Advertisement
Quick Links
Advertisement
Table of Contents

Related Manuals for CraftBot CB4 FLOW Series


Summary of Contents for CraftBot CB4 FLOW Series
- Page 1 V 1.0 2020. 01. 22.
- Page 2 USER GUIDE CB4 FLOW GENERATION PLEASE VISIT HTTPS://SUPPORT.CRAFTBOT.COM FOR THE LATEST USER GUIDE! 2020. 01. 22. V2.0...
-
Page 3: Table Of Contents
ARNINGS THE PACK ...................................... 8 3.1................................8 NPACKING THE PRINTER 3.2....................................8 CCESSORIES INTRODUCING THE CRAFTBOT 3D PRINTER........................... 9 ........................................... 9 ASSEMBLING THE CRAFTBOT PRINTER ............................10 5.1................................10 RAFT PRINTER 5.2..................................11 SING THE PRINETER 5.3. - Page 4 11.1......................................30 OGIN 11.2....................................30 AINMENU 11.3..........................31 RINTING OBJECTS FROM RAFTBOT PLATFORM 11.4..................................32 RAFTBOT OPTIONS 11.4.1. Camera ..................................... 32 11.4.2. Temperature..................................32 11.4.3. Extrude ..................................... 33 11.4.4. Control ....................................33 11.4.5. Other settings ................................... 33 CLEANING AND MAINTENANCE ..............................
-
Page 5: Introduction
3D design files into printing instructions for the CraftBot 3D printer. Transfer your files to Your CraftBot 3D printer via USB drive or Wi-Fi. The CraftBot 3D printer will melt plastic filaments and squeeze it out onto the building plate in thin... -
Page 6: Important
IMPORTANT Read this user manual carefully before you use the appliance, then save it for future reference. All information in this user manual is subject to change at any time without notice and is provided for convenience purposes only. CraftUnique, reserves the right to modify or revise this user manual in its sole discretion and at any time. - Page 7 • Never leave the CraftBot 3D printer unattended while it is plugged in, and is in operation. • Make sure that the power supply is off and that the power cord is disconnected before servicing. Allow at least 5 minutes for the device to cool down after unplugging it before reaching inside to service.
-
Page 8: The Pack
3. THE PACK 3.1. UNPACKING THE 3D PRINTER 1. Place the CraftBot box on the ground on a level surface. Make sure that there is a lot of open space around you. 2. Open the box with care, not to damage the contents if using a blade. Be careful and watch out for the printer as well. -
Page 9: Introducing The Craftbot 3D Printer
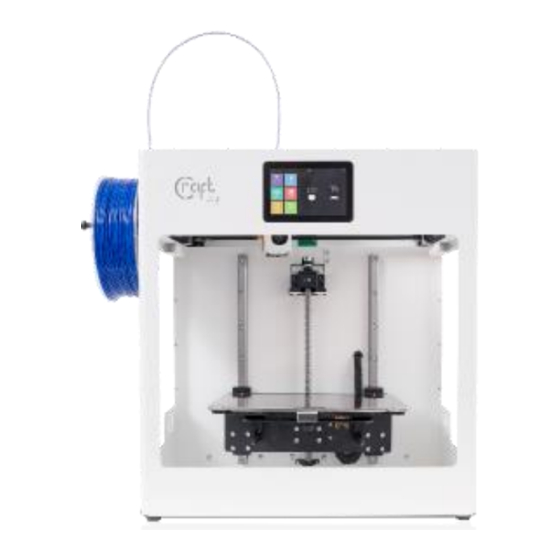
4. INTRODUCING THE CRAFTBOT 3D PRINTER 4.2. CraftBot Flow IDEX/XL printer Filament guide tube Touchschreen LCD display Hotend Build plate Z axis rod USB-A for flash drive Extruder Filament guide tube holder Filament spool Filament spool holder On/off switch AC power cable... -
Page 10: Assembling The Craftbot Printer
• Attaching the powercord Ensure that the power switch on the CraftBot is set to the OFF position. Find and then insert the AC power cord into the power input on the back of the... -
Page 11: Using The Prineter
5.2. USING THE PRINETER Switch on CraftBot by the ON/OFF button located on the back part of the appliance. The LCD panel on the front will light up. Navigation on the touch screen is possible by touching icons. On the main screen, you can preheat the head to a preset temperature by pressing the print head or buildplate icon. -
Page 12: Lcd Layout
5.3. LCD LAYOUT Temp New folder Speed Print Operation Settings Light Print Pause Encoder Nozzle Stop Camera Heating Load Extrude Unload X, Y axis Heads Z axis Axes Motor power off X, Y, Z, XYZ home Network/WiFi Fan/Light Language/Sound/Time Settings Upgrade Info Mode... -
Page 13: Settings
6. SETTINGS 6.1. NETWORK Select the Settings menu on the LCD screen and touch the Network icon. • Network • Select the Ethernet or the Wifi network. The printer can be on the Ethernet or the WiFi. If you select the Wifi option the printer will turn off the ethernet and vice versa. -
Page 14: Language/ Sound/ Time Options
Touch the third button (Logo) in the top submenu and a multi-slider screen will appear. • Here you can adjust the backlighting of the CraftBot logo on the printer. • We can set the lighting in 4 states • Stand by •... - Page 15 • Sound • After touching the second button (Sound) in the top submenu, a new screen appears again. • In the menu, you can turn the volume on or off and the slider to adjust the volume. • Time • After touching the third button (Time) in the top submenu, a new screen appears again.
-
Page 16: Calibration Settings
6.5. CALIBRATION SETTINGS CraftBot has a leveling procedure which ensures that the extruder and the heated build plate are at optimal distance and they must be leveled evenly. Smaller gap or uneven levelling may lead to the damaging of the Kapton cover of the build plate or the extruder. - Page 17 There are a few important rules to follow before calibrating! Heat up the nozzle and remove the filament from the extruder. Clean the plate and the nozzle tip. Make sure the metal plate is pushed back as far as it will go. •...
- Page 18 begin. • The print head begins to measure at the front in the middle point. At the bottom of the screen, you can see the scale of the deviation. • If the deviation is large, the dashes are dense and several arrows indicate which direction the knob under the current position is rotated will result in a better reading.
-
Page 19: Fw Upgrade Menu
Make sure the metal plate is pushed back as far as it will go. 6.6. FW UPGRADE MENU • Download the latest frilmware file at https://craftbot.com/firmware and upload it to the root folder of a flash drive without unpacking. •... -
Page 20: Preparing The Printer
7. PREPARING THE PRINTER 7.1. HEATING UP THE PRINTER Warming up, loading or removing filaments the head is essential for printing. From the main menu screen, touch the element to be heated (head, build plate icons) which will immediately warm up to a predefined temperature. If you want to change the heating values, follow the instructions below. -
Page 21: Loading The Filament
7.2. LOADING THE FILAMENT • Heat up the printer. • Take the end of the filament out of the securing hole on the Filament spool. • Cut and the end of the filament so the filament is straight and has no damages bends kinks or melted parts. -
Page 22: Removing The Filament From The Estruder
nozzle evenly and vertically. • Watch out! The freshly spilled molten filament is hot. Avoid contact with spilled filaments or other flammable materials in the near. 7.3.2. Removing the filament from the estruder Never remove the filament from the extruder if the extruder is cold! Always preheat the extruder before removing or changing filaments. -
Page 23: Homing Menu
8. HOMING MENU Select the Homing menu on the Home screen. • The small house icon indicates the „home” position of the extruder which is location in the front left corner of the build plate. You can reset the extruder and the build plate to the “home”... -
Page 24: Using The Craftware
In the pop-up • window you can set the language, graphics, keyboard commands, colors and Craftbot type. All build areas of all the craftbots are-pre-set and programmed in • Please click on the Options button... - Page 25 You can save the generated gcode onto a USB drive and place it into the top of the printer or send information directly to CraftBot if connected via USB cable. For detailed user’s instruction of CraftWare, download the user manual from...
-
Page 26: Printing Menu
Save the printing command gcode file created by the CraftWare slicer program onto USB flash drive. The pendrive provided with CraftBot has design samples saved on it. (3D designs must be converted into a printing command file with the help of the CraftWare slicer software. -
Page 27: File Management
• The machine warms the print head and the build plate to the values specified in gcode. • Printing starts when the machine reaches the required operating temperature. • The following values are displayed during printing: • Name file/object to be printed •... -
Page 28: Printing Options
10.4. PRINTING OPTIONS You can change the print settings while printing by tapping the Settings button on the right icon bar. Variable values: • temperature • speed • light • encoder • camera • Temperature • Head and build plate temperature can be adjusted separately. -
Page 29: Pause Menu
• There are two types of fan: • the interion LED lighting • LCD display backlighting • Extrude • This menu is inactive while printing. Active in Pause menu after head stops. • Encoder • In the Settings menu select the Encoder button. -
Page 30: Using The Mycraftbot
11. USING THE MYCRAFTBOT 11.1. LOGIN • When you first login, write the IP address of your printer into the web browser eg http://10.0.1.101/login • Login to the site with the username and password you entered, and then change your password. o Username: admin o Password: adminadmin 11.2. -
Page 31: Printing Objects From Mycraftbot Platform
11.3. PRINTING OBJECTS FROM MYCRAFTBOT PLATFORM • In the Print menu, drag the gcode of the file you want to print into the Drag and Drop bar. • If the uploaded file appears in the list, select it and then start printing with the start icon. -
Page 32: Mycraftbot Options
11.4. MYCRAFTBOT OPTIONS 11.4.1. Camera You can see the current camera image on the screen so you can keep track of your printing. You can take snapshots of the image or make a video of the print. 11.4.2. Temperature You can adjust the temperature of the individual head and tray or pre- heat them according to the material. -
Page 33: Extrude
11.4.3. Extrude From the Extrude menu, we can remotely extrude the filament from the head when the head is heated. 11.4.4. Control When you enter the Control menu, you will see the Home buttons and the x, y and z movement buttons already described. We can even monitor the movement of our printer when viewed through a camera. - Page 34 • Lights As with the printer, you can set up the printer here • backlight • intensity of the LED screen illumination, • and adjusting the background colors of the logo in different states. • Network Configure static or DHCP. If Static is selected, the data must be entered manually on the page.
-
Page 35: Cleaning And Maintenance
Cleaning and lubrication should only be conducted while the extruder and built plate are cold. Please allow the CraftBot 3D printer to cool down at least 30 minutes before cleaning or maintenance. It neccecery to clean the printer after every 1000 hour. - Page 36 Remove the rag from the CraftBot interior. Plug in and power up the CraftBot and move the build plate to the lowest point (“Axes” menu, home position and then go to the directional menu and press the Z down arrow until the bed reaches the lowest point).
-
Page 37: Z Extruder Eltömődésének Megakadályozása Javítása
• If the extruder is clogged clean out the passageway of the extruder. You can use one of the small hex wrenches that came with the craftbot. To do so. Heat up the extruder to 250 °C While the extruder is empty push... -
Page 38: Removing The Nozzle
12.4. REMOVING THE NOZZLE 12.4.1. PARTS OF EXTRUDER • Remove the filament from the head or cut the filament at the point closest to the extruder. • Remove the head only when cooled to avoid burns. Wait until the extruder has completely cooled down before replacing the head. -
Page 39: Applying A New Layer Of Protective Kapton Sheet To Your Build Plate
13. APPLYING A NEW LAYER OF PROTECTIVE KAPTON SHEET TO YOUR BUILD PLATE Build plate Kapton sheets get worn out in time or can be damaged by the nozzle due to incorrect levelling or removing the printed models. Reapplying a new Kapton sheet is essential to maximize print qualities if the old one has issues/ damages. -
Page 40: Garantee And Limitation Of Liability
14. GARANTEE AND LIMITATION OF LIABILITY For special conditions relating to product guarantee, see the „Guarantee Statement” on a separate sheet, which is also delivered with the product as well. With the exceptions included in the regulations concerning the guarantee and to the greatest extent permitted by the relating act, CRAFTUNIQUE Ltd.
Need help?
Do you have a question about the CB4 FLOW Series and is the answer not in the manual?
Questions and answers