Table of Contents
Advertisement
Advertisement
Table of Contents

Related Manuals for CraftBot Plus PRO


Summary of Contents for CraftBot Plus PRO
- Page 1 USER GUIDE...
-
Page 2: Table Of Contents
Connecting the CraftBot printer to wireless network........ -
Page 3: Introduction
CraftBot 3D printer. Transfer your files to Your CraftBot 3D printer via USB drive or USB cable. The CraftBot 3D printer will melt plastic filaments and squeeze it out onto the building plate in thin lines to... -
Page 4: Important
• Never leave the CraftBot 3D printer unattended while it is plugged in, and is in operation. • Make sure that the power supply is off and that the power cord is disconnected before servicing. Allow at least 5 minutes for the device to cool down after unplugging it before reaching inside to service. -
Page 5: Unpacking Your Craftbot Printer
1.4. Unpacking your CraftBot printer Place the CraftBot box on the ground on a level surface. Make sure that there is a lot of open space around you. Open the box with care, not to damage the contents if using a blade. -
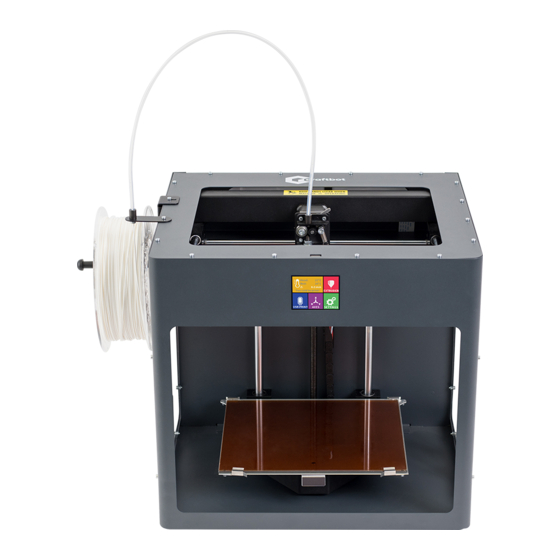
Page 6: Introducing The Craftbot 3D Printer
USER GUIDE 2. INTRODUCING THE CRAFTBOT 3D PRINTER Touchschreen LCD display Filament guide tube Nozzle Removable glass build plate Leveling knobs Z axis rod Filament spool holder Filament spool Filament guide tube holder Extruder USB-A for flash drive USB-B socket... -
Page 7: Assembling The Craftbot Printer
FMS system. Attaching the powercord • Ensure that the power switch on the CraftBot is set to the OFF position. • Find and then insert the AC power cord into the power input on the back... -
Page 8: Using The Craftbot Printer
USER GUIDE 4. USING THE CRAFTBOT PRINTER 4.1. Switching the appliance • Switch on CraftBot by the ON/OFF button located on the back part of the appliance. • The LCD panel on the front will light up. 4.2. Setting the language •... -
Page 9: Setting The Clock
USER GUIDE 4.4. Setting the clock You can set the time and reset the operating hour counter. This function helps to track printing time between maintenance sessions. • Select the Settings menu on the LCD screen and go to the page 3 with right arrow icon. •... -
Page 10: Connecting The Craftbot Printer To Wireless Network
USER GUIDE 4.5. Connecting the CraftBot printer to wireless network • Select the Settings menu on the LCD screen and go to the page 4 with right arrow icon. • Select the Wi-Fi icon • Select „search Wi-Fi network” icon –in the bottom row.. -
Page 11: Loading The Filament
USER GUIDE • You can then select the Extruder icon, and the Bed icon (line with 3 wavy lines above) to start the heating process. • Once the extruder reaches the target temperature of your filament you can start printing. If you want to print with material with other temperature properties, select USER1 or USER2, then click the icon to adjust the temperature using the arrows. -
Page 12: Extruding
USER GUIDE 5.3. Extruding • Enter into the extruder menu. • You can also use the “extrude” menu to extrude the filament. This will only rotate the gear wheel every time you press the icon and will give you more control over the filament movement. •... -
Page 13: Leveling The Build Plate
5.5. Leveling the build plate CraftBot has a leveling procedure which ensures that the extruder and the heated build plate are at optimal distance (0.3mm) and they must be leveled evenly. Smaller gap or uneven levelling may lead to the damaging of the Kapton cover of the build plate or the extruder and can give bad printing problems. - Page 14 USER GUIDE • Repeat the process with the two back knobs. First the right back, then the left back knob these will need to be adjusted. • Before switching from knob to knob, please remove and replace the leveling card as necessary. •...
-
Page 15: Other Menu Settings
You will see a variance pop up on the screen: two different touchscreen sliders. • Adjusting the lighting: Move the line from the left to the right to vary the brightness of either the interior LED lighting of the CraftBot or the LCD display backlighting. 6.2. Activating the fans •... -
Page 16: Sound Settings
Warnings Only 6.4. Report function Registered users on the Craftbot.com website can register their printer using its serial number on the website. After registration, and assuming both the function is switched on and that the printer is connected to Wi-Fi then the printer every day at midnight or at the very first power on of that day will automatically send the actual hours of operation, plus the filament usage of the printer to the users account. -
Page 17: Dome Menu
USER GUIDE • You can check if the code is correct with the cloud icon. If you have entered an incorrect number, you will receive a warning message, a correctly entered number will receive a confirmation message. • Turn on the report function with the button. -
Page 18: Reset Settings
USER GUIDE 6.6. Reset settings You can reset all settings. • Select the Settings menu on the LCD screen and go to the page 6. Select the Reset circle arrow icon • Select the circle arrow again, and press OK. 6.7. - Page 19 USER GUIDE • You can provide your email address with the icon, where the printer will send a message if it was unable to resolve a jam. Please check or set your e-mail address with the @ icon. • Calibration can be initiated by touching the icon .
-
Page 20: Navigate The Build Plate And The Extruders
USER GUIDE 7. NAVIGATE THE BUILD PLATE AND THE EXTRUDERS Select the AXES on the menu. • The left arrow button will return you to the main menu. • The small house icon indicates the “home” position of the extruder which is location in the front left corner of the build plate. -
Page 21: Using The Printer
Once CraftWare has been opened up, you will see a virtual build platform. This will represent your CraftBot’s real build plate. Please click on the Options button , and select your CraftBot printer type in the “Printer” page. You can add... - Page 22 USER GUIDE The “Options” menu is located on the right side of the screen. In the pop-up window you can set the language, graphics, keyboard commands, colors and Craftbot type. All build areas of all the craftbots are-pre-set and programmed in.
-
Page 23: Printing Objects From Usb Flash Drive
Craftbots do have Wi-Fi connection and offer the option to upload gcode file using the Craftprint app mobile craftapp application. The pendrive provided with CraftBot has design samples saved on it. 3D designs must be converted into a printing command file with the help of the CraftWare slicer software. -
Page 24: Tweak Menu
9.3. Pause Next Layer menu Pause next layer function will stop printing at the end of the current layer. Once the layer is finished, the CraftBot will switch to Pause menu. This is a toggle button – when the icon is crossed out, it means that Pause Next Layer function is active. -
Page 25: Cleaning And Maintenance
Cleaning and lubrication should only be conducted while the extruder and build plate are cold. Please allow the CraftBot 3D printer to cool down at least 30 minutes before starting any cleaning or maintenance. It is necessary to both clean and change the used and worn parts on the printer after every 1000 hours. The printer will warn the user. -
Page 26: Lubricating
Power up the CraftBot once again and raise the build plate back up to the highest position (set the X, Y and Z to the home position). -
Page 27: Troubleshooting
If the extruder is clogged clean out the passageway of the extruder. You can use one of the small hex wrenches that came with the craftbot. To do so. Heat up the extruder to 250 °C While the extruder is empty push down any... -
Page 28: Firmware Update
Open the CraftPrint program. Select the “Load custom firmware from file” from „ …” menu. Select and open the *.firmware file On successful load you got message, click OK! Open again the “…” menu and select Update CraftBot firmware from loaded file…... - Page 29 USER GUIDE When asked please turn off the printer at least 5 seconds. Turn the printer back on and wait until the update is finished When the update is finished, power cycle the printer once again. Check the pr3Dator firmware version on printer. Update is done.
-
Page 30: Firmware Update On Older Printers
Erase the LCD display Take a look at your LCD display located at the middle top front of the CraftBot 3D printer. You will need to get around to the back of the LCD to erase. The “erase” button is located at the bottom left corner of the LCD looking from the inside. -
Page 31: Applying A New Layer Of Protective Kapton Sheet To Your Build Plate
USER GUIDE 13. APPLYING A NEW LAYER OF PROTECTIVE KAPTON SHEET TO YOUR BUILD PLATE Build plate Kapton sheets get worn out in time or can be damaged by the nozzle due to incorrect levelling or removing the printed models. Reapplying a new Kapton sheet is essential to maximize print qualities if the old one has issues/ damages. -
Page 32: Appendix Technical Specifications
OBJ / STL / CWPRJ Operating nozzle temperature: 180 - 260 °C Windows 7 and above, Supports: Operating heated build plate temperature: 50 - 110 °C OS X and Linux Concerning any problems or enquiries, you can contact us at: craftbot.com... - Page 33 Cooperation between 3D printer and people has never been easier. Get in touch! CONTACT: CraftUnique Ltd. Salgótarjáni str. 12-14. Budapest 1087, Hungary Phone: +36 30 338 5056 Web: www.craftbot.com • www.craftbotusa.com Craftbot is made in the EU. Copyright 2013-2020 by CraftUnique Ltd. All Rights Reserved.
Need help?
Do you have a question about the Plus PRO and is the answer not in the manual?
Questions and answers