Table of Contents
Advertisement
Quick Links
Advertisement
Table of Contents

Subscribe to Our Youtube Channel
Related Manuals for CraftBot Flow


Summary of Contents for CraftBot Flow
- Page 1 CRAFTBOT FLOW USER MANUAL WWW. C R A FT B OT.C OM...
-
Page 2: Table Of Contents
3.3. Assembling the Craftbot Printer ....... . . 8 First steps ......... . . 9 4.1. -
Page 3: Introduction
CraftBot 3D printer. Transfer your files to Your CraftBot 3D printer via USB drive or Wi-Fi. The CraftBot 3D printer will melt plastic filaments and squeeze it out onto the building plate in thin lines to print your object layer by layer. -
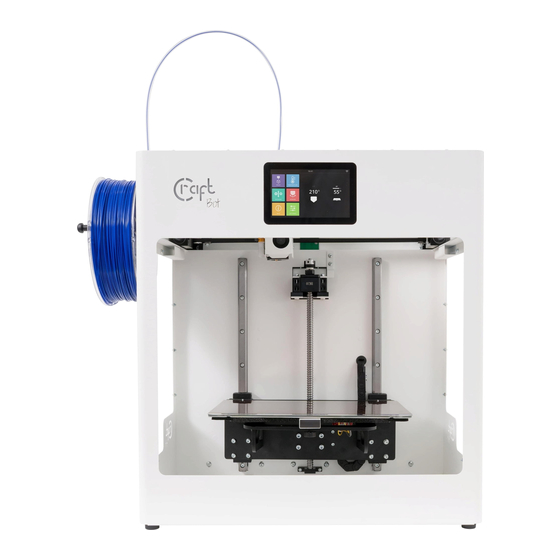
Page 4: Craftbot Flow / Flow Xl Printer Components
12. AC power cable 13. LAN connection 14. Reset button The model displayed is the CraftBot Flow printer. The difference between the two models is the frame height. See Specifications for the different dimensions. WWW. C R A FT B OT.C OM... -
Page 5: Specifications
USER MANUAL V1.0 1.2. Specifications Printing properties Flow Flow XL Printing technology Fused Filament Fabrication (FFF) Printing heads All metal hotend with Filament Monitoring system (FMS) Build volume X: 300mm x Y: 200mm x Z: 250mm X: 300mm x Y: 200mm x Z: 500mm... -
Page 6: Safety
• Never leave the CraftBot 3D printer unattended while it is plugged in, and is in operation. • Make sure that the power supply is switched off and that the power cord is disconnected before servicing. -
Page 7: Unpack And Assembly
3.1. Unpacking the printer Place the CraftBot box on the ground on a level surface. Make sure that there is a lot of open space around you. 1. Open the box with care, not to damage the contents if using a blade. Be careful and watch out for the printer as well. -
Page 8: Assembling The Craftbot Printer
• Attach the power cord Ensure that the power switch on the CraftBot is set to the OFF position. Find and then insert the AC power cord into the power input on the back of the CraftBot. -
Page 9: First Steps
4. FIRST STEPS 4.1. Switching on the Appliance Switch on CraftBot by the ON / OFF button located on the back part of the appliance. The LCD panel on the front will light up. Navigation on the touch screen is possible by touching icons. -
Page 10: Operating The Printer
USER MANUAL V1.0 5. OPERATING THE PRINTER 5.1. Menu map New directory Print Print Delete Action Move Heating Copy Extrude Axes Status Info Tutorials Operation counters Printer Wizard Main menu Calibrate wizard Calibrate Update Personalise Network Network WiFi Web config Head 1 Others Light... -
Page 11: Heating Up The Printer
USER MANUAL V1.0 5.2. Heating up the printer Warming up, loading or removing filaments the head is essential for printing. From the main menu screen, touch the element to be heated (head, build plate icons) which will warm up to a predefined temperature. If you want to change the heating values, follow the instructions below. -
Page 12: Unloading The Filament
USER MANUAL V1.0 Select the Extrude menu on the Home screen. Before extruding, make sure the head is next to the build plate, not pressed into the plate or directly above. • To extrude filament from the print head, use the down arrow on the touch screen. -
Page 13: Start A Print
You can change the print settings during printing by pressing the Settings button on the right icon bar. The following parameters can be altered: • Print temperatures • Fan speeds • Print speed and material flow • Lighting • Encoder • Camera WWW. C R A FT B OT.C OM... -
Page 14: File Management
5.8. File management Flow generation machines has a 4GB internal storage for printable items. In the Print menu, you can copy, move or delete one or more items. Copy and move possible between internal storage and the flash drive, in both directions. -
Page 15: Calibration
USER MANUAL V1.0 5.9. Calibration You need to calibrate your printer periodically to ensure that you always print in good quality, and good adhesion to the build plate. There are a total of 4 calibration processes that ensure perfect print quality. There are a few important rules to follow before calibrating: Heat up the nozzle and remove the filament from the extruder. -
Page 16: Extruder (Fms) Calibration
Please do not over-bend the build plate! It may damage it permanently. 5.11. Firmware update CraftBot FLOW printers are able to update itself through Internet or from flash drive. We are continuously improving the features of our printers for the best user experience. -
Page 17: Craftware
USER MANUAL V1.0 6. CRAFTWARE To print a 3D object, The CraftBot needs toolpath information generated from 3D object CAD files like .obj or .stl. Toolpath information is simply called “gcode”. CraftWare software converts 3D design files into printing commands for the CraftBot 3D printer. -
Page 18: Using The Web Interface
USER MANUAL V1.0 7. USING THE WEB INTERFACE 7.1. Login If you already configured your printer for network use, its IP address can be found on the main screen. When you first login, write the IP address of your printer into the web browser. -
Page 19: Uploading Files Through The Web Interface
USER MANUAL V1.0 7.3. Uploading files through the WEB interface In the File manager menu, you can drag and drop, or upload gcode files on the conventional way. Please note, only gcode files are allowed. If you have .stl file, you need to slice it before. See chapter 6.2. 7.4. -
Page 20: Watching The Camera Remotely
USER MANUAL V1.0 7.5. Watching the camera remotely CraftBot Flow printers are equipped with built-in camera. This allows the user to view the print progress, spot fail- ures, and to control the printer remotely. To access the camera please login to the web interface, and choose Camera menu. -
Page 21: Cleaning And Maintenance
8.1. Cleaning Clean the metal housing of the CraftBot by wiping with a damp cloth. Cleaning the build plate with window cleaner or Acetone. Wipe clean with a dry cloth or paper towel. WWW. C R A FT B OT.C OM... -
Page 22: Lubricating
Power up the CraftBot once again and raise the build plate back up to the highest position (set the X, Y and Z to the home position). -
Page 23: Removing Clogging Of The Extruder
If the extruder is clogged clean out the passageway of the extruder. You can use one of the small hex wrenches that came with the Craftbot. To do so. Heat up the extruder to 250 °C While the extruder is empty push down any... -
Page 24: Replace The Fan Set
USER MANUAL V1.0 8.5. Replace the Fan set If you have any problems from the BL touch intermittently or not working altogether or the fans not working, then Please follow the process below to investigate. This could be due to pins breaking or being miss aligned due to twisting of the Fan casing. -
Page 25: Applying A New Kapton Sheet To Your Build Plate
USER MANUAL V1.0 8.7. Applying a new Kapton sheet to your build plate Build plate Kapton sheets get worn out in time or can be damaged by the nozzle due to incorrect levelling or removing the printed models. Reapplying a new Kapton sheet is essential to maximize print qualities if the old one has issues/ damages. - Page 26 Cooperation between 3D printer and people has never been easier. Cooperation between 3D printer and people has never been easier. G et in t o uch! G et in t o uch! CO N TACT: CO N TACT: C r a ftUn iq ue Ltd. C r a ftUn iq ue Ltd.
Need help?
Do you have a question about the Flow and is the answer not in the manual?
Questions and answers