Table of Contents
Advertisement
Quick Links
Advertisement
Table of Contents

Related Manuals for CraftBot FLOW GENERATION IDEX


Summary of Contents for CraftBot FLOW GENERATION IDEX
- Page 1 IDEX USER MANUAL...
-
Page 2: Table Of Contents
Craftbot Flow / Flow XL printer components ........ -
Page 3: Introduction
Craftbot 3D printer. Transfer your files to Your Craftbot 3D printer via USB or Wi-Fi. The Craftbot 3D printer will melt plastic filaments and squeeze them out onto the building plate in thin lines to print your... -
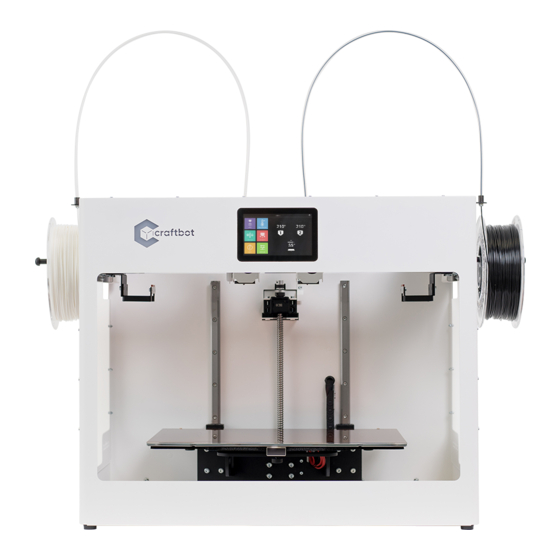
Page 4: Craftbot Flow / Flow Xl Printer Components
Filament spool holder Filament spool ON / OFF switch AC power cable LAN connection Reset button The model displayed is the Craftbot Flow IDEX. The difference between the two models is the frame height. See Specifications for the different dimensions. -
Page 5: Specifications
IDEX USER MANUAL 1.2. Specifications PRINTING PROPERTIES FLOW IDEX FLOW IDEX XL Fused Filament Fabrication (FFF) Printing technology Printing heads Independent Dual Extruders (IDEX) with Filament Monitoring system (FMS) Build volume X: 425mm x Y: 250mm x Z: 250mm X: 425mm x Y: 250mm x Z: 500mm Theoretical precision X,Y: 4 microns, Z: 2 microns Layer resolution... -
Page 6: Safety
• Never leave the Craftbot 3D printer unattended while it is plugged in, and is in operation. • Make sure that the power supply is switched off and that the power cord is disconnected before servicing. Allow at least 5 minutes for the device to cool down after unplugging it before reaching inside to service. -
Page 7: Unpack And Assembly
3.1. Unpacking the printer Please check the packaging for any damage. If you detect any damage please contact the reseller. Place the Craftbot box on the ground on a level surface. Make sure that there is plenty of open space around you. -
Page 8: Assembling The Craftbot Printer
• Attach the power cord Ensure that the power switch on the Craftbot is set to the OFF position. Plug the AC power cord into the power input an the back of the unit. Plug the power cord into a wall socket. -
Page 9: First Steps
Select your time zone from the list Then press Next Firmaware update Please don’t skip this step! Download the latest Firmware for the FLOW 3D printers at https://craftbot.com/firmware Copy CRAFT_UPDATE.ZIP to a FAT32 formatted USB drive Plug the USB drive you found in the accessories box... -
Page 10: Welcome Wizard- Calibration
IDEX USER MANUAL 4.2. Welcome wizard- Calibration Please make sure that the bed is clean and there are no residues / dirt on the nozzles. You can use the metal brush to clean the nozzle. Remove every object that may be blocking the bed moving all the way down. - Page 11 IDEX USER MANUAL Bed leveling Adjusts the parallelity of the build plate and XY mechanics, and the distance between the nozzle and the build plate. The assisted bed calibration requires you to manually adjust the build plate. It will be adjusted using the 3 knob screws at the bottom of the build plate.
- Page 12 IDEX USER MANUAL FMS calibration This calibration will measure the Filament Monitoring System (FMS) sensor values and adjust if necessary. Make sure you select the correct type of filament on the screen. The head heats up to the correct temperature. After it has heated, load the filament to the extruder.
-
Page 13: The First Print Job
4.3. The first print job Please print the CW_ToolDisk_dual.gcode or CW_ToolDisk_single.gcode files from pendrive. If you have not have this gcode please download it from this link and copy it to the pendrive: https://support.craftbot.com/hc/en-us/ articles/360012631777-Craftbot-tooldisk-sample-test- object • Select the Print menu on the main screen. -
Page 14: The Graphical User Interface
5. THE GRAPHICAL USER INTERFACE 5.1. Home menu Switch on the Craftbot printer with the ON / OFF button located at the back of the appliance. The LCD panel on the front will light up. You can navigate the touch screen by touching icons. -
Page 15: Print Menu
IDEX USER MANUAL 5.2. Print menu You can print the previously saved .gcode files in more ways: either form the printer’s 4GB internal storage or from a USB flash drive. Save the gcode file created by the CraftWare slicer program onto USB flash drive or directly to the printer’s internal storage. -
Page 16: The Print Menu
IDEX USER MANUAL 5.4. The print menu Printing starts when the machine has reached the required operating temperature. The following values are displayed during printing: Name of the file/object to be printed Percentage of total printing completed Current z height/total z height Remaining time (with heating time) Head temperature Filament remaining/ total... - Page 17 IDEX USER MANUAL Temperature Head and build plate temperatures can be adjusted separately. Adjust the head and the build plate temperature by touching the slider and the + and - buttons. You can lock the previously set values if needed. Extrude For filament change use the Extrude / Reverse functions or the preprogrammed Load / Unload options.
-
Page 18: The Heating Menu
IDEX USER MANUAL 5.6. The heating menu Warming up the head and loading or removing filaments are essential for printing. From the main menu screen, touch the element to be heated (head and build plate icons), which will warm up to the predefined temperature. -
Page 19: The Extrude Menu
IDEX USER MANUAL 5.7. The extrude menu Heat up the extruder where you want to insert the filament into. • Take the end of the filament out of the securing hole on the Filament spool. • Cut the end of the filament so the filament is straight and has no damage, bends kinks or melted parts. •... -
Page 20: Changing Filaments
IDEX USER MANUAL 5.9. Changing filaments • When changing filaments, note that different filaments, such as PLA, ABS, and PET, have different temperature characteristics. • If you want to replace a material with a higher temperature (eg. ABS, PETG) with a material with a lower temperature (PLA), you will need to heat the head to a higher temperature so that the previous material can leave the head completely before the other filament can its place. -
Page 21: The Info Menu
IDEX USER MANUAL 5.11. The info menu Select the Info menu on the Home screen. You can seee some important infos: • Model type • Pr3dator (Mainboard) version • HMI (LCD board) version • Language file version • Gui lib If you want to restart your printer press the Restart button and the printer will restart. -
Page 22: Safe Mode
IDEX USER MANUAL History If you have any problems with your printer, here you can see the problems. Please if you have a capital error on your printer save the report information (Info menu/ Report) and send it to our support team. 5.12. -
Page 23: The Settings Menu
IDEX USER MANUAL 5.13. The settings menu Select the Settings menu on the Home screen. Items of the Settings menu: • Printer wizard • Calibrate wizard • Calibrate • Update • Language • Personalise • Network • E-mail • Time zone •... - Page 24 IDEX USER MANUAL Calibration You need to calibrate your printer regularly to ensure that you can always print in good quality and achive good adhesion to the build plate. There are a total of 4 calibration processes that ensure perfect print quality. There are a few important rules to follow before calibrating: Heat up the nozzle and remove the filament...
- Page 25 IDEX USER MANUAL If the alignment is as it should be, the calibration process will continue and no further intervention is required. Assisted bed calibration Adjusts the parallelity of the build plate and XY mechanics, and also the distance between the nozzle and the build plate.
- Page 26 IDEX USER MANUAL Firmware update Craftbot FLOW printers are able to update their firmwar through the Internet or from a flash drive. We are continuously improving the features of our printers for the best user experience. If the printer is connected to the Internet and the update...
- Page 27 IDEX USER MANUAL Go to SETTINGS and then UPDATE menu Press the RESCAN button until UPDATE FROM PENDRIVE appears Tap the UPDATE FROM PENDRIVE to start the update process Update is automatic, when it is ready, click on the UPDATE FINISHED OK button. Do again the calibrations!!! Troubleshooting: If the FW update run into error, please do the following:...
- Page 28 USERNAME: admin PASSWORD: adminadmin E-mail Craftbot FLOW Generation printers can send an E-mail notifiaion if a problem occurred during the print job. For the E-mail notification to work you have to set up an E-mail account for sending.
- Page 29 IDEX USER MANUAL SMTP username: the GMAIL address you just registered SMTP password: the password you used when you registered the new GMAIL address. After you have entered the settings in, please click on “Send test Email” and you will get a sample E-mail to E-mail inbox you have just set up.
- Page 30 Move the slider from left to right to adjust the brightness of the light. Logo color Here you can adjust the color of the backlight of the Craftbot logo on the printer. You can assign four statuses to the logo light: • Stand by •...
- Page 31 IDEX USER MANUAL Door If you have a door for your printer turn on the Door and select the treshold temperature (40 °C or 60 °C ). For safety reasons, the system does not allow the opening of the door if the temperature is higher than this threshold.
-
Page 32: Using The Web Interface
IDEX USER MANUAL 6. USING THE WEB INTERFACE 6.1. Login If you have already configured your printer for network use, its IP address can be found on the main screen. When you first log in, enter the IP address of your printer the web browser, eg.: http://10.0.1.21/ Log in to the site with the default username and password:... -
Page 33: Printing Objects Through The Web Interface
IDEX USER MANUAL 6.4. Printing objects through the WEB interface In the File manager you can see the available gcode files. You can print gcode files either from the internal storage or from the flash drive. Press the Print icon next to the file you want to print. Confirm your choices with the pop-up messages and the print job will start. -
Page 34: Watching The Camera Image Remotely
You can change your username and the associated password. 6.6. Watching the camera image remotely Craftbot Flow printers are equipped with a built-in camera. This allows the user to view the print progress, spot failures and control the printer remotely. -
Page 35: Cleaning And Maintenance
Cleaning and lubrication should only be performed while the extruder and build plate are cold. Please allow the Craftbot 3D printer to cool at least 30 minutes before cleaning or maintenance. The printer needs to be cleaned after every 1000 hours of operation. After every 1000 hours you will need to change the used and worn parts of the unit. -
Page 36: Removing Clogs From The Extruder
Power up the Craftbot once again and raise the build plate back up to the highest position (set the X, Y and Z to the home position). -
Page 37: Replacing The Fan Set
IDEX USER MANUAL 7.4. Replacing the fan set If you have encounter problems because the BL touches intermittently or is not working at all or the fans are not working, then follow the process below to investigate. This could be due to pins breaking or being misaligned due to twisting of the Fan casing. -
Page 38: Relocating The Fan Assembly To The Extruder Assembly
IDEX USER MANUAL 7.6. Relocating the fan assembly to the extruder assembly • Move the fan Assembly over the extruder first about 1 centimeter below the required height. Gently lift the fan assembly to connect to the 2 boards together but first insert the central pin from the Extender board into the hole of the Fan extender board below •... -
Page 39: Removing The Nozzle
IDEX USER MANUAL 7.7. Removing the nozzle Remove the filament from the head or cut the filament at the point closest to the extruder. • Remove the head only after it has completely cooled to avoid burns. • In the Navigation menu, lower the bed level for convenient head access during the process. -
Page 40: Replace The Hotend
IDEX USER MANUAL 7.9. Replace the hotend Assembly instructions: Items 14 and 15 are placed in block 3 until they stop, Fasten plate part number 5 to part number 3 with screw number 6. Slide item number 4 onto item number 3 until it stops. Wring Nozzle part 1 into block number 3 until it stops. -
Page 41: Adjusting X Belt Tension
IDEX USER MANUAL 7.10. Adjusting X belt tension • Loosen the nut that secures the X-belts through the hole with a 7-gauge wrench provided until the block no longer locks the belts. • Then tighten the nut. 7.11. Battery replacement •... -
Page 42: The Cleaning Kit
IDEX USER MANUAL 7.13. The cleaning kit Sharp tweezer Spatula Lubricant syringe Nozzle drill bits ALCOHOL Alcohol prep pads PREP PADS Wire brush Wire cutter Curved tweezer Nozzle needles Sharp tweezer and Curved tweezer The 2 different shape precision tweezers are perfect for •... - Page 43 IDEX USER MANUAL Nozzle hand drill bits To help drill the clogged nozzle during the cleaning process. There are 3 sizes: • Ø 0,6 mm • Ø 0,8 mm • Ø 1 mm Caution! Don’t use the drill to clean until the extruder is heated to above 200 degrees.
-
Page 44: Craftware
IDEX USER MANUAL 8. CRAFTWARE To print a 3D object, The Craftbot needs toolpath information generated from 3D object CAD files like .obj or .stl. Toolpath information is simply called “gcode”. CraftWare software converts 3D design files into printing commands for the Craftbot 3D printer. -
Page 45: Guarantee And Limitation Of Liability
IDEX USER MANUAL 9. GUARANTEE AND LIMITATION OF LIABILITY For special conditions relating to product guarantee, see the „Guarantee Statement” on a separate sheet, which is also delivered with the product. With the exceptions included in the regulations concerning the guarantee and to the greatest extent permitted by the relating act, Craftunique Ltd. - Page 46 Budapest 1087, Hungary Phone: +36 1 700 8060 Web: www.craftbot.com • www.craftbotusa.com C raf t b ot is mad e i n the E U . C o py right 2 0 13 -20 20 by Cra f tU ni qu e Ltd. Al l R ight s Res erved .
Need help?
Do you have a question about the FLOW GENERATION IDEX and is the answer not in the manual?
Questions and answers