Advertisement
Quick Links
Package Contents
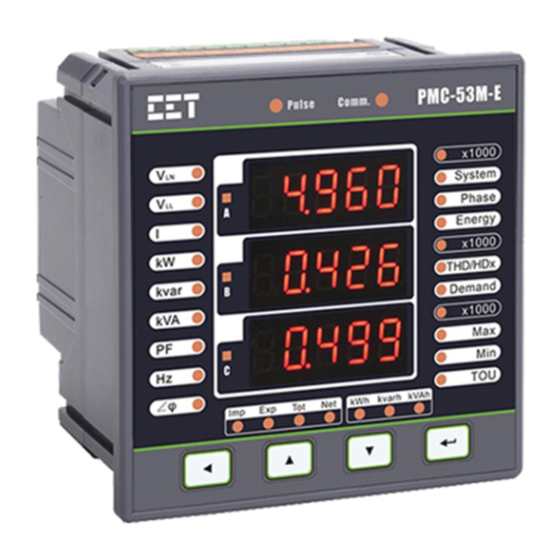
Meter Overview
Front Panel
A
kWh/kvarh LED Pulse Output
B
Phase Indicators
C
Parameters
D
Import/Export/Total/Net LED Indicators
E
Communication Indicator
Using the Front Panel Buttons
Buttons
Pressing this button scrolls through the available
measurements indicated by the LEDs on the left side of
<
>
the Front Panel under a particular menu as indicated by
the LEDs on the right side of the Front Panel.
Pressing this button scrolls to the previous measurement
for a particular parameter under the menu items:
< >
<THD/HDx>, <Demand Max> and <Max>, <Min> and
<TOU>. This button is ignored for the <System>, <Phase>,
<Demand> and <Energy> menu items.
Pressing this button scrolls to the next measurement for a
particular parameter under the menu items: <THD/HDx>,
< >
<Demand Max> and <Max>, <Min> and <TOU>. This
button is ignored in <System>, <Phase>, <Demand> and
<Energy> Menus.
Pressing this button scrolls through the different menus as
indicated by the LEDs on the right side of the Front Panel:
<System>, <Phase>, <Energy>, <THD/HDx>, <Demand>,
<
>
<Max Demand>, <Max>, <Min> and <TOU>.
Pressing this button for 2 seconds or more enters the Setup
Configuration mode.
Mounting the Meter
Remove the installation clips from the meter.
Fit the meter through a 92mmx92mm cutout as shown in the right
figure.
Re-install the installation clips and push the clips tightly against the
panel to secure the meter.
PMC-53M-E Quick Start Guide
a. PMC-53M-E with all mounting clips and plug-in connectors installed
b. Factory Test Report
c. CD with PMC-53M-E User Manual
d. Quick Start Guide (this document)
F
G
H
I
J
Data Display Mode
Version 1.01
Rear View - 4DI, 2DO, RS-485
Measurements
x1000 Scaling Factor
Front Panel Buttons
Voltage Input Terminals
RS-485 Terminals
• Before a parameter is selected for modification, pressing this button returns to the
previous menu level if it's currently in a sub-menu. Otherwise, this button is ignored.
• Once a numeric parameter is selected, pressing this button moves the cursor to the left
by one position. Otherwise, this button is ignored.
• Before a parameter is selected for modification, pressing this button goes back to the
last parameter in a particular menu or sub-menu.
• If a parameter is already selected, pressing this button increments a numeric value or
goes back to the last enumerated value in the selection list.
• Before a parameter is selected for modification, pressing this button advances to the
next parameter in a particular menu or sub-menu.
• If a parameter is already selected, pressing this button decrements a numeric value or
advances to the next enumerated value in the selection list.
• Once inside the Setup Configuration mode, pressing this button selects a parameter
for modification or chooses whether to enter a sub-menu by selecting YES or NO.
• After changing the parameter pressing this button again saves the new setting into
memory.
• Pressing this button for 2 seconds anywhere exits the Setup Configuration mode.
Serial Number & Warning Labels
K
Current Input Terminals
L
Power Supply Terminals
M
Optional DI Terminals
N
Optional DO Terminals
Setup Configuration Mode
Revision Date: October 26, 2020
Advertisement

Subscribe to Our Youtube Channel
Related Manuals for CET PMC-53M-E


Summary of Contents for CET PMC-53M-E
- Page 1 PMC-53M-E Quick Start Guide Version 1.01 Package Contents a. PMC-53M-E with all mounting clips and plug-in connectors installed b. Factory Test Report c. CD with PMC-53M-E User Manual d. Quick Start Guide (this document) Meter Overview Front Panel Rear View - 4DI, 2DO, RS-485 Serial Number &...
- Page 2 Wiring Diagrams 3P4W, Direct Connection, 3CTs 3P4W, 3PTs, 3CTs 3P3W, Direct Connection, 3CTs 3P3W, Direct Connection, 2CTs 3P3W, 2PTs, 3CTs 3P3W, 2PTs, 2CTs 1P3W, Direct Connection, 2CTs 1P2W L-N, Direct Connection, 1CT 1P2W L-L, Direct Connection, 1CT Basic Setup Parameters Menu Parameters Description...
Need help?
Do you have a question about the PMC-53M-E and is the answer not in the manual?
Questions and answers