
Related Manuals for Parmco HX-2-6NF-ZLIND

Summary of Contents for Parmco HX-2-6NF-ZLIND
- Page 1 Installation and Operating Instructions Model: HX-2-6NF-ZLIND For your convenience, we recommend to attach the serial number label HERE. 727626112018...
- Page 2 727626112018...
- Page 3 Dear Valued Customer, Thank you and congratulations on purchasing your new Parmco appliance. All Parmco products are made to the highest quality and design standards. We are sure you will enjoy your new appliance. As a note, please read through these instructions carefully. These will assist you appliance.
-
Page 4: Table Of Contents
INDEX Important Safety Warnings Product overview Top view Control panel Induction Cooking Before using your Induction Hob Using your Induction Hob To start cooking When you have finished cooking Using the Bridge Locking the controls Using the timer Over-Temperature Protection Detection of Small Items Auto Shutdown Cooking guidelines... -
Page 5: Important Safety Warnings
Important Safety Warnings Your safety is important to us. Please read this information before using your cooktop. Important safety instructions • Never leave the appliance unattended when in use. Boil-over causes smoking and greasy spillovers may ignite. • Never use your appliance as a work or storage surface. •... - Page 6 Installation Electrical Shock Hazard • Disconnect the appliance from the main electricity supply before carrying out any work or maintenance on it. • Connection to a good earth wiring system is essential and mandatory. • Alterations to the domestic wiring system must only be made by a qualified technician. •...
-
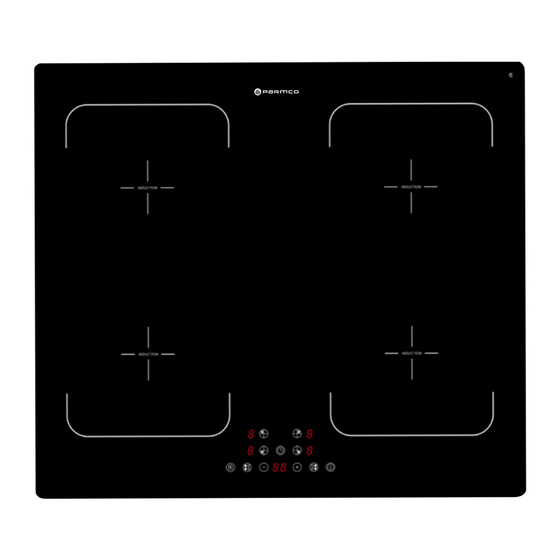
Page 7: Product Overview
• Handles of saucepans may be hot to touch. Check saucepan handles do not overhang other cooking zones that are on. Keep handles out of reach of children. • Failure to follow this advice could result in burns and scalds. Product Overview HX-2-6NF-ZLIND Top View Control Panel ... -
Page 8: Before Using Your Induction Hob
Before using your Induction Hob • Read this guide, taking special note of the ‘Safety Warnings’ section. • Remove any protective film that may still be on your Induction hob. Using the Touch Controls • The controls respond to touch, so you do not need to apply any pressure. •... -
Page 9: Using Your Induction Hob
Do not use cookware with jagged edges or a curved base. Make sure that the base of your pan is smooth, sits flat against the glass, and is the same size as the cooking zone. Use pans with a base diameter that is as large as the graphic of the zone selected. By using a slightly wider pot, energy will be used at its maximum efficiency. -
Page 10: When You Have Finished Cooking
2. Touch the ON/OFF control After switching the power on, the buzzer beeps once. All displays show “ – “ or “ – – “, indicating that the induction hob has entered standby mode. Note: if the display flashes “ “, alternatively with the heat setting, this means: •... -
Page 11: Using The Bridge
4. Beware of hot surfaces • “H” will show which cooking zone is still hot to touch. The signal will disappear when the surface has cooled down to a safe temperature. It can also be used as an energy saving function - if you want to heat further pans, use the hotplate that is still hot. Note: the residual heat indicator will disappear if the main power supply to the hob is turned off. -
Page 12: Locking The Controls
Locking the Controls You can lock the controls to prevent unintended use (for example children accidentally turning the cooking zones on). When this function is activated, all controls except the ON/OFF control are disabled. To lock the controls 1. Touch and hold the keylock symbol and the timer indicator display will show “Lo”... - Page 13 Touch the timer control, the display will show “30” Set the time by touching the “-“ or “+” regulating controls. Hint: Touch the “-“ or “+” controls once and the time will change in increments of 1 minute. Touch and hold the “-“ or “+” control and the time will change in increments of 10 minutes.
-
Page 14: Over-Temperature Protection
Over-Temperature Protection A temperature sensor can monitor the temperature inside the Induction hob. When excessive temperature is detected, the Induction hob will stop operation automatically. Detection of Small Items When an unsuitable sized/non-magnetic pan, or some other small item (e.g. knife, fork, key) has been left on the hob, the hob automatically goes on to standby after 1 minute. -
Page 15: Cooking Guidelines
Cooking Guidelines Take care when frying as oils and fats heat up very quickly, At extremely high temperatures, oils and fats will ignite spontaneously and present a serious fire risk. Cooking Tips • When food comes to boil, reduce the temperature setting. •... -
Page 16: Heat Settings
For stir-frying 1. Choose an induction compatible flat-based wok or a large frying pan. 2. Have all the ingredients and equipment ready. Stir-frying should be quick. If cooking large quantities, cook the food in several smaller batches. 3. Preheat the pan briefly and add two tablespoons of oil. 4. -
Page 17: Care And Cleaning
Care and Cleaning What? How? Important! Everyday soiling on glass 1. Switch the power to the cooktop off. • When the power to the cooktop is switched (fingerprints, marks, 2. Apply a cooktop cleaner while the off, there will be no ‘hot surface’ indication glass is still warm (but not hot!). -
Page 18: Troubleshooting
Troubleshooting Problem Possible causes What to do The induction hob cannot No power. Make sure the induction hob is connected be turned on. to the power supply and that it is switched Check whether there is a power outage in your home or area. -
Page 19: Fault Codes
The induction hob or a Technical fault. Please note down the error cooking zone has turned letters and numbers, switch itself off the power to the induction hob unexpectedly, a tone off at the wall, and contact a sounds and an error code qualified technician. -
Page 20: Technical Specifications
Technical Specification Cooking Hob HX-2-6NF-ZLIND Cooking Zones 4 Zones Supply Voltage 220-240V~ 50Hz Power front left (180mm):2000W rear left (180mm):1500W rear right (180mm):2000W front right (180mm):1500W Product Size L×W×H(mm) 590x520x77mm Cut Out Dimensions A×B (mm) 560x490mm Dimensions are approximate. Because we continually strive to improve our products we may change specifications and designs without prior notice. - Page 21 HX-2-6NF-ZLIND L(mm) W(mm) H(mm) D(mm) A(mm) B(mm) X(mm) 50 min Under any circumstances, make sure the Induction hob is well ventilated and the air inlet and outlet are not blocked. Ensure the Induction hob is in good working state. Note: The safety distance between the hob and the extraction system above at least be 650mm.
- Page 22 Before you install the hob, make sure that • the work surface is made of a heat-resistant material. • if the hob is installed above an oven, the oven has a built-in cooling fan. • the installation complies with all clearance requirements and New Zealand standards and regulations.
- Page 23 screw bracket base screw hold Connecting the hob to the mains power supply This hob must be connected to the main power supply by a qualified personnel. Before connecting the hob to the mains power supply, check that: 1. the domestic wiring system is suitable for the power drawn by the hob. 2.
- Page 24 ④ CONNECTION DIAGRAM Caution! Voltage of heating elements 220-240V ⑤ Caution! In the event of any connection the safety ② Wire must be connected to the E terminal. ① Recommended type of connection lead ④ For 220-240V earthed one-phase connection, bridges connect L terminals and N terminals, safety...