Table of Contents
Advertisement
Quick Links
Page 1 of 22
MG2639 Cellular Shield Hookup Guide
Introduction
The MG2639 Cellular Shield is a perfect addition to any Arduino project that
requires connectivity when there's no WiFi signal radiating or Ethernet drop
nearby. The ZTE MG2639 module, which this shield is built around,
supports SMS, TCP, UDP, and can even be used to make or receive phone
calls (imagine that!). That means you can send and receive text messages,
or use it to remotely connect your Arduino to the Internet. To top it off, it has
an integrated GPS receiver, so it doesn't get lost.
The MG2639 Cellular Shield is the perfect centerpiece for any remotely-
operating project – whether it's a text-message-triggered MP3 player, an
environmental monitor logging to data.sparkfun.com, or a new iteration of
the Port-O-Rotary telephone.
Covered In This Tutorial
This tutorial aims to answer any and every question you have about the
MG2639 Cellular Shield. In the beginning, we'll focus on the hardware of
the board – looking at the schematic, pin-outs, and jumpers on-board. Then
we'll discuss what assembly steps to take before connecting the shield to
your Arduino – finding the right power supply, plugging in a SIM card, and
so on. Finally we'll show off the MG2639 Arduino library and document a
series examples that demonstrate how to use the module's TCP, SMS, and
phone functionalities.
This tutorial is split into sections. Click the links to the right if you want to
jump around to other sections.
Advertisement
Table of Contents

Subscribe to Our Youtube Channel
Related Manuals for sparkfun MG2639 Cellular Shield


Summary of Contents for sparkfun MG2639 Cellular Shield
- Page 1 MG2639 Cellular Shield Hookup Guide Introduction The MG2639 Cellular Shield is a perfect addition to any Arduino project that requires connectivity when there’s no WiFi signal radiating or Ethernet drop nearby. The ZTE MG2639 module, which this shield is built around, supports SMS, TCP, UDP, and can even be used to make or receive phone calls (imagine that!).
-
Page 2: Required Materials
Page 2 of 22 Required Materials Aside from the MG2639 Cellular Shield itself, there are a few extra components you’ll need to connect it all up. Here’s a list of recommended products which we will use in this guide: • SparkFun RedBoard – You’ll need a “brain” to control the cellular shield. -
Page 3: Suggested Reading
Hardware Overview Before you get to connecting the MG2639 Cellular Shield to your Arduino, you should familiarize yourself with the features and abilities of the board. This page serves as an overview of the shield’s components and pin-outs. - Page 4 Arduino’s hardware UART. Check out the “Jumpers” section below for more information. LED Status Indicators There are a trio of LEDs on the MG2639 Cellular Shield which indicate connectivity or power status: • POWER – This red LED is connected to the MG2639 module’s power supply line.
- Page 5 Page 5 of 22 The “BOOT” button connects to the MG2639’s PWRKEY input, which turns the module on or off. This button works exactly as you might expect any cell phone power button to work. If the module is off, hold the button down for 2-5 seconds then release to turn it on.
-
Page 6: Hardware Assembly
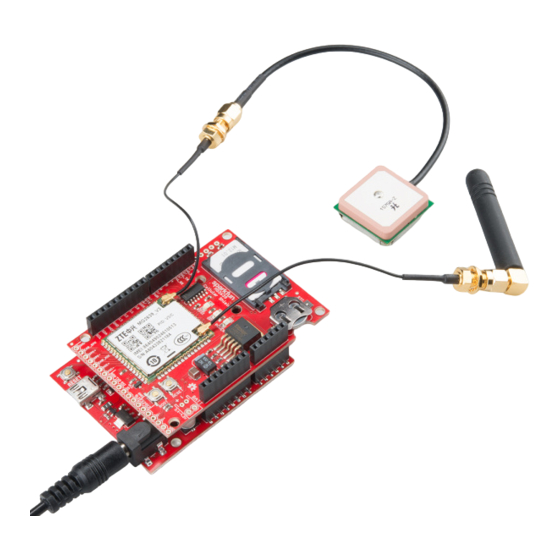
Hardware Assembly Now that you’re familiar with the components and inner workings of the MG2639 Cellular Shield, it’s time for some assembly! Soldering You’ll need to solder a header of some kind to the shield, in order to connect it to your Arduino. - Page 7 Page 7 of 22 CE L- 08347 Snapping these U.FL connectors can be tricky! Carefully line up the little head of the connector with the "GSM" or "GPS" label, then press down with your thumb or finger. It can be difficult to get enough force from your finger, so once you have good alignment you may want to use the blunt, rounded end of the cell antenna to snap the connector in place.
-
Page 8: Supplying Power
Page 8 of 22 • SPK+ and SPK- – Differential speaker interface. If using this interface, the two pins of a speaker can be tied directly to these two pins. • EAR_MIC – “Earpiece” microphone. This is a single-ended audio input. - Page 9 Page 9 of 22 The operating voltage range of the MG2639 (3.4-4.2V) makes it an ideal candidate for direct LiPo battery supply. The Shield can be powered through a LiPo battery, but there are some adjustments you’ll need to make to the bottom-side jumpers before doing so.
- Page 10 SoftwareSerial library, which the Cellular Shield library depends on.) Download and Install the Arduino Library We’ve written an Arduino library specifically for the MG2639 Cellular Shield. Click the button below to download it, or clone it from our GitHub repository.
- Page 11 Page 11 of 22 To actually set the sketch into motion, open up your serial monitor and send any character. After a few moments, the monitor should respond with a number of information tidbits about your shield: The sketch will finish faster if you turn the module on before running it. Try holding down the “BOOT”...
-
Page 12: Running The Example
If your cellular plan has SMS-ability, give the MG2639_SMS_Responder example a try! With the SFE_MG2639_CellularShield library installed, open the sketch by going to File > Examples > SparkFun MG2639 CellShield > MG2639_SMS_Responder. You shouldn’t have to change anything here, simply upload the sketch to your Arduino/shield combo. - Page 13 Page 13 of 22 As with the previous example, to start the sketch, open your serial monitor, and send any character. The Arduino will poll the shield for its phone number, then ask you to send a text message. Any text messages received will be printed out to the Serial Monitor along with the sending phone number and date.
- Page 14 Page 14 of 22 Checking for available message function is defined for you to check if any sms.available(sms_status) read and/or unread messages have been received. The value returned by this function may not be what you expect, though – it returns the index of the first requested message.
- Page 15 Page 15 of 22 Here’s an example usage: sms.start(sms.getSender()); sms.print("Analog 0 is: "); sms.print(analogRead(A0)); int8_t status = sms.send(); if (status > 0) Serial.println("SMS successfully sent"); Deleting a Stored SMS Due to limitations of the library and the Arduino’s memory, we can only keep track of so many (256 by default) unread messages.
- Page 16 Given a domain name, the MG2639 supports DNS IP lookup with the function. Unlike hostByName(const char * domain, IPAddress * ipRet) , this function doesn’t return an IP address by value – instead it’ll localIP() return the requested IP by reference. For example, if you want to look up the IP address of sparkfun.com:...
-
Page 17: Sending And Receiving
To connect to a remote IP address, use either gprs.connect(IPAddress ip, unsigned int port) to connect to gprs.connect(const char * domain, unsigned int port) an IP address or domain string. For example, to connect to SparkFun on port 80 (the good, old, HTTP port), send this: const char sparkFunDomain[] = "sparkfun.com"; int connectStatus; connectStatus = gprs.connect(sparkFunDomain, 80);... - Page 18 MG2639 can only interact with one at a time. Running the Example To load up the MG2639_Phone example, go to File > Examples > SparkFun MG2639 CellShield > MG2639_Phone. Depending on which audio channel you use, you may need to alter the line to phone.setAudioChannel(AUDIO_CHANNEL_DIFFERENTIAL)
- Page 19 Page 19 of 22 If a call is coming in, the serial terminal will print a message saying so. Press any key to answer it. While the call is active, press any key to hang Using the Library: Phone Once again, to segment out the library, a separate class is defined for phone functions: .
- Page 20 Memory is at a real premium. You'll get a compile error if the library isn't updated. Running the Example Open the MG2639_Phant example sketch by going to File > Examples > SparkFun MG2639 CellShield > MG2639_Phant.
- Page 21 Resources & Going Further We hope you’ll enjoy creating with the MG2639 Cellular Shield. If you have any questions about the board itself, these resources may be helpful: • MG2639 Cellular Shield GitHub Repository •...
- Page 22 Electric Imp. Whether you want to connect an LCD to your shield to make a fully navigable cell phone, or want to log sensor data to data.sparkfun.com, the MG2639 Cellular Shield should serve as a solid launching point.
Need help?
Do you have a question about the MG2639 Cellular Shield and is the answer not in the manual?
Questions and answers