Advertisement
Quick Links
Getting Started with Chibi Chip and Clip
Introduction
Note: Content and images courtesy of Chibitronics.
Looking to add more functionality to your paper circuits? This tutorial goes over the how to assemble the Chibi
Chip programmable microcontroller with the Chibi Clip to add more functionality to your paper circuits! We will also
go over how to program your Chibi Chip microcontroller board by writing code (block-based and text-based) in a
browser-based code editor and then transmit code through sound to your board.
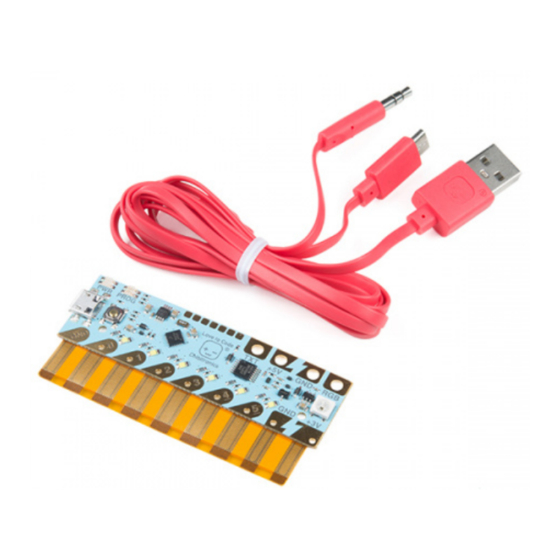
Love to Code Chibi Chip Microcontroller Board
DEV-14591
Advertisement

Related Manuals for sparkfun DEV-14591


Summary of Contents for sparkfun DEV-14591
- Page 1 Chip programmable microcontroller with the Chibi Clip to add more functionality to your paper circuits! We will also go over how to program your Chibi Chip microcontroller board by writing code (block-based and text-based) in a browser-based code editor and then transmit code through sound to your board. Love to Code Chibi Chip Microcontroller Board DEV-14591...
- Page 2 Love to Code Chibi Clip Mounting Accessory DEV-14593 Ready? Let’s get started! Required Materials To follow along with this tutorial, you will need the following materials. You may not need everything though depending on what you have. Add it to your cart, read through the guide, and adjust the cart as necessary. Chibi Chip Programmable Microcontroller Board Chibi Clip Mounting Accessory Programming Cable with USB and Audio Connectors...
- Page 3 Suggested Reading You may need to know the following concepts before working with one of these boards: What is a Circuit? Voltage, Current, Resistance, and Ohm's Law Every electrical project starts with a circuit. Don't know Learn about Ohm's Law, one of the most fundamental what a circuit is? We're here to help.
- Page 4 Suggested Viewing How to Assemble the Chibi Clip Hardware Hookup Remove example paper insert.
- Page 5 Remove the adhesive tape from your clip holder. Flip the clip over so that the flat side showing “Chibitronics” faces up and open the clip. Hold your Chibi Chip with flat side facing up and insert the flexible part into the three notches on the mouth of the clip.
- Page 6 Slide the rigid board into the hook at the top of your clip. You’re done! Now you can open and close the clip with your Chibi Chip attached. Try creating a simple circuit with one LED and traces that align to the Chibi Chip and clip's tabs.
- Page 7 Removing Chibi Chip from Clip If you need to remove the Chibi Chip from your clip, slide out the flexible part from the clip and the rest of the board will slide off. Power Your Circuit You can power your Chibi Chip with any 5V USB power supply! Here are a few examples. Love to Code Powered Binder ...
- Page 8 Plugging in and Powering on from Chibitronics on Vimeo. Computer USB Port You can also use a computer or laptop USB port to power the Chibi Chip. USB Wall Adapter USB wall adapters also make great power supplies since you don’t need to worry about running down batteries. USB Battery Packs...
- Page 9 Finally, USB phone charger battery packs work as a handy portable power supply! Make sure your charger battery pack has an on/off switch so that you can keep the power supply on. The Chibi Chip runs on low power so the battery pack may automatically turn off by itself.
- Page 10 Press the PROG button on the Chibi Chip and hold it until the PROG light blinks and stays red. This puts your Chibi Chip into programming mode – it’ll know to listen for code! Open your programming editor of your choice and write some code! You can either go with a block-based code editor or text-based code editor.
- Page 11 To start coding in the editor, head over to https://makecode.chibitronics.com/. CHIBI CHIP'S MAKECODE ONLINE EDITOR Upload Your Block-Based Code Once you head over to MakeCode, click on the “+ New Project”. You can also follow along by clicking on “Get Started! >...
- Page 12 Link the blocks together to blink the LED like so. Check to see that the PROG light on your board is red. If it isn’t, press the PROG button until the light stays red. Then press the Upload button at the bottom of the page. Now you should see this sound animation appear on the screen.
- Page 13 Now that you have your first program uploaded. Try playing with the code and creating your own light and blink patterns! Software: ChibiScript (Arduino) If you would like to start with text-based coding, try using ChibiScript, an Arduino-based beginner-friendly coding language.
- Page 14 Check to see that the PROG light on your board is red. If it isn’t, press the PROG button until the light stays red. Finally, click the Upload button to play the code to your Chibi Chip! You will see a sound animation appear on the bottom of the screen. That means the code is being uploaded! When the code is done uploading, the red PROG light on your board will turn back to green to let you know that programming is done successfully.
- Page 15 Now that you have your first program uploaded. Try playing with the code and creating your own light and blink patterns! Love to Code (LtC) STEM Reimagined: Craft Meets Code Note for Educators: Love to Code Vol 1 is made available under a CC BY-SA-4.0 license. This means you are free to download, copy, print, translate, and remix elements of the book.
- Page 16 Love to Code Volume 1 Note: The Love to Code (LtC) Volume 1 storybook is included in the Love to Code Chibi Chip Starting Kit. It uses the Chibiscript and Arduino code. Love to Code Creative Coding Kit KIT-14590 Both adaptations are free for download! Click on the links below based on your programming preference and download to start coding with the Chibi Chip.
- Page 17 Check out the Chibitroinics demo videos to help guide you through the chapters. The following videos were filmed for the Chibiscript and Arduino code. If you are following along with the Love to Code Volume 1 MakeCode Edition, the code will be similar but in block-based code. Chapter 1: Light Up an LED Walk-through of Chapter 1: Light up an LED from Chibitronics on Vimeo.
- Page 18 Walk-through of Chapter 3: Add a Switch! (part 1) from Chibitronics on Vimeo. Walk-through of Chapter 3: Add a Switch! (part 2) from Chibitronics on Vimeo Chapter 4: Fade In and Out!
-
Page 19: Troubleshooting
Walk-through of Chapter 4: Fade in and out! from Chibitronics on Vimeo. Troubleshooting If the sound animation didn’t appear, try refreshing the page and uploading again. Check that your volume is all the way up and unmuted. You can test this by unplugging the audio cable and see if you can hear the static (that’s your code!) when you press the upload button. - Page 20 Chibi Chip Default Firmware Chibi Chip Schematic (PDF) Vimeo: Chibitronics - Demo videos SparkFun Product Showcase: Chibitronics Paper and Sticker Circuits SparkFun Paper Circuit Templates Need some inspiration for your next project? Try crafting your own paper circuit holiday greeting card from...
- Page 21 LED Butterfly Pop Up Card Craft a Holiday Greeting with Love to Code Craft an illuminated butterfly pop up card with copper Craft your own paper circuit holiday greeting using the tape, two LEDs, and a battery. LEDs, a Chibi Chip, Love to Code!
Need help?
Do you have a question about the DEV-14591 and is the answer not in the manual?
Questions and answers