Table of Contents
Advertisement
Quick Links
Advertisement
Table of Contents

Related Manuals for Life Fitness Integrity SL


Summary of Contents for Life Fitness Integrity SL
- Page 1 Integrity SL Service Manual REV July 15, 2021...
- Page 3 Latin America and Caribbean* Spain Hong Kong Life Fitness, LLC Life Fitness IBERIA Life Fitness Asia Pacific LTD 10601 W Belmont Ave C/Frederic Mompou 5,1º1ª 32/F, Global Trade Square Franklin Park, IL 60131 U.S.A. 08960 Sant Just Desvern Barcelona...
-
Page 4: Table Of Contents
Configuration..........71 © Copyright , Life Fitness, LLC. All Rights Reserved. Life Fitness, Hammer Strength, Cybex, ICG and SCIFIT are registered trademarks of Life Fitness, LLC and its affiliated companies and subsidiaries. Brunswick and related trademarks used under license from Brunswick Corporation. - Page 5 Authorized....153 © Copyright , Life Fitness, LLC. All Rights Reserved. Life Fitness, Hammer Strength, Cybex, ICG and SCIFIT are registered trademarks of Life Fitness, LLC and its affiliated companies and subsidiaries. Brunswick and related trademarks used under license from Brunswick Corporation.
-
Page 6: Safety Instructions
1. Safety Safety Instructions Read all instructions before using Life Fitness products. All Products WARNING: Health-related injuries may result from incorrect or excessive use of exercise equipment. It is STRONGLY recommended seeing a physician for a complete medical exam before undertaking an exercise program, particularly if the user has a family history of high blood pressure or heart disease, is over the age of 45, smokes, has high cholesterol, is obese, or has not exercised regularly in the past year. - Page 7 • Read all warnings on each product prior to starting a workout. • If warnings are missing or damaged, please contact Customer Support Services immediately for replacement warning labels. Warning labels are shipped with every product and should be installed before product is used. Life Fitness Family of Brands is not responsible for missing or damaged warning labels.
-
Page 8: Getting Connected
SAVE THESE INSTRUCTIONS FOR FUTURE REFERENCE. Getting Connected Connecting Your Product • SSID: LFwireless • Password: See your Life Fitness representative • Authentication Method: WPA2-Personal Registering Product with Halo 1. Go to the Halo website: https://www.halo.fitness 2. Click the Sign Up link. If you already have an account, Log In. -
Page 9: Immobilization Method - Integrity Sl - Treadmill
Immobilization Method - Integrity SL - Treadmill The purpose of immobilizing the treadmill is to prevent unauthorized use. The system causes immobilization of the treadmill when activated. 1. Enter Manager's Configuration: • Press the SPEED UP / DOWN arrow keys in the following sequence: UP, DOWN, UP, DOWN. -
Page 10: Introduction
Life Fitness, Hammer Strength, and ICG. • http://www.lifefitness.com/parts service parts ordering for Life Fitness, Cybex, SCIFIT, Hammer Strength, and ICG products along with warranty parts ordering and technician requests. • https://lfworld.lifefitness.com easy to find Knowledge Base articles with answers to frequently asked questions and product support documentation for Life Fitness, Cybex, SCIFIT, Hammer Strength, and ICG. -
Page 11: Maintenance
3. Maintenance Preventive Maintenance Tips NOTE: Safety of the equipment can be maintained only if the equipment is examined regularly for damage or wear. Keep the equipment out of use until defective parts are repaired or replaced. Pay special attention to parts that are subject to wear, as outlined below. -
Page 12: Maintenance And Wifi Bluetooth Led Indicator
Maintenance and WiFi Bluetooth LED Indicator In the manager configuration option several mileage parameters can be set. 1. Press the SPEED UP / DOWN arrow keys (Treadmill) or LEVEL UP / DOWN arrow keys (Non Treadmill) in the following sequence: UP, DOWN, UP, DOWN. 2. -
Page 13: Theory Of Operation
4. Theory of Operation Main Board (PCB-001) Theory of Operation: This is the main interconnection board that interfaces to the various PCBA’s in the console. There are two processors on this board. One is an i.MX8 quad core processor that runs the workout logic, drives LED displays, reads keypads, and services USB and wireless devices. - Page 14 Functions/Connectors: Base Power Contains power (+12 VDC or +24 VDC) from base, plus Verp and E-Stop signals. Base Signal Contains handlebar buttons, E-Stop (to magnet/tether), Life Pulse signals. Attachable TV Contains R/L audio input and TV detect signal from TV, plus IR control signal to Base Communication Contains RS-485 Rx &...
-
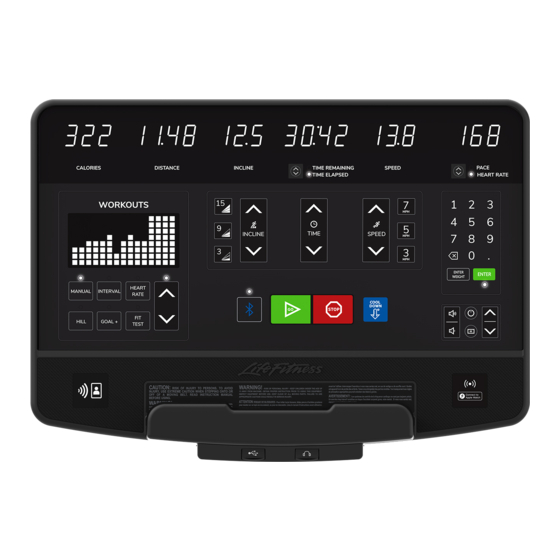
Page 15: Message Center Boards (Pcb-002)
Message Center Boards (PCB-002) Theory of Operation: There are three total Message Center boards: two sizes of LED Message Center boards plus the LCD Message Center board. The Treadmill’s LED Message Center board has twenty-six 14-segment LED characters, while the Non- Treadmill’s LED Message Center board has twenty 14-segment LED characters. -
Page 16: Hill Profile Board (Pcb-003)
The Hill Profile board is only used on Integrity SL consoles. It contains a rectangular array of 7x15 LED's that comprise the Hill Profile. All Integrity SL consoles use the same board. It does not have a processor on the board. Its data and LED's are driven by the Message Center boards. -
Page 17: Polar Board (Pcb-005)
Polar Board (PCB-005) Theory of Operation: The Polar board is an off-the-shelf RE-07 telemetry receiver board from Polar, Inc. It receives HR pulses from the user’s telemetry chest strap. The pulses may be coded or uncoded depending on the type of telemetry strap. If coded, the chest strap must first be within ~25”... -
Page 18: Gem3 Nfc Board (Pcb-006)
GEM3 NFC Board (PCB-006) Theory of Operation: The GEM3 NFC board is an off-the-shelf NFC receiver board from North Pole Engineering, Inc. The GEM3 NFC Module supports BLE, GymKit and NFC. The GEM3 NFC Module implements the NFC antenna on the board. It also contains a connector to interface to a NFC Tag board. -
Page 19: Nfc Tag Board (Pcb-007)
NFC Tag Board (PCB-007) Theory of Operation: The NFC Tag board is an off-the-shelf board from North Pole Engineering, Inc. The NFC Tag facilitates pairing an Android phone (with the LF Connect App open) to the console when the NFC Tag is read with the phone. Functions/Connectors: IO Connector Contains +3.3 VDC power and I2C signals from the GEM3 NFC Board. -
Page 20: Headphone Jack Board (Pcb-008)
Headphone Jack Board (PCB-008) Theory of Operation: Audio out is provided via a Headphone Jack board. The Headphone Jack board is inside the angled, over-molded assembly and is screwed into the rear bezel. The board also has TVS (Transient Voltage Suppressor) devices to shunt ESD energy to the chassis. -
Page 21: User Usb Port (Pcb-009)
User USB Port (PCB-009) Theory of Operation: A Type A USB port is provided to the user along the bottom edge of the console, behind the door with the USB symbol, next to the headphone jack. The USB port is inside the angled, over-molded assembly and is screwed into the rear bezel. -
Page 22: How To's
5. How To's Knowledge Base Knowledge Base for more detailed information. Main Board Replacement The main board is not serviceable. Core product details are stored in main PCB. The whole console needs to be replaced. Page 20 of 153... -
Page 23: Gem3 Nfc Board
GEM3 NFC Board Tools Required: • Phillips screwdriver • ESD (Electrostatic Discharge) grounding strap Time: 15 minutes Disconnect Power Source Unplug power cord from power outlet. WARNING: Shock and electrocution hazard. • Unplug unit and let sit 10 minutes before cleaning or performing maintenance. •... - Page 24 2. Unplug and remove headphone jack cable and USB cable from rear cover. Non-Treadmill console shown Item Description Front cover Main board Headphone jack cable USB connector cable Rear cover Remove GEM3 NFC Board 1. Unplug GEM3 NFC board by pressing center push lever and lifting both cable connectors. 2.
- Page 25 Install Rear Cover 1. Install headphone jack cable and USB cable into rear cover. Non-Treadmill console shown Item Description Front cover Main board Headphone jack cable USB connector cable Rear cover 2. Install screws securing rear cover to front cover. Non-Treadmill Treadmill Item...
- Page 26 Install Console to Unit 1. Connect base to console connections. Non-Treadmill Item Description CSAFE Base Switches, Lifepulse Base Power Base Com TV (optional) Treadmill Item Description CSAFE Base Interface Cable (Base Switches, ESS, Lifepulse) Base Power Base Com TV (optional) 2.
-
Page 27: Headphone Jack Cable
Headphone Jack Cable Tools Required: • Phillips screwdriver • ESD (Electrostatic Discharge) grounding strap • Cable tie Time: 15 minutes Disconnect Power Source Unplug power cord from power outlet. WARNING: Shock and electrocution hazard. • Unplug unit and let sit 10 minutes before cleaning or performing maintenance. •... - Page 28 2. Unplug and remove headphone jack cable and USB cable from rear cover. Non-Treadmill console shown Item Description Front cover Main board Headphone jack cable USB connector cable Rear cover Remove Headphone Jack Cable 1. Cut cable tie securing headphone jack cable to front cover 2.
- Page 29 Install Headphone Jack Cable 1. Plug headphone jack cable into main board and rear cover. Non-Treadmill console shown Item Description Front cover Main board Headphone jack cable USB connector cable Rear cover 2. Secure headphone jack cable to front cover using a cable tie. Cut access cable tie with side cutters. Install Rear Cover 1.
- Page 30 2. Install screws securing rear cover to front cover. Non-Treadmill Treadmill Item Description Qty. Front cover Rear cover Screw 7 screws Non-Treadmill, 8 screws Treadmill. Page 28 of 153...
- Page 31 Install Console to Unit 1. Connect base to console connections. Non-Treadmill Item Description CSAFE Base Switches, Lifepulse Base Power Base Com TV (optional) Treadmill Item Description CSAFE Base Interface Cable (Base Switches, ESS, Lifepulse) Base Power Base Com TV (optional) 2.
-
Page 32: Headphone Jack Connector
Headphone Jack Connector Tools Required: • Phillips screwdriver • Flat head screwdriver • ESD (Electrostatic Discharge) grounding strap Time: 15 minutes Disconnect Power Source Unplug power cord from power outlet. WARNING: Shock and electrocution hazard. • Unplug unit and let sit 10 minutes before cleaning or performing maintenance. •... - Page 33 2. Pry off USB / headphone panel exposing USB connector and headphone jack. NOTE: USB / headphone panel is held on with Tinnerman clips. Item Description Rear cover Tinnerman clip USB connector Headphone jack USB / headphone panel Remove Headphone Jack Connector 1.
- Page 34 2. Install two screws securing headphone jack connector to rear cover using a Phillips screwdriver. Item Description Rear cover Headphone jack connector Screw Install USB / Headphone Panel Press USB / headphone panel onto rear cover. IMPORTANT: Make sure both Tinnerman clips are in place and USB / headphone panel installs correctly. Item Description Rear cover...
- Page 35 Install Console to Unit 1. Connect base to console connections. Non-Treadmill Item Description CSAFE Base Switches, Lifepulse Base Power Base Com TV (optional) Treadmill Item Description CSAFE Base Interface Cable (Base Switches, ESS, Lifepulse) Base Power Base Com TV (optional) 2.
-
Page 36: Hill Profile Board
Hill Profile Board Tools Required: • Phillips screwdriver • Needle nose pliers • ESD (Electrostatic Discharge) grounding strap Time: 15 minutes Disconnect Power Source Unplug power cord from power outlet. WARNING: Shock and electrocution hazard. • Unplug unit and let sit 10 minutes before cleaning or performing maintenance. •... - Page 37 2. Unplug and remove headphone jack cable and USB cable from rear cover. Non-Treadmill console shown Item Description Front cover Main board Headphone jack cable USB connector cable Rear cover Remove Hill Profile Board 1. Gently pull out / up on the two tabs to unlatch flex connector on Hill Profile board, then remove ribbon cable by pulling it out of flex connector.
- Page 38 Install Hill Profile Board 1. Install four screws securing hill profile board to front cover using a Phillips screwdriver. Item Description Front cover Hill profile board Screw 2. Install ribbon cable by aligning carefully and inserting into Hill Profile flex connector, then press down / in on the two tabs to latch ribbon cable into flex connector on Hill Profile board.
- Page 39 2. Install screws securing rear cover to front cover. Non-Treadmill Treadmill Item Description Qty. Front cover Rear cover Screw 7 screws Non-Treadmill, 8 screws Treadmill. Page 37 of 153...
- Page 40 Install Console to Unit 1. Connect base to console connections. Non-Treadmill Item Description CSAFE Base Switches, Lifepulse Base Power Base Com TV (optional) Treadmill Item Description CSAFE Base Interface Cable (Base Switches, ESS, Lifepulse) Base Power Base Com TV (optional) 2.
-
Page 41: Lcd Board
LCD Board Tools Required: • Phillips screwdriver • Needle nose pliers • ESD (Electrostatic Discharge) grounding strap Time: 15 minutes Disconnect Power Source Unplug power cord from power outlet. WARNING: Shock and electrocution hazard. • Unplug unit and let sit 10 minutes before cleaning or performing maintenance. •... - Page 42 2. Unplug and remove headphone jack cable and USB cable from rear cover. Non-Treadmill console shown Item Description Front cover Main board Headphone jack cable USB connector cable Rear cover Remove LCD Board 1. Remove left and right ribbon cables by pulling down on board cable connectors. Item Description Ground terminal...
- Page 43 Install LCD Board 1. Install eight screws securing LCD board to front cover using a Phillips screwdriver. If a console has spacers between the front cover and the Message Center board, reuse the spacers when installing the new Message Center board. NOTE: Tighten screws in the following order.
- Page 44 2. Install screws securing rear cover to front cover. Non-Treadmill Treadmill Item Description Qty. Front cover Rear cover Screw 7 screws Non-Treadmill, 8 screws Treadmill. Page 42 of 153...
- Page 45 Install Console to Unit 1. Connect base to console connections. Non-Treadmill Item Description CSAFE Base Switches, Lifepulse Base Power Base Com TV (optional) Treadmill Item Description CSAFE Base Interface Cable (Base Switches, ESS, Lifepulse) Base Power Base Com TV (optional) 2.
-
Page 46: Led Board
LED Board Tools Required: • Phillips screwdriver • Needle nose pliers • ESD (Electrostatic Discharge) grounding strap Time: 15 minutes Disconnect Power Source Unplug power cord from power outlet. WARNING: Shock and electrocution hazard. • Unplug unit and let sit 10 minutes before cleaning or performing maintenance. •... - Page 47 2. Unplug and remove headphone jack cable and USB cable from rear cover. Non-Treadmill console shown Item Description Front cover Main board Headphone jack cable USB connector cable Rear cover Remove LED Board 1. Remove left and right ribbon cables by pulling down on board cable connectors. Item Description Left ribbon cable...
- Page 48 Install LED Board 1. Install eight screws securing LED board to front cover using a Phillips screwdriver. NOTE: Tighten screws in the following order. 2. Install left and right ribbon cables by aligning carefully and inserting into board cable connectors. Item Description Left ribbon cable...
- Page 49 2. Install screws securing rear cover to front cover. Non-Treadmill Treadmill Item Description Qty. Front cover Rear cover Screw 7 screws Non-Treadmill, 8 screws Treadmill. Page 47 of 153...
- Page 50 Install Console to Unit 1. Connect base to console connections. Non-Treadmill Item Description CSAFE Base Switches, Lifepulse Base Power Base Com TV (optional) Treadmill Item Description CSAFE Base Interface Cable (Base Switches, ESS, Lifepulse) Base Power Base Com TV (optional) 2.
-
Page 51: Nfc Tag Board
NFC Tag Board Tools Required: • Phillips screwdriver • ESD (Electrostatic Discharge) grounding strap Time: 15 minutes Disconnect Power Source Unplug power cord from power outlet. WARNING: Shock and electrocution hazard. • Unplug unit and let sit 10 minutes before cleaning or performing maintenance. •... - Page 52 2. Unplug and remove headphone jack cable and USB cable from rear cover. Non-Treadmill console shown Item Description Front cover Main board Headphone jack cable USB connector cable Rear cover Remove NFC Tag Board 1. Unplug NFC tag board by pressing center push lever and lifting cable connector. 2.
- Page 53 Install Rear Cover 1. Install headphone jack cable and USB cable into rear cover. Non-Treadmill console shown Item Description Front cover Main board Headphone jack cable USB connector cable Rear cover 2. Install screws securing rear cover to front cover. Non-Treadmill Treadmill Item...
- Page 54 Install Console to Unit 1. Connect base to console connections. Non-Treadmill Item Description CSAFE Base Switches, Lifepulse Base Power Base Com TV (optional) Treadmill Item Description CSAFE Base Interface Cable (Base Switches, ESS, Lifepulse) Base Power Base Com TV (optional) 2.
-
Page 55: Polar Board
Polar Board Tools Required: • Phillips screwdriver • ESD (Electrostatic Discharge) grounding strap Time: 15 minutes Disconnect Power Source Unplug power cord from power outlet. WARNING: Shock and electrocution hazard. • Unplug unit and let sit 10 minutes before cleaning or performing maintenance. •... - Page 56 2. Unplug and remove headphone jack cable and USB cable from rear cover. Non-Treadmill console shown Item Description Front cover Main board Headphone jack cable USB connector cable Rear cover Remove Polar Board 1. Unplug Polar board by pressing side push levers and lifting cable connector. 2.
- Page 57 Install Rear Cover 1. Install headphone jack cable and USB cable into rear cover. Non-Treadmill console shown Item Description Front cover Main board Headphone jack cable USB connector cable Rear cover 2. Install screws securing rear cover to front cover. Non-Treadmill Treadmill Item...
- Page 58 Install Console to Unit 1. Connect base to console connections. Non-Treadmill Item Description CSAFE Base Switches, Lifepulse Base Power Base Com TV (optional) Treadmill Item Description CSAFE Base Interface Cable (Base Switches, ESS, Lifepulse) Base Power Base Com TV (optional) 2.
-
Page 59: Reading Rack
Reading Rack Tools Required: • Phillips screwdriver • ESD (Electrostatic Discharge) grounding strap Time: 15 minutes Disconnect Power Source Unplug power cord from power outlet. WARNING: Shock and electrocution hazard. • Unplug unit and let sit 10 minutes before cleaning or performing maintenance. •... - Page 60 2. Unplug and remove headphone jack cable and USB cable from rear cover. Non-Treadmill console shown Item Description Front cover Main board Headphone jack cable USB connector cable Rear cover Remove Reading Rack Remove five screws securing reading rack to front cover using a Phillips screwdriver. Item Description Qty.
- Page 61 Install Rear Cover 1. Install headphone jack cable and USB cable into rear cover. Non-Treadmill console shown Item Description Front cover Main board Headphone jack cable USB connector cable Rear cover 2. Install screws securing rear cover to front cover. Non-Treadmill Treadmill Item...
- Page 62 Install Console to Unit 1. Connect base to console connections. Non-Treadmill Item Description CSAFE Base Switches, Lifepulse Base Power Base Com TV (optional) Treadmill Item Description CSAFE Base Interface Cable (Base Switches, ESS, Lifepulse) Base Power Base Com TV (optional) 2.
-
Page 63: Usb Connector Cable
USB Connector Cable Tools Required: • Phillips screwdriver • ESD (Electrostatic Discharge) grounding strap Time: 15 minutes Disconnect Power Source Unplug power cord from power outlet. WARNING: Shock and electrocution hazard. • Unplug unit and let sit 10 minutes before cleaning or performing maintenance. •... - Page 64 2. Unplug and remove headphone jack cable and USB cable from rear cover. Non-Treadmill console shown Item Description Front cover Main board Headphone jack cable USB connector cable Rear cover Remove USB Connector Cable 1. Cut cable tie securing USB connector cable to front cover 2.
- Page 65 Install USB Connector Cable 1. Plug USB connector cable into main board and rear cover. Non-Treadmill console shown Item Description Front cover Main board Headphone jack cable USB connector cable Rear cover 2. Secure USB connector cable to front cover using a cable tie. Cut access cable tie with side cutters. Install Rear Cover 1.
- Page 66 2. Install screws securing rear cover to front cover. Non-Treadmill Treadmill Item Description Qty. Front cover Rear cover Screw 7 screws Non-Treadmill, 8 screws Treadmill. Page 64 of 153...
- Page 67 Install Console to Unit 1. Connect base to console connections. Non-Treadmill Item Description CSAFE Base Switches, Lifepulse Base Power Base Com TV (optional) Treadmill Item Description CSAFE Base Interface Cable (Base Switches, ESS, Lifepulse) Base Power Base Com TV (optional) 2.
-
Page 68: Troubleshooting
6. Troubleshooting Knowledge Base Knowledge Base for more detailed information. Page 66 of 153... -
Page 69: Software
7. Software Software Update Tools Required: USB stick Time: 15 minutes 1. Place update file on root directory of USB drive __________.lfupd. 2. Insert USB stick into USB port in front panel. 3. Software update will auto start and display STARTING SOFTWARE UPDATE. The update will take 5-10 minutes. 4. -
Page 70: User Profiles
Software version Press the button to select. Press up or down on the navigation button to see the console software version, the console software part number, and the console software build date. Floor Model This option disables the Power Save feature. Selection options are On or Off. The default is Off (Power Save On). - Page 71 AGE = XX Press up or down on the navigation button to change the characters. Press left or right on the navigation button to move back and forth between characters, and press the button to erase characters. When finished, press .
- Page 72 then the message center will display PRESS ENTER TO SAVE. Selection options are 0-12% (F3) and 0-15% (T3 and T5). HIGH INC = XX.X Press up or down on the navigation button to change the characters. Press left or right on the navigation button to move back and forth between characters, and press the button to erase characters.
-
Page 73: Diagnostics
8. Diagnostics Manager Configuration Access Manager's Configuration - Treadmill 1. Enter Manager's Configuration: • Press the SPEED UP / DOWN arrow keys in the following sequence: UP, DOWN, UP, DOWN. • Press STOP. 2. Navigate through the Manager's Configuration Options using any ARROW key. 3. - Page 74 Manager Configuration Options - Treadmill Item Option Description Default 0: SW Version Displays which software version is currently installed. 1: Units Imperial Imperial for U.S. English skus Metric Metric for all skus except U.S. English 2: Language • 0 - English •...
- Page 75 Access Manager's Configuration - Non Treads 1. Enter Manager's Configuration: • Press the LEVEL UP / DOWN arrow keys in the following sequence: UP, DOWN, UP, DOWN. • Press STOP. Bike console shown 2. Navigate through the Manager's Configuration Options using any ARROW key. 3.
- Page 76 Manager Configuration Options - Bikes and Cross-Trainer Item Option Description Default 0: SW Version Displays which software version is currently installed. 1: Units Imperial Imperial for U.S. English skus Metric Metric for all skus except U.S. English 2: Language • 0 - English •...
- Page 77 Manager Configuration - PowerMill Item Option Description Default 0: SW Version Displays which software version is currently installed. 1: Units Imperial Imperial for U.S. English skus Metric Metric for all skus except U.S. English 2: Language • 0 - English •...
- Page 78 Manager Configuration - Arc Trainer Item Option Description Default 0: SW Version Displays which software version is currently installed. 1: Units Imperial Imperial for U.S. English skus Metric Metric for all skus except U.S. English 2: Language • 0 - English •...
-
Page 79: Access Diagnostics
Access Diagnostics 1. Enter Manager's Configuration: Non-Treadmill Treadmill Press the LEVEL UP / DOWN arrow keys in the Press the SPEED UP / DOWN arrow keys in the following sequence: UP, DOWN, UP, DOWN. following sequence: UP, DOWN, UP, DOWN. Press STOP. - Page 80 5. Navigate through diagnostic options and press ENTER to select option. Diagnostics (919 required to enter) Option Description 0 - Demo Mode 0 - off, 1 - On Collect Logs, Start LED Test Button Test RPM Test 5 - Log Level •...
-
Page 81: Error Code List Error 20
9. Error code list Error codes notify user of a problem condition and are displayed on the console. Error codes can also help to indicate the part of the unit most likely to be causing the problem. • Error 20 •... - Page 82 Error 20 Error Message Displayed to user • E20 • Notify Maintenance! Module Comm Error! Condition Console not communicating with the motor controller (base), at power-up. Cause • Un-programmed base board or installed console software does not support the product type/base. •...
-
Page 83: Error 21
Error 21 Error Message Displayed to user • E21 • Notify Maintenance! Communication Timeout (Motor Controller) • Notify Maintenance! Communication Timeout (Incline Controller) Condition Lost Communication with a Controller, after initially communicating. Cause • Bad Cables • Bad Motor Controller •... - Page 84 Error 25 Error Message Displayed to user • E25 • Incline Inoperative • Incline Inoperative - Continue if desired! Condition Lift Home Switch Error. Home switch on Treadmill is not being properly detected/depressed when the system is seeking the home position (0% incline). ARC and Bike LCB error: Incline Movement Feedback Stopped. Cause •...
- Page 85 Error 27 Error Message Displayed to user • E27 • Incline Inoperative • Incline Inoperative - Continue if desired! Condition Lift timeout error. Cause • Bad cable • Bad Motor Controller • Bad Incline Motor • Incline Motor is in Thermal Protection Mode Remedy •...
-
Page 86: Error 31
Error 31 Error Message Displayed to user • E31 • Unable to Attain Target Speed! Message goes away after 30 seconds Condition Running belt did not reach the target speed within the allotted time. Cause • Multiple, frequent speed changes - in older software, the speed attainment timer starts with first speed change request and does not reset for subsequent speed change requests before the timer expires, therefore the equipment may be in the midst of a speed change when the timer expires, this can result in an E31 •... -
Page 87: Error 33
Error 33 Error Message Displayed to user • E33 • Notify Maintenance! Motor Controller Error (Thermal Shutdown) Keep error on screen until OK button pressed. Condition Error sent by Motor Controller if there is a Motor Controller thermal trip. Temperature sensor on Motor Controller board. - Page 88 Error 34 Error Message Displayed to user • E34 • Notify Maintenance! Motor Controller Error (Hardware Current Trip) Keep error on screen until OK button pressed. End workout. Condition Error sent by Motor Controller when it detects an over current condition (i.e. current limit threshold exceeded. Also called - "Controller Fault 1 Trip".
- Page 89 Error 38 Error Message Displayed to user • E38 • Warning - Step Off Belt, Maximum Voltage Trip Keep error on screen until OK button pressed. End workout. Condition Error sent by the Motor Controller when it detects an over voltage condition. Applies to motorized equipment only. Cause •...
- Page 90 Error 39 Error Message Displayed to user • E39 • Notify Maintenance No Encoder Error Keep error on screen until OK button pressed. End workout. • Speed Sensor Errors Condition Error sent by Motor Controller when the encoder movement is expected but is not being detected. Run encoder test. Cause •...
- Page 91 Error 47 Error Message Displayed to user • E47 • Start Up Error Condition Message sent by the motor controller when no current is detected while trying to run the belt motor. Cause • Bad cables • Bad motor controller •...
- Page 92 Error 49 Error Message Displayed to user • E49 • Notify Maintenance! Motor Controller Error (Low Voltage Detected) Condition Error sent by motor controller when it detects an under voltage condition (Low Bus Voltage) Cause • Low AC voltage / Brownout •...
- Page 93 Error 50 Error Message Displayed to user • E50 • Workout Start Time-out Condition A workout was unable to start due to a fault in the system. This occurs if the system couldn't enable either the belt or incline motors. The incline motor was unable to reach home within 60 seconds. Cause •...
- Page 94 Error 62 Error Message Displayed to user Condition Error if the motor controller has unexpectedly disabled the main/belt motor. Cause Motor Controller improperly jumpered (on PowerMill) Remedy • Check motor controller jumpers • Check all AC, motor and/or encoder wiring and terminals •...
-
Page 95: Error 63
Error 63 Error Message Displayed to user Condition The Interface (Maintenance Interface Board) board software has failed a check sum integrity check. The board needs to be programmed or replaced. Cause • Software corrupted • Reprogram Remedy • Reprogram Maintenance Interface Board •... -
Page 96: Error 65
Error 65 Error Message Displayed to user • E65 • Motor Thermal Trip Condition The motors internal thermal switch tripped, disabling the motor. When motor cools down, the thermal switch will automatically reset. Cause • Motor thermal cable damaged. • Worn Belt / Deck •... -
Page 97: Error 71
Error 71 Error Message Displayed to user • E71 • Stuck hard key detected. Condition Reported by Maintenance Interface Board board when one or more keys are held in at power-up. Cause • Stuck key on Activity Zone • Stuck key in console Remedy •... - Page 98 Column Number Console Race Console Goal 0080 Mode* Workouts* * Denotes keys that are only on the Advanced console Page 96 of 153...
-
Page 99: Error 72
Error 72 Error Message Displayed to user • E72 • Activity Zone keypad not detected. Condition Reported by Maintenance Interface Board board when Activity Zone keypad is not connected / detected Cause • Activity Zone keypad is disconnected • Damaged cable to Activity Zone •... -
Page 100: Error 73
Error 73 Error Message Displayed to user Condition Indicates a short / over-current condition to the VCardio power pin on the CSAFE port(s). Cause • CSAFE connected device or cable shorted • Bad CSAFE board (Explore) • Bad board (which contains the CSAFE connector) Remedy •... -
Page 101: Error 74
Error 74 Error Message Displayed to user • E74 • Emergency Stop Drive Trip. Condition The consoles Emergency stop switch (i.e. E-Stop) drive circuitry detected a shorted condition. Cause • E-Stop switch components damaged • Cable to E-Stop circuit pinched •... -
Page 102: Error 75
Error 75 Error Message Displayed to user • E75 • doStartWorkflow-Up Failure Condition System unexpectedly timed out retrieving base data at power-up. Retry to power up first to see if there was a temporary failure. If problem persists, then check other causes. Cause •... -
Page 103: Error 76
Error 76 Error Message Displayed to user • E76 • System Error Condition Motor Controller detected a UL Error condition related to a hardware failure. Cause • Software update needed • Bad Motor Controller Remedy • Ensure that latest software is installed. Download the latest software https://www.halo.fitness/web/ softwareDownload.html. -
Page 104: Error 77
Error 77 Error Message Displayed to user Condition USB power is / was shorted. Cause Android/USB micro cable shorted Remedy • Check USB dongle, cable, device for damage • Replace USB dongle, cable, device • If USB still over-current with all USB cables/devices unplugged, then replace console Page 102 of 153... -
Page 105: Error 78
Error 78 Error Message Displayed to user • E78 • Notify Maintenance Motor Controller Error (Motor Thermal Shutdown) Keep error on screen until OK button pressed. Condition Error sent by Motor Controller if it detects the internal motor thermal / temperature switch tripped. This disables the motor until it cools down and the thermal switch re-engages. -
Page 106: Error 80
Error 80 Error Message Displayed to user • E80 • Notify Maintenance Brake Deactivated Keep error on screen until OK button pressed. Condition Error sent by the Motor Controller when it detects that the mechanical brake was inadvertently disabled. Try to enable the mechanical brake. -
Page 107: Error 81
Error 81 Error Message Displayed to user • E81 • Notify Maintenance RPM Limit Error Keep error on screen until OK button pressed. Condition Error sent by Motor Controller when it has exceeded its internal RPM limit. A step speed too far from the target speed was detected due to excessive weight or abrupt non-typical operation. -
Page 108: Error 82
Error 82 Error Message Displayed to user • E82 • Notify Maintenance! Dump Resistor Error Keep error on screen until OK button pressed. Condition Error sent by MC when the dump resistor maximum 'on-time' has been exceeded. Thus maximum allowed resistor power was dissipated for an excessive period. -
Page 109: Error 83
Error 83 Error Message Displayed to user • E83 • Notify Maintenance Dump Resistor Test Error Keep error on screen until OK button pressed. Condition Error sent by the Motor Controller when the dump resistor is not detected (i.e. test failed). Cause •... -
Page 110: Error 84
Error 84 Error Message Displayed to user • E84 • Notify Maintenance RPM Sensor Error Keep error on screen until OK button pressed. Condition Error sent by Motor Controller when the encoder RPM difference test has detected a significant and unexpected change. -
Page 111: Error 88
Error 88 Error Message Displayed to user • E88 • MC Lost Comm Condition Motor controller lost communication with the console. Reported after / if console re-establishes comm with motor controller. Cause • Bad communication cable • Bad console • Bad main PCBA •... -
Page 112: Error 89
Error 89 Error Message Displayed to user • E89 • Notify Maintenance Bus Dump Power Error Keep error on screen until OK button pressed. Condition Motor Controller reporting a Bus Dump resistor power to stop error. Maximum allowed resistor power was dissipated for an excessive time period stopping the machine. -
Page 113: Error 90
Error 90 Error Message Displayed to user • E90 • Notify Maintenance Steps Jammed Keep error on screen until OK button pressed. Condition Maximum positive force exceeded error, as reported by Motor Controller. The drive system detected having to push the steps excessively to maintain speed. -
Page 114: Error 91
Error 91 Error Message Displayed to user • E91 • Notify Maintenance Mechanical Brake Error Keep error on screen until OK button pressed. Condition Error sent by the Motor Controller when it detects the mechanical brake has failed which is detected when the Motor Controller has the brake locked but RPM's / movement is detected and it shouldn’t be. -
Page 115: Error 92
Error 92 Error Message Displayed to user • E92 • RPM MAX Error Condition This indicates that the console commanded an RPM value that was above the maximum allowed RPM value that the MC supports. This should not happen in the field - notify Engineering. Cause •... -
Page 116: Error 93
Error 93 Error Message Displayed to user • E93 Condition The RMS current drawn by the motor was excessive causing a step slowdown. Cause • Bad motor / wiring • Bad Motor Controller • Excessive user weight • Jumping / pushing on steps Remedy •... -
Page 117: Error 94
Error 94 Error Message Displayed to user • E94 • Notify Maintenance No Motor Current Keep error on screen until OK button pressed. Condition No Motor Current measured Cause • Motor might be unplugged from Motor Controller board • Bad Motor Controller Remedy •... -
Page 118: Error 34
Error 95 Error Message Displayed to user • E95 • Motor Controller Error • Notify Maintenance Max Temperature Trip • Warning - Step off Belt • Notify Maintenance, Maximum Voltage Trip • Notify Maintenance, Motor Thermal Trip • Low Voltage Detected •... -
Page 119: Error 98
Error 98 Error Message Displayed to user • E98 • Boot Checksum Condition This message is shown at power-up if the boot update software has failed a checksum integrity check, where xxxxx will be a number. Cause • Bad main PCBA •... -
Page 120: Error 99
Error 99 Error Message Displayed to user • E99 • MIB Checksum Failed Condition The MIB board software failed a checksum test. Cause Bad main PCBA Remedy • Reprogram main PCBA. • If error continues, replace main PCBA. • If reprogramming cannot be performed or still fails, replace console. Page 118 of 153... -
Page 121: Error 101
Error 101 Error Message Displayed to user E101 Condition Unable to communicate with LifePulse Module. Cause • No LifePulse board • LifePulse board un-programmed • LifePulse connector P7 damaged Remedy • Replace LifePulse board • Replace Fitcore board • Replace console •... -
Page 122: Error 103
Error 103 Error Message Displayed to user • E103 • RAM Error Condition This message is shown at power-up if the system failed an internal or external hardware RAM integrity check. Cause Bad Main PCBA Remedy • Replace Main PCBA •... -
Page 123: Error 104
Error 104 Error Message Displayed to user • E104 • Update Messages Condition This message is shown at power-up if the system has detected that the strings / messages are outdated. Cause Corrupt or outdated software Remedy Reprogram Main PCBA. Page 121 of 153... -
Page 124: Error 105
Error 105 Error Message Displayed to user • E105 • No Messages Condition This message is shown at power-up if the system detected that the strings / messages are missing. Cause Corrupt or outdated software Remedy Reprogram Main PCBA. Page 122 of 153... -
Page 125: Error 106
Error 106 Error Message Displayed to user • E106 • Messages In Boot Condition This message is shown at power-up if the system became stuck in the flash update mode while the strings / message binary file was being updated. Cause •... -
Page 126: Error 107
This message is shown at power-up if the motor controller is in boot flash update mode. Selecting the wrong software file when using the Life Fitness Flash Programmer will typically cause a checksum error and result in the motor controller remaining in boot mode. -
Page 127: Error 110
Error 110 Error Message Displayed to user E110 Condition LifePulse Module firmware update failed. Cause • Update image is corrupted • Intermittent connection issues • Damaged LifePulse module Remedy • Re-download software update, retry software update. • Check condition and connections of LifePulse cable, un-seat and re-seat connections, retry software update. •... -
Page 128: Error 111
Error 111 Error Message Displayed to user • E111 • LifePulse Module Boot Condition LifePulse Module in Boot. Cause • Corrupt or outdated software • Bad Main PCBA Remedy • Reprogram Main PCBA. • Replace Main PCBA. • Reprogram main PCBA •... - Page 129 Error 126 Error Message Displayed to user E126 Condition ECB base - Vsys power supply short detection. Cause • Damaged console wiring • Damaged console • Bad Vext brick power supply • Bad ECB Remedy • Check wiring between ECB and console for damage. Repair / replace as needed. •...
-
Page 130: Error 127
Error 127 Error Message Displayed to user E127 Condition ECB and RCB base - Vsys power supply over voltage detection. Cause • Bad Vext brick power supply • Bad ECB Remedy • Measure Vext to ensure rated V output. Vsys too high, replace brick power supply. •... -
Page 131: Error 137
Error 137 Error Message Displayed to user E137 Condition Stride Sensor is not connected on Tread Base. Cause • Certain models that may not have stride sensor hardware installed • Sensor not plug-in properly Remedy • Ensure Stride sensor is connected and cable / terminals in good condition Page 129 of 153... -
Page 132: Error 138
Error 138 Error Message Displayed to user E138 Condition Error 138 occurs after a software update. Cause • Failed firmware update attempt (majority of the time) • Corrupted firmware • Board failure Remedy • Ensure that latest software is installed. Download the latest software https://www.halo.fitness/web/ softwareDownload.html. -
Page 133: Error 139
Error 139 Error Message Displayed to user • E139 • Low Voltage Detected Condition Error sent by motor controller when it detects an under voltage condition (Low Bus Voltage) Cause • Low AC voltage / Brownout • Bad power cord / cables •... -
Page 134: Error 143
Error 143 Error Message Displayed to user E143 Condition Data Resolver Update Cause Replacement of a console or base printed circuit board Remedy • Error 143 indicates that an update is taking place to resychronize the persistant data. Allow adequate time for completion of the update and associated reboot •... -
Page 135: Error 148
Error Message Displayed to user E148 Condition CSN doesn't contain console type. Cause When the SKU manager can't determine the Console Type from the CSN. Remedy See Knowledge Base article Life Fitness SL Console Errors 148, 149, 150, 157. Page 133 of 153... -
Page 136: Error 149
Error Message Displayed to user E149 Condition SKU doesn't contain product type. Cause When the SKU manager can not determine the Product Type from the SKU. Remedy See Knowledge Base article Life Fitness SL Console Errors 148, 149, 150, 157. Page 134 of 153... -
Page 137: Error 150
Error 150 Error Message Displayed to user E150 Condition Base SKU is absent Cause SKU not programmed. Remedy See Knowledge Base article Life Fitness SL Console Errors 148, 149, 150, 157. Page 135 of 153... -
Page 138: Error 151
Error 151 Error Message Displayed to user E151 Condition Console GO / STOP / PAUSE key not detected Cause Console GO / STOP / PAUSE keypad disconnected. Remedy • Insure all connectors are connected properly (Specifically P13 and P14). P13 is connector for console-front GO / STOP / PAUSE keys. -
Page 139: Error 152
Error 152 Error Message Displayed to user E152 Condition Media keypad not detected Cause • Non-entertainment SKU • Media keypad disconnected Remedy • For all non-entertainment SKU's this error may occur once on every boot, ignore error. • Ensure console code is up to date (outdated code may pop-up message on screen - no pop-up with current code. -
Page 140: Error 153
Error 153 Error Message Displayed to user E153 Condition Base data remapped console to reboot soon Cause • Integrity C, X or Cybex 50L console. Data stored in the base is being upgraded. • This is not a fatal error. The process will take between a few seconds and as long as a minute. Remedy •... -
Page 141: Error 155
Error 155 Error Message Displayed to user E155 Condition Console Serial Number is missing. Cause • The Console was manufactured without a Serial Number Remedy • Replace the console • Return the console for correct console serial number reprogramming. Reprogramming is not possible in the field as it requires a serial debug connection Error Error... -
Page 142: Error 156
Error 156 Error Message Displayed to user • E156 • Console QR Code Error Condition Console QR code is missing. Cause Missing QR code Remedy • Enter Console QR code (in Diagnostics?). • Replace console. Page 140 of 153... -
Page 143: Error 157
Error Message Displayed to user E157 Condition Base Serial Number is missing. Cause The unit serial number is not present to be read from the base. Remedy See Knowledge Base article Life Fitness SL Console Errors 148, 149, 150, 157. Page 141 of 153... -
Page 144: Error 160
Error 160 Error Message Displayed to user E160 Condition Display Reset Detected Cause • Reseat flat flex cables • Replace flat flex cables • Replace Message Center PCBA • Replace console Remedy • Unplug flat flex cable (FFC) at MSG CTR connector (J13 on Main PCBA), then re-insert FFC into MSG CTR Connector (J13 on Main PCBA) and latch connector. -
Page 145: Error 161
Error 161 Error Message Displayed to user E161 Condition Display Detected SPI Communication Error Cause • Reseat flat flex cables • Replace flat flex cables • Replace Message Center PCBA • Replace console Remedy • Unplug flat flex cable (FFC) at MSG CTR connector (J13 on Main PCBA), then re-insert FFC into MSG CTR Connector (J13 on Main PCBA) and latch connector. -
Page 146: Error 162
Error 162 Error Message Displayed to user E162 Condition SPI Watchdog Timeout Cause • Board failed to read from IO board within threshold. • Reseat flat flex cables • Replace flat flex cables • Replace Message Center PCBA • Replace console Remedy •... -
Page 147: 10. Schematics
Life Fitness, Hammer Strength, and ICG. • http://www.lifefitness.com/parts service parts ordering for Life Fitness, Cybex, SCIFIT, Hammer Strength, and ICG products along with warranty parts ordering and technician requests. • https://lfworld.lifefitness.com easy to find Knowledge Base articles with answers to frequently asked questions and product support documentation for Life Fitness, Cybex, SCIFIT, Hammer Strength, and ICG. -
Page 148: Block Diagram - Console
Block Diagram - Console MESSAGE CENTER PCBA (TREAD LED: 14-SEG x 26 CHAR, NT LED: 14 -SEG x 20 CHAR TREAD & NT LCD: 288x16 PIXELS) HILL PROFILE PCBA (15x7 LED MATRIX) USB DONGLE MAIN PCBA (BT/WIFI) KEYPAD (LEDS) KEYPAD (MEMBRANE SWITCHES) POLAR PCBA... -
Page 149: Schematic Non-Treadmill
Schematic Non-Treadmill 1012741 (LED) / 1012929 (LCD) PCB: MESSAGE CENTER 1012736 PCB: LED MATRIX FFC 1MM 18 POS. 1 2 3 4 5 6 7 8 9 10 11 12 13 14 15 16 17 18 1013263-0001 1012774 PCB: MAIN 1013263-0006 (LED) 1013263-0005 (LCD) FFC 1MM... -
Page 150: Schematic Treadmill
Schematic Treadmill 1012745 (LED) / 1012929 (LCD) PCB: MESSAGE CENTER 1012736 PCB: LED MATRIX FFC 1MM 18 POS. 1 2 3 4 5 6 7 8 9 10 11 12 13 14 15 16 17 18 1013263-0001 1012774 PCB: MAIN 1013263-0006 (LED) 1013263-0005 (LCD) FFC 1MM... -
Page 151: Console Connector Access
Console Connector Access Non-Treadmill Integrity SL Item Description CSAFE Base Switches, Lifepulse Base Power Base Com TV (optional) Treadmill Item Description CSAFE Base Interface Cable (Base Switches, ESS, Lifepulse) Base Power Base Com TV (optional) Page 149 of 153... -
Page 152: 11. Led Chart
11. LED Chart Main PCB LED's Item LED Label LED Color Description Green This LED blinks fastly (~twice per second) to indicate there is communication between the Life Pulse Kinetis K17 uP and the i.MX8 uP. DS2, SERVICE This LED blinks slowly (~once every 2 seconds). It is the I’m alive indicator for the i.MX8’s M4 uP. -
Page 153: 12. Glossary
Light Emitting Diode - LED's provide display functionality and are commonly used for indicator lights. Lifepulse ™ Life Fitness' proprietary hardware and software system designed to measure user's heart rate by making electrical contact at user’s palms. Motor Drive Board... -
Page 154: 13. Warranty
Who Pays Transportation and Insurance For Service If the Product or any covered part must be returned to a service facility for repairs, We, Life Fitness, will pay all transportation and insurance charges for the first year. You are responsible for transportation and insurance charge after the first year. -
Page 155: Effects Of State Laws
(contact information found at the front of this manual) or visit the applicable local Life Fitness website to receive the specific warranty information for your country. Changes in Warranty Not Authorized No one is authorized to change, modify or extend the terms of this limited warranty.
Need help?
Do you have a question about the Integrity SL and is the answer not in the manual?
Questions and answers
Why does my treadmill stops every 2 minutes
The Life Fitness SL treadmill may stop every 2 minutes due to a fault detected by the motor controller, such as an over voltage condition or encoder error. Possible causes include:
- Faulty resistor, resistor wiring, or motor drive board dump circuit
- High line voltage
- Excessive workout load (e.g., high incline, heavy user, pushing belt)
- Faulty or misadjusted encoder
- Bad encoder cables or connections
These conditions can trigger safety shutdowns, causing the treadmill to stop.
This answer is automatically generated