Table of Contents
Advertisement
Advertisement
Table of Contents
Troubleshooting

Related Manuals for Life Fitness Integrity SL


Summary of Contents for Life Fitness Integrity SL
- Page 1 Integrity SL Console Owner's Manual 1016310-0001 REV AA...
- Page 3 Latin America and Caribbean* Spain Hong Kong Life Fitness, LLC Life Fitness IBERIA Life Fitness Asia Pacific LTD 10601 W Belmont Ave C/Frederic Mompou 5,1º1ª 32/F, Global Trade Square Franklin Park, IL 60131 U.S.A. 08960 Sant Just Desvern Barcelona...
- Page 4 User and Service Documents Link https://lifefitness9512.zendesk.com/hc/en-us https://www.lftechsupport.com/web/document-library/documents Additional information is available online using the links above. أ علاه إل ر إبط باستخدإم إ لإ ن تر نت على إضافية معلومات تتوفر 点击上面的链接可在线获取更多信息。 Flere oplysninger er tilgængelige online gennem linket ovenfor. Bijkomende informatie is online beschikbaar via bovenstaande link.
-
Page 5: Table Of Contents
Service..............54 © Copyright 2021, Life Fitness, LLC. All Rights Reserved. Life Fitness, Hammer Strength, Cybex, ICG and SCIFIT are registered trademarks of Life Fitness, LLC and its affiliated companies and subsidiaries. Brunswick and related trademarks used under license from Brunswick Corporation. - Page 6 FCC Compliance Information Before using this product, it is essential to read this ENTIRE operation manual and ALL assembly instructions. It describes equipment setup and instructs members on how to use it correctly and safely. FCC Warning - Possible Radio / Television Interference Contain: FCC ID: XRH-NPE-109;...
- Page 7 Bikes: For EN ISO 20957-5: 2016 Class SA accuracy testing, power at the crankshaft was measured by connecting the training equipment to a dynamometer. The crank was rotated and torque measured per EN ISO 20957-5: 2016 Class SA operating test conditions. Accuracy of the resulting watts displayed on the console and actual watts measured by dynamometer were found to be within the tolerance of EN ISO 20957-5: 2016 Class SA (+/- 5 Watts up to 50 Watts and +/- 10% over 50 Watts).
- Page 8 ANATEL Compliance Information - Brazil This equipment incorporates the product approved by ANATEL under the numbers ANATEL:00054-21-13575 and ANATEL:04800-21-05919. This equipment is not entitled to protection against harmful interference and may not cause interference in duly authorized systems. Page 6 of 55...
- Page 9 Statements of Purpose: • The Life Fitness Treadmill is an exercise machine that enables users to walk or run, in place, indoors on a moving surface. • The Life Fitness Cross-Trainer is an exercise machine that combines low-impact elliptical pedaling with push / pull arm motion to provide an efficient, effective total body workout indoors.
-
Page 10: Safety Instructions
1. Getting Started Safety Instructions Read all instructions before using Life Fitness products. All Products WARNING: Health-related injuries may result from incorrect or excessive use of exercise equipment. It is STRONGLY recommended seeing a physician for a complete medical exam before undertaking an exercise program, particularly if the user has a family history of high blood pressure or heart disease, is over the age of 45, smokes, has high cholesterol, is obese, or has not exercised regularly in the past year. - Page 11 • Read all warnings on each product prior to starting a workout. • If warnings are missing or damaged, please contact Customer Support Services immediately for replacement warning labels. Warning labels are shipped with every product and should be installed before product is used. Life Fitness is not responsible for missing or damaged warning labels.
- Page 12 • Do not stand on center tube of the Cross-Trainer. • The individual human power required to perform an exercise may be different than the mechanical power displayed on the Cross-Trainer. • Use caution when mounting or dismounting the Cross-Trainer. Before mounting, use the moving arms to bring the pedal nearest to you to the lowest position.
-
Page 13: Immobilization Method - Integrity Sl - Treadmill
Immobilization Method - Integrity SL - Treadmill The purpose of immobilizing the treadmill is to prevent unauthorized use. The system causes immobilization of the treadmill when activated. 1. Enter Manager's Configuration: • Press the SPEED UP / DOWN arrow keys in the following sequence: UP, DOWN, UP, DOWN. -
Page 14: Immobilization Method - Integrity Sl - Powermill
Immobilization Method - Integrity SL - PowerMill The purpose of immobilizing the PowerMill is to prevent unauthorized use. The system causes immobilization of the PowerMill when activated. 1. Enter Manager's Configuration: • Press the LEVEL UP / DOWN arrow keys in the following sequence: UP, DOWN, UP, DOWN. -
Page 15: Console Overview - Treadmill
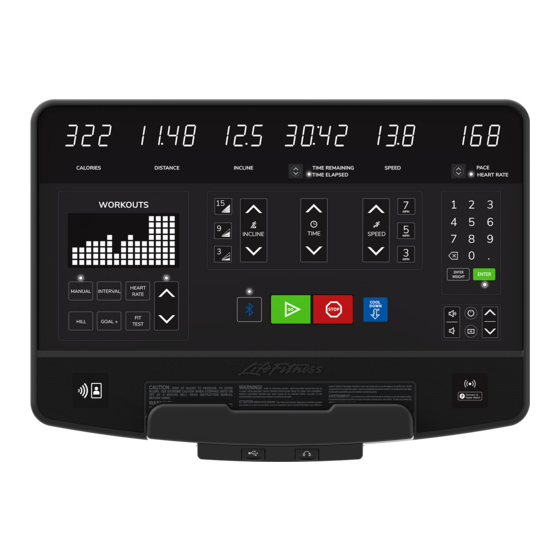
2. Overview Console Overview - Treadmill Displays Calories, Distance, Incline, Time Remaining / Time LED display Elapsed, Speed, Pace / Heart Rate Press one of these three keys during a workout to have the treadmill deck incline at the preset value. The preset values QUICK INCLINE keys and INCLINE UP and are: 3%, 9%, and 15%. - Page 16 Press to automatically begin a Quick Start workout. Press to resume a Paused workout. Press once during a workout to Pause the workout. Press STOP while in Pause to Stop the workout. COOL DOWN Press to activate cool down mode in a workout. Pair your mobile device to the console via Bluetooth Mobile Device Pairing proximity or NFC for log-in and workout tracking to the Life...
-
Page 17: Console Overview - Bikes And Cross-Trainer
Console Overview - Bikes and Cross-Trainer Displays RPM, MPH/KPH, Calories, Distance, Time LED display Remaining / Time Elapsed, Level, Watts, Heart Rate The profile of the currently selected workout is shown. Profile window Volume changes are also displayed. Select one of the workout categories: Manual, Power, Heart Rate, Hill, Goal +, Fit Test. - Page 18 Place traditional reading material as well as mobile devices Reading Rack / Tablet Holder and tablets in this built-in holder. A covered USB port used for charging devices and USB port updating software. A covered 3.5mm headphone jack used for wired audio Audio jack headsets.
-
Page 19: Console Overview - Powermill
Console Overview - PowerMill Displays Feet / Meters / Total Steps / Calories, SPM, Time LED display Remaining / Time Elapsed, Level, Floors Climbed / Heart Rate The profile of the currently selected workout is shown. Profile window Volume changes are also displayed. Select one of the workout categories: Manual, Power, Heart Rate, Hill, Goal +, Fit Test. - Page 20 Pair your mobile device to the console via Bluetooth proximity or NFC for log-in and workout tracking to the Life Mobile Device Pairing Fitness Connect app. Place traditional reading material as well as mobile devices Reading Rack / Tablet Holder and tablets in this built-in holder.
-
Page 21: Console Overview - Arc Trainer
Console Overview - Arc Trainer Displays SPM / Speed / Calories, Incline, Time Remaining / LED display Time Elapsed, Level, WATTS / Distance / Heart Rate The profile of the currently selected workout is shown. Profile window Volume changes are also displayed. Select one of the workout categories: Manual, Power, Heart Rate, Hill, Goal +, Fit Test. - Page 22 Place traditional reading material as well as mobile devices Reading Rack / Tablet Holder and tablets in this built-in holder. A covered USB port used for charging devices and USB port updating software. A covered 3.5mm headphone jack used for wired audio Audio jack headsets.
-
Page 23: Workouts
3. Workouts Workouts List Treadmill Cross-Trainer Bikes PowerMill Arc Trainer Quick Start Quick Start Quick Start Quick Start Quick Start Manual Manual Manual Manual Manual Time Goal Time Goal Time Goal Time Goal Time Goal Hill Hill Hill Hill Hill •... -
Page 24: Workout Descriptions
Workout Descriptions NOTE: Available workout categories and workouts vary depending on base type. See Workouts List. Quick Start Manual workout that skips workout setup and goes straight to workout. Manual Time Goal Manual workout that only has a requirement to end at a specific time duration. Hill Rolling Hill Moderate intensity repeating hill workout. - Page 25 Fit Tests A 5-minute submaximal test to predict VO2 max. Estimates cardiovascular fitness and Life Fitness Fit Test can be used to monitor improvements in endurance every 4 - 6 weeks. See Life Fitness Fit Test for more information. A 5-minute distance goal test based on the time needed to complete the required U.S.
- Page 26 Life Fitness Fit Test • The Life Fitness Fit Test estimates cardiovascular activity and can be used to monitor improvements in endurance every 4 - 6 weeks. • The Fit Test is considered to be a submax VO2 (volume or oxygen) test and gauges how well the heart supplies oxygenated blood to the exercising muscles and how efficiently those muscles receive oxygen from the blood.
- Page 27 20 - 21 <20 Life Fitness developed this rating scale based on VO2 max percentile distributions referenced in American College of Sports Medicine’s Guidelines for Exercise Testing and Prescription (8th E. 2010). It is designed to provide a qualitative description of a user’s VO2 max estimation, and a means of assessing initial fitness level and tracking improvement.
-
Page 28: Workout Setup - Treadmill
Workout Setup - Treadmill Manual Workouts (Tread) 1. Press the Manual workout selection key. 2. Use the Workout Selection Up and Down Arrow Keys to scroll until Time is shown. 3. Press Enter. Workout User Input Enter a range from 1-60 minutes on the Numeric Keypad or •... - Page 29 Hill Workouts (Tread) 1. Press the Hill workout selection key. 2. Use the Workout Selection Up and Down Arrow Keys to scroll until desired workout is shown. 3. Press Enter. Workout User Input Enter an intensity level range from 1-15 on the Numeric Keypad or use the Speed Up and Down Arrow Keys.
- Page 30 Interval Workouts (Tread) 1. Press the Interval workout selection key. 2. Use the Workout Selection Up and Down Arrow Keys to scroll until desired workout is shown. 3. Press Enter. Workouts User Input Enter a range from 4-15 on the Numeric Keypad or use the •...
- Page 31 Heart Rate Workouts (Tread) 1. Press the Heart Rate workout selection key. 2. Use the Workout Selection Up and Down Arrow Keys to scroll until desired workout is shown. 3. Press Enter. Workout User Input Enter a range from 1-60 minutes on the Numeric Keypad or •...
- Page 32 Workout User Input Enter a range from 1-60 minutes on the Numeric Keypad or • Time use the Time Up and Down Arrow Keys or Speed Up and Down Arrow Keys. Default is 30 minutes. Press Enter. Enter a range from 75-400 lbs. (34-180 kg) on the Numeric •...
- Page 33 Goals + Workouts (Tread) 1. Press the Goal + workout selection key. 2. Use the Workout Selection Up and Down Arrow Keys to scroll until desired workout is shown. 3. Press Enter. Workout User Input Enter a range from 0.5-30 miles (0.8-48 km) on the Numeric •...
-
Page 34: Workout Setup - Non Treads
Workout Setup - Non Treads NOTE: Available workouts vary depending on base type (Cross-Trainer, Upright Bike, Recumbent Bike, PowerMill Climber and Arc Trainer) Manual Workouts (Non-Tread) 1. Press the Manual workout selection key. 2. Use the Workout Selection Up and Down Arrow Keys to scroll until Time is shown. 3. - Page 35 Hill Workouts (Non-Tread) NOTE: Available workouts vary depending on base type. 1. Press the Hill workout selection key. 2. Use the Workout Selection Up and Down Arrow Keys to scroll until desired workout is shown. 3. Press Enter. Workout User Input Enter an intensity level range from 1-25 on the Numeric Keypad or use the Level Up and Down Arrow Keys.
- Page 36 Power Workouts (Non-Tread) NOTE: Available workouts vary depending on base type. 1. Press the Power workout selection key. 2. Use the Workout Selection Up and Down Arrow Keys to scroll until desired workout is shown. 3. Press Enter. Workout User Input Enter a range from 1-60 minutes on the Numeric Keypad or •...
- Page 37 Heart Rate Workouts (Non-Tread) 1. Press the Heart Rate workout selection key. 2. Use the Workout Selection Up and Down Arrow Keys to scroll until desired workout is shown. 3. Press Enter. Workout User Input Enter a range from 1-60 minutes on the Numeric Keypad or •...
- Page 38 Workout User Input Enter a range from 1-60 minutes on the Numeric Keypad or • Time use the Time Up and Down Arrow Keys or Level Up and Down Arrow Keys. Default is 30 minutes. Press Enter. Enter a range from 75-400 lbs. (34-180 kg) on the Numeric •...
- Page 39 Goals + Workouts (Non-Tread) NOTE: Available workouts vary depending on base type. 1. Press the Goal + workout selection key. 2. Use the Workout Selection Up and Down Arrow Keys to scroll until desired workout is shown. 3. Press Enter. Workout User Input Enter a range from 0.5-30 miles (0.8-48 km) on the Numeric...
- Page 40 Workout User Input Enter a range from 4-15 on the Numeric Keypad or use the • Intervals Level Up and Down Arrow Keys. Default is 8. Press Enter. Enter a range from 2-25 on the Numeric Keypad or use the •...
-
Page 41: Cool Down Mode
Cool Down Mode Press Cool Down to activate cool down mode in a workout. Users can pause the cool down mode by pressing Stop once. Users can end the cool down mode by pressing Stop twice. Treadmill Workout Duration (Non-Heart Rate Workouts) Cool Down Duration Less than 5 minutes 1 minute... - Page 42 • For Heart Rate, Watts, or Mets workouts, software will find the resistance level that is closest to the final Watts and use that resistance level reduced by half. • After every elapsed minute in Cool Down mode, the resistance will be reduced in half until Level 1 is reached. Once Level 1 is reached, it stays at Level 1.
-
Page 43: Getting Connected
• Mounting: wall or ceiling mountable (e.g. Meraki MR32 or Rukus R500) Cabling Requirements • CAT 5e or CAT 6 cabling can be used to connect your wireless access points to your wired network. Life Fitness recommends using CAT 6 cable for this purpose. -
Page 44: Registering Product With Halo
Registering Product with Halo 1. Go to the Halo website: https://www.halo.fitness 2. Click the Sign Up link. If you already have an account, Log In. 3. Click the Sign Up link in the Manager section. 4. Enter your information, and click Create Account to complete the process. 5. -
Page 45: Maintenance And Troubleshooting
5. Maintenance and Troubleshooting NOTE: Safety of the equipment can be maintained only if the equipment is examined regularly for damage or wear. Keep the equipment out of use until defective parts are repaired or replaced. The following preventive maintenance tips will keep the product operating at peak performance: •... -
Page 46: Maintenance Bluetooth Led Indicator
Maintenance Bluetooth LED Indicator In the manager configuration option several mileage parameters can be set. Item Option Description Maintenance 0 - Belt Mileage Manually set mileage parameter to trigger maintenance indicator (Treadmill only) 1 - Belt Reset Resets Belt Mileage after replacement (Treadmill only) 2 - Product Time Manually set product hours to trigger maintenance indicator... - Page 47 Belt transmitter is not within 3 ft. (0.9 m) of the heart rate Make sure the chest strap transmitter is within 3 ft. (0.9 m) receiver. of the heart rate receiver. Contact Life Fitness Customer Support Services for Polar ® telemetry heart rate chest strap battery is depleted.
-
Page 48: Manager Configuration
6. Manager Configuration Access Manager's Configuration - Treadmill 1. Enter Manager's Configuration: • Press the SPEED UP / DOWN arrow keys in the following sequence: UP, DOWN, UP, DOWN. • Press STOP. 2. Navigate through the Manager's Configuration Options using any ARROW key. 3. -
Page 49: Manager Configuration Options - Treadmill
Manager Configuration Options - Treadmill Item Option Description Default 0: SW Version Displays which software version is currently installed. 1: Units Imperial Imperial for U.S. English skus Metric Metric for all skus except U.S. English 2: Language • 0 - English •... -
Page 50: Access Manager's Configuration - Non Treads
Access Manager's Configuration - Non Treads 1. Enter Manager's Configuration: • Press the LEVEL UP / DOWN arrow keys in the following sequence: UP, DOWN, UP, DOWN. • Press STOP. Bike console shown 2. Navigate through the Manager's Configuration Options using any ARROW key. 3. -
Page 51: Manager Configuration Options - Bikes And Cross-Trainer
Manager Configuration Options - Bikes and Cross-Trainer Item Option Description Default 0: SW Version Displays which software version is currently installed. 1: Units Imperial Imperial for U.S. English skus Metric Metric for all skus except U.S. English 2: Language • 0 - English •... -
Page 52: Manager Configuration - Powermill
Manager Configuration - PowerMill Item Option Description Default 0: SW Version Displays which software version is currently installed. 1: Units Imperial Imperial for U.S. English skus Metric Metric for all skus except U.S. English 2: Language • 0 - English •... -
Page 53: Manager Configuration - Arc Trainer
Manager Configuration - Arc Trainer Item Option Description Default 0: SW Version Displays which software version is currently installed. 1: Units Imperial Imperial for U.S. English skus Metric Metric for all skus except U.S. English 2: Language • 0 - English •... -
Page 54: Specifications
7. Specifications Specifications Display LED or LCD* Ambient Temperature Range: 10°C to +40°C (50°F to 104°F) @ 85% RH (non-condensing) (Operating) Storage and Shipping -33°C to 71°C (-27°F to 160°F) Temperature Range Heart Rate Monitoring Patented Lifepulse ™ digital contact heart rate monitoring with DSP (Digital Signal Systems Processing) and Polar ®... - Page 55 Shipped Dimensions Tread Non Tread Tread Non Tread (LED) (LED) (LCD) (LCD Depth 6.75 in. (17 cm) 6.75 in. (17 cm) 6.75 in. (17 cm) 6.75 in. (17 cm) Width 22.5 in. (57.15 cm) 18.5 in. (47 cm) 22.5 in. (57.15 cm) 18.5 in.
-
Page 56: Getting Started What We Will Do To Correct Covered Defects
Who Pays Transportation and Insurance For Service If the Product or any covered part must be returned to a service facility for repairs, We, Life Fitness, will pay all transportation and insurance charges for the first year. You are responsible for transportation and insurance charge after the first year. -
Page 57: Overview Changes In Warranty Not Authorized
(contact information found at the front of this manual) or visit the applicable local Life Fitness website to receive the specific warranty information for your country. Changes in Warranty Not Authorized No one is authorized to change, modify or extend the terms of this limited warranty.
Need help?
Do you have a question about the Integrity SL and is the answer not in the manual?
Questions and answers