
Related Manuals for Westinghouse WFE912SB


Summary of Contents for Westinghouse WFE912SB
- Page 1 USER MANUAL 900MM COOKING APPLIANCES WFE912SB IMPORTANT SAFETY INSTRUCTIONS...
-
Page 2: Table Of Contents
We are sure you will find your new cooker a pleasure to use and a great asset to your cooking. Before you use WFE912SB .................. 5 the appliance, we recommend you read through the Before operating your appliance for the first time ..6 whole user manual which provides a description of the Installing your oven accessories ..........7... -
Page 3: Important Safety Instructions
IMPORTANT SAFETY INSTRUCTIONS Installation, cleaning and servicing Please read the user manual carefully and store in a handy place for later reference. Pass the user manual on • An authorised person must install this appliance. to possible new owners of the appliance. (Certificate of Compliance to be retained). - Page 4 IMPORTANT SAFETY INSTRUCTIONS WARNING WARNING WARNING WARNING Oven Child safety • During use the appliance becomes hot. Care should • This appliance is not intended for use by persons be taken to avoid touching the hot surfaces inside (including children) with reduced physical, sensory the oven.
-
Page 5: Wfe912Sb
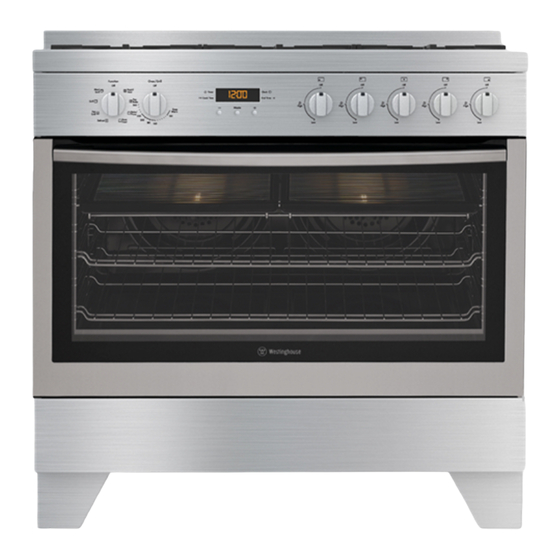
MODEL WFE912SB Gas hob, multi-function electric oven with electronic timer Removable wok trivet Stainless steel splashback (optional to fit) Removable cast iron trivet Gas burner Control panel Oven door Control Panel Oven Oven Clock/Timer Gas hob burner controls function temperature... -
Page 6: Before Operating Your Appliance For The First Time
BEFORE OPERATING YOUR APPLIANCE FOR THE FIRST TIME Preparing your appliance for the first time TIPS & INFORMATION IMPORTANT • Please remove all internal boxes and bags from the oven before operation. Setting the time • Please wipe out the oven interior prior to operation If you have purchased a model fitted with an electronic with warm soapy water and polish dry with a soft or programmable timer, you MUST set the time of day... -
Page 7: Installing Your Oven Accessories
INSTALLING YOUR OVEN ACCESSORIES Prior to installing accessories, remove all packaging and • Once the indents have passed the front edge of the remove plastic film from external panels. side rack, the shelf can be pushed completely in. • When fully inserted the shelf/tray should not interfere Side racks with the closed door. -
Page 8: Installing Your Cooktop Accessories
INSTALLING YOUR COOKTOP ACCESSORIES Installing trivets • The rubber feet on the trivets locate into the contours of the hob • Take care when placing the trivets as dropping them may damage the hob or trivet • The wok trivet sits on top of the trivet above the wok burner Trivets Wok trivet... -
Page 9: Using Your Gas Cooktop
USING YOUR GAS COOKTOP Using your gas hotplates Model WFE912SB NOTE: Gas controls turn anticlockwise from ‘Off’ and have limited movement. Lighting tlhe burners Electronic ignition These hobs are fitted with mains powered electronic Low heat burner (5.1MJ/h) ignition. When the appliance has been connected and the power is on, depressing any knob will release Used for simmering with small cookware items. -
Page 10: Using Your Oven
USING YOUR OVEN Understanding your oven functions (WFE912) Base Heat Rapid Heat Function 4 Heat comes from the element below the floor of the Function 1 oven. The Element is controlled by the thermostat and will turn on and off to maintain the set temperature. The Heat comes from the elements surrounding the fans as “Base Heat”... - Page 11 USING YOUR OVEN Maxi Grill oven temperature falls below the desired setting, the heating source switches on and the indicator light comes on again. Once the food is cooked, turn the temperature selector off in an anticlockwise direction. Do not force it right round in a clockwise direction as this will result in damage to the thermostat.
- Page 12 To check or cancel settings Setting the cooking duration • To check your settings, press the mode button until • Select the desired oven function and temperature. the indicator you want is flashing. • The oven indicator light will glow and the heating •...
-
Page 13: Cooking Test
COOKING TEST Get to know your new oven with this ‘Simple Test Cake’ • Make sure dishes will fit into the oven before you switch it on. Although we strive for a perfect performing oven, it’s • Keep edges of baking dishes at least 40mm from possible that there will be some variation in colour the side of the oven. -
Page 14: Cooking Guide
COOKING GUIDE Choosing the best oven settings The following table is intended as a guide and experience may show some variation in cooking times necessary to meet individual requirements. We recommend that you preheat your oven for 30 minutes. Modes without oven fan FOOD TEMPERATURE C OVEN SHELF POSITION*... - Page 15 Roasting Meat Grilling Guide Place the meat in the oven and set the temperature between 180°C and 200°C. (It is recommended to WARNING WARNING wrap your meats in an oven roasting bag or foil to prevent fats and oils from splattering, making it easier Always clean the grill/oven dish after every use.
-
Page 16: Dealing With Cooking Problems
DEALING WITH COOKING PROBLEMS (SEE ALSO TROUBLESHOOTING) PROBLEM CAUSES REMEDIES Uneven cooking: • Incorrect shelf position. – Select shelf that puts food in the centre of the oven. • Oven tray too large. – Experiment with other trays or dishes. •... -
Page 17: Cleaning Your Appliance
CLEANING YOUR APPLIANCE Gas hotplate WARNING WARNING • The trivets can be removed for cleaning by carefully lifting them from the hob. • Always make sure that the oven is electrically isolated before cleaning. This can be done by the •... -
Page 18: Cleaning Oven Accessories
CLEANING YOUR OVEN ACCESSORIES Removing the trays and shelves from your Cleaning your oven door appliance The oven door has been designed to allow the two inner door glasses to be removed for cleaning without • Slide the dish and grill tray towards you until they removing the door from the product. - Page 19 CLEANING YOUR OVEN ACCESSORIES Cleaning your oven door WARNING WARNING • DO NOT use the oven without the inner and middle door glass fitted. • NEVER spray any caustic cleaners on any surface of the door or damage to the surface coatings will result.
-
Page 20: Troubleshooting
TROUBLESHOOTING Faults NOTE: We may charge for service even in the guarantee period if your problem is due to the causes listed below. If there is a problem with the oven and/or grill, please: • Check the points listed below before calling for service. - Page 21 TROUBLESHOOTING PROBLEM POSSIBLE CAUSE WHAT TO DO Flames not staying on when Knob not held down long enough in ‘High’ Repeat lighting procedure and knob released position for flame safeguard hold knob down for 5 seconds in (where fitted) to engage ‘High‘...
-
Page 22: Installation Of The Appliance
INSTALLATION OF THE APPLIANCE installing splashback Gas model clearance requirement • Ensure the appliance is installed in accordance with clauses 6.2.5 and 6.10.1.1 of AS/NZS 5601.1 or clauses 6.9.1 and 6.9.5 of AS/NZS 5601.2 with regard to clearances to combustible surfaces and materials, and clearances to rangehoods and exhaust fans, to ensure clearances of 200mm from burners to vertical combustible surfaces observe the minimum... - Page 23 INSTALLATION OF THE APPLIANCE Freestanding installation The freestanding type installation uses the appliance as supplied, and can be fitted in between cabinets, with cabinets on one side or without adjacent cabinets. There is no clearance requirement to adjacent side cabinets. To ensure cooker stability, the anti-tilt brackets must be installed, and the end of chain attached to the appliance must be placed onto hook attached to the rear wall.
- Page 24 INSTALLATION OF THE APPLIANCE Installation of anti-tilt brackets and hook • The anti-tilt brackets must be secured to the floor at rear of cavity with an appropriate fastener according to dimensions in diagram. Hole location for hook installation Measurements are to be adjusted to account Measurements are to be adjusted to account for the thickness of any skirting board or tiles coming between the back of the appliance and the wall.
- Page 25 Slot-in Installation Slot in conversion To convert the free standing appliance to a slot in installation the kick panel provided on the appliance is removed and the appliance is mounted on a plinth. This enables a continuous cupboard kick board to be installed, giving a more integrated appearance.
- Page 26 INSTALLATION OF THE APPLIANCE Installation of anti-tilt brackets and stops • Once services are connected, product can be lifted • The brackets are to be secured to the back wall onto the plinth and pushed back carefully, ensuring with appropriate fasteners. the appliance engages into both brackets at the •...
-
Page 27: Wiring Requirements
WIRING REQUIREMENTS Connecting to services and commissioning The cooker MUST be installed in compliance with: • Wiring connections in AS/NZS 3000 Wiring Rules. This appliance must be installed by an authorised person, according to all codes and regulations of: • Local regulations, municipal building codes and •... -
Page 28: Installing The Gas Cooker
INSTALLING THE GAS COOKER Gas connection Gas connection point to regulator Model: WFE912SB Read these points before connecting to the gas supply: • The appliance is preset for natural gas use, if LPG is to be used see Conversion to LPG section. -
Page 29: Lpg Conversion
LPG CONVERSION One by one, turn the knobs to minimum and This appliance is supplied set up for Natural Gas screw in the bypass screw (accessible when the usage. A conversion kit is included with the product knob is removed) until a small stable flame results. for Universal LPG usage. -
Page 30: Testing The Operation Of The Gas Cooker
TESTING THE OPERATION OF THE GAS COOKER NOTE: You MUST test the cooker after installation, Testing the cooker features before you hand it over to the customer. You MUST have • Observe the flame appearance on each burner. If it a manometer and a connecting tube. -
Page 31: Warranty
Warranty FOR SALES IN AUSTRALIA AND NEW ZEALAND APPLIANCE: BUILT-IN OVEN, COOKTOP AND FREESTANDING COOKERS 7. You may not make a claim under this warranty unless the defect claimed This document sets out the terms and conditions of the product is due to faulty or defective parts or workmanship. - Page 32 The Electrolux Group to consumers including delivery, home service and spare parts. and WESTINGHOUSE are trademarks of Westinghouse Electric Corporation. Used under license by Electrolux Home Products Pty Ltd. All Rights Reserved. © 2016 Electrolux Home Products Pty Ltd...
Need help?
Do you have a question about the WFE912SB and is the answer not in the manual?
Questions and answers