Mircom TX3-TOUCH-S15B-WR Installation Manual
Hide thumbs
Also See for TX3-TOUCH-S15B-WR:
- Replacement manual (3 pages) ,
- Replacement (2 pages) ,
- Installation manual (161 pages)
Table of Contents
Advertisement
Quick Links
For field wiring, refer to LT-996 TX3 Touch Screen Installation Manual. For
configuration, refer to LT-995 TX3 System Configuration and Administration
Manual. These manuals are available on http://www.mircom.com
1.1
Installation
The enclosure mounts on the wall. Mount the enclosure with the right side up (the
Mircom logo on the door is on the bottom).
To mount the enclosure
You need:
4 fasteners appropriate for the wall that you are mounting the enclosure on.
1.
2.
3.
4.
5.
6.
Warning: To prevent water from entering the unit, use an elbow
TX3-TOUCH-S15B-WR and TX3-TOUCH-S15S-WR Installation
Version 1
LT-6651
Copyright 2019
1
TX3-TOUCH-S15B-WR and
TX3-TOUCH-S15S-WR Installation
Find a suitable location for the enclosure.
Using the enclosure as a template, mark the back mounting locations of
the two keyholes shown in Figure 1. Ensure that at least one side is over a
wall stud.
Remove the enclosure and place the fasteners halfway into the wall into
the marked hole locations.
Place the enclosure onto the fasteners and lower it so that the fasteners fit
in the narrow part of the keyholes.
Screw the other two fasteners into the two remaining holes.
Tighten all fasteners into place.
connector to run the wires to one of the three knockouts on the
back. The elbow connector must point downwards.
1
Advertisement
Table of Contents

Related Manuals for Mircom TX3-TOUCH-S15B-WR


Summary of Contents for Mircom TX3-TOUCH-S15B-WR
- Page 1 Manual. These manuals are available on http://www.mircom.com Installation The enclosure mounts on the wall. Mount the enclosure with the right side up (the Mircom logo on the door is on the bottom). To mount the enclosure You need: 4 fasteners appropriate for the wall that you are mounting the enclosure on.
- Page 2 TX3-TOUCH-S15B-WR and TX3-TOUCH-S15S-WR Installation Figure 1. Mounting Hole Dimensions (inches) Figure 2. Overall Dimensions (inches) TX3-TOUCH-S15B-WR and TX3-TOUCH-S15S-WR Installation Version 1 LT-6651 Copyright 2019...
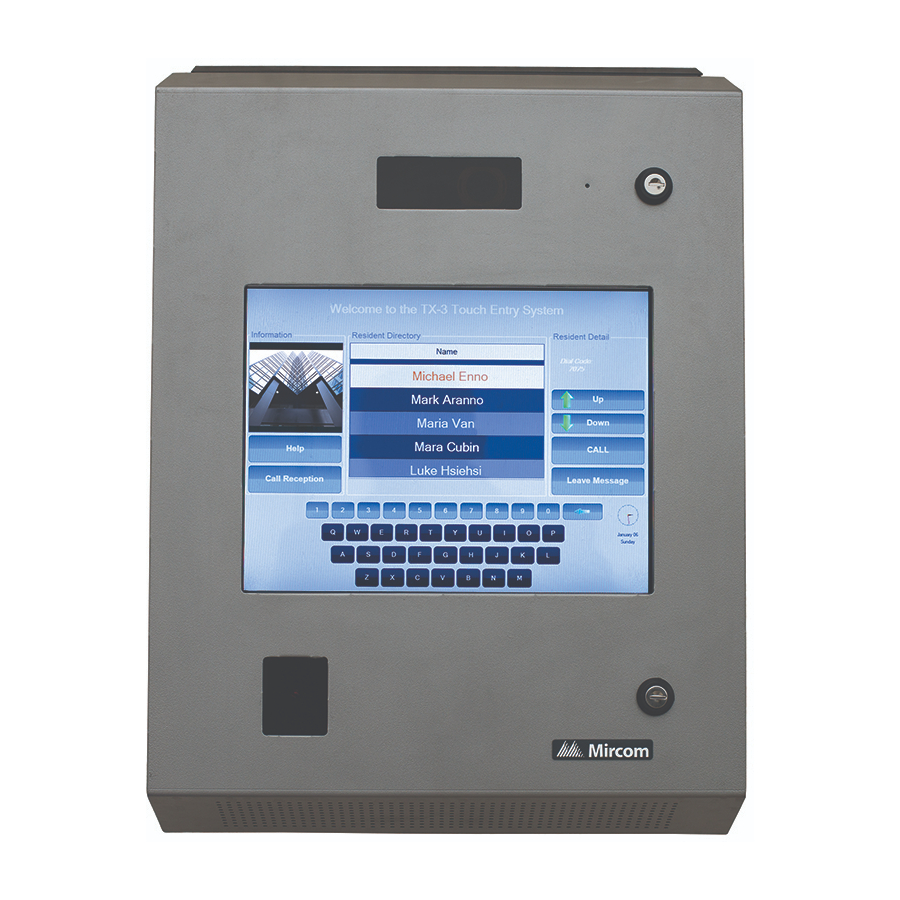
- Page 3 The inside doors contain the following components as shown in Figure 3: • Camera • Microphone • P300 Card Reader Camera Microphone Display P300 Card Reader Figure 3. Inside Door Note: Mircom sells a postal lock adapter: part number DO-CR3. TX3-TOUCH-S15B-WR and TX3-TOUCH-S15S-WR Installation Version 1 LT-6651 Copyright 2019...
- Page 4 TX3-TOUCH-S15B-WR and TX3-TOUCH-S15S-WR Installation 1.2.2 Controller Boards The TX3-TOUCH-S15B-WR and TX3-TOUCH-S15S-WR contain the following components and controller boards as shown in Figure 4: • Power Switch • USB Port • Lobby Controller • PC Sub Compact Board with Ethernet Port •...
-
Page 5: External Power Supply Installation
TX3-TOUCH-S15B-WR and TX3-TOUCH-S15S-WR Installation Grounding Grounding reduces the risk of electrical shock by providing an alternate escape route for the electrical current. To ground the Touch Screen The ground terminal is shown in Figure 4. Attach the ground screw to a suitable grounding wire and connect it to the site ground, as shown in Figure 4. -
Page 6: Back View
TX3-TOUCH-S15B-WR and TX3-TOUCH-S15S-WR Installation Back View Side View Figure 5. Power Supply Enclosure Dimensions (inches) To mount the power supply enclosure Attention: Install the power supply indoors. You need: 4 fasteners appropriate for the wall that you are mounting the enclosure on. - Page 7 TX3-TOUCH-S15B-WR and TX3-TOUCH-S15S-WR Installation External Power Supply Wiring Attention: Install the power supply indoors. The power supply terminal block on the Touch Screen is shown in Figure 4. It receives 24 VDC from the external power supply. The external power supply connects to the building power AC power supply. A voltage selectable switch is located on the side of the unit and is factory set to 120 V.
-
Page 8: Turning The Touch Screen On And Off
TX3-TOUCH-S15B-WR and TX3-TOUCH-S15S-WR Installation 1.5.1 Maximum Power Supply Wire Distances The distance from the Touch Screen to the power supply is a function of the wire gauge and the resistance generated by the cable by the power draw. Do not exceed the maximum distances from the Touch Screen to the power supply as indicated in Table 1. - Page 9 TX3-TOUCH-S15B-WR and TX3-TOUCH-S15S-WR Installation Factory Wiring for TX3-TOUCH-S15B-WR and TX3-TOUCH-S15S-WR In these diagrams, WX and WR refer to the Mircom part numbers of the cables. WX-079: CN9 on PC board MD-1236 WX-110: TS4 on telephone access Black controller TS4B Green...
- Page 10 TX3-TOUCH-S15B-WR and TX3-TOUCH-S15S-WR Installation MD-1245 WX-053: USB on PC board WC-1100: USB on PC board Power switch WX-070: Ground wire WX-110: TS1 on Black to MD-1236 MD-1236 Red Black WX-109: TS12 on MD-1236 WX-120: (not polarity sensitive) Microphone White Note: connect...
- Page 11 TX3-TOUCH-S15B-WR and TX3-TOUCH-S15S-WR Installation Power cable to VGA cable to CN30 TS10B on MD-1236 on PC board USB to PC board Figure 11. Display connections WX-084 to ground post on door WX-070 WX-070 WX-019 Figure 12. Ground wires TX3-TOUCH-S15B-WR and TX3-TOUCH-S15S-WR Installation...
-
Page 12: Specifications
Mircom door strikes below and its compatible power transformer. • Mircom Model M-10. DC (silent) or AC (buzzing) Door Strike. (Use PS-3B transformer) Note: The door strike must have its own separate power transformer. Do not tap or use the system power transformers.
Need help?
Do you have a question about the TX3-TOUCH-S15B-WR and is the answer not in the manual?
Questions and answers