Table of Contents
Advertisement
Advertisement
Table of Contents

Related Manuals for Leica M501


Summary of Contents for Leica M501
- Page 1 Leica M501 User manual 10 711 785 – Version D...
- Page 2 Leica M501 / Ref. 10 711 785 / Version D...
- Page 3 Chapter Overview Introduction Controls Preparation for Operation Safety Notes Care and Maintenance Messages and Warnings Technical data Leica M501 / Ref. 10 711 785 / Version D...
-
Page 4: Table Of Contents
Table 201 according to EN 60601-1-2:2001 Table 202 according to EN 60601-1-2:2001 Table 204 according to EN 60601-1-2:2001 Table 206 according to EN 60601-1-2:2001 Hazards associated with instrument use Signs and labels Leica M501 / Ref. 10 711 785 / Version D... - Page 5 Useful information that can help the user questions you may have. operate the product correctly and effi- ciently. Model: Serial No.: ➩ Request for action; here, you are requested to take action. Leica M501 / Ref. 10 711 785 / Version D...
-
Page 6: Introduction
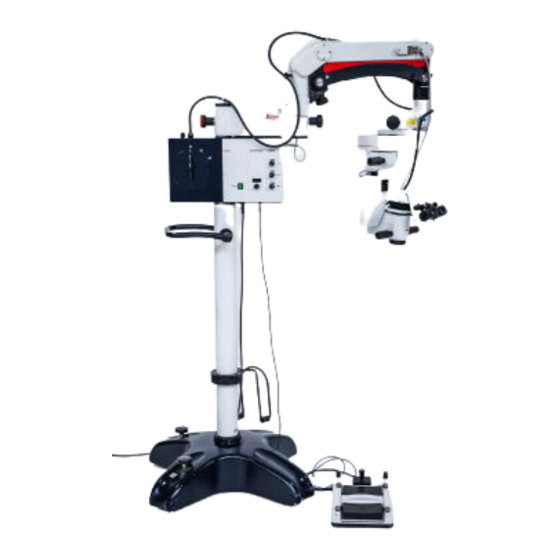
1 Base 2 Control unit/lamp housing 3 Swing arm 4 XY-coupling (optional) 5 Tilt head 6 Focusing unit 7 Optics carrier 8 Binocular tube 9 Eyepieces 10 Objective Floor stand Leica M501 / Ref. 10 711 785 / Version D... -
Page 7: Ceiling Mounts
Introduction Ceiling mounts 1 Mini Mount ceiling mount 2 Leica Telescope Mount Leica M501 / Ref. 10 711 785 / Version D... -
Page 8: Controls
1 XY adjustment 2 Focus up and down 3 Zoom up and down 4 Greater illumination 5 Less illumination 6 XY-Reverse 7 Microscope illumination on/off Cross pedal variant Vertical pedal variant Leica M501 / Ref. 10 711 785 / Version D... -
Page 9: Handswitch
1 Footbrakes 2 Footbrake release lever 3 Articulation brakes 4 Balance turn knob 5 Safety hook 6 Retaining pin Remote control for Leica Telescope Mount 1 Buttons for up/down movement Leica M501 / Ref. 10 711 785 / Version D... -
Page 10: Optics Carrier
1 Turn knob for fading ambient lighting 2 Handles Binocular tube, eyepiece, tubes for second observer 1 Drive knob for adjusting the interpupillary distance 2 Diopter adjustment 3 Knurled ring for image correction Leica M501 / Ref. 10 711 785 / Version D... -
Page 11: Preparation For Operation
➩ See whether or not the microscope drifts. Microscope drifts downwards: ➩ Turn rotary knob (4) clockwise. Microscope drifts upwards: ➩ Turn rotary knob (4) counter-clockwise. Leica M501 / Ref. 10 711 785 / Version D... -
Page 12: Attach The Binocular Tube, Eyepiece And Objective
Binocular tube 10° – 50°, low Straight binocular tube Binocular tube with variable 180° Inclined binocular tube 45° Optional for use on the assistant’s attachment (no standard configuration) Binocular tube var. 30° – 150° Leica M501 / Ref. 10 711 785 / Version D... - Page 13 Objectives Objective WD = 175mm APO Objective f = 175mm Objective f = 200mm Objective f = 225mm Objective f = 250mm Objective f = 275mm Objective f = 300mm Leica M501 / Ref. 10 711 785 / Version D...
-
Page 14: Set The Interpupillary Distance And Eyepoint
➩ Zoom through the whole range, observing the test object. The image sharpness must remain constant at all magnifica- tions. If it does not, then repeat points 2 to 4 of this proce- dure. Leica M501 / Ref. 10 711 785 / Version D... -
Page 15: Attach The Adapter For Accessories
Attach the adapter ➩Insert adapter into beam splitter. ➩ Tighten the rotary ring (1). Adapter for Zeiss accessories on the Leica M501 Adapter for M600 accessories for the Leica M501 Leica M501 / Ref. 10 711 785 / Version D... -
Page 16: Adjusting Second-Observer Tube
Stereo attachment for second observer The assistant turns his or her diopters in the desired direction, centers the binocular tube horizontally, adjusts his or her diopters and centers the image using the knurled ring. Leica M501 / Ref. 10 711 785 / Version D... -
Page 17: Display/Change The Footswitch Type
➩ Switch on the control unit/lamp housing at the power switch (3) and release button (1). The "XY-Reverse" button is now disabled. Enable the XY-Reverse button: ➩ Repeat the above steps. Leica M501 / Ref. 10 711 785 / Version D... -
Page 18: Transport The Surgical Microscope
➩ Push the surgical microscope to its setup position using the handle (4). ➩ Lock the footbrakes at the setup position. Caution 3 Surgical microscope can move without warning! ➩Always lock the footbrakes when you are not moving the system. Leica M501 / Ref. 10 711 785 / Version D... -
Page 19: Position The Surgical Microscope At The Op Stage
1 minute out of every 10. After 2 minutes of uninterrupted operation, the built-in temperature switch switches off the motor of the Leica Telescope Mount. Leica M501 / Ref. 10 711 785 / Version D... -
Page 20: Sterile Components
➩ Switch off the power switch. ➩ Move the swing arm all the way upwards. ➩ Release the articulation brakes. ➩ Press the raise lift arm (2) button. The Leica Telescope Mount moves upwards. Leica M501 / Ref. 10 711 785 / Version D... -
Page 21: Setting The Rest Position On The Leica Mini Mount
(1/3 up, 2/3 down). When the focus reset position is reached, the LED lights up. Basic settings: When the Leica M501 is switched on at the power switch, the zoom finds the position it was in when the unit was last switched off. -
Page 22: Positioning The Microscope
➩ Activate the button (10) on the foot or hand switch. Adjusting the magnification ➩ Adjust the speed using the regulating knob (13) on the control unit/lamp housing. Leica M501 / Ref. 10 711 785 / Version D... -
Page 23: Adjusting The Illumination
➩ Adjust the approximate working distance by raising or lowering the microscope using the handles (8). ➩ Turn counterclockwise (7) to fade out ambient lighting/6° ➛ Red reflex illumination/0° remains. Leica M501 / Ref. 10 711 785 / Version D... -
Page 24: Safety Notes
Safety Notes ➩ Modifications to or service on the surgical microscope may The Leica surgical microscope meets today’s state of the art of technology. Nevertheless, hazards can occur during operation. be carried out only by technicians who are explicitly autho- ➩... - Page 25 Guidance and manufacturer’s declaration – electromagnetic emissions The Leica M501 surgical microscope is intended for use in the electromagnetic environment specified below. The customer or the user of the Leica M501 surgical microscope should assure that it is used in such an environment. Emissions test Compliance Electromagnetic environment –...
- Page 26 Guidance and manufacturer’s declaration – electromagnetic immunity The Leica M501 surgical microscope is intended for use in the electromagnetic environment specified below. The customer or the user of the Leica M501 surgical microscope should assure that it is used in such an environment.
- Page 27 RF transmitters, an electromagnetic site survey should be considered. If the measured field strength in the location in which the Leica M501 surgical microscope is used exceeds the applicable RF compliance level above, the Leica M501 should be observed to verify normal operation. If abnormal performance is observed, additional measures may be necessary, such as reorienting or relocating the Leica M501.
- Page 28 Warning message: Using accessories or cables other than those listed here or those permitted by the manufacturer of the Leica M501 surgical microscope may result in increased electromagnetic emissions or decreased immunity.
-
Page 29: Hazards Associated With Instrument Use
Caution 14 You may sustain burns! Lamps and mounts for holding illumination devices can become very hot. ➩Before changing lamps, ensure that the lamp and the mount have cooled down. Leica M501 / Ref. 10 711 785 / Version D... -
Page 30: Signs And Labels
Refer servicing to qualified service personnel only. 400VA Form 2x T8.3A / 250V Type 10446644 S/N XXXXXXXXX Grounding reliability can only be achieved when EQUIPMENT is connected to equivalent receptacle marked "Hospital" or "Hospital Grade". Leica M501 / Ref. 10 711 785 / Version D... - Page 31 Safety Notes DO NOT OPEN AND DAMAGE-HIGH PRESSURE! GAS SPRING 10710287 Warning: This system may only be used with the gas spring 10710287 otherwise the instrument can fall over. Leica M501 / Ref. 10 711 785 / Version D...
- Page 32 Safety Notes Caution 1 You may sustain burns! Mounts for the main illuminator can become very hot. ➩ Before changing lamps, ensure that the mount has cooled down. Leica M501 / Ref. 10 711 785 / Version D...
- Page 33 50 Hz CH-9435 Heerbrugg 1400VA MODEL LEICA M501 TTMMJJxxx - C 120V~ 60 Hz 1500VA TTMMJJxxx - C Only one of the two signs, depending on the power supply voltage. Leica M501 / Ref. 10 711 785 / Version D...
-
Page 34: Care And Maintenance
(3, Figure 2) out in the direction indicated by the arrow, pull it out completely by hand (Figure 3) and change the fuses. ➩Insert the fuse holder again and push it all the way in by hand. Leica M501 / Ref. 10 711 785 / Version D... -
Page 35: Changing The Bulb
Auxiliary illumination lights up. ➩ Switch back to the main illuminator and switch illumination off. Foot/hand switch ➩ Position the foot and hand switches. ➩ Test all foot and hand switch functions. Leica M501 / Ref. 10 711 785 / Version D... -
Page 36: Notes On Reprocessing Of Resterilizable Products
Every deviation from the supplied instructions should posable cloth/paper cloth. Dry off optical surfaces with a also be examined carefully by the processing person to deter- micro-fiber cloth. mine effectiveness and possible detrimental consequences. Leica M501 / Ref. 10 711 785 / Version D... - Page 37 Products with optical components can be steam-autoclaved using the conditions listed above. However, this may lead to the formation of a layer of dots and streaks on the glass surface, which may reduce the optical performance. Leica M501 / Ref. 10 711 785 / Version D...
-
Page 38: Messages And Warnings
➩ Have the fan replaced. The display bar for the brightness level Power pack fan defective. blinks but the light brightness remains the same. Leica M501 / Ref. 10 711 785 / Version D... -
Page 39: Electrical Data
Homogenous ambient illumination Ø 47mm Adjustable brightness Ambient illumination can be blocked out IR protective filter firmly integrated Integrated UV protection filter KV408 UV protective filter GG475 on/off switchable, integrated Leica M501 / Ref. 10 711 785 / Version D... -
Page 40: Stands
- Power switch - Adjusters for brightness and zoom, XY and focus speed Weight 15kg (with accessories) Stands Floor stand Guide rollers Weight Base 100kg Column 22kg Brakes Two integrated friction brakes Leica M501 / Ref. 10 711 785 / Version D... -
Page 41: Swing Arm
–40 °C to +70 °C, -40 °F to +158 °F 10% to 100% relative humidity Limitations of use The Leica Surgical Microscope may be used only in closed rooms and must be placed on a solid floor or attached to a strong ceiling or wall. Standards IEC 60601, UL 2601 Leica M501 / Ref. -
Page 42: Dimensions
Technical data Dimensions 1186 1186 1520 1520 Floor stand (in mm) Leica Mini Mount (in mm) Leica M501 / Ref. 10 711 785 / Version D... - Page 43 Technical data Leica Telescope Mount (in mm) Leica M501 / Ref. 10 711 785 / Version D...
- Page 44 Leica Microsystems – the brand for outstanding products Leica Microsystems’ mission is to be the world’s first-choice provider of innovative The companies of the Leica Microsystems Group operate internationally in four business solutions to our customers’ needs for vision, measurement, lithography and analysis segments, where we rank with the market of microstructures.
Need help?
Do you have a question about the M501 and is the answer not in the manual?
Questions and answers