Table of Contents
Advertisement
Quick Links
Advertisement
Table of Contents

Subscribe to Our Youtube Channel
Related Manuals for Ledj HBR 1D


Summary of Contents for Ledj HBR 1D
- Page 1 www.prolight.co.uk (Order code: LEDJ123)
- Page 3 IMPORTANT: The manufacturer will not accept liability for any resulting damages caused by the non-observance of this manual or any unauthorised modification to the equipment. • Never let the power-cable come into contact with other cables. Handle the power-cable and all mains voltage connections with particular caution! • Never remove warning or informative labels from the equipment. • Do not open the equipment and do not modify the equipment. • Do not switch the equipment on and off in short intervals, as this will reduce the system’s life. • Only use the equipment indoors. • Do not expose to flammable sources, liquids or gases. • Always disconnect the power from the mains when equipment is not in use or before cleaning! Only handle the power-cable by the plug. Never pull out the plug by pulling the power-cable. • Make sure that the available voltage is between 220v/240v. • Make sure that the power-cable is never crimped or damaged. Check the equipment and the power-cable periodically. • If the equipment is dropped or damaged, disconnect the mains power supply immediately.
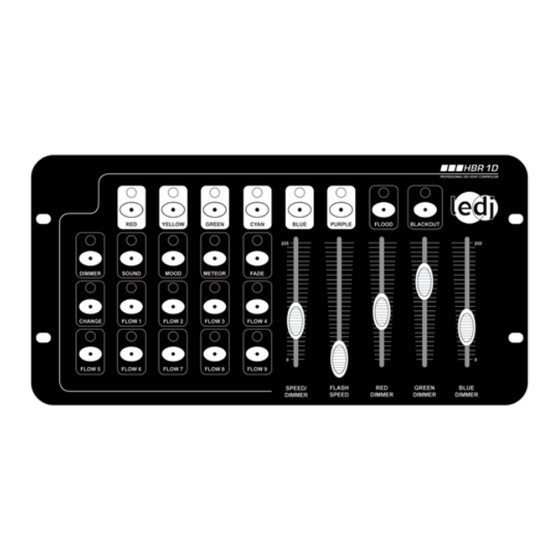
- Page 4 Over view: Front: Rear:...
- Page 5 Features: 7 Preset colour buttons for instant colour selection. 6 Buttons for dimmer, sound, mood, meteor, fade and change. 9 Flow buttons for instant light shows. Sound active function with adjustable sensitivity. Blackout, flood & strobe functions. 1, Blackout mode: When you power up your HBR-1D controller, the LED above the “BLACKOUT” button will illuminate, indicating that the unit is set to blackout mode. To exit the blackout mode simply press any one of the function buttons. 2, Preset colour mode In this mode you can select one of the seven preset colours by pressing one of the designated colour buttons. Once you have selected your colour you can now set the desired flash speed from slow - fast by using the “FLASH SPEED” slider. (0 = slow, 255 = fast) 3, Dimmer mode To activate this mode first press the ‘DIMMER” button and make sure that the “SPEED/DIMMER” slider is set to 255. Now you can use any of the “RED, GREEN and BLUE” colour sliders to set the desired output brightness and colour. To set the flash speed use the “FLASH SPEED” slider to set the desired speed (0 = slow, 255 = fast). 4, Sound Active mode To activate this mode, press the “SOUND” button. You will need to adjust the “SPEED/DIMMER” slider to set the music input sensitivity level. (0 = low, 255 = high) You can then use the “FLASH SPEED” slider to set the desired strobe speed. (0 = slow, 255 = fast) 5, Colour Mood mode...
- Page 6 Flow function button: The Flow buttons 1-9 are equipped with built-in chase patterns. Each “FLOW” chase button is described below. Flow 1: Flows from left to right through its built-in preset colours. Flow 2: Flows from left-right, right-left, running through its built-in preset colours. Flow 3: Flows from left-right, fading through its built-in preset colours. Flow 4: Bounces from left-right, right-left, through its built-in preset colours. Flow 5 : Anti-clockwise rotation running through its built-in preset colours. Flow 6: Clockwise rotation running through its built-in preset colours. Flow 7: Left to right in a worm fashion through its built-in preset colours. Flow 8: Jumps from left to right with individual colours or you can mix it yourself with two colours of your choice. To chose the desired colours use the “RED DIMMER” slider. Flow 9: Jumps from left-right, right-left with selected individual colours or you can mix it yourself with two colours of your choice. To chose the desired colours use the “RED DIMMER” slider. NOTE: Each of the above flow patterns can be controlled by using the “SPEED/ DIMMER” slider to select the desired running speed and the “FLASH SPEED”...
- Page 7 Notes:...
Need help?
Do you have a question about the HBR 1D and is the answer not in the manual?
Questions and answers