Table of Contents
Advertisement
Quick Links
Advertisement
Table of Contents

Subscribe to Our Youtube Channel
Related Manuals for Ledj Spectra Par 30Q8 PRO Exterior Fixture


Summary of Contents for Ledj Spectra Par 30Q8 PRO Exterior Fixture
- Page 1 Spectra Par 30Q8 PRO Exterior Fixture User Manual Order code: LEDJ310...
-
Page 2: Safety Advice
Safety advice WARNING FOR YOUR OWN SAFETY, PLEASE READ THIS USER MANUAL CAREFULLY BEFORE YOUR INITIAL START-UP! • Before your initial start-up, please make sure that there is no damage caused during transportation. • Should there be any damage, consult your dealer and do not use the equipment. •... -
Page 3: Ip Rating Information
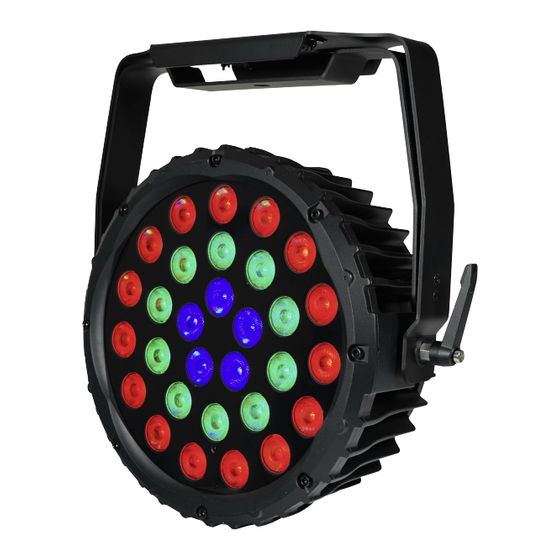
IP rating information PLEASE READ THE BELOW CAREFULLY BEFORE USING THE FIXTURE IN OUTDOOR/EXTREME ENVIRONMENTS IP Rating: The IP (International Protection) rating classifies and rates the degree of protection provided against intrusion of foreign objects such as dust and water into housings IP65 RATED and electrical enclosures. - Page 4 Product overview & technical specifications Spectra Par 30Q8 PRO IP65 Packing all the popular features of its smaller sibling (15Q8 PRO), the exterior Spectra Par 30Q8 PRO features 30 x 8W quad-colour LEDs, delivering a smooth wash of colour, ranging from intense, rich saturated hues through to pastel shades.
-
Page 5: Technical Specifications
Technical specifications 145mm 134mm 100mm 386mm 40mm In the box: 01 - Bracket tightening knobs 1 x fixture, 02 - Bracket 05 - Pressure relief valve 08 - Safety eye 1 x omega clamp 03 - PowerTwist TR1 input 06 - PowerTwist TR1 output 09 - OLED display &... -
Page 6: Installation
Installation Before installing the fixture, the supporting structure (ie. truss) must be able to hold a minimum of 10 times the fixtures weight without any deformation (eg. 15kg - 150kg point load). The fixture must be se- cured with a secondary safety attachment when being installed (ie. an appropriate safety cable). Never stand directly below the fixture when mounting, removing, and/or servicing. - Page 7 Installation Installation: 1. Fasten each clamp to the omega clamps with a bolt and lock nut through the hole in the omega clamp. 2. Align and insert the omega clamps quick-lock fasteners with the respective holes on the bottom of the unit. 3.
- Page 8 Operating instructions IMPORTANT! PLEASE NOTE: The OLED display for this fixture has a menu locking function where after 30 seconds of inactivity it will lock. To unlock the menu hold the “MODE” and “SET” buttons for 3 seconds. Main Menu Sub Menu Options/Values Description Address...
- Page 9 Operating instructions Main Menu Sub Menu Options/Values Description 1) Linear 2) Square Law Curves Select Dimming Curve Setting 3) Inv Square Law 4) S-Type Fast Dimmer Speed Dimming Speed Setting Smooth Normal Display Display Direction Setting Inverted PMW Frequency Refresh Rate Setting Settings Hold DMX Fail...
- Page 10 Operating instructions 4 channel mode: Channel Value Function 000-255 Red dimmer (0-100%) 000-255 Green dimmer (0-100%) 000-255 Blue dimmer (0-100%) 000-255 White dimmer (0-100%) 6 channel mode: Channel Value Function 000-255 Master dimmer (0-100%) 000-004 No function 005-127 Strobe (slow-fast) 128-189 Random strobe (slow-fast) 190-255 Random zone strobe (slow-fast) 000-255 Red dimmer (0-100%)
- Page 11 Operating instructions 10 channel mode: Channel Value Function Channel Value Function 000-255 Master dimmer (0-100%) 000-005 No function 000-004 No function 006-019 Program jump 1 005-127 Strobe (slow-fast) 020-033 Program jump 2 128-189 Random strobe (slow-fast) 034-047 Program jump 3 190-255 Random zone strobe (slow-fast) 048-061 Program jump 4 000-007 No function...
- Page 12 Operating instructions 12 channel mode: 22 channel mode: Channel Value Function Channel Value Function 000-255 Red dimmer 1 (0-100%) 000-255 Master dimmer (0-100%) 000-255 Green dimmer 1 (0-100%) 000-004 No function 000-255 Blue dimmer 1 (0-100%) 005-127 Strobe (slow-fast) 000-255 White dimmer 1 (0-100%) 128-189 Random strobe (slow-fast) 000-255 Red dimmer 2 (0-100%) 190-255 Random zone strobe (slow-fast)
- Page 13 Operating instructions 22 channel mode (cont.): Channel Value Function Channel Value Function 000-005 No function 000-015 No function (Hold for 006-019 Program jump 1 016-039 Dimmer fast 2 secs) 020-033 Program jump 2 040-063 Dimmer slow 034-047 Program jump 3 064-087 Linear 048-061 Program jump 4 088-111 Square law...
-
Page 14: Dmx Setup
DMX setup Setting the DMX address: The DMX mode enables the use of a universal DMX controller. Each fixture requires a “start address” from 1- 512. A fixture requiring one or more channels for control begins to read the data on the channel indicated by the start address. - Page 15 DMX setup Notice: Be sure to follow the diagrams below when making your own cables. Pin Configuration Do not connect the cables shield conductor to the ground lug or 3-Pin 5-Pin allow the shield conductor to come in contact with the XLRs Pin 1 - Ground outer casing.
- Page 16 Multiple fixture power linking Power linking: This fixture provides power linking via the power output on the rear allowing multiple units to be connected together. The maximum number of fixtures that can be connected is 2 fixtures @ 240V or 1 fixture @ 120V (including the first fixture). After the maximum number of fixtures are connected a new power run will need to be started.
-
Page 17: Weee Notice
WEEE notice Correct Disposal of this Product (Waste Electrical & Electronic Equipment) (Applicable in the European Union and other European countries with separate collection systems) This marking shown on the product or its literature, indicates that it should not be disposed of with other household wastes at the end of its working life.
Need help?
Do you have a question about the Spectra Par 30Q8 PRO Exterior Fixture and is the answer not in the manual?
Questions and answers