Table of Contents
Advertisement
Quick Links
Advertisement
Table of Contents

Related Manuals for Raven Viper


Summary of Contents for Raven Viper
- Page 1 VIPER...
-
Page 2: Basic Startup
Basic Startup Press the Power button to turn on the Viper system. -
Page 3: Backlight Adjustment
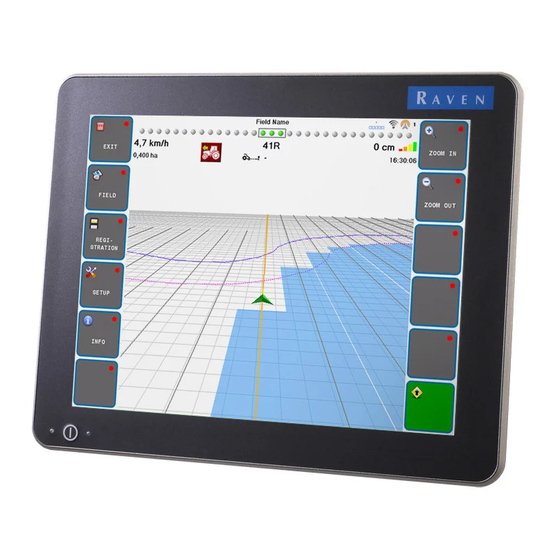
Viper serial number and firmware revision available when calling for technical assistance. It is best if the user is in the machine and in front of the Viper when calling for tech support. read the manual in its entirety before using Viper. - Page 4 Main Screen Areas See the screen below and the corresponding numbers on the next page for a description of each screen area.
- Page 5 - Information that is associated with the current tab. Tabs - Used to access the features, functions, and screen displays for the Viper console. Press a tab to access. Application Rates - Target Rate (R ) and Actual Rate (R Press in this area to set or change rates (Available for CAN systems only).
- Page 6 CAN Controller Status Screen Areas See the screen below and the corresponding numbers on the next page for a description of each screen area.
- Page 7 Boom Cals Area - Current booms that have been configured. Press in this area to access the Boom Select screen and assign booms to products. Miscellaneous Area - Various system settings and actual system readouts. Press in this area to change the settings.
- Page 8 Screen Icons & Symbols Icon Name Description When the Cursor Lock icon is active, Viper is in the auto-pan mode. Select this mode when running a job. The Information icon is only available when you are not running a job and you have selected the Main tab on the Viper console, or when you have selected the Scout tab when in a job.
- Page 9 Setting Application Rates Press the Application Rates Area. Press the Node you want to set/change. Enter Target Rate. Press Next to change other Nodes or OK to save changes and close. Important: You can only set Application Rates if you are using a CAN system.
-
Page 10: Saving A Profile
Profiles Saving a Profile Select Menu, then Setup, Local, Profile, and Save Profile. Type a Profile name and press OK. - Page 11 Loading a Saved Profile Select Menu, then Setup, Local, Profile, and Load Profile. Select a profile from the list.
-
Page 12: Starting A New Job
Starting a New Job Select Menu, Start Job, then New Job. Type in a Job Name, select a Swath Pattern (if the Guidance Option has been installed), and enter the number of products. - Page 13 Type a Product Name. Select Booms (typically ‘All’), if necessary. Select VRC (if variable rating), otherwise, click OK. Click Browse to find a Rx Map file. Select the file and click OK. Click on the Rate Field (outlined in red below) and click Next.
- Page 14 Adding to Existing Jobs Select Menu, Start Job, From File, then Add to Job. Select Existing Job and press OK. Then press Menu and Cont Job to un-pause the job.
- Page 15 Resetting Tank Volume Press Product Control. Press Tally Registers. Press Next. Press Next again. Type in a value for the Tank Volume and then press Set. Press Next. Do the same process for all nodes, if needed, and press OK when finished. Press OK again to exit the Product Control screen.
- Page 16 Marking a Field Boundary Press the Scout tab and then Record. Press Zone. The Record Field Feature Screen Displays. Select Field Boundary, choose your options, and press OK.
- Page 17 Press OK. CAN Startup If the results show ‘Not Found’ for all of your nodes, press the Retry CAN Init button. If you still have CAN issues, see Chapter 2 in the Viper Installation and Operators Manual for more information.
-
Page 18: Accuboom Setup
AccuBoom Setup Press the Booms Area. Enter Look-Ahead values and press Next. Select the booms to control and press OK. - Page 19 AutoBoom UltraGlide Calibration Press in the center of the AutoBoom Area. Select Autoboom ON and UltraGlide for mode. Press the Calibrate button. Press Cal Left and wait for left boom calibration to complete, then press Cal Right and wait for right boom calibration to complete.
- Page 20 AutoBoom PowerGlide Plus Calibration Press in the center of the AutoBoom Area. Select Autoboom ON and PowerGlide Plus for mode. Press the Calibrate button. Press Cal Boom button. Press OK.
- Page 21 On-Screen Lightbar Press Menu, Setup, then Lightbar. Select a Lightbar to use. Press Next to set it up. Press OK when finished.
-
Page 22: Troubleshooting
You must use a flashdisk with a minimum of 128 MB and a maximum of 512 MB for the Viper console. The flashdisk must be a SanDisk brand and either a full size PC card or a compact flashcard in a PC card adapter. - Page 23 Viper Sub-Menu Structure * Buttons with arrows go to sub-menus. Buttons without arrows go directly to selection screens.
- Page 24 P.O. Box 5107 www.ravenprecision.com Sioux Falls, SD 57117-5107 fcdinfo@ravenind.com Notice: This document and the information provided are the property of Raven Industries, Inc. and may only be used as authorized by Raven Industries, Inc. All rights reserved under the copyright laws.
Need help?
Do you have a question about the Viper and is the answer not in the manual?
Questions and answers