Advertisement
Quick Links
Advertisement

Subscribe to Our Youtube Channel
Related Manuals for Raven UltraGlide Autoboom


Summary of Contents for Raven UltraGlide Autoboom
- Page 1 UltraGlide AUTOBOOM RAVEN INDUSTRIES UltraGlide...
- Page 3 H A P T E R N T RO D U C T I O N Congratulations on your purchase of the Raven UltraGlide Autoboom system! This system is designed to provide worry-free operation of your hydraulically controlled booms. Once set up, your system is very easy to use and requires almost no attention.
-
Page 4: Controller Description
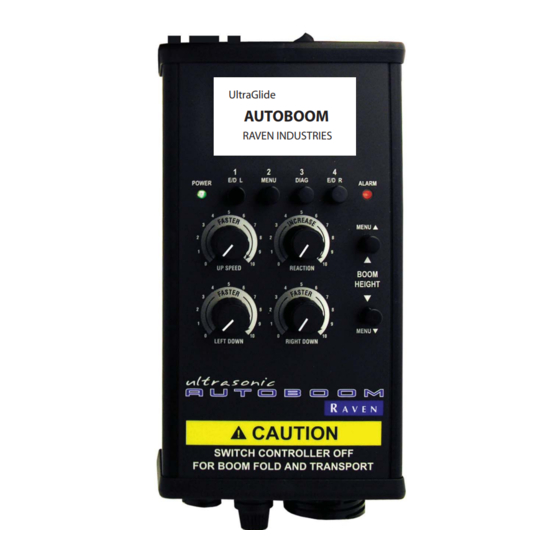
Screen shot should say “UltraGlide” Autoboom. Description A. Main Power Switch K. Serial Update Port UltraGlide B. Information Screen AUTOBOOM Raven Industries C. Function Keys (1-4) J. Power “On” Light D. Alarm Light I. Speed Dial E. Menu Back Button and raise boom height H. - Page 5 Manual # 016-0130-030 Rev B H A P T E R A L I B R A T I O N Calibrating a System Use this procedure if this is the first time you are calibrating the system or if the default settings have been restored.
- Page 6 Autoboom UltraGlide Calibration Guide 3. Press Function Key 2 to calibrate the system. 4. The screen briefly displays “Initializing” while the system prepares for the automatic calibration process.
- Page 7 Manual # 016-0130-030 Rev B 5. The “Calibrate System” screen displays. Press Function Key 1 (LCal) to start the automatic calibration of the left boom. (Auto Settings) Auto Important: The left boom will lift into the air and then fall. This is part of the calibration process.
- Page 8 Autoboom UltraGlide Calibration Guide “CALing” next to the right boom. (Auto Settings) Auto Important: If the boom fails to calibrate, press Function Key 4 again to stop the calibration and see Appendix B for more information. 8. When the right boom calibration is finished the screen will display “Calibration Complete”.
- Page 9 Manual # 016-0130-030 Rev B H A P T E R Y S T E M P E R A T I O N UltraGlide Operation Remember: Previous controllers are labeled “Up Speed” for system speed adjustments or “Reaction” for system sensitivity adjustment.
- Page 10 Autoboom UltraGlide Calibration Guide the slowest speed and 10 as the fastest speed. For hilly terrain, increase the “Speed” dial so Remember: that the booms will rise and fall faster. Sensitivity Dial The Sensitivity dial on the controller adjusts how quickly the system reacts to height settings.
- Page 11 Manual # 016-0130-030 Rev B Start up Once the system has been calibrated system, start up is as simple as turning on the controller and enabling the left and/or right boom via the controller or by pressing the boom down buttons on the joystick. When the system is first turned on, you should see a screen that looks similar to this: LTRA LIDE...
-
Page 12: System Diagnostics
Autoboom UltraGlide Calibration Guide System 1. From the main screen press Function Key 3 (Diag) to go to the System Diagnostics Information screen. This screen displays the current left and right cylinder pressures and the current sensor height reading (not setpoint) above the ground or crop. - Page 13 Manual # 016-0130-030 Rev B Changing Boom 1. Press Function Key 2 (Menu) from the main screen to return to the Mode configuration menu. (PowerGlide 2. Press Function Key 1 (SET BOOM MODE). Plus or UltraGlide) 3. Press Function Key 1 (PowerGlide Plus). This will place the controller in the pressure mode and the ultrasonic sensors will no longer be used to control boom height.
- Page 14 Autoboom UltraGlide Calibration Guide After acknowledging the warning, the screen will display PowerGlide Plus mode. PowerGlide Left Down Dial Plus Operation The Left Down dial adjusts the speed at which the left booms will fall. Turning the dial towards 10 makes the boom heavier, while turning the dial toward 0 makes the boom lighter.
- Page 15 Manual # 016-0130-030 Rev B PowerGlide 1. To make setup adjustments to the PowerGlide Plus mode or to return to Plus Setup the UltraGlide mode, press Function Key 2 (Menu). Adjustments 2. Press Function Key 3 (Press Mode Adj) to make setup adjustments to the PowerGlide Plus mode.
- Page 16 Autoboom UltraGlide Calibration Guide 5. Once either the left or right “Pressure Alarm” setpoint has been selected, the setpoint may be adjusted using Functions Keys 2 (-) or 3 (+) to decrease or increase the Alarm setpoint, if needed. Left Boom 1.
- Page 17 Manual # 016-0130-030 Rev B 3. Press Function Key 4 to toggle the adjustment mode between the lightest and heaviest setpoints. Once the correct setpoint is selected, adjust the setpoint using Function Keys 2 (-) or 3(+). Hvst Helpful Hint: By increasing the lightest value, the “zero”...
- Page 18 Autoboom UltraGlide Calibration Guide Right Boom 1. Press the “Menu” down button to go to the next screen. Down Speed Adjustment 2. Use the instructions from the Left Boom Down Speed Adjustment section to adjust the right boom down speed, using the right boom instead of the left and the appropriate Function Keys.
-
Page 19: Resetting Defaults
Manual # 016-0130-030 Rev B Resetting Defaults Important: In some situations it may be necessary to reset system defaults. Resetting the system defaults will erase all calibration settings and require the system to be recalibrated. 1. Press Function Key 4 (Reset Defaults) to reset the system. 2. - Page 20 Autoboom UltraGlide Calibration Guide Notes:...
- Page 21 Manual # 016-0130-030 Rev B H A P T E R Y S T E M RO U B L E S H O O T I N G Misc. Problems Problem 1: The booms won’t enable. ‘Automatic’ mode won’t come on when tapping left or right down on the joystick, but it will enable by pushing Function and Solutions Keys 1 and 4 on the controller.
- Page 22 Autoboom UltraGlide Calibration Guide Problem 2: The pressure alarm is always on. Solutions: 1. Verify that the pressure transducer is plugged in and that the white dots on the transducer and plug are lined up as shown below. 2. Verify the pressure alarm settings in PowerGlide Plus mode. Refer to the ‘Setting Pressure Alarms’...
- Page 23 Manual # 016-0130-030 Rev B The booms oscillate when standing still (UltraGlide mode). Problem 5: Solutions: 1. The Speed dial is too high. 2. The Sensitivity dial is set too high. Ultrasonic Alarm tones will NOT sound if a user is in any of the configuration menus. However, the enable/disable beeps should always sound when appropriate.
- Page 24 Autoboom UltraGlide Calibration Guide Notes:...
- Page 25 Manual # 016-0130-030 Rev B P P E N D I X A I N A R N E S S I R I N G I A G R A M The following page shows the main harness wiring diagram. If you have questions, refer to the Troubleshooting chapter.
- Page 26 Autoboom UltraGlide Calibration Guide...
- Page 27 Manual # 016-0130-030 Rev B P P E N D I X A N U A L E T T I N G S A L I B R A T I O N The following instructions show the manual settings calibration process. Not all sprayers may calibrate correctly using the automatic settings calibration procedure.
- Page 28 Autoboom UltraGlide Calibration Guide 5. Once the left boom has finished calibrating and “CALd” is displayed, repeat the procedure for the right boom. 6. When the right boom calibration is complete, the screen will then display “Calibration Complete”. Press any button to return to the main screen.
- Page 31 RAVEN INDUSTRIES LIMITED WARRANTY WHAT IS COVERED? This warranty covers all defects in workmanship or materials in your Raven Flow Control Product under normal use, maintenance, and service. HOW LONG IS THE COVERAGE PERIOD? This warranty coverage runs for 12 months from the purchase date of your Raven Flow Control Product.
- Page 32 P.O. Box 5107 www.ravenprecision.com Sioux Falls, SD 57117-5107 fcdinfo@ravenind.com Notice: This document and the information provided are the property of Raven Industries, Inc. and may only be used as authorized by Raven Industries, Inc. All rights reserved under the copyright laws.
Need help?
Do you have a question about the UltraGlide Autoboom and is the answer not in the manual?
Questions and answers