Table of Contents
Advertisement
Advertisement
Table of Contents

Related Manuals for Eighteeth E-CONNECT


Summary of Contents for Eighteeth E-CONNECT
- Page 1 E-CONNECT & E-PEX USER MANUAL...
-
Page 3: Table Of Contents
15、Setting the reference point..................20 16、The instruction of APEX LOCATOR display ............20 17、Connect ..........................22 18、Connection operation ....................23 19、Display the root canal on E-CONNECT .............. 24 20、Combination Function ....................24 21、Cleaning, Disinfection and Sterilization ............26 22、Technical specifications ................... 31 23、EMC Table ........................ -
Page 4: 1、Picture Of E-Connect
E-CONNECT part 1、Picture of E-CONNECT ① ② ④ ③ ⑥ ⑤ Accessories list ① Contra-angle ② Motor Handpiece ③ Adapter ④ Data transfer cable ⑤ Silicon Sleeves ⑥ Spray Nozzle... -
Page 5: 2、Symbols Used
2、Symbols Used warning If the instructions are not followed properly, operation may lead to hazards for the product or the user/patient. note Additional information, explanation of operation and performance. Serial number Catalogue number Manufacturer Date of manufacture Safety class II device Type BF applied part CE marking DC current... -
Page 6: 3、Scope Of Application
5、If irregularities occur in the device during treatment, switch it off. Contact the agency. 6、Never open or repair the device yourself,otherwise, void the warranty. 6、 E-CONNECT charging The number of cells in the battery shows the current amount of power available. When it is only... - Page 7 Connect the handle and adapter as shown. Only the original adapter could be used. The screen will show indicate • being charging. Warning Away from the heat source, and make sure that there is no combustible surrounding. When low or no power charge the device,Charging intermittently for short duration multiple times will reduce the battery life Do not use other power adapter to charge the device, otherwise it will damage the device.
-
Page 8: 8、Install The File
The contra angle can be 340 degrees rotated without take Make it easy to watch the LCD in treatment by rotating the contra-angle. Warning: Make sure the assembly is connected properly,otherwise might cause unexpected motor reverse, even hurt the patients After connect the contra-angle and handle,pull it gently to make sure the connection is good 8、Install the file... -
Page 9: 9、 E-Connect Control Operation
Pay attention to avoid finger injuries, while inserting or removing the files. File insertion or removal without pressing bottom of head will damage the spindle. Make sure the motor is not running while inserting or removing the files. 9、 E-CONNECT control operation Contra-angle < > key Main switch Select key 9.1 Switch control operation... - Page 10 Warning: Use the E-CONNECT outside the oral cavity to make sure that the device is functioning properly. Change file on time to avoid file separation within the canal. File may separate because of cyclic / torsional fatigue. Heavy force / hand pressure on endo motor while using may even cause file separation.
- Page 11 9.2 Keys and interface OLED (Display the real state information) < > key S Select key Main switch (choose memory or other (select the menu) (start device parameters) or star/stop motor running) Display torque interface Display standby interface ① The memory number ②...
- Page 12 When the motor is running, the torque bar real time monitor will appear on the LCD. When the torque in file exceeds 70% of the set reverse torque, E-CONNECT will make a discontinuous stone alarm. When reaches 100% of the set reverse torque, E-CONNECT will make a continuous alarm sound and carry out the reverse motion to disengage &...
- Page 13 9.4 Operation steps . press +/-to choose a memory number 2.Press the S key to select a function that needs to be set 3. Press +/- to set the parameter that user need. 4. Every time the parameters are changed, it will be saved automatically. *If exceed 5 seconds without any operation ( factory setting is 5 seconds,it could be change),display will be switched to standby interface.
- Page 14 ( factory setting is 5 seconds, it could be change),display will switch to standby interface. Connect Function E-CONNECT and APEX LOCATOR connect use, the following online function will be activated. Apical Reverse Close to root canal apex, automatic reverse / stop.
- Page 15 9.6 Additional function settings Factory set as shown below: Beep volume Right hand or left hand Right hand Automatic shutdown time 10 mins Automatic standby time 1.When the device is shutdown press key S and main switch at the same time. 2.Press S, choose one of these functions to setting.
- Page 16 5 After calibration,the progress bar will be full,accompany 2 buzzing sound. 9.8 Error warning while operating, E-CONNECT will detects the real time performance of the system, if the state is unsuitable, the device will self protect and inform user. The power is too low, there will be auto power off, charge the device immediately.
-
Page 17: 10、Picture Of E-Pex
Note Please set the functions according to the requirements as dictated by the manufacturer. It is recommended to perform a calibration operation after each change of the bending head. Please keep the battery in more than half when calibrating. Do not apply pressure to the bending head during calibration. If the error alarm has occurred, please contact the local distributor to check and repair. - Page 18 Accessories list 1.Apex Locator (main unit) 2.Measuring wire 3.File clip 4.Lip hook 5.Tester 6.Adapter 11、Symbols Used warning If the instructions are not followed properly, operation may lead to hazards for the product or the user/patient. note Additional information, explanation of operation and performance.
- Page 19 55 C Temperature limitation 20 C Relative humidity 106kPa Atmospheric pressure 70kPa Only applicable to indoor Washer-disinfector for thermal disinfection Manufacturer’s LOGO 12、Scope of application This apex locator is used to detect the apex of root canal 13、Contraindications Do not use this unit in conjunction with an electric scalpel or on patients who have a pacemaker.
- Page 20 5、If irregularities occur in the device during treatment, switch it off. Contact the agency. 6、Never open or repair the device yourself,otherwise, void the warranty. 15、E-PEX Charging When the power indicator flash, please stop use the device to charge. We suggest user charge the device when one bar left.
-
Page 21: 12、Install The Apex Locator
When the power indicator as shown, means the device is charging Warning Away from the heat source and make sure that there is no combustible surrounding. When battery is low charge the device fully. Charging frequently in low power state for short time will reduce the battery life. Do not use other power adapter to charge the device, otherwise it will damage the device. -
Page 22: 13、Function Checking Of Apex Locator
Note When installing the connecting wire, please pay attention to the orientation pf the slots in the attachment part and do not apply too much force while adapting Incorrect connection will result device measurement inaccurate, even cannot be used. 17、Function checking of APEX LOCATOR ⑴... -
Page 23: 14、Volume Control Of Apex Locator
4、It is strongly recommended to regularly control the device using the tester. Replace the measuring wire by the tester. The green strips shall appear and the displayed strip number shall be between “02” “03” or “04”. Note If the indicating is wrong,please check whether the measuring wire is properly connected. -
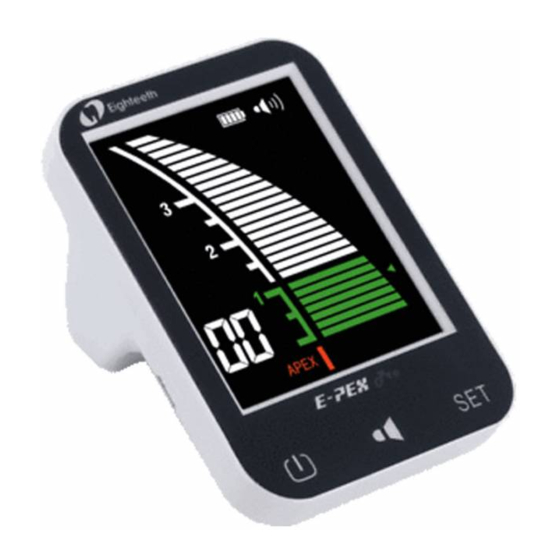
Page 24: 15、Setting The Reference Point
19、 Setting the reference point Press SET key,can setting the reference point,between 0~1. Press SET to adjust reference point The point will be automatically saved. 20、The instruction of APEX LOCATOR display ⑴ ⑵ ⑶ 1、 When the file reaches the front region of the apical foramen, the screen displays the white indicated strips (As shown in picture 1). - Page 25 Warning Avoid using apex locator for working length determination in the following conditions: (1) Open apex cases. (2) Draining canals. (3) Poor isolation from oral environment (avoid seepage of oral fluids into access cavity). (4) Root fractures / perforation. (5) Gutta percha filled canals; Please use the original accessories, otherwise the device may measure inaccurately or not even function.
- Page 26 E-CONNECT connect with APEX LOCATOR 21、Connect ⑴ 1、Make sure E-CONNECT in standby Open rubber cover,plug data transfer cable ⑵ 2、Turn on the APEX LOCATOR, insert other end of data transfer cable into APEX LOCATOR ⑶ 3、After connect the cable,the screen of the E-CONNECT will display “CONNECTED !”...
-
Page 27: 18、Connection Operation
22、Connection operation After connecting E-CONNECT and APEX LOCATOR,do the below step to make sure the device is working normally . 1. Insert the file into contra-angle handpiece, now contact the lip clip to file (short circuit). Make file contra angle with lip hook (short circuit) 3. -
Page 28: 19、Display The Root Canal On E-Connect
Apical Torque Reduction functions as described earlier refer to chapter 14 to set Arrive reference reference reference point point point adjustable The position of the reference point is automatically setting with the APEX LOCATOR, and the cursor is displayed on the E-CONNECT screen. - Page 29 Apical When the file reaches the reference point, E-CONNECT will start Reverse ,Apical Slow Down Apical Torque Reduction function(If the function is activated), Warning Do not use a non - specified data transfer cable,otherwise will damage the device. Do not hit device and splash liquids Note Make sure to connect the two devices with right position.
-
Page 30: 21、Cleaning, Disinfection And Sterilization
25、Cleaning, Disinfection and Sterilization 25.1 Foreword For hygiene and sanitary safety purpose, the components (contra angle, file clip, lip hook and insulating sleeve) must be cleaned, disinfected and sterilized before each usage to prevent any contamination. This concerns the first use as well as the subsequent uses. - Page 31 Autoclavable Components Warning ● Only the components above can be autoclaved. ● Before first use and after each use, sterilize the above components. Autoclave Procedure: STEP NO. INSTRUCTIONS Immediately after using, wipe gross contaminations from the components (contra angle, file clip, lip hook and insulating sleeve), and put them in container for transportation.
- Page 32 Remove and disconnect the components (Contra Angle, Lip Hook, File clip, Insulating Sleeve) before cleaning. Preparation before cleaning Do not fail to take out the file before cleaning ● the contra angle. Observe suitable personal protective measures. ● The following Step 3 to Step 5 are operated in a washer-disinfector: Use only approved washer-disinfectors according to EN ISO 15883, maintain ●...
- Page 33 Black oil Before autoclaving, the contra angle must be ● lubricated. Attaching the spray nozzle to oil can and contra ● angle, press the oil can button more than 3 seconds, till all the black oil flow out from the head of the contra angle.
- Page 34 Storage Keep the components in sterilization packaging in a dry and clean environment. Sterility cannot be guaranteed if packaging is ● open, damaged or wet. Check the packaging and the contra angle ● before using it (packaging integrity, no humidity and validity period).
- Page 35 26、Technical Data Manufacturer Changzhou Sifary medical technology Co.,Ltd Model E-CONNECT Dimensions 20cm x 17.5cm x7cm (package) Weight 700g Contra-angle Contra-angle compatible with rotary and reciprocating instruments, equipped with a 2.35 mm shaft conforming to ISO 1797-1:2011, Type 1 Power supply Lithium ion battery: 3.7V, 1500mAh...
- Page 36 Manufacturer Changzhou Sifary medical technology Co., Ltd Model E-PEX Dimensions 20cm x 17.5cm x7cm (package) Weight 600g Display 3.5’ color LCD Power supply Lithium ion battery: 3.7V, 1500mAh Charger power supply AC100-240V Frequency 50/60Hz Charger nominal power input 5.5VA Power Rating 0.3 W Degree of Protection IPX 0...
- Page 37 27、EMC Tables Guidance and manufacturer’s declaration – electromagnetic emissions The E-connect is intended for use in the electromagnetic environment specified below. The customer or the user of the E-connect should assure that it is used in such an environment. Emissions test...
- Page 38 Note: UT: rated voltage(s); E.g. 25/30 cycles means 25 cycles at 50Hz or 30 cycles at 60Hz Guidance and manufacturer’s declaration – electromagnetic immunity The E-connect is intended for use in the electromagnetic environment specified below. The customer or the user of the E-connect should assure that it is used in such an environment.
- Page 39 IEC 61000-4- 1. Use of accessories and cables other than those specified or provided by the manufacturer of E-connect could result in increased electromagnetic emissions or decreased electromagnetic immunity of E-connect and result in improper operation.
- Page 40 Remark Adapter Cable 2. Use of E-connect adjacent to or stacked with other equipment should be avoided because it could result in improper operation. If such use is necessary, E-connect and the other equipment should be observed to verify that they are operating normally.
- Page 41 Add: NO.99, Qingyang Road, Xuejia County, Xinbei District, Changzhou City, 213000 Jiangsu, China Tel: +86-0519-85962691 Fax: +86-0519-85962691 Email: ivy@sifary.com Web: www.eighteeth.com Llins Service & Consulting GmbH Tel: +49 175 4870819 Add: Obere Seegasse 34/2, 69124, Heidelberg, Germany Email: Llins.Service@gmail.com Version: 02 IFU-6035001 Issued: 2019.11.11...
Need help?
Do you have a question about the E-CONNECT and is the answer not in the manual?
Questions and answers