Table of Contents
Advertisement
Advertisement
Table of Contents

Related Manuals for Welch Allyn CP 20


Summary of Contents for Welch Allyn CP 20
- Page 1 REF 71305-0000 Rev A CP 20 12-Lead Resting Electrocardiograph User Manual ____________________________________________________________________________ Manufactured by Mortara, Inc. Milwaukee U.S.A. CAUTION: Federal law restricts this device for sale to or on the order of a physician.
- Page 2 This document contains confidential information that belongs to Welch Allyn, Inc. No part of this document may be transmitted, reproduced, used, or disclosed outside of the receiving organization without the express written consent of Welch Allyn, Inc. Welch Allyn is a registered trademark of Welch Allyn, Inc. CP 20 is a trademark of Welch Allyn, Inc.
- Page 3 Fax: 1 905 890 0008 Canada 1-800-561-8797 South Africa (+27) 11-777-7509 South Africa Sales Support/Supplies & Accessories Welch Allyn Pty Ltd S. Africa 394 Surrey Ave. Welch Allyn, Inc. Ferndale 4341 State Street Road Randburg 2194 P.O. Box 220 Zambowie...
- Page 4 Failure to do so may cause undue failure and possible health hazards. Equipment Identification Welch Allyn, Inc. equipment is identified by a serial and reference number on the back of the device. Care should be taken so that these numbers are not defaced.
- Page 5 This product is sold by Welch Allyn, Inc. under the warranties set forth in the following paragraphs. These warranties are extended only to the end user with respect to the purchase of this product directly from Welch Allyn or Welch Allyn’s authorized distributors.
- Page 6 (+49) 7477-927-173 China (+86) 21-6327-9631 Before contacting Welch Allyn it is helpful to attempt to duplicate the problem and to check all accessories to ensure that they are not the cause of the problem. When calling, please be prepared to provide: •...
- Page 7 UL 2601-1, IEC 601-1 and IEC 601-2-25. • Patient cables intended for use with the CP 20 include series resistance (10 K ohm minimum) in each lead for defibrillation protection. Patient cables should be checked for cracks or breakage prior to use.
- Page 8 IEC 60601-1-1, and leakage currents should be measured to confirm no electric shock hazard exists. • The CP 20 has not been designed for use with high-frequency (HF) surgical equipment and does not provide a protective means against hazards to the patient. •...
- Page 9 • The rechargeable internal battery is a sealed lead acid type and it is totally maintenance free. If the battery appears to become defective, refer to Welch Allyn Service Department. • Do not pull or stretch patient cables as this could result in mechanical and/or electrical failures. Patient cables...
- Page 10 After operating the CP 20 using battery power, always reconnect the power cord. This ensures that the batteries will be automatically recharged for the next time you use the CP 20. A light will illuminate, next to the on/off switch, indicating that the unit is charging.
- Page 11 Equipment Symbols and Markings Symbol Delineation Attention, consult accompanying documents Alternating current Protective earth (ground) Fuse Telephone line (modem) Defibrillator-proof type CF applied part Output/Transmit Input ON/OFF (power) Stop (of action)
- Page 12 Shift key (to enter upper case text) Space key Enter key (accept data/return) Initiate printing of 12-Lead ECG Initiate printing of continuous rhythm strip Indicates compliance to applicable EEC directives...
-
Page 13: Table Of Contents
Chapter Purpose..............................1-1 System Description............................1-1 Figure 1-1, System Illustration.........................1-3 System Layout ..............................1-4 Figure 1-2, CP 20 Left Side ..........................1-4 Figure 1-3, CP 20 Rear ...........................1-4 Figure 1-4, CP 20 Base ...........................1-5 Figure 1-5, CP 20 Display and Keyboard......................1-6 Automatic Feature Keys ..........................1-6 CP 20 Specifications ............................1-7... - Page 14 5 Special Functions Chapter Purpose ............................. 5-1 Application Menu............................. 5-1 Patient Directory.............................. 5-2 Print Configuration ............................5-5 Appendix A CP 20 Connectivity Chapter Purpose ............................. A-1 Transmitting Records ............................A-1 Direct Connection............................A-3 Modem Transmission............................A-3 Modem Initialization ............................A-3 Wireless LAN Transmission ..........................
-
Page 15: Introduction
Conventions Used in the User’s Manual The CP 20 user interface incorporates various function keys with variable labels as displayed on the LCD screen of the unit. These temporary key labels or “softkey” labels will be referred to in this manual in bold Arial font (e.g., Leads). - Page 16 CP 20_______________________________________________________________________Section 1 The CP 20 electrocardiograph includes: • 10-lead Patient Cable • Hospital Grade Power Cord • 500 Resting Tab electrodes • 1 pad of paper • Universal Electrode Adapters (10) • User’s Manual on CD, including Physician’s Guide to ECG Interpretation •...
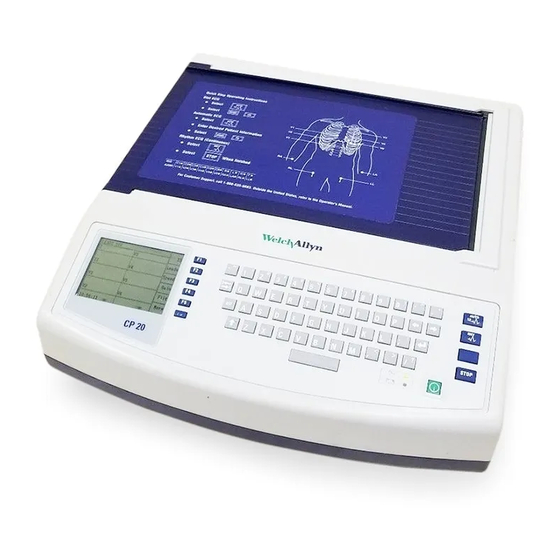
- Page 17 CP 20_______________________________________________________________________Section 1 Figure 1-1, CP 20, System Illustration...
-
Page 18: System Layout
CP 20_______________________________________________________________________Section 1 System Layout Figure 1-2, CP 20, Left Side Left Side View Figure 1-3, CP 20, Rear... - Page 19 CP 20_______________________________________________________________________Section 1 Figure 1-4, CP 20, Base...
-
Page 20: Automatic Feature Keys
CP 20_______________________________________________________________________Section 1 Figure 1-5, CP 20, Display and Keyboard Function Keys activate the liquid crystal display (LCD) label adjacent to each function key. LCD labels/functions change depending upon the screen displayed. If the label is blank, the adjacent function key is deactivated. -
Page 21: Cp 20 Specifications
CP 20_______________________________________________________________________Section 1 CP 20 Specifications Feature Specifications Instrument Type 12-lead Electrocardiograph Input Channels Simultaneous acquisition of 12 leads Standard Leads Acquired I, II, III, aVR, aVL, aVF, V1, V2, V3, V4, V5, V6 Waveform Display 1/4 VGA LCD 3-channel lead groups or complete... -
Page 22: Getting Started
Real-Time ECG View Equipment Set-Up Two AC line fuses and one battery fuse are installed on your CP 20. Should you ever need to replace the battery fuse, follow these instructions. Note Section 1, Figure 1-4 for battery fuse location. - Page 23 CP 20_______________________________________________________________________Section 2 To load the paper: Remove the outer packaging from the paper stack. Facing the front of the unit, use the release latch on the left side and slide the paper tray cover to the left. Place the stack of thermal paper into the paper tray such that the grid side of the paper is up when it is pulled over the paper tray cover.
- Page 24 CP 20_______________________________________________________________________Section 2 To apply power to the electrocardiograph: Plug the power cord into an AC wall outlet and into the back of the CP 20. (Reference Figure 1-3). Unit powers on automatically and can not be turned off when AC is connected (unit is in Stand by Mode).
- Page 25 Select number 3 (Set Time/Date) from the Application menu. The preprogrammed date and time is displayed for the CP 20. To make changes, type in the desired date and time values (using a 24-hour clock) in the same format as displayed. Use (F1) and (F2) to move back and forth through each row.
-
Page 26: Patient Preparation
CP 20_______________________________________________________________________Section 2 Patient Preparation Correct electrode placement is important for acquiring a successful ECG (see Patient Hookup below). Consider performing some patient preparation procedures to remove oils, lotions, and hair from the skin. Optimal skin preparation includes exposing skin on hairy areas, scratching with abrading pad, wiping with alcohol and a dry gauze pad. -
Page 27: Real Time Ecg View
CP 20_______________________________________________________________________Section 2 Real-Time ECG View The CP 20 LCD display offers the user valuable information including waveform display, function keys and parameters (leadfail messages, clock, filter, etc.). Detailed descriptions of the Real-Time ECG View are offered in section 4. -
Page 28: System Settings
Once you set these default conditions, you will rarely need to use the configuration screens again. When you apply power to the CP 20, it will operate according to the settings you have selected. To access the configuration menus:... - Page 29 CP 20_______________________________________________________________________Section 3 Select System Configuration (number 4) from the application menu. The first configuration screen will appear. There are a total of 6 configuration screens. Notice the page indicator in the upper right hand corner on each screen. NOTES: Use Page (F4) to toggle through the six configuration pages.
-
Page 30: Summary Of Configuration Menus
CP 20_______________________________________________________________________Section 3 Summary of Configuration Menus Configuration Definition Configuration Screen Parameter Software Version The firmware version of the unit Screen One Cart Number User-defined (up to 4 digits) Screen One Site Number User-defined (up to 4 digits) Screen One Site Name User-defined (up to 30 alphanumeric characters) Screen One... - Page 31 CP 20_______________________________________________________________________Section 3 Configuration Definition Configuration Screen Parameter Delete Rule Post plot, post transmit, post plot/xmt Screen Three Auto-save ECG Yes or No Screen Three Auto-print ECG Yes or No Screen Three Baud Rate Serial Baud Rates: 9600, 19200, 38400, or 57600 Screen Three Rhythm Lead 1 V1-V6, I, II, III, aVR, aVL, aVF...
-
Page 32: Summary Of Configuration Menus (For Optional Communication Module)
CP 20_______________________________________________________________________Section 3 The following chart summarizes the configuration screens for the optional Communication Module and the available options for each parameter. Summary of Configuration Menus for the Optional Communication Module Default XMT Media RS232, Modem, WLAN Screen Five DHCP Yes or No Screen Five IP Address... -
Page 33: Configuration
Cart numbers indicate which electrocardiograph transmitted a particular ECG. Site Number This option identifies the site of your CP 20. Site numbers designate the hospital, clinic, or institution for ECG records stored in Welch Allyn CardioPerfect workstation and must be defined for transmitting ECGs. You can use up to four digits for the site number, numbers from 0 –9999 are supported. - Page 34 AC Filter The CP 20 removes 60Hz or 50Hz interference. The setting you select depends on the line frequency in your country. Always use the 60Hz setting in the United States. If the AC interference is present, check to see that the proper AC filter is selected.
- Page 35 CP 20_______________________________________________________________________Section 3 ID Format This option defines the format for the patient ID information prompts. There are four available formats: short, standard, long, and long2. The short format includes the patient's last name and first name, patient ID number, date of birth (which will automatically calculate the age) and gender field.
- Page 36 Interpretation Option The CP 20 automatically analyzes ECGs and prints the optional interpretation on the ECG printout. This option allows you to select or suppress the “interpretive” text on the ECG report. Interpretive statement text can be retrieved from memory if the interpretation option is disabled when the ECG is acquired and later enable.
-
Page 37: Configuration
Auto Save ECG This option defines whether or not the CP 20 is to automatically save newly acquired ECGs in the directory, once they are acquired and printed. If the auto save configuration option is set to OFF, and the record is printed, the CP 20 will prompt you to “Save ECG?”... -
Page 38: Configuration
NOTE: If the ECG is not printed you will be prompted to save. Auto Print ECG This option defines whether or not the CP 20 will automatically print the ECG after acquisition. If the selected configuration option is set to OFF, a manual printout is possible after acquisition. -
Page 39: Configuration Page 5 (For Optional Communication Module)
IP Address Define the fixed IP address used by the CP 20 for network transmission. (If DHCP is not selected) Def Gateway Enter the address of the default gateway. (If DHCP is not selected) -
Page 40: Configuration Page 6 (For Optional Communication Module)
In this way, only devices with the proper WEP will be able to login. The CP 20 adopts the 128-bit encryption. Access Points can have multiple WEP IDs stored. Each one of them is identified by a number (0, 1, 2, 3) - Page 41 CP 20_______________________________________________________________________Section 3 WEP Key ID Enter the 128 bit WEP key value (26 digits in 13 sets of two digits e.g. HH-HH-HH-HH-HH-HH-HH-HH- HH-HH-HH-HH-HH) 3-14...
-
Page 42: Record An Ecg
• Rhythm printouts. Display Overview The CP 20 features a 320 x 240 pixel LCD display for valuable preview of ECG waveform, function key labels and other parameters as explained below: • Heart Rate: When a patient is connected to the cardiograph, his/her heart rate is displayed in real-time. - Page 43 CP 20_________________________________________________________________Section 4 Function keys always activate the corresponding LCD label adjacent to each key. LCD function key labels change according to the ECG view - the Real-Time ECG View is pictured below and the Acquired ECG View is described later in this section. Toggle through the available waveform display formats by selecting Leads (F2).
- Page 44 CP 20_________________________________________________________________Section 4 5 seconds of leads V1, V2, V3 5 seconds of leads V4, V5, V6 2.5 seconds of leads I, II and V1-V6 (default display – only available in Real-Time ECG View...
-
Page 45: Patient Demographics
CP 20_________________________________________________________________Section 4 Patient Demographics You may enter patient demographic information before acquisition. The entered patient ID fields will remain populated until you acquire the ECG. However, when you disconnect the leads from the patient, turn off the cardiograph, or change a configuration setting before acquisition, the entered patient demographic information will be cleared for you to enter the demographics of your next patient. -
Page 46: Ecg Acquisition, Printing, Storage
(one at a time). This is to alert the operator of a lead fail condition. The screen display "LEAD V2 OFF" identifies a lead fail V2 chest lead. When the problem is corrected, the CP 20 waits for 10 seconds of good data before analyzing the ECG. -
Page 47: Printing
CP 20_________________________________________________________________Section 4 Please note that the default Real-Time ECG View (as pictured below) is not available in the Acquired ECG View for navigation purposes. Real-Time ECG View Acquired ECG View Note: new softkey labels are available in the Acquired ECG View. Note: functions are not available during acquisition. -
Page 48: Storage
CP 20_________________________________________________________________Section 4 Storage The CP 20 manages storage in one of two ways – automatically or manually. When the Auto Save configuration option is enabled, ECGs are automatically saved upon acquisition and printing. However, when the Auto Save configuration option is disabled, upon completion of acquisition, a prompt is presented as follows and saving the ECG record is at the user’s discretion. -
Page 49: Special Functions
Patient Directory & Directory Maintenance • Configuration Printouts Application Menu The CP 20 offers several special functions available through the Application menu. Select More (F6) from the Real Time ECG View and the Application Menu is displayed. Application Menu Real Time ECG View NOTE: Function Keys activate the LCD label adjacent to each function key. -
Page 50: Patient Directory
ECG at a later time. All stored ECGs will remain in the directory until it becomes full, at this time, the CP 20 will automatically remove a... - Page 51 CP 20_______________________________________________________________________Section 5 record, based on its size, in order to make room for the new ECG. Only those records that have been marked for deletion will be removed. Records are automatically marked for deletion based on the Delete Rule in the configuration.
- Page 52 CP 20_______________________________________________________________________Section 5 The directory of stored ECGs is easily sorted either by Name, ID, or Date. To sort the patient records, select More (F5) from the patient list. Patient Directory Directory Organization (sorted by name) Select F1 to sort the directory by patient name (ID, time & date are displayed on the top row) Select F2 to sort the directory by patient ID (name is displayed on the top row) Select F3 to sort the directory by acquisition date (name is displayed on the top row) To make a printout of the patient directory, select Print Directory (F4).
-
Page 53: Print Configuration
CP 20_______________________________________________________________________Section 5 Print Configuration In order to verify the cardiograph’s configuration settings, a printout of the unit’s configuration is possible from the Application menu by selecting Print Configuration (5). The configuration printout obtains every configuration setting for the specific cardiograph, the firmware version, the cart number of the unit, and the date and time that the configuration printout occurred. -
Page 54: Appendix A Cp 20 Connectivity
Wireless LAN Configuration Transmitting Records You may transmit ECGs from the CP 20 to the Welch Allyn CardioPerfect workstation using a direct connection or either an optional factory installed internal modem or WLAN card. Before transmitting ECGs to the CardioPerfect workstation, the site number must be defined as well as the telephone number in the configuration. - Page 55 ECG at a later time. All stored ECGs will remain in the directory until it becomes full, at this time, the CP 20 will automatically remove a record, based on its size, in order to make room for the new ECG.
-
Page 56: Direct Connection
Modem Transmission For a modem transmission, connect the CP 20 to a standard telephone jack with the provided phone line cable. Plug the cable into the telephone jack located on the back of the cardiograph and the other end into a telephone wall jack. - Page 57 CP20_____________________________________________________________________________ Select F2 (+GCI=) to populate the prefix “AT+GCI” of the modem command. TIP: “AT+GCI” will be highlighted – cursor is not present – use keypad to enter country code. Enter your country code as listed below. Select F1 (Send) to change your country code. “Command stored” will be displayed.
-
Page 58: Wireless Lan Transmission
WEP (Wired Equivalent Privacy) security yes or no. Your IP manager will need to configure the wireless access point and Welch Allyn CardioPerfect workstation at your site. Your IP manager will also need to provide the following parameter values to be set in your CP 20 electrocardiograph. Refer to section 3 for more information on WLAN setup. -
Page 59: Appendix B Maintenance And Troubleshooting
CP 20 ____________________________________________________________________Appendix B Appendix B Maintenance and Troubleshooting Troubleshooting Chart LCD Message Problem Correction BATTERY LOW Unable to acquire ECG Charge the battery with AC power. or unable to print. CONNECTION Unable to transmit Check for correct baud rate, phone number, FAILED ECGs. -
Page 60: Inspection And Cleaning
Examine patient cable, power cable and other accessory cables for obvious damage (e.g. torn insulation, broken connectors, etc.). Replace cables as necessary. • No bent prongs or pins on the plugs and connectors. Check the fit of cables with connectors on the CP 20 to ensure proper fit. •... -
Page 61: Cleaning The Patient Cable
(70% - 80%) • propanol (70% - 80%) • aldehydes (2% - 4%) WARNING: Do not attempt to clean/disinfect the CP 20 or patient cable(s) by submerging into a liquid, autoclaving, or steam cleaning. Never expose cables to strong ultra-violet radiation. -
Page 62: Glossary
_____________________________________________________________________________Glossary Glossary TERM DEFINITION Augmented lead (aVL, aVR, aVF) The difference between one site and the average of the potential of two other sites; unipolar extremity leads. Baseline drift The QRS complexes are present, but the baseline wanders due to poor skin/electrode contact and/or patient movement.
Need help?
Do you have a question about the CP 20 and is the answer not in the manual?
Questions and answers