Table of Contents
Advertisement
Quick Links
Advertisement
Table of Contents

Subscribe to Our Youtube Channel
Related Manuals for DEPURECO M Series


Summary of Contents for DEPURECO M Series
- Page 1 INSTRUCTION AND MAINTENANCE MANUAL SERIES...
-
Page 2: Table Of Contents
TABLE OF CONTENTS: 1. INFORMATIVE SECTION Foreword ....................... 4 Main parts ......................7 Optional parts ....................... 8 Manufacturer's identification data ..............8 Identification plate ....................8 Permitted Uses ..................... 8 Authorised environmental conditions ..............9 Noise level ......................9 Technical data ....................10 1.10 Warranty ...................... -
Page 3: Informative Section
Foreword Dear Customer Thank you for having chosen DEPURECO; we hope you will enjoy using your new DEPURECO M series vacuum cleaner. This manual has been drafted in order for our customer to fully appreciate the quality of this machine. Please read all sections before using the machine for the first time. - Page 4 This manual is an integral part of the vacuum cleaner and must accompany it at all times, until its demolition. In the event it is lost or damaged, you can request another copy from DEPURECO INDUSTRIAL VACUUMS S.r.l. (henceforth shortened to DEPURECO).
- Page 5 The technical information contained in this manual is exclusive property of DEPURECO and must be considered confidential. Reproduction, even partial, of graphics, text and illustrations is prohibited by law. Some details shown in the figures in this manual may differ from those on your vacuum; this is because some components may have been removed to ensure maximum illustration clarity.
-
Page 6: Main Parts
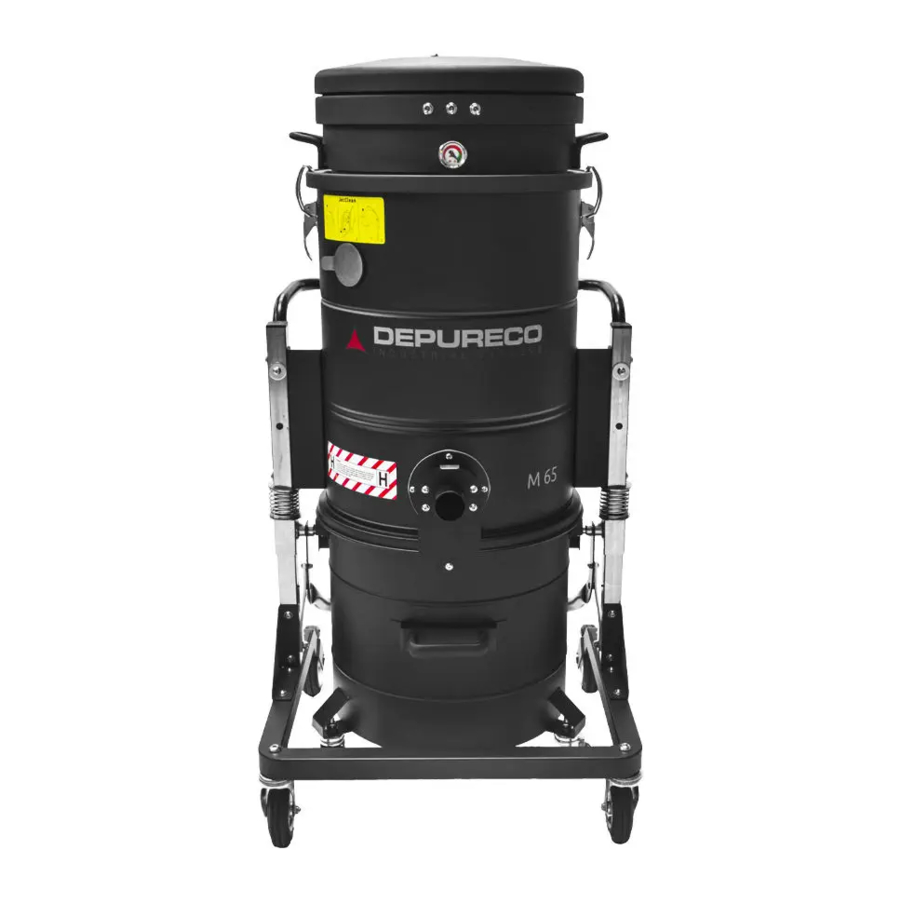
Main parts M 65 M 65 Jet Clean® 1. Commands 2. Vacuum handle 3. JetClean® valve 4. Filter chamber 5. Filter shaker handwheel 6. Suction inlet 7. JetClean® sliding damper 8. Dust/ Debris Bin 9. Bin handle 10. Accessories Bin Page 7 of 47... -
Page 7: Optional Parts
Optional parts A wide range of optional accessories is available from DEPURECO depending on the intended use of the vacuum. Manufacturer's identification data DEPURECO INDUSTRIAL VACUUMS S.r.l. Corso Europa 609 - 10088 Volpiano (TO) - ITALY phone +39 011 98 59 117 - fax +39 011 98 59 326 | VAT NO. 02258610357 e-mail: depureco@depureco.com - website: www.depureco.com... -
Page 8: Authorised Environmental Conditions
Authorised environmental conditions To ensure the correct operation, the vacuum cleaner must be kept away from atmospheric agents (rain, hail, snow, fog, dust in suspension, etc.) in an area with a room temperature range between 0° and 40°C and a relative humidity no higher than 70%. The work environment must be clean and suitably lit. -
Page 9: Technical Data
1.9 Technical data M 100 M 100 M 65/100 U.M. M 65/100 JetClean® Longopac® JetClean® Longopac® Weight* [Kg] 660 x 800 660 x 800 660 x 800 660 x 800 Overall dimensions** [mm] x 1300/1515 X 1515 X 1515 1300/1515 Voltage I Frequency [V] –... -
Page 10: Warranty
DEPURECO shall not be held liable for any injuries to persons or damage to objects caused by misuse or improper use of the vacuum. -
Page 11: Safety Section
Adequate training is crucial to this end. DEPURECO shall not be held liable for accidents or damage due to the improper use of the vacuum by untrained personnel or to failure to comply, even partially, with the occupational safety standards and intervention procedures contained in this manual. -
Page 12: Safety Recommendations
Structural damage, alterations or improper repairs can modify the protective capacity of the vacuum, thereby nullifying this certification and releasing DEPURECO from any liability. Each section lists further safety measures specific to the various functions. - Page 13 CAUTION! It is absolutely forbidden; For underage and non-trained people to use this vacuum cleaner. • To connect the vacuum cleaner to mains without suitable earthing. • To operate the vacuum cleaner outdoors in the presence of atmospheric precipitations. • To operate the vacuum cleaner without locking the swivelling wheel through the special brake located •...
-
Page 14: Safety Plates And Symbols
Clean them using a cloth with water and soap. Do not use solvents, naphtha or petrol. Request replacements for damaged plates from DEPURECO. If a plate is located on a component that is being replaced, make sure to fit the old plate to the new component. -
Page 15: Residual Risks
The user must immediately replace any safety plate rendered illegible due to wear or damage. Warning! The removal of safety plates from the vacuum and/or its components and packaging is strictly prohibited. DEPURECO shall not be held liable for the vacuum's safety in the event of failure to comply with this prohibition. Page 16 of 47... -
Page 16: Applied Directives
2011/65/EU ROHS - Directive on the restriction of the use of certain hazardous substances in electrical and electronic equipment 2014/35/UE Low tension directive The reference standards, including their binding requirements, are managed within the DEPURECO Quality Management System and archived by DEPURECO. Page 17 of 47... -
Page 17: Handling, Unpacking And Installation Section
3. HANDLING, UNPACKING AND INSTALLATION SECTION Handling Warning! The instructions for transporting and unpacking the vacuum correctly are shown on the packaging as well. The following instructions also indicate the operations to be undertaken should the vacuum need to be re-packed or unpacked after subsequent transportation. -
Page 18: Unpacking
3.2 Unpacking Cut and unwind the two packaging fixing belts remove the staples that fix the carton packaging to the pallet with the aid of a screwdriver remove the carton completely Page 19 of 47... - Page 19 Unscrew and remove from both sides the fixing screws and brackets. The cardboard packaging can be recycled. To protect the environment, make sure to dispose it off in specialised collection centres. Warning! Keep the pallet. In the event of subsequent transport, the vacuum must be secured to the pallet using the same fastening system.
-
Page 20: Installation
In the event of one or more components being damaged, do not continue with installation, inform DEPURECO about the anomaly and agree upon action to be taken. The vacuum cleaner is already fitted with an appropriate filter intended exclusively to vacuum dry dust... - Page 21 Note: the flexible hose and the relevant end-pieces and accessories are not included with the STANDARD model. Contact your dealer (or DEPURECO) for information regarding the various types of OPTIONALS that can be used on this specific model. The following operation must be carried out by a qualified electrician.
-
Page 22: Operation Section
4. OPERATION SECTION Description of the controls Warning! The vacuum can be used solely by authorised personnel after having read these use and maintenance instructions. The user of the equipment and the maintenance technician, who carry out operations on the vacuum, must be adequately educated, informed and trained, in compliance with the occupational safety standards in force and, during the various operations, must wear personal protective equipment (PPE), such as safety footwear, gloves, protective goggles, mask, etc. -
Page 23: Operating Cycle
Operating cycle Ensure that the power cord is intact and in perfect state. Warning! Before inserting the plug, ensure that the voltage of the power supply line corresponds to the one indicated on the vacuum's identification plate. Make sure the plug is correctly inserted into the socket Make sure the hose is properly inserted and locked in the suction inlet. - Page 24 Use the handles on the back of the machine to move the vacuum cleaner. For greater comfort, the most frequently used accessories can be placed in the dedicated accessories basket. Caution! While the device is running, prevent the flexible hose from rolling up or kinking. On the vacuum cleaner is located a vacuum gauge which indicates the vacuum level inside the vacuum cleaner.
-
Page 25: Cleaning The Filter
Cleaning the filter To clean the filter, proceed as follows: Switch the vacuum off by turning off all the previously activated motors through the switches located on the vacuum’s head Wait until the motor has fully stopped Lift and lower the lever vigorously to shake the inner filter Warning! If the vacuum cleaner, after cleaning the filter, doesn’t work correctly it’s possible that the filter is clogged and must be replaced. - Page 26 Cleaning the filter (JetClean@ System) To clean the filter cartridge, the vacuum cleaners in the "JC" model, are equipped with the JetClean® cleaning system. The system works thanks to the difference in pressure between the internal atmosphere and the external atmosphere leading to the dust becoming detached from the filtering fabric of the cartridge, without needing to switch the vacuum cleaner off.
- Page 27 Lower the shutter (detail no. 7, chap. 1.2) and resume normal use Warning! The JetClean® cleaning system only works with the vacuum cleaner switched on. Page 28 of 47...
-
Page 28: Emptying The Bin
Emptying the bin Warning! Wear appropriate PPE (dust mask, latex gloves, goggles, etc.). Depending on the type and quantity of material being vacuumed, it is necessary to periodically check the bin to avoid filling it excessively. Proceed as follows to empty the container: Switch the machine off As previously mentioned the vacuum is blocked thanks to the brake on the pivoting wheel Unlock the container by lifting the special handle. - Page 29 empty the bin in a dedicated container for waste disposal In the case the chosen collecting container is a plastic bag proceed as follows for its replacement: After having removed the bag, tie it, dispose of it and insert a new bag in the bin Warning! If the bin weighs more than 15 Kg, at least two people are needed to empty it.
-
Page 30: Inserting And Locking The Bin
Inserting and locking the bin Depending on the type and quantity of material being vacuumed, it is necessary to periodically check the bin to avoid filling it excessively. Proceed as follows to empty the container: Follow the steps below to insert and lock the container: Place the bin under the vacuum’s chamber Lower the lever blocking the container completely with both hands The pins (A) must be aligned with the slots (B) - Page 31 Replacing parts of the Longopac® sac (if provided) Warning! Wear appropriate PPE (dust mask, latex gloves, goggles, etc.). Depending on the type and quantity of material being vacuumed, it is necessary to periodically check the sac to avoid filling it excessively. Proceed as follows to replace the portions of used sac: Switch the machine off Block the vacuum cleaner using the lever on the swivelling wheel...
- Page 32 Replacing the Longopac® sac (if provided) To replace the Longopac® sac, operate as follows Switch the vacuum off Rotate the red hooks under the filter chamber to unlock the sac’s support ring Take the ring out and remove the last portion of the sac Position the sac inside the ring ensuring that both the internal flap and the external one are out of the container’s edges.
-
Page 33: Storage - Decommissioning
Position the support ring under the chamber and block it with the red hooks To prepare the first portion of the sac, pull towards the vacuum’s base and close the end of the sac with the supplied clamp Switch the vacuum cleaner on and immediately assess its regular operation Storage –... -
Page 34: Maintenance Section
5. MAINTENANCE SECTION Warning! Special vacuum maintenance must be carried out solely by specialised technicians authorised by the DEPURECO dealer. Informative notes This section describes the checks and routine maintenance operations required to ensure proper vacuum operation. Maximum reliability and minimum maintenance costs are the result of a planned maintenance and inspection schedule carefully followed throughout the entire lifespan of the vacuum. -
Page 35: General Safety Regulations
General safety regulations Warning! All the operations described above must be carried out with the plug disconnected from the socket. Before starting any maintenance or cleaning operation, wear suitable PPE (protective clothing, goggles and/or gloves, etc.) according to the work to be done. Place a sign on the vacuum with the message: “MACHINE UNDER MAINTENANCE DO NOT START”... - Page 36 Check that the power cord and the plug are not damaged: replace them immediately if there are any signs of wear, using a cord of the same type (information c/o DEPURECO). This operation is the sole responsibility of an electrician.
-
Page 37: Replacing The Filter
Replacing the filter Warning! Wear appropriate PPE (dust mask, latex gloves, goggles, etc.). Proceed as follows to replace the filter: Switch the machine off Unplug the vacuum cleaner from the socket Remove the bin or the Longopac® sac From the lower side of the filter chamber, release the clip and remove the retaining pin of the cage from the filter shaking lever Unlock the two locking hooks (C) on both sides Page 38 of 47... - Page 38 Remove the vacuum’s cap Remove the HEPA filter and/or the S.P. cleaning system (if provided) Slip out the filter and place all components on a work bench Loosen the fastening clip (H), remove the filter from its support and, using scissors, cut the lower belts that clamp it to the filter’s cage Remove the filter, put it in a plastic bag, seal it and dispose it of according to the current legislation on the type of material extracted...
- Page 39 To reassemble the filter, operate in reverse order: Insert the new filter in the support ring and lock it by means of the fastening clip (H) lock the filter to the cage by tying the special laces on the bottom side insert the filter with ring and cage inside the filtering chamber paying particular attention to the alignment of the cage with the filter shaker’s handle Insert the lever’s end into the appropriate seat on the bottom of the cag, then insert...
- Page 40 Position the vacuum cleaner’s head above the HEPA filter, then lock it with the appropriate locking hooks Connect the vacuum cleaner to the mains Switch the vacuum cleaner on by positioning the main switch to "I", then check to make sure it works properly. EXCLUSIVELY USE FILTERS MANUFACTURED BY DEPURECO Page 41 of 47...
-
Page 41: Troubleshooting
Check the integrity of the socket The vacuum cleaner No electric supply and the cable will not start Contact DEPURECO’s technical assistance Shake the filter If this solution is not effective, Clogged filter replace it. Irregular values on the... -
Page 42: Scrapping
Scrapping In case of scrapping, to avoid damage to the environment, all components of the vacuum cleaner, must be disposed of responsibly, in appropriate landfills, in compliance with current legislation - for Italy Legislative Decree no. 152/2006 and subsequent amendments. (subsequent modifications and additions). - Page 43 MAINTENANCE LOG: INTERVENTION 1: DATE: TECHNICAL ASSISTANCE: TYPE OF INTERVENTION: INTERVENTION 2: DATE: TECHNICAL ASSISTANCE: TYPE OF INTERVENTION:...
- Page 44 INTERVENTION 3: DATE: TECHNICAL ASSISTANCE: TYPE OF INTERVENTION: INTERVENTION 4: DATE: TECHNICAL ASSISTANCE: TYPE OF INTERVENTION:...
Need help?
Do you have a question about the M Series and is the answer not in the manual?
Questions and answers