
Subscribe to Our Youtube Channel
Related Manuals for DEPURECO HF 300


Summary of Contents for DEPURECO HF 300
- Page 1 INSTRUCTION AND MAINTENANCE MANUAL HF – HF Z22 TRANSLATION OF ORIGINAL INSTRUCTIONS...
-
Page 2: Table Of Contents
INDEX INFORMATIVE SECTION ......................... 5 Forward ............................5 main parts ............................8 Optional parts ..........................9 manufacturer’s identification data ....................9 Identification plate .......................... 9 Permitted uses ..........................10 Authorised environmental conditions ................... 10 Noise level ............................. 11 Technical data ..........................12 hf atex Z22 .............................. - Page 3 Replacing the filter ........................43 Troubleshooting ..........................56 Scrapping ............................58 INTERVENTION 1: DATE: ........................... 59 INTERVENTION 2: DATE: ........................... 60 INTERVENTION 3: DATE: ........................... 61...
-
Page 5: Informative Section
1.1 F ORWARD Dear Customer Thank you for choosing DEPURECO and congratulations on choosing a DEPURECO HF series vacuum cleaner. We have prepared this manual to enable you to fully appreciate the quality of this machine. We recommend that you read it through in its entirety before using it for the first time. - Page 6 HF 300 HF 5,5 HF 5,5 HF 7,5 HF 10 HF 10 HF 15P/ HF 15S HF 15 HF 18 HF 20 HF 30P/ HF 30S HF 25 HF 35P/ HF 35S HF 35P/ HF 35S L’aspiratore è equipaggiato con i seguenti filtri:...
- Page 7 This manual is an integral part of the vacuum cleaner and must accompany it until it is destroyed. In the event of loss or damage, a replacement copy must be requested from DEPURECO INDUSTRIAL VACUUMS S.r.l. (hereinafter simply referred to as DEPURECO).
-
Page 8: Main Parts
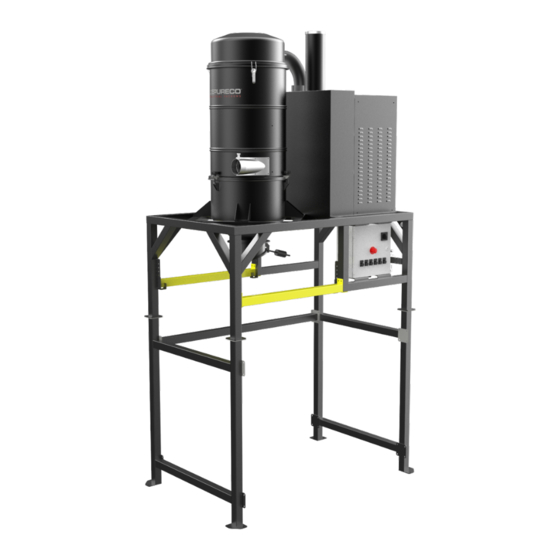
MAIN PARTS HF 300 1. Pump 2. Support structure 3. Lower support structure 4. Bottom structure reinforcement bar 5. Electrical cabinet 6. Exhaust system 7. Tangential nozzle 8. Filter chamber 9. Filter chamber lid 10. HEPA filter (optionanal) -
Page 9: Optional Parts
Depending on the vacuum cleaner application, a wide range of other optional accessories is available from DEPURECO. ’ MANUFACTURER S IDENTIFICATION DATA DEPURECO INDUSTRIAL VACUUMS S.r.l. Via Venezia, 32 - 10088 Volpiano (TO) - ITALIA tel. +39 011 98 59 117 fax +39 011 98 59 326 e-mail: depureco@depureco.com... -
Page 10: Permitted Uses
1.6 P ERMITTED USES These vacuum cleaners are constructed and designed in accordance with Directive 2006/42/EC (Machinery Directive) for professional industrial use only; however, for purposes other than normal domestic use. This vacuum cleaner is suitable for cleaning and collection of solid materials and only in covered areas. The vacuum cleaner is designed to be used by a single operator. -
Page 11: Noise Level
1.8 N OISE LEVEL Phonometric tests carried out on this specific vacuum cleaner model show a sound pressure level of 74 dB(A) HF 300 76 dB(A) HF 5,5-7,5 HF 10-15-18-20 74 dB(A) 78 dB(A) HF 30-35 Attention! For sound pressure levels above 85 dB(A), workers exposed to must be protected by appropriate personal protective equipment (PPE), such as approved individual hearing protectors. -
Page 12: Technical Data
HF 10 HF 15P HF 15S HF 18 HF 30P HF 30S HF 35P HF 30S Feature HF 300 Power 3 - 4 4 - 5,5 7,5 - 10 11 - 15 11 - 15 12,5 -18 22 -30 22 -30... -
Page 13: Hf Atex Z22
HF ATEX Unità HF 5,5 HF 7,5 HF 10 HF 15 HF 20 HF 25 HF 30P HF 30S Feature Misura Power KW-HP 4 - 5,5 5,5 - 7,5 7,5 - 10 11 - 15 15 - 20 18,5 - 25 22 - 30 22 - 30 Voltage/freque... -
Page 14: Warranty
1.10 W ARRANTY DEPURECO guarantees this vacuum cleaner model for a period of 12 months from the date of purchase, indicated on the fiscal document upon delivery of the product. The guarantee shall be void if the vacuum cleaner has been repaired by unauthorised third parties or if equipment, accessories or components are used which have not been supplied or authorised by DEPURECO or for which the serial number has been found to have been removed (during the guarantee period). -
Page 16: Safety Section
Proper training is a prerequisite for this. DEPURECO cannot under any circumstances be held liable for accidents or damage resulting from the use of the vacuum cleaner by personnel who have not been adequately instructed or who have used it improperly, as well as from the non-observance, even partial, of the accident prevention regulations and intervention procedures contained in this manual. -
Page 17: Safety Recommendations
In the event that tools, procedures, working methods or techniques are used which are not explicitly envisaged by DEPURECO, it must be ascertained in advance that there is no danger to oneself or to others, with DEPURECO's liability remaining in any case excluded. - Page 18 • In case the Customer installs on the vacuum cleaner a tool not supplied by DEPURECO, it is necessary to check that the safety conditions, required by the Machine Directive 2006/42/CE, are maintained and in any case DEPURECO shall not be held responsible for any inconvenience resulting from the use of this part.
-
Page 19: Safety Plates And Symbols
This manual must always be at hand, for consultation on the planned operating cycle and whenever in doubt. • If it is lost or damaged, a replacement copy must be requested from DEPURECO. CAUTION! This vacuum cleaner may contain dust that is harmful to health. - Page 20 Caution! Read the operating and maintenance manual carefully before using the vacuum cleaner or performing maintenance work. Caution! Read the instructions on the packaging carefully before handling and unpacking the vacuum cleaner.
-
Page 21: Residual Risk
DEPURECO recommends strict adherence to the instructions, procedures and recommendations contained in this manual as well as to current safety regulations. In addition, DEPURECO recommends the use of the prescribed protective equipment, either integrated in the vacuum cleaner or individual. -
Page 22: Applied Directions
Directive on the restriction of the use of certain hazardous substances in electrical and electronic equipment Regulatory references, including mandatory requirements, are managed in the Quality Management System and archived at DEPURECO. ATEX SAFETY INSTRUCTIONS Hexagon Ex - ATEX Directive 2014/34/EU In this manual, the Ex hexagon is placed alongside the main safety instructions on explosion risk. - Page 23 The equipment is only suitable for working with dusts without ignition sources. Combustible dusts with the following characteristics can be handled:Self - °C > 215 flammability in MIT cloud. Self-flammability in LIT layer °C > 215 Minimum Initiation Energy (MIE) ≥...
- Page 24 INSTALLATION - START-UP Before installation and start-up, provide a visual check for possible transport damage. The instruments used for installation must comply with standard EN 1127-1 in relation to the area of use. As a preliminary operation, grounding must be carried out and its correct functioning checked.
- Page 25 In the case of suction of dust that may give rise to self-ignition, the collection bin must be emptied immediately after each activity. This precaution must also be taken in the case of extraction of different types of dust whose mixture may give rise to exothermic reactions.
- Page 26 The manuals for the ATEX components mounted on the equipment are enclosed: the user must observe all safety instructions regarding the use of these components. The equipment must be cleaned by the user to avoid the formation of combustible dust layers. Do not use compressed air for cleaning the dust layers, but suitable suction systems for dealing with potentially explosive dust (ATEX- certified hoovers).
- Page 27 Hoses, suction nozzles and filter bags are of the antistatic type declared by their respective manufacturers. It is forbidden to use other types of components. Protection against atmospheric discharges must be present in the establishment where the equipment is used. There must be no sources of ignition in the immediate vicinity of the device, for example:- fiamme;...
-
Page 28: Unpacking, Installation And Handling Section
NPACKING INSTALLATION AND HANDLING SECTION 3.1 H ANDLING Caution! Instructions for the correct transport and unpacking of the vacuum cleaner are also given on the packaging. The following instructions also indicate the steps to be taken if the vacuum cleaner has to be repacked or unpacked for later transport. - Page 29 • remove, with the help of a screwdriver, the points that secure the cardboard packaging to the pallet (where provided) • completely remove the cardboard (where applicable) The cardboard packaging is recyclable and, in order not to create an environmental impact, it is recommended to take it to separate collection.
-
Page 30: Installation
In the event that one or more components are damaged, it is essential not to proceed further with the installation and to inform DEPURECO of the anomaly detected, agreeing with them on the action to be taken. A suction filter is already fitted to the vacuum cleaner, which allows the suction of dry dust or debris only. - Page 31 1. Fasten the backing plates firmly to the ground using appropriate dowels (dowels are not supplied by DEPURECO) Insert the forks of the forklift under the bars of the upper frame (as in the picture below) and lift it up to above the lower frame Next, join the upper structure (1) to the lower structure (2) at the attachment plates as shown in the image below.
- Page 32 As previously mentioned, the frame connections (1) are to be made at the joint plates (2) by means of screws supplied with the extractor (3) The following operations must be carried out by an electrician. • Connect the connection shown in the figure with a suitable hose to the pneumatic network. The required pneumatic supply is max.
- Page 33 Note: the hose with its terminals and suction accessories are not included in the STANDARD equipment. Contact your dealer (or DEPURECO) for information on the different types of OPTIONAL accessories that can be used for this specific vacuum cleaner model.
- Page 34 Caution! Do not insert the plug into the socket with wet hands. The use of extension cords is not permitted.
-
Page 35: Operation Section
(PPE) for the various operations, such as safety footwear, gloves, protective goggles, mask, etc. The user must observe the regulations in force for sucked materials and their disposal. HF 300: Main switch ON/OFF White indicator lamp: VOLTAGE PRESENCE... - Page 36 HF 5,5 – 7,5 – 10 – 15 – 18 – 20 – 25 – 30 – 35: General ON/OFF switch White indicator lamp: VOLTAGE PRESENCE Green indicator light: FILTER CLEANING IN PROGRESS Green indicator light: WORK CYCLE IN PROGRESS Yellow warning light: SAFETY THERMAL SHOCKED Blue button: MANUAL START OF FILTER CLEANING Green button: START ASPIRATION...
-
Page 37: Operating Cycle
4.2 O PERATING CYCLE Caution! Before plugging in, make sure that the voltage of the supply line corresponds to that indicated on the vacuum cleaner's rating plate. Ensure that the power cable is undamaged and in perfect condition. Make sure that the power plug is correctly inserted into the socket and make sure that the white POWER INDICATOR light is on. - Page 38 Working cycle description: 1. Dust-laden air is drawn in through a tangential nozzle that ensures its uniform distribution within the hopper 2. Inside the filter chamber, the inhaled air abruptly reduces its velocity, assuming a spiral motion that causes the coarser particles to precipitate while the lighter particles follow the airflow reaching the filter elements. 3.
-
Page 39: Storage - Decommissioning
This operation can also be carried out when the vacuum cleaner is not in operation but always in the presence of voltage Vacuum cleaner with manual cleaning system (HF 300) Turn off the vacuum cleaner Wait for the pump to completely stop... -
Page 40: Informative Notes
5.1 I NFORMATIVE NOTES This section describes the routine inspection and maintenance operations that are essential to ensure the smooth operation of the vacuum cleaner. Maximum vacuum cleaner reliability and minimum maintenance cost are the result of a planned maintenance and inspection program that is scrupulously followed throughout the life of the vacuum cleaner. - Page 41 Before starting any maintenance or cleaning operation, wear appropriate PPE (protective clothing, goggles and/or gloves, etc.) depending on the work to be performed. Affix a sign on the vacuum cleaner indicating: "MACHINE UNDER MAINTENANCE DO NOT START." Before resuming service, recheck the entire system in accordance with start-up procedures.
- Page 42 Before each work shift Check that the power cord and plug are not damaged: replace it immediately if it shows signs of wear and tear, using a cord of the same type (information c/o DEPURECO) operation the sole responsibility of an electrician.
-
Page 43: Replacing The Filter
5.3 R EPLACING THE FILTER To replace the filter in the HF300 (with manual cleaning), proceed as follows: Turn off the vacuum cleaner by turning the main switch (1) to "o" Disconnect the vacuum cleaner from the power supply. Remove the hopper From the underside of the filter chamber, unhook the clip and pull out the pin securing the cage to the filter shaker lever Unlock from both sides the two locking hooks of the head base on the filter chamber (C) - Page 44 Remove the HEPA filter (where provided) by releasing the two dedicated locking hooks. Remove the filter and place it on a workbench. Loosen the retaining clamp (H), remove the filter from its holder To replace the filter in the HF300 (with PSC cleaning), proceed as follows: - Disconnect the vacuum cleaner from the power supply and compressed air supply.
- Page 45 Getting help from a second person, lift the head slightly taking care to disconnect the 2 compressed air hoses (D). Getting help from a second person, remove the head with its base Caution! The total weight of the head with its base is about 35kg Remove the filter (complete with holder and piston) and gently place it on a workbench...
- Page 46 Loosen the retaining strap (H), detach the filter from its holder. Slide out the filter and unfasten the tapes holding it to the cage. • To replace the filter in the HF300 (with SP cleaning), proceed as follows: Disconnect the vacuum cleaner from the power supply and compressed air supply. Disconnect the pipe (B) of the compressed air supply.
- Page 47 Unlock the two hooks (C) closing the canopy from both sides. Getting help from a second person, remove the head with its base Caution! The total weight of the head with its base is about 35kg Unlock the C.C.A. cleaning system from the locking hooks (A) and having a second person help you lift it out of the filter chamber, turn it upside down and place it on a workbench From the base of the cartridges, remove and unscrew the retaining nuts...
- Page 48 Slide out and replace the filter cartridges. For filter replacement in HF 5.5 - 7.5 - 10 - 15 - 18 - 20 - 25 (with PSC cleaning) proceed as follows: - Disconnect the vacuum cleaner from the power supply and compressed air supply. - Disconnect the suction hose (C) by unscrewing the clamp with appropriate hex wrench - Unfasten the hooks (A) closing the hood - Disconnect the 2 hoses (B) of compressed air from the head...
- Page 49 - Remove the filter (complete with support and plunger) and place it gently on a workbench - Loosen the retaining clamp (H), detach the filter from its support - Slide off the filter and unfasten the ribbons holding it to the cage To replace the filter in HF 5.5 - 7.5 (with SP cleaning), proceed as follows: - Disconnect the vacuum cleaner from the power supply and compressed air supply.
- Page 50 Disconnect the pipe (D) of the compressed air supply. Disconnect the electrical connector (A) Unlock the C.C.A. cleaning system from the locking hooks (E) and with the help of a second person lift it out of the filter chamber, turn it upside down and place it on a workbench From the base of the cartridges, remove and unscrew the retaining nuts Slide out and replace the filter cartridges.
- Page 51 With the help of a second person, lift the head slightly and, on the inside, disconnect the connector (E) and disconnect the pneumatic supply tube (F) from the air supply fitting. Remove the head and place it on a workbench. Use No.
- Page 52 Slide out and replace the filter cartridges. To replace the filter in HF 30 - 35 (with SP cleaning), proceed as follows: - Disconnect the vacuum cleaner from the power supply and compressed air supply. - Disconnect the suction hose (C) by unscrewing the clamp with appropriate hex wrench - Unscrew and remove the 6 bolts (B) closing the hood - Disconnect the compressed air hose (D) from the head - Disconnect the electrical connector (A)
- Page 53 Hook 2 lifting ropes to the 2 handles (G) and by forklift/crane truck/crane lift the head slightly and, inside, disconnect the connector (E) and disconnect the pneumatic supply hose (F) from the appropriate fitting. Remove the head and place it on a workbench. Warning.
- Page 54 - Use No. 2 eyebolts F M8 [G] (not supplied) by screwing them onto the studs on the top of the pneumatics to lift and remove it Attenzione! Il peso complessivo della pneumatica col suo basamento è di circa 25kg Dalla base delle cartucce rimuovere e svitare i dadi di fissaggio Slide out and replace the filter cartridges.
- Page 55 When replacing the filter, make sure that the equipotential bonding braid is properly connected Remove the spent filter, place it inside a plastic bag, close it and dispose of it according to current laws for the type of material sucked in USE ONLY ORIGINAL DEPURECO FILTERS...
-
Page 56: Troubleshooting
5.4 T ROUBLESHOOTING POSSIBLE ANOMALY SUGGESTED REMEDY CAUSE - Replace the filter insufficient suction Clogged filter reduced Check the assembly of the filter Filter cartridges not filtering capacity cartridges properly fitted Improperly closed Check tailgate closure maintenance hatch Dust leakage from the Replace filter Cracked filter vacuum cleaner... - Page 57 The vacuum cleaner does cable - Circuit breaker tripped not start -Reset circuit breaker - Contact DEPURECO Technical Service - Clogged filter Carry out a filter cleaning. If this is not sufficient, replace it. Irregular suction - Clogged suction pipe - Check the suction pipe and clean it.
-
Page 58: Scrapping
5.5 S CRAPPING This product falls within the scope of Directive 2012/19/EU re and electronic equipment (WEEE). The appliance must not be disposed of with waste d can be recycled at appropriate facilities. Inform yourself through the ecological platforms suitable to receive the product for disposal and its s purchase of equivalent equipment, the distributor is obliged to take it back free of charge potentially dangerous to human health and the environment, as it does not contain so... -
Page 59: Intervention 1: Date
MAINTENANCE INTERVENTIONS INTERVENTION 1: DATE: TECHNICAL ASSISTANCE: TYPE OF INTERVENTION:... -
Page 60: Intervention 2: Date
MAINTENANCE INTERVENTIONS INTERVENTION 2: DATE: TECHNICAL ASSISTANCE: TYPE OF INTERVENTION:... -
Page 61: Intervention 3: Date
MAINTENANCE INTERVENTION: INTERVENTION 3: DATE: TECHNICAL ASSISTANCE: TYPE OF INTERVENTION:...
Need help?
Do you have a question about the HF 300 and is the answer not in the manual?
Questions and answers