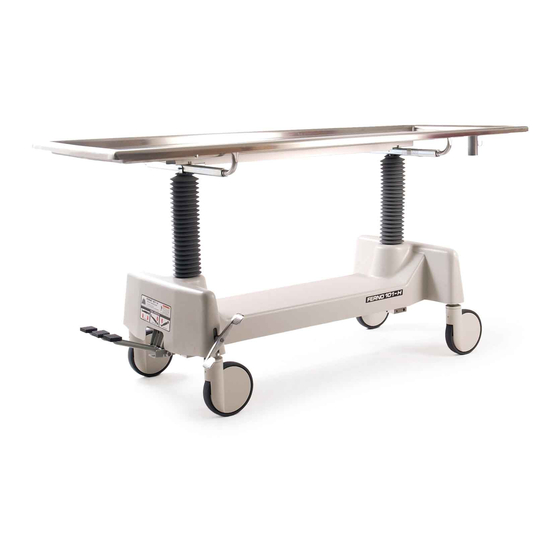
Summary of Contents for Ferno 101-H
- Page 1 FERNO ® Users’ Manual Mortuary Model 101-H Operating Table Read this Manual October 2010 GLO and Retain for Pub. No. 234-1994-03 Future Reference...
-
Page 2: Ferno Customer Relations
Serial Number _________________________ all OTHer lOCaTiOns Location: On cover holder for 101-H Base For assistance or information, please contact your Ferno distributor. If you do not have a Ferno distributor, please contact Ferno Customer Relations: Users’ ManUal Ferno-Washington, Inc. To request additional free users’ manuals,... -
Page 3: Table Of Contents
4.4 Preparing the Table Base ___________________ 8 8.3 Parts Diagrams _________________________ 14 4.5 Assembling the Table _____________________ 9 8.4 Parts List ______________________________ 15 Training Record ______________________________ 16 Maintenance Record ___________________________ 17 Notes _____________________________________ 18, 19 © Ferno-Washington, Inc 234-1994-03 October 2010... -
Page 4: Safety Information
The symbols defined below are used on the table and/or which, if not avoided, could result in injury or death. in this users’ manual. Ferno uses symbols recognized by the International Standards Organization (ISO), American National Standards Institute (ANSI) and the mortuary Warning services industry. -
Page 5: Safety And Instruction Label
● record their training information. A sample training ● record sheet is provided on page 16. Warning Untrained operators can cause injury or be injured. Permit only trained personnel to operate the table. © Ferno-Washington, Inc 234-1994-03 October 2010... -
Page 6: About The Table
Weight Overall 158 lb/72 kg Table Top 59 lb/27 kg Table Base 90 lb/41 kg Table Base Cover 9 lb/4 kg Load Limit 600 lb/272 kg Metric conversions are calculated before rounding the Imperial measurements. For more information, contact Ferno Customer Relations (page 2) or your Ferno distributor. Ferno reserves the right to change specifications without notice. © Ferno-Washington, Inc 234-1994-03 October 2010... -
Page 7: Components
Table Base Locking Control Wheel (4) Pedals Table-Base Wheel-Lock Cover Pedal OPeraTOr enD Users' ManUals To request additional free users’ manuals, please contact Ferno Customer Relations (page 2), your Ferno distributor, or visit www.ferno.com. © Ferno-Washington, Inc 234-1994-03 October 2010... -
Page 8: Assembling The Table
Always use Only the left pedal to raise the jacks. If one or both ends of the table will not raise to the maximum height, see Troubleshooting, page 14. Figure 2 - Raising the Table Top © Ferno-Washington, Inc 234-1994-03 October 2010... -
Page 9: Assembling The Table
11. Test the table by following instructions in Inspecting Jack Cover Tab, the Table, page 13. Socket Head Cap Screw, and Jack Cover 1/4" Flat Washer Figure 5 - Attaching the Table Top To the Base © Ferno-Washington, Inc 234-1994-03 October 2010... -
Page 10: Using The Table
Tables before Serial Number 10C-051944 function differently: the wheels are unlocked when the drain- end of the wheel-lock pedal is pushed down AND when the wheel-lock pedal is in the intermediate position. © Ferno-Washington, Inc 234-1994-03 October 2010... -
Page 11: Using The Foot Pedals
Do not try to raise the table top beyond its maximum height as this can cause the hydraulics to stick. Stop pumping the left pedal when the table top stops moving upward. Figure 11 - Lowering the Table Top © Ferno-Washington, Inc 234-1994-03 October 2010... -
Page 12: Tilting The Table Top
12-C). 4. To raise the table top again, pump the left foot pedal. Figure 12-B - Tilting the Drain End of the Table Top Figure 12-C - Returning the Table Top to the Level © Ferno-Washington, Inc 234-1994-03 October 2010... -
Page 13: Maintenance
Disinfectinge: Wipe all surfaces with disinfectant. Follow the disinfectant manufacturer’s instructions for application method important and contact time. Ferno recommends you inspect the table top for damage as you disinfect it. Do not use cleaning solvents on the table-base cover. -
Page 14: Troubleshooting
Modifying the table can cause injury and damage. 8.2 Worldwide Use the table only as designed by Ferno. To order Ferno parts, and for professional table repair, contact your Ferno distributor. Your distributor is the only agent authorized by Ferno to manage, service, and repair Ferno products. -
Page 15: Parts List
21 190-1747 Clevis pin set w/e-clip (E) 190-1276 (New) 101-H label sheet* * Not Shown 190-1277 (New) 101-H base cover (photo page 14) 9 190-1739 Left pedal weldment w/hardware (E) (E) - For parts designated (E), tables before serial number 10 190-1740 Center pedal weldment w/hardware (E) 08C-010631 must be updated by EMSAR in the U.S.A. and... -
Page 16: Training Record
Model 101-H Operating Table Training reCOrD Date name Training Method © Ferno-Washington, Inc 234-1994-03 October 2010... -
Page 17: Maintenance Record
Model 101-H Operating Table MainTenanCe reCOrD Date Maintenance Performed © Ferno-Washington, Inc 234-1994-03 October 2010... -
Page 18: Notes
Model 101-H Operating Table nOTes © Ferno-Washington, Inc 234-1994-03 October 2010... - Page 19 Model 101-H Operating Table nOTes © Ferno-Washington, Inc 234-1994-03 October 2010...


Need help?
Do you have a question about the 101-H and is the answer not in the manual?
Questions and answers
Wheels eon’t lock when pedal is depressed
The wheels may not lock when the pedal is depressed on the Ferno 101-H if the wheel lock is still partially engaged. This can happen if a clicking sound occurs while moving the table. In this case, the solution is to re-engage the wheel lock and then unlock the wheels again before moving the table.
This answer is automatically generated