Advertisement
Quick Links
A S S E M B LY I N S T R U C T I O N S
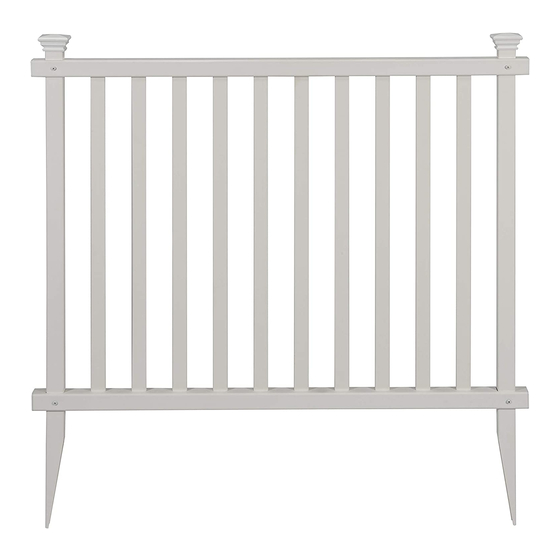
Baskenridge Vinyl Fence Kit
(42"W x 36"H)
Please read through before starting assembly.
IMPORTANT: CHECK THE INSIDE OF THE LARGER PIECES IN YOUR BOX FOR OTHER MATERIALS
PACKED INSIDE.
Check Box for These Contents
In the event of missing or defective parts please call our customer service department at 1 877 234 6196 (Mon. to Fri. 8:00 AM to 4:00 PM EST).
1. Post Caps (4)
2. Top & Bottom Rails (4) - 1½" x 1½" x 41 7/8"
3. Posts (4) - 7/8" x 1½" x 44"
4. Spindles (20) ¼" x 1½" x 31 ¼"
5. Joiner Clips (4)
6. 3/4" Self-Auguring Stainless Steel Screw (16) (Bag A)
7. 1" Self-Tapping Stainless Steel Screw (8) (Bag B)
8. End Caps (8) (4 are installed, 4 are loose)
Tools You Will Need
• Cordless Drill
• Level
• Hammer
General Information
• Read Instructions through carefully before beginning assembly.
• When assembling components, place on a non-abrasive surface
(i.e. shipping box) to avoid scratching.
• We recommend an area approx 5'x 8' for unobstructed assembling.
• You should not need to use excessive force when assembling components.
1 in
36 in
8 1/2 in
5
6
7
Not to Scale
THIS FENCE IS DESIGNED
FOR SEMI-PERMANENT
APPLICATIONS
42 in
2 1/4 in
36 3/4 in
38 1/4 in
1
2
3
4
1 1/8 in
31 1/2 in
Ground
8
1
Ver 1.0/122718
Advertisement

Related Manuals for Zippity Baskenridge


Summary of Contents for Zippity Baskenridge
- Page 1 A S S E M B LY I N S T R U C T I O N S Baskenridge Vinyl Fence Kit (42”W x 36”H) THIS FENCE IS DESIGNED FOR SEMI-PERMANENT APPLICATIONS 42 in 1 1/8 in 2 1/4 in...
- Page 2 S T E P O N E Pressure fit an end cap to the end of the horizontal rails. There will be a total of four end caps and four rails. 2 & 3 Slide the top rail up from the bottom of a post until the pre-drilled hole on the rail aligns with the pre-drilled hole Note: Spindle holes facing down at the top of the post.
- Page 3 S T E P T W O Insert the spindles into the routed holes as illustrated. Note: the tabs on the end of the spindles are intended to go into the rail to lock spindles into place. Push the posts and spindles down into the bottom rail as illustrated.
- Page 4 S T E P T W O Secure the rail to the posts with 3/4” screws on both sides of the rail as illustrated. B a s k e n r i d g e Vi n y l F e n c e I n s t r u c t i o n s...
- Page 5 S T E P T H R E E Install fence into Ground Move the fence to its final location and identify the location of posts. Loosen the top 8” to 10” of the ground using a claw hammer and screw driver (or something equivalent) as illustrated. Add water to loosen soil.
- Page 6 S T E P T H R E E OPTIONS IN HARD GROUND If your ground is too hard, or you have more than three or four panels to install, please consider: Purchase a 1 3/4” diameter auger bit (commonly used for planting tulips) as illustrated ($15-$20 on Amazon.com) Drill a hole in the ground at the desired location only about 8”...
- Page 7 Level S T E P T H R E E Install fence into Ground - Continued Level the assembled unit and backfill and compact dirt around the base of each post to strengthen the unit. S T E P F O U R Fasten Joiner Clips Fasten joiner clips by screwing into place on the top of the top rail and top of the bottom rail as illustrated.
- Page 8 O P T I O N A L Angled Installation The fence panels can also be installed on an angle as shown. 45° Application 90° Application 6935 Reames Rd. Ste. K. Charlotte, NC 28216 www.zippity-outdoor.com Toll Free Phone: 1 877 234 6196 Fax: 704 631 4685...