Advertisement
Quick Links
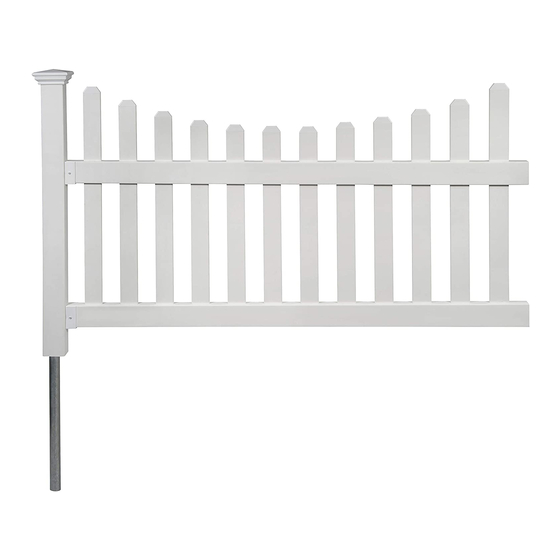
A S S E M B LY G U I D E
All American Vinyl Picket Fence
with No-Dig Steel Pipe Anchor Kit
(42" H x 72" W)
This fence can easily be trimmed
down horizontally to fit your custom
space. Use a fine toothed circular
saw or hack saw.
2"x3½" Fence Run Finishing Post with Cap and
No-Dig Steel Pipe Anchor Kit Sold Separately
Please read through before starting assembly.
IMPORTANT: CHECK THE INSIDE OF THE LARGER PIECES IN YOUR BOX FOR OTHER MATERIALS
PACKED INSIDE.
Check Box for These Contents
In the event of missing or defective parts please call our customer service department at 1 877 234 6196 (Mon. to Fri. 8:00 AM to 4:00 PM EST).
1. Post Cap (1)
2. Picket 1 (2) - 3/8" x 2 3/4" x 36 1/2"
Picket 2 (2) - 3/8" x 2 3/4" x 34 3/8"
Picket 3 (2) - 3/8" x 2 3/4" x 32 3/4"
Picket 4 (2) - 3/8" x 2 3/4" x 31 1/2"
Picket 5 (2) - 3/8" x 2 3/4" x 30 3/4"
Picket 6 (2) - 3/8" x 2 3/4" x 30 1/2"
3. Post (1) - 2" x 3 1/2" x 44 5/8"
4. Rail Brackets (4)
5. Top Rail (1) - 1 1/2" x 3 1/2" x 68 1/4"
6. Anchor Pipe (1) - 44 7/8"
7. Bottom Rail (1) - 1 1/2" x 3 1/2" x 68 1/4"
8. 1" Self-Augering Hex Head Steel Screws (2)
9. 3/4" Self-Augering Stainless Steel Screws (24)
10. 1/8" Hardened Steel Drill Bit (1)
Sold Separately:
All American Vinyl Fence Finishing Post (42" High)
with No-Dig Steel Pipe Anchor Kit
Tools You Will Need
• Cordless Drill
• Level
38 5/8 in
21 3/4 in
2 in
23 in
1
2
3
4
5
6
7
8
9
10
Not to Scale
68 1/2 in
6 in
2 3/4 in
Ground
70 3/8 in
72 in
Ver 1.0/050219
42 in
18 1/8 in
4 in
1
Advertisement

Subscribe to Our Youtube Channel
Related Manuals for Zippity ZP19041


Summary of Contents for Zippity ZP19041
- Page 1 A S S E M B LY G U I D E All American Vinyl Picket Fence with No-Dig Steel Pipe Anchor Kit (42” H x 72” W) 68 1/2 in 6 in 2 3/4 in 42 in 38 5/8 in 18 1/8 in 21 3/4 in 4 in...
- Page 2 TOOL OPTIONS FOR DRIVING PIPE INTO GROUND GOOD BETTER BEST DO NOT USE 5lb Sledgehammer 10lb Sledgehammer Post Pounder Hammer Purchase post pounder at any hardware store or go to: www.wambamfence.com. Post pounders cost roughly $25 to $30 at hardware store (or rental stores often have for rent).
- Page 3 S T E P T W O Optional: Install Post over Anchor Pipe Optional If your ground is dry and hard, use a claw hammer to loosen 2” or 4“ of dirt around the base of the pipe. This will allow the vinyl post to easily insert itself into the ground in step 2 below.
- Page 4 S T E P T W O Use the self-drilling tek screw to secure the bottom of just one vinyl post to the pipe as illustrated. The hex head screws are designed to be installed without pre-drilling, however you may find that using the included drill bit for pre-drilling will allow easier installation of hex head screw into pipe.
- Page 5 S T E P T H R E E Install Fence Panel Install one vinyl bracket on the vinyl post that has been secured to the pipe using 3/4” screws (approximately 2” 2 in off the ground) Slide second bracket over the opposite end of the bottom rail and slide the rail down into the pre-installed bracket on the opposing side.
- Page 6 S T E P T H R E E Temporarily remove bottom rail and install bracket using screws. Install top brackets as illustrated using screws, as per measurement illustrated below. Orientate bottom and top rails correctly (to receive vertical pickets) and slide down into brackets. Use screws to secure. Once the top and bottom rails are secured, fasten the second post, following the same steps as outlined on page 4.
- Page 7 S T E P F O U R Install Pickets & Post Caps Install pickets by inserting through top rail and locking into the bottom rail. Install post caps. Push down on cap to lock it to vinyl post. Note: Each picket is numbered Install ONE complete Locking Tabs...
- Page 8 T I P S . After you install your rst panel and you have gone through the learning curve, you can opt to temporarily remove your fence panel and posts and continue driving all your pipe. This will enable you to work with an unobstructed string line. .
- Page 9 T I P S Installing Bottom Bracket on a 90° Corner? Place the bottom bracket on the post and mark the locations of the two holes on the post. Using a 9/64” drill bit for steel, pre-drill the vinyl post and internal steel pipe.
- Page 10 Please visit www.zippity-outdoor.com or call us at 1-877-234-6196 for answers to your other questions. We are eager to help you succeed in your project. Thanks for choosing Zippity Outdoor and all the best with your project. 6935 Reames Rd. Ste. K. Charlotte, NC 28216 www.zippity-outdoor.com...
Need help?
Do you have a question about the ZP19041 and is the answer not in the manual?
Questions and answers