Table of Contents
Advertisement
Quick Links
Advertisement
Table of Contents

Related Manuals for Maico MB 11 Classic


Summary of Contents for Maico MB 11 Classic
- Page 1 Operation Manual MB 11 Classic...
-
Page 3: Table Of Contents
Operation Manual MB 11 Classic Table of Contents Page 1 Introduction 2 Important safety instructions 3 Description 3.1 Auditory Brainstem Response (ABR) audiometry 3.2 The MB 11 Classic 3.3 Automatic Screening with the "Fast Steady State Algorithm” 4 Installation and Settings 4.1 USB Specifications... - Page 4 Operation Manual MB 11 Classic 6.3.4 Removal of disposables 6.4 Performing the screening test 6.4.1 Impedance Test 6.4.2 The signal quality control 6.4.3 EEG-Display 6.4.4 Test result “Pass” 6.4.5 Test result "Refer" 6.5 Binaural Screening 6.5.1 Preparing for a Binaural Screening 6.5.2 Binaural Screening Result...
-
Page 5: Introduction
Operation Manual MB 11 Classic 1 Introduction Thank you for purchasing a quality product from the MAICO family. This automatic ABR-test system MAICO MB 11 Classic (Standard) is manufactured to meet all quality and safety requirements, and has been certified with the CE-symbol according to Medical Directive 93/42/EEC. -
Page 6: Important Safety Instructions
Operation Manual MB 11 Classic 2 Important safety instructions The MAICO MB 11 Classic is designed to be used only by skilled personnel (Audiologists, Physicians or other trained personnel). No person should attempt to use this instrument without the necessary knowledge and training to understand how this equipment is to be properly utilized and interpreted. - Page 7 Disclaimer The MAICO MB 11 Test Instrument is designed to be a screening device for hearing loss. Sensitivity and specificity of this type of device are based on the test parameters defined by the user, and may vary depending on environmental and operating conditions.
-
Page 8: Description
Operation Manual MB 11 Classic 3 Description MB 11 tests hearing function by measuring the brainstem auditory evoked response of the auditory pathway. Processing of EEG samples allows the auditory brainstem response generated by the delivery of the acoustic stimulus and present in the EEG to be differentiated from generalized EEG activity. - Page 9 Operation Manual MB 11 Classic The statistical test is performed using repeated EEG samples of one second. The first test is done after passing the impedance test and then the test is repeated every second, until the overall test result arrives at critical value (the green marked PASS criteria, see figure 2).
-
Page 10: Installation And Settings
USB devices or change the USB port and try again. Also see 4.1 above about using USB ports. After a few seconds, the system will show a message about a newly found USB device “MAICO MB 11”. Allow the wizard to install the MB 11 driver if necessary. -
Page 11: Power Supply
Operation Manual MB 11 Classic supply 4.3.1 Power NOTE: The PC used with the MB 11 must either be grounded, or the laptop must be in used in battery mode. Use only protective earth conductor plugs and wiring for the power supply. - Page 12 Operation Manual MB 11 Classic Select Universal Serial Bus controllers and then select a listed USB Root Hub. Double-click to open the Properties and select the Power Management tab of the Properties dialog. Remove the check mark if preselected. (Don’t allow the computer to turn off this device to save power.)
- Page 13 Operation Manual MB 11 Classic 8100498-4_OM_MB11_Classic_3.18_EN_16a.docx 01/16...
- Page 14 Operation Manual MB 11 Classic Deactivate both options If there are more than one listed USB Root Hubs, please repeat the procedure as described above and take out the check mark if preselected for each of them. (Do not allow the computer to turn off this device to save power).
-
Page 15: Change Power Options
Operation Manual MB 11 Classic 4.4.2 Change Power Options To change power options select Run within the “START” column, type powercfg.cpl and confirm 8100498-4_OM_MB11_Classic_3.18_EN_16a.docx 01/16... - Page 16 Operation Manual MB 11 Classic If you use a desktop computer select Home/Office Desk within the Power Schemes and select never: Turn Off monitor: never Turn off hard disk: never System on standby: never 8100498-4_OM_MB11_Classic_3.18_EN_16a.docx 01/16...
- Page 17 Operation Manual MB 11 Classic Select Hibernate within the menu bar and change Hibernate settings to off as shown in the picture. If you use a Notebook computer select Portable/Laptop within the Power Schemes and select as follows: Plugged in...
- Page 18 Operation Manual MB 11 Classic Select Hibernate within the menu bar and change Hibernate settings to off as shown in the picture. Select Advanced within the menu bar and change Advanced settings to “When I close the lid of my portable computer” Do nothing as shown in the picture.
-
Page 19: Change Visual Effects
Operation Manual MB 11 Classic 4.4.3 Change visual effects (Optional at low-power PC) To change visual effects select Run within the “START” column, type sysdm.cpl and confirm 8100498-4_OM_MB11_Classic_3.18_EN_16a.docx 01/16... -
Page 20: Change Display Properties
Operation Manual MB 11 Classic 4.4.4 Change Display Properties (Optional at low-power PC) To change display properties select Run within the “START” column, type desk.cpl and confirm. Select Desktop and change background settings to none. Select Screen Saver setting to none. -
Page 21: Bios Setup
Operation Manual MB 11 Classic 4.4.5 BIOS Setup Because the MB 11 software uses real-time and processor-intensive algorithms, we recommend disabling energy saving processor settings in the BIOS, like “throttling” on Intel Pentium or “Power Now” on AMD Athlon. For further details, consult the documentation for your main board or ask your local computer dealer. -
Page 22: Getting Started
If any damage is noted, please notify the carrier immediately. This will assure that a proper claim is made. Save all packing material so the claim adjuster can inspect it as well. Notify your dealer or MAICO when the adjuster has completed the inspection. -
Page 23: Preparing The Mb 11 For Use
Operation Manual MB 11 Classic 5.2 Preparing the MB 11 for use The MB 11 unit consists of a USB interface box connected with the MB11 Classic preamplifier by a cable. A USB cable connects the MB 11 interface box with a USB port of a mobile or desktop computer. -
Page 24: Device Recognition
Operation Manual MB 11 Classic 5.3 Device Recognition You can connect multiple MB 11 devices to a single computer. When more than one MB 11 device is attached to the PC, a pop-up window displays the connected instruments when the software is launched. At that time you can choose the device you want to use with a mouse click. -
Page 25: Menus
Operation Manual MB 11 Classic 5.4 Menus 5.4.1 Menu “File” “New” – Entry of a new patient (see also Tracking – Patient data). Clears all fields if they contain information on a previously tested patient. “Search” - Launches a dialogue that allows selection of a patient from the integrated database. -
Page 26: Menu "Settings
Operation Manual MB 11 Classic using a text editor or a spreadsheet application. Information contained in the .txt file includes: ID No. (as entered by the user), Name (last), First name, Sex, Birthdate (Born), Date of test (date and time), Screener, Ear (side), Test type (Mode), Result (Note).If additional fields are completed using the... - Page 27 Operation Manual MB 11 Classic information as well as screener, physician, screening location and birth hospital entries entered in the List Field Setup area. “Print Mode” – This allows the type of printout to be selected. Enable “Label” to print to a supported label printer. In this mode, the “best”...
- Page 28 Operation Manual MB 11 Classic entering these names to be used with merging data to HiTrack, they must be entered in exactly the same format as they are entered in the HiTrack application or there will be merge errors upon importing the tracking file into HiTrack.
-
Page 29: Menu "About
The MB 11 Classic area allows the user to set preferences related to testing when the hardware being used is the MB 11 Classic rather than the BERAphone. This control will only show up in the dialog if an MB 11 Classic is attached to the PC when the software is launched. -
Page 30: Operation With Mouse And Keyboard Or Touch-Screen
Operation Manual MB 11 Classic 5.5 Operation with mouse and keyboard or touch-screen The MB 11 program can be operated with the mouse by pointing and clicking on the required input field or button on the screen. It is also possible to jump with the <TAB> key from field to field. Pressing the Enter key activates the selected field or button. - Page 31 Operation Manual MB 11 Classic There are also several shortcuts accessible by using the Function keys: Help Add to Today’s List Display Today’s List Ear/Other Ear Measure/Start Measurement Advanced Display On/Off Pause (Continue) Stop Measurement Print Quit Beep (at end of test) On/Off 8100498-4_OM_MB11_Classic_3.18_EN_16a.docx...
-
Page 32: Registry Of New Patient Data
Operation Manual MB 11 Classic 5.6 Registry of new patient data Figure 8 - MB 11 - program start screen with patient data For a fast screening test without tracking, it is sufficient to enter the last and first name, birthday, gender and Patient-ID. -
Page 33: Loading Stored Patient Data
Operation Manual MB 11 Classic 5.7 Loading stored patient data Figure 9 Load from database After clicking on the button "Search", all stored patients will be shown (see Figure 9). Select a patient by double-clicking on the name with the mouse or highlight the desired name and select the OK button. -
Page 34: Working With A "Today's List
Operation Manual MB 11 Classic 5.8 Working with a “Today’s list” Figure 11 MB 11 - Today’s list If several tests will be conducted in one day, it may be easier to enter the data of all babies before you start to test. In this case click on the button "New data"... -
Page 35: Automatic Testing In The Automated Abr Screening Mode
Operation Manual MB 11 Classic 6 Automatic testing in the automated ABR screening mode It is fast and easy to screen patients with the built-in patented automatic Fast Steady State Algorithm. At the conclusion of the test or when the test is manually terminated, one of the following results will display and be saved with the screening. -
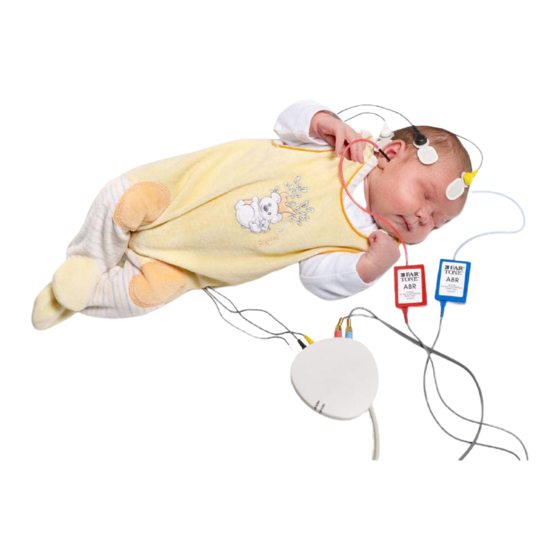
Page 36: Placement Of The Electrodes
Operation Manual MB 11 Classic 6.2 Placement of the Electrodes For electrode placement, the skin should be cleaned with an electrode skin preparation product to remove any oil and dirt from the skin’s surface. Using a cotton-tipped applicator or your finger, rub the skin briskly but gently several times with the product. -
Page 37: In-The-Ear Eartips
Operation Manual MB 11 Classic 6.3.2 In-the-ear Eartips 6.3.2.1 Selecting a disposable ear tip When in-the-ear tips are used to deliver the stimulus, the size of the disposable ear tip should correspond to the size of the patient’s ear canal. -
Page 38: Use Of Adhesive Earcup Couplers
Operation Manual MB 11 Classic back to open and straighten the ear canal. While holding the canal open, slide the compressed foam ear tip into the ear canal. The foam should be completely surrounded by the canal with virtually none of the foam sticking out of the canal. -
Page 39: Performing The Screening Test
Operation Manual MB 11 Classic 6.4 Performing the screening test Enter or load patient data. Figure 14 MB 11 - program start screen Prepare the patient and as described in chapter 6.1 and place the electrodes as described in chapter 6.2. Insert the eartip as described in section 6.3. -
Page 40: Impedance Test
Operation Manual MB 11 Classic 6.4.1 Impedance Test Figure 16 Impedance traffic lights at top of measurement window The impedance is the resistance between the measuring electrodes (Vertex and Nape (or Mastoid) and the ground electrode. This impedance is influenced by the resistance of the electrodes and the resistance of the skin. -
Page 41: The Signal Quality Control
When the signal quality is poor (red light) then artifacts are occurring which, in effect, pauses data collection. The signal quality indicator light on the MB 11 Classic amplifier box also shows a color indicator of signal quality that matches the display on the screen. -
Page 42: Eeg-Display
Operation Manual MB 11 Classic 6.4.3 EEG-Display The EEG display mode can be accessed by clicking on the “EEG” checkbox on the left of the test screen. The EEG view at the top of the screen allows you to monitor the ongoing real-time EEG activity. - Page 43 Operation Manual MB 11 Classic At the bottom of the test screen are several function buttons: Figure 19 MB 11 - program “Test stop” Other Ear: After the test is completed on one ear, use this button to change to the other ear. Then select “Start Measurement” when ready. Note that when an MB11 Classic is attached to the PC, the Other ear button cycles through selections for Right ear, Left ear and Binaural (i.e.
-
Page 44: Test Result "Pass
Operation Manual MB 11 Classic EEG: Enabling the EEG checkbox replaces the signal quality indicator light with a display of ongoing EEG activity. 6.4.4 Test result “Pass” Figure 20 MB 11-program “Test result PASS” During the test, a small segment of a line is drawn after each 1 second of data collection. -
Page 45: Test Result "Refer
Operation Manual MB 11 Classic 6.4.5 Test result "Refer" If 100% of the pass criteria is not reached after 180 seconds of data Figure 21 MB 11–program Test result “REFER” collection time, the test is automatically terminated and a “REFER” will be displayed below and to the right of the graph. - Page 46 Operation Manual MB 11 Classic Figure 22 Test result “Abort” If the test is aborted by manual selection of the “Stop Measurement” button or the “Quit” button by the screener, the test will be documented as an Abort. If Tracking is enabled, a pop-up window will display to allow selection of a reason for termination.
-
Page 47: Binaural Screening
Operation Manual MB 11 Classic 6.5 Binaural Screening With the MB11 Classic, simultaneous binaural testing is possible. This allows both ears to be screened at the same time. Testing will continue until both ears achieve a Pass result or until one or both ears’ test terminates in a Refer result. - Page 48 Operation Manual MB 11 Classic If no response is detected in one or both ears, the line for that ear will not reach the 100% green area after 180 seconds, the result will be “REFER”. NOTE: For Binaural Testing, a “PASS” result can only be obtained when the 100% pass criteria are reached by both ears.
-
Page 49: Tracking
OZ web-based data management system. . Note: binaural tests collected with the MB 11 Classic hardware are not compatible with the OZ tracking system at this time. If you use OZ as your tracking database, perform only monaural tests with your MB 11. -
Page 50: Input Of Tracking Data
Operation Manual MB 11 Classic 7.2 Input of Tracking data If Settings/HI*TRACK is activated, the function button “Tracking” appears on the start screen: Figure 26 Start screen with function button Tracking data Click on the Tracking button to open the input window. -
Page 51: Advanced Tracking Data
Operation Manual MB 11 Classic 7.3 Advanced Tracking data Figure 28 Advanced tracking data The Advanced tracking dialog allows entry of Mother’s data, an Alternate Contact’s information as well as documentation of the relevant risk factors for the baby. 7.4 The export functions of the MB 11 database (no tracking... -
Page 52: The Export Functions Of The Mb 11 Database (Tracking Enabled)
Operation Manual MB 11 Classic 7.5 The export functions of the MB 11 database (Tracking enabled) The MB 11 software allows the export of patient and test data from the database into an OZ or HiTrack compatible format. To do this, the OZ or HiTrack Tracking option must be enabled in the Settings/Tracking settings menu. -
Page 53: Follow Up Measurements
Operation Manual MB 11 Classic 8 Follow up measurements If your MB 11 system was purchased with the advanced features of the Standard ABR or Time Step Stimulus, you can enable these functions by clicking on the box labeled "advanced" on the lower right of the start screen. -
Page 54: Testing With The Time Step Stimulus
Operation Manual MB 11 Classic users of the advanced feature of Standard ABR and Time Step stimulus should decide whether they prefer to use Vertex/Ipsilateral mastoid placement of the electrodes and position the electrodes on the patient in accordance with that preference. - Page 55 Operation Manual MB 11 Classic Figure 33 Typical ABR-Response with the Time Step Stimulus Signal The white bars show the frame within which wave V for each of the evoking clicks is expected. Click intensities are located above the corresponding column (white bar).
-
Page 56: Testing With The Time Step Stimulus
Operation Manual MB 11 Classic 8.1.2 Testing with the Time Step Stimulus Figure 34 Program start screen with Time Step Stimulus After clicking on the button “Time Step Stimulus” the start screen, shown in figure 34 is displayed. You can select the maximum intensity of the time step stimulus test signal with the “Level slider”... - Page 57 Operation Manual MB 11 Classic measurement is performed and the number in the box “Accepted” increases by one. If the EEG signal is larger than the Artifact-limit, this measurement will not be used and the numeric value indicated as” Artifacts” increases by one.
-
Page 58: Advanced Display Time Step Stimulus Test
Operation Manual MB 11 Classic 8.1.3 Advanced display Time Step Stimulus Test The advanced display mode can be entered clicking "advanced" on the left side of the test screen. This test screen contains additional information and features. This mode is available for the current test result as well as for the stored data. -
Page 59: Testing With Standard-Abr
Operation Manual MB 11 Classic 8.2 Testing with Standard-ABR After clicking "Standard ABR" on the start screen, an intensity level selector Figure 40 MB 11 - program start screen in expert mode "Standard ABR" appears as shown in figurer 40. The intensity level for the click can be adjusted between 0 and 70 dBnHL using the slider adjustment. -
Page 60: Care And Maintenance Of The Instrument
To clean the MB 11 and other accessories use a damp soft cloth with some warm soapy water or detergent. Please ensure that no liquid runs into the instrument. Annual calibration check by an authorized MAICO distributor is recommended. 8100498-4_OM_MB11_Classic_3.18_EN_16a.docx... -
Page 61: Trouble Shooting
Operation Manual MB 11 Classic 10 Trouble shooting If you should find that your instrument is no longer working properly during a test run, please check the following points: 10.1 Instrument does not turn on Verify that the USB cable is connected securely into both the USB box of the MB 11 hardware as well as the computer USB port. - Page 62 Operation Manual MB 11 Classic Check that the insert earphone eartip remains securely inserted into the baby’s ear canal(s). If you are using the EarCups, check that they are in contact with the baby’s skin around the entire circumference of the baby’s ear.
-
Page 63: Technical Data
Operation Manual MB 11 Classic 11 Technical Data The MB 11 Standard (Classic) is an active, diagnostic medical product according to the class IIa of the EU medical directive 93/42/EEC. Standards: IEC 601-1, IEC 645-3, IEC 645-7 Type 2 Test signals: Screening: CE-Chirp™... - Page 64 Operation Manual MB 11 Classic (MB 11 Box) Power Supply: via USB port of computer Power Consumption: max. 400 mA Weight: 165 g Dimensions: W x D x H: 12 x 9 x 3 cm Computer requirements (computer not included):...
- Page 65 Operation Manual MB 11 Classic If it is necessary to use accessory devices while you operate in the battery mode, ensure a separate continuous and sufficient grounding of your PC. 8100498-4_OM_MB11_Classic_3.18_EN_16a.docx 01/16...
-
Page 66: Scientific Background Information
Operation Manual MB 11 Classic 12 Scientific Background Information 12.1 CE-Chirp Stimulus™ The stimulus for an automated ABR-newborn hearing screening should generate auditory evoked brainstem responses with an amplitude as great as possible at the level of 35 dB HL. High response amplitudes allow a fast objective detection with high specificity and short measuring time. - Page 67 Operation Manual MB 11 Classic evoked activity. The traveling wave delay in the more apical part of the cochlea is responsible for considerably dispersed responses from this area. For this reason, the spatio-temporally summated response does not achieve the amplitude that would result from a more synchronous excitation.
- Page 68 Operation Manual MB 11 Classic halving the amplitudes of the cosines with the lowest and the highest frequency. In contrast to the standard click generated in the time domain the new stimulus is a steady-state signal. The patented stimulus constructed from individual cosines offers the possibility of introducing a frequency-dependent phase correction in order to compensate for the propagation time in the cochlea.
- Page 69 Operation Manual MB 11 Classic individual cosines of the stimulus. Figure 33 c) shows the time course of the resulting CE-Chirp™ Stimulus. For preventing an overlapping of response harmonics by electrical artifacts the above described frequency offset has to be added, too.
-
Page 70: Warranty, Maintenance And After-Sales Service
The MB 11 Classic may be repaired only by your dealer or by a service center recommended by your dealer. We urgently advise you against attempting to rectify any faults yourself or commissioning non-experts to do so. -
Page 71: Safety Regulations
14.1 Electrical Safety: The MB 11 Classic ABR-Screener is specified to comply with the international standard IEC 601-1 (EN 60601-1). The MAICO MB 11 is guaranteed according to IEC 601-1 safety against electrical hazard only when the connected notebook computer is powered by batteries or the computers power supply accords to IEC 601-1 or IEC 950-1 safety regulations. - Page 72 Operation Manual MB 11 Classic Specifications are subject to change without notice. MAICO Diagnostics GmbH Sickingenstr. 70-71 10553 Berlin Germany Tel.: + 49 30 / 70 71 46-50 Fax: + 49 30 / 70 71 46-99 E-mail: sales@maico.biz Internet: www.maico.biz 8100498-4_OM_MB11_Classic_3.18_EN_16a.docx...
Need help?
Do you have a question about the MB 11 Classic and is the answer not in the manual?
Questions and answers