Table of Contents
Advertisement
Quick Links
Advertisement
Table of Contents

Related Manuals for Maico MI 34


Summary of Contents for Maico MI 34
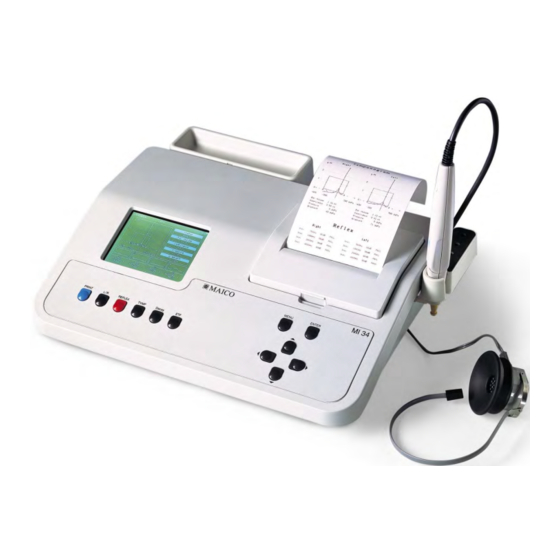
- Page 1 Operating Instructions MAICO MI 34...
-
Page 2: Table Of Contents
4.6 How to print out the test result ............21 4.7 How to delete the test results ............21 5 Measurement with Hightone (optional MI 34 H) ........22 6. How to measure the Stapedius reflex ........... 23 ... - Page 3 10 How to test children ................39 11 Recommended literature ..............40 12 Individual Setup of the MI 34 .............. 41 12.1 The setup menu ................41 12.2 The Tympanogram Setup Menu ............ 42 ...
- Page 4 Operating Instructions MI 34 / MI 34 H 17.5 Patient Safety: ................53 18 Checklist for subjective device control ..........55 19 Technical Data and Accessories ............56 ...
-
Page 5: Introduction
This user manual should make it as easy as possible for you to become familiar with the functions of the MAICO MI 34. Please open out the flap of illustrations on the last page. The description of the position (e.g. -
Page 6: Description
Tube. Eustachian Tube function tests may be determined on patients with intact or perforated eardrums. The MI 34 H includes a high frequency probe tone of 1000 Hz which is ideal for providing reliable results when testing newborns and young children. -
Page 7: Acoustic Reflex
Operating Instructions MI 34 / MI 34 H the hand-held probe. This tone is used to measure the change in compliance in the middle ear system while the air pressure is varied automatically from a positive value (+200 daPa) to a negative value (-400 daPa max.) - Page 8 If a ”flat” tympanogram is observed, showing a non-mobile middle ear system, the MI 34 will not perform an acoustic reflex test. Theoretically, a compliance peak is necessary to observe a reflex at peak pressure.
-
Page 9: Getting Started
Operating Instructions MI 34 / MI 34 H 3 Getting started Your MI 34 was carefully inspected and packed for shipping. However, it is good practice to thoroughly inspect the outside of the shipping container for signs of damage. If any damage is noted, please notify the carrier immediately. -
Page 10: Connect Mains Cable And Accessories
Put the enclosed mains cable into the power connection socket and its mains plug into a power socket. The instrument is now operational. Your MI 34 is equipped with a contra receiver. Plug the cable in the contra receiver socket 3.4 Switch the instrument on Switch the mains switch on. -
Page 11: Getting Familiar With The Mi 34
Operating Instructions MI 34 / MI 34 H 3.5 Getting familiar with the MI 34 MENU ENTER MENU ENTER PRINT L / R REFLEX PRINT L / R REFLEX 12 13 Figure 4 The controls of the MI 34 = Print key... -
Page 12: The Display Of The Mi 34
AUTO or “Tympanogram” if no reflex test is selected. Figure 5 The measurement screen of the MI 34 At the left centre the graph of the tympanogram is shown. At the right five boxes show the status and test values. - Page 13 Operating Instructions MI 34 / MI 34 H found or the maximum level is reached. With the cursor up button down button the test level can be changed to a fixed level. The dB values below the boxes change accordingly. It is possible to have fixed levels from 70 dB to 100 dB and AUTO.
-
Page 14: Calibrate The Probe
2 ml cavity and proceed as described above. After the successful calibration of the 5 ml volume the MI 34 switches automatically to the tympanometry mode. The basic menu for the impedance measurement appears again and you are ready for measurements. -
Page 15: Getting Familiar With The Probe
Operating Instructions MI 34 / MI 34 H 3.8 Getting familiar with the probe The probe of the MI 34 is shown in figure 8. The probe head is adjustable in three steps (0°, 60° E R E S und 80°). It is adjusted by... -
Page 16: Choose An Appropriate Ear Tip
Operating Instructions MI 34 / MI 34 H operation pauses also the test. The colour of the control light of the probe indicates in standby the selected ear and in operation the fitting of the probe in the auditory canal: A red control light indicates that the right ear is selected. - Page 17 Operating Instructions MI 34 / MI 34 H By choosing an appropriate ear tip and placing it correctly on the probe you create the basic conditions for measurements without problems and mistakes. Now all preparations are concluded and you can start the impedance and reflex measurement.
-
Page 18: How To Create A Tympanogram
The two most important impedance measuring methods possible with your MI 34 are Tympanometry and the measurement of the Stapedius reflex which is treated in chapter 5. “How to measure the stapedius reflex”. impedance... -
Page 19: Training Of The Test Person
Operating Instructions MI 34 / MI 34 H auditory canal before the eardrum. Another tube B is connected with the microphone in the probe which receives the sound. Both tubes are lead together with tube C nearly to the eardrum and are made airtight against the outside pressure by the ear tip. -
Page 20: Preparing The Measurement
Operating Instructions MI 34 / MI 34 H 4.3 Preparing the measurement Before you start a new measurement, delete Impedance Right Tympanogram former test results (see also chapter 4.7.) The Status READY LCD display shows the Ear Volume empty measurement... -
Page 21: How To Evaluate The Tympanogram Display
Operating Instructions MI 34 / MI 34 H side by pressing the L/R-key or the probe button and repeat the measuring procedure described above with the other ear. 4.5 How to evaluate the Tympanogram display After having carried out a measurement you can... -
Page 22: How To Print Out The Test Result
Operating Instructions MI 34 / MI 34 H 4.6 How to print out the test result After the end of a test you can print out the results for your records by pressing the PRINT button . The quiet thermal printer... -
Page 23: Measurement With Hightone (Optional Mi 34 H)
Operating Instructions MI 34 / MI 34 H 5 Measurement with Hightone (optional MI 34 H) In addition to the standard 226 Hz probe tone tympanometry, the MI 34 H has a high frequency probe tone of 1000 Hz that can be selected by the user. -
Page 24: How To Measure The Stapedius Reflex
Operating Instructions MI 34 / MI 34 H 6. How to measure the Stapedius reflex 6.1 The basics of the Stapedius reflex measurement While the Tympanometry method measures the change of the compliance caused by changing pressure in the outer auditory canal, the Stapedius reflex measurement works with a changing compliance caused by contraction of the Stapedius muscle in the middle ear. -
Page 25: Training The Test Person
80, 85, 90, 95 and 100 dBHL and AUTO with a starting level of 70 or 80 dBHL. If you choose AUTO the MI 34 starts with the lowest level 70 dBHL or 80 dBHL and increases the level automatically until a reflex is registered or the maximum value is reached. -
Page 26: Doing The Ipsilateral Measurement
If a Stapedius reflex occurs the compliance decreases and the curve rises. The box which occurs during the test symbolizes the threshold at which the MI 34 accepts a change of compliance as valid Stapedius reflex. GEBAmi34e.11a.docx... -
Page 27: Preparing The Contralateral Measurement
Operating Instructions MI 34 / MI 34 H 6.5 Preparing the contralateral measurement Switch on the contralateral reflex measurement by pressing again the REFLEX-key (The word CONTRA must appear on the right top of the LCD - display ). Here the... - Page 28 Operating Instructions MI 34 / MI 34 H registered at 100 dB and for 4 kHz at 95 dB . If no reflex threshold was registered the information FAIL appears below the frequency. A correct interpretation of the measuring results can only follow in connection with the Tympanogram, the graphic reflex display and other actual data.
-
Page 29: How To Print Out The Test Result
Operating Instructions MI 34 / MI 34 H 6.7 How to print out the test result After a test you can print out the result for your documents by pressing the PRINTER button . The M A IC O M I 34 Id N o .:... -
Page 30: Reflex Decay Test Operation
Operating Instructions MI 34 / MI 34 H 7 Reflex Decay Test Operation The diagnostic probe insert must be used for this test. If you are currently using the optional screening probe insert, do not use it for this test! - Page 31 Operating Instructions MI 34 / MI 34 H Set the desired volume level with the Down-key respectively the Up-key . On the LCD display below the left reflex box at the bottom the selected level in dB appears. The starting level is always 80 dB.
- Page 32 Operating Instructions MI 34 / MI 34 H When you finished all decay tests and have pressed the DECAY-key, you can print out the result for your documents by pressing the blue PRINT GEBAmi34e.11a.docx 850 232/14 08/11...
-
Page 33: Eustachian Tube Test Operation
Operating Instructions MI 34 / MI 34 H 8 Eustachian Tube Test Operation The diagnostic probe must be used for this test. If you have an additional impedance screening probe (option), do not use it for this test! If you have not already done so today, press the MENU-button, highlight CALIBRATION and calibrate the diagnostic probe (as described in chapter 3.5). - Page 34 Operating Instructions MI 34 / MI 34 H movement will give unreliable results. Press the ENTER button when ready to begin the test. The pressure value at the maximum compliance is shown under “Pressure 1". Now the text “Make the patient decrease middle ear pressure by Swallowing”...
-
Page 35: Etf Test For Patients With Perforated Tm
Operating Instructions MI 34 / MI 34 H 8.2 ETF test for patients with perforated TM The test determines if the patient can open his/her Eustachian tube in the presence of positive pressure delivered by the probe to the external ear canal. - Page 36 Operating Instructions MI 34 / MI 34 H Once the peak pressure has been obtained ask the patient to swallow. If the Eustachian tube opens, a drop in pressure will be recorded. Repeated attempts to swallow will display a ”stair step” effect, or a complete drop to 0 daPa.
-
Page 37: Interpreting Test Results
Operating Instructions MI 34 / MI 34 H 9 Interpreting Test Results 9.1 Understanding the printout M A IC O M I 34 Id N o .: D a te : The printout contains the following N a m e :... -
Page 38: Abnormal Values
The MI 34 may refuse to run the test, with the probe indicating a volume out of tolerance by illuminating the red light, or a flat tympanogram will be recorded since no movement will occur with a change in air pressure. - Page 39 Operating Instructions MI 34 / MI 34 H severe negative middle ear pressure. The ear canal volume is normal and the reflex is either absent or at an elevated level. Eustachian tube disfunction in the absence of fluid will show a normal compliance curve, but it will be displayed to the negative side of the tympanogram.
-
Page 40: How To Test Children
Operating Instructions MI 34 / MI 34 H 10 How to test children The practice of the impedance measurement is difficult especially with small children. You could have problems with the child being restless or afraid of the examination or reacting sensitively to the change of pressure and the loud test sound but also with different conditions of the eardrum and the middle ear which do not appear in ears of adults. -
Page 41: Recommended Literature
Operating Instructions MI 34 / MI 34 H 11 Recommended literature Auditory Disorders: A Manual for Clinical Evaluation Jerger, Susan, and James Jerger Boston: College Hill Press, 1981 Handbook of Clinical Audiology Katz, Jack Baltimore: William & Wilkins, 1994 s Audiology Desk Reference Roeser, Ross J. -
Page 42: Individual Setup Of The Mi 34
Operating Instructions MI 34 / MI 34 H 12 Individual Setup of the MI 34 While getting familiar with the MI 34 in the Main Menu previous chapters you had the chance to Tympanogram : find out how easy the instrument is to Reflex Decay control. -
Page 43: The Tympanogram Setup Menu
Operating Instructions MI 34 / MI 34 H 12.2 The Tympanogram Setup Menu Select the menu option “Tympanogram Setup Menu”: as illustrated in Figure 35 and the Tympanogram setup menu will appear on the LCD display You change the menu options with the Tympanogram Setup Menu cursor keys DOWN↓... - Page 44 Operating Instructions MI 34 / MI 34 H Comp. limit lo: With this option you can set the lower limit of the box for normal Tympanograms to a value between 0.1 ml and 1ml in steps of 0.1 ml. Seal sensitivity: Minimum: This gives reproducible results.
-
Page 45: The Setup Menu For Reflex Test
Operating Instructions MI 34 / MI 34 H 12.3 The Setup menu for Reflex Test Select the menu option “Reflex Test Setup Menu”: from the main setup menu as described before for the Tympanometry setup menu and the reflex setup menu will appear on the LCD display... -
Page 46: The Common Setup Menu
Operating Instructions MI 34 / MI 34 H 2000 Hz: With this option you can switch ON and OFF the stapedius reflex test for 2000 Hz. 4000 Hz: With this option you can switch ON and OFF the stapedius reflex test for 4000 Hz. -
Page 47: Insert Your Personal Printout Data
Operating Instructions MI 34 / MI 34 H Remote Switch: With this option you can change the function of the probe button . You can choose between: L/R where the test ear can be selected with the probe button Pause where the test can be paused and restarted with the probe button... -
Page 48: Care And Maintenance Of The Instrument
Therefore please follow the below illustrated instruction on how to remove e.g. cerumen from the small acoustic and air pressure channels of the probe tip. For the MI 34 two different probe systems exist; the Screening Probe System and the Diagnostic Probe System. - Page 49 Operating Instructions MI 34 / MI 34 H To clean the small acoustic and air pressure channels of the probe tip unscrew the small ribbed plastic nut that holds the probe tip: Figure 39: After unscrewing the small ribbed plastic nut it is possible to detach the...
- Page 50 Operating Instructions MI 34 / MI 34 H Besides cleaning the holes ensure also a proper surface cleaning of the transparent sealing. After cleaning all the acoustic and air pressure channels of the probe tip it can be reassembled. Make sure that the Probe Tip is connected correctly onto the Transducer Housing –...
-
Page 51: Disinfection
Operating Instructions MI 34 / MI 34 H 14 Disinfection It is recommended that parts which are in direct contact with the patient are subjected to standard disinfecting procedure between patients. This includes physically cleaning and use of a recognized disinfectant. Individual manufacturer's instruction should be followed for use of this disinfecting agent to provide an appropriated level of cleanliness. -
Page 52: How To Change The Printer Paper
MI 34. Press the front of the printer cover down until it fastens. The instrument is now ready to print. -
Page 53: Warranty, Maintenance And Service
Operating Instructions MI 34 / MI 34 H 16 Warranty, Maintenance and Service The MI 34 Tympanometer is guaranteed for 1 year. This warranty is extended to the original purchaser of the instrument by MAICO through the Distributor from whom it was purchased and covers defects in material and workmanship for a period of one year from date of delivery of the instrument to the original purchaser. -
Page 54: Safety Regulations
Operating Instructions MI 34 / MI 34 H 17 Safety Regulations 17.1 Electrical Safety: The MI 34 tympanometer is constructed to comply with protection class I, Type BF of the international standard IEC 601-1 (EN 60601-1) . Protection from an electric shock is ensured even without the system earth connection. - Page 55 Operating Instructions MI 34 / MI 34 H and the IEC 60601 series for medical electrical equipment). In addition, all such combinations - systems - shall comply with the standard 60601-1-1, Safety requirements for medical electrical systems. Equipment not complying...
- Page 56 Operating Instructions MI 34 / MI 34 H 18 Checklist for subjective device control According to the manufacturer requirement the user should control the instrument once a week to find errors immediately and to avoid wrong test results. He should test Tympanogram and Reflex with an otologic normal person and compare the results with earlier measurements.
- Page 57 Operating Instructions MI 34 / MI 34 H 19 Technical Data and Accessories The Impedance meter MI 34 is an active, diagnostic medical product according to the class IIa of the EU medical directive 93/42/EEC. Impedance measurement: Type: Class 2 acc. to IEC 645-5 (EN 60645-5)
- Page 58 Operating Instructions MI 34 / MI 34 H LCD-display: Graphical display of the Tympanograms and reflex curves, numeric display of max. compliance, pressure at max. compliance, canal volume, gradient and reflex thresholds Printer: Thermal printer, paper roll width 110 mm...
- Page 59 Operating Instructions MI 34 / MI 34 H Weight: app. 2,6 kg Standard accessories: 1 hand-held probe with diagnostic probe insert 1 shoulder strap for diagnostic probe 1 screening probe insert 1 contra phone receiver with cord 1 mains cable...
- Page 60 Operating Instructions MI 34 / MI 34 H Specifications are subject to change. MAICO Diagnostic GmbH Salzufer 13/14 D-10587 Berlin Telephone (++49) 30 70 71 46 - 50 Telefax (++49) 30 70 71 46 - 99 internet: www.maico.biz e-mail: export@maico.biz GEBAmi34e.11a.docx...
Need help?
Do you have a question about the MI 34 and is the answer not in the manual?
Questions and answers
we do calibrate on the cavity , but not correct ,itsmore than .05 and 2 so how to adjust to be correct
To adjust the Maico MI 34 calibration to achieve correct measurements within 0.5 ml and 2 ml:
1. Place the probe in the 5 ml cavity for initial calibration.
2. If the "Cavity Calibration out of range" error appears, place the probe in the 0.5 ml cavity and check if the probe tip opening is clean.
3. Clean the probe if necessary and recalibrate.
4. If the error persists, the probe or instrument may be defective and service should be contacted.
Correct calibration ensures accurate measurements within the desired range.
This answer is automatically generated