Table of Contents
Advertisement
Quick Links
Advertisement
Table of Contents

Related Manuals for Maico MB 11 BERAphone


Summary of Contents for Maico MB 11 BERAphone
- Page 1 Operation Manual MB 11 ® BERAphone / Classic...
-
Page 3: Table Of Contents
® Operation Manual MB 11 BERAphone /Classic Contents Introduction General ......................3 Intended Use Statement ................3 Contraindications of Use ................4 Essential Performance .................. 4 Features and Benefits ................... 4 Description ....................5 Warnings and Cautions Reading this Operation Manual ..............7 Customer Responsibility ................ - Page 4 Copyright © 2019 MAICO Diagnostics All rights reserved. No part of this publication may be reproduced or transmitted in any form or by any means without the prior written permission of MAICO Diagnostics. The information in this publication is proprietary to MAICO Diagnostics.
-
Page 5: Introduction
The MB 11 is designed and manufactured to meet all quality and safety requirements. When designing the MB 11, MAICO placed particular importance on making it a user-friendly device. The intent was to make its operation easy-to-learn, thus making the device simple and easy to operate. -
Page 6: Contraindications Of Use
® Operation Manual MB 11 BERAphone /Classic Indications for Use ® The MAICO MB 11 BERAphone /Classic is designed to be used only by trained personnel (Audiologists, Physicians or other trained, supervised personnel). No person should attempt to use this instrument without the necessary knowledge and training to understand how this equipment is to be properly utilized and interpreted. -
Page 7: Description
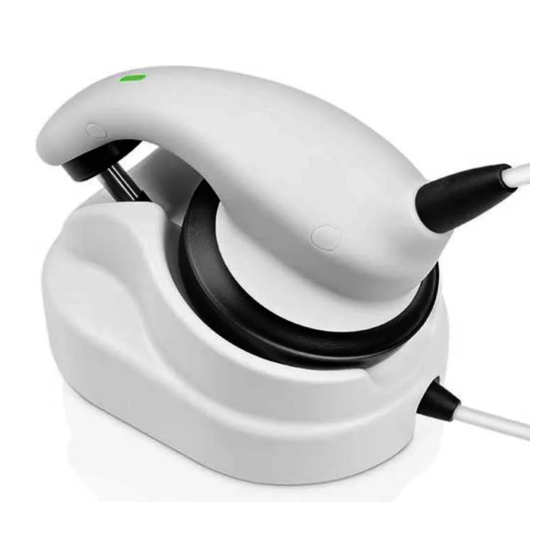
® Cradle for MB 11 BERAPHONE ® The cradle for MB 11 BERAphone allows you to: • To store the MB 11 BERAphone ® when not in use. Description General The MB 11 features a user-friendly user interface via the MB 11 Software for ABR testing. - Page 8 ® Operation Manual MB 11 BERAphone /Classic ® MB 11 BERAphone Traditional ABR screening of infants uses disposable electrodes that adhere to the baby’s skin for recording the response. The patented BERAphone® has spring- mounted, stainless-steel electrodes, a headphone and preamplifier integrated in one unit (see figures 1 and 2), which is held to the infant’s head after the three electrode...
-
Page 9: Warnings And Cautions
® Operation Manual MB 11 BERAphone /Classic 2 Warnings and Cautions This section offers you important information about: ▪ how to read the operation manual ▪ where to spend special attention ▪ the customer responsibility ▪ the explanation of all regulatory symbols used ▪... -
Page 10: Customer Responsibility
(see sections 3.2 to 3.4 and section 6). Breach of the customer responsibility can lead to limitations of Manufacturer’s Liability and Warranty (see sections 2.3 and 3.1). NOTE: In the unlikely case of a serious incident, inform MAICO as well as your local distributor. Precautions for Patient Confidentiality Store a backup of the data in a safe manner. -
Page 11: Regulatory Symbols
® Operation Manual MB 11 BERAphone /Classic Regulatory Symbols The following Table 1 gives an explanation of the symbols used on the device itself, on the packaging and the accompanying documents including the Operation Manual. Table 1 Regulatory Symbols REGULATORY SYMBOLS... -
Page 12: General Precautions
Modification of the equipment could be hazardous. No parts of the equipment can be serviced or maintained while in use with the patient. Connect only accessories purchased from MAICO to the MB 11. Only WARNING accessories which have been stated by MAICO as being compatible are allowed to be connected to the device. - Page 13 The consequence could be a too high leakage current to the patient. ® The operator of the MB 11 BERAphone /Classic must not WARNING ® touch the electrode part of the MB 11 BERAphone /Classic during a measurement. 8100496 Rev. 6 23/10/2019...
-
Page 14: Electromagnetic Compatibility (Emc)
® Operation Manual MB 11 BERAphone /Classic The device is not intended for operation in areas with an WARNING explosion hazard. Do NOT use the device in a highly oxygen- enriched environment, such as a hyperbaric chamber, oxygen tent, etc. If the device is not used switch it off and disconnect it from the power supply. -
Page 15: Warranty, Maintenance And After-Sales Service
The MAICO device is guaranteed for at least one year. Ask your authorized local distributor for more information. This warranty is extended to the original purchaser of the device by MAICO through the distributor from whom it was purchased and covers defects in material and workmanship for a period of at least one year from date of delivery of the device to the original purchaser. -
Page 16: Cleaning And Disinfection Recommendations
Recommendations for cleaning and disinfection of MAICO device presented in this document are not intended to replace or contradict policies in effect or procedures required for infection control at the facility. - Page 17 ® Operation Manual MB 11 BERAphone /Classic Cleaning the Case and Cables Use caution while cleaning. CAUTION Before cleaning, unplug MB 11 from USB connector. Use a damp cloth to clean the plastic parts of the MB 11 ® BERAphone /Classic.
- Page 18 ® Operation Manual MB 11 BERAphone /Classic 3.3.3.3 Cleaning & Disinfection between Examinations of Different Patients ® Follow this process for cleaning and disinfection of the BERAphone after each use. 1. Clean residual gel from the electrodes and ear cushion using a tissue or a disinfectant wipe.
- Page 19 ® Operation Manual MB 11 BERAphone /Classic 2. Inspect the inside of the gel protectors looking for residual electrode gel. a. The presence of gel inside the gel protector is generally an indication that the screeners are applying an excessive amount of gel to the electrode and/or the baby.
- Page 20 Replacement of the removable electrodes is recommended at least every 3 months. More frequent replacement of electrodes may be required based on the cleaning and maintenance practices of the facility. Replacement electrodes are available from MAICO. 1. Remove the electrode tip/gel protector assemblies from the fixed electrode posts by pulling each one straight out from the fixed post.
-
Page 21: Troubleshooting
® Operation Manual MB 11 BERAphone /Classic Troubleshooting In case of problems see below for symptoms, possible causes and suggested troubleshooting (Table 2). Table 2 Troubleshooting SYMPTOM POSSIBLE SUGGESTED TROUBLESHOOTING CAUSE Instrument Connections 1. Verify that the USB cable is connected securely... - Page 22 ® Operation Manual MB 11 BERAphone /Classic SYMPTOM POSSIBLE SUGGESTED TROUBLESHOOTING CAUSE ® BERAphone Different head Depending on the size of the head the position of does not sizes the vertex electrode can be adapted by rotating make contact the black disc in which the electrode is mounted.
-
Page 23: Recycling And Disposal
Within the European Union it is illegal to dispose of electric and electronic waste as unsorted municipal waste. According to this, all MAICO products sold after August 13, 2005, are marked with a crossed-out wheeled bin. Within the limits of Article (9) of DIRECTIVE 2002/96/EC on waste electrical and electronic equipment (WEEE), MAICO has changed their sales policy. -
Page 24: Unpacking And Hardware Orientation
® Operation Manual MB 11 BERAphone /Classic 4 Unpacking and Hardware Orientation This section provides information on: ▪ unpacking the system ▪ becoming familiar with the hardware inclusive connections ▪ system assembly ▪ how to install the PC software ▪... -
Page 25: Use Of Equipment After Transport And Storage
® Operation Manual MB 11 BERAphone /Classic The MB 11 comes with different components (see Table 3). The availability of configurations with the following components are country specific. Contact your local distributor for more information. Table 3 List of Components List of Components Components –... -
Page 26: Mb 11 Hardware And System Assembly
® Operation Manual MB 11 BERAphone /Classic MB 11 Hardware and System Assembly Powering MB 11 The MB 11´s power is directly supplied through the computer via the USB port. No external power supply is needed. ® MB 11 BERAphone... -
Page 27: Mb 11 Software Installation
® Operation Manual MB 11 BERAphone /Classic Connect the electrode lead wires to the color-coded jacks on the side of the preamplifier. 1. Electrode lead wires 2. Insert Earphones IP 30 3. Red and blue tubes 4. Tube adapters (black for... - Page 28 ® Operation Manual MB 11 BERAphone /Classic Table 4 PC connections PC CONNECTIONS PC Connection 1: PC Connection 2: Medical device – Medical Device Medical device – Non-Medical Device PC Connection 3: PC Connection 4: Medical device – Non-Medical Device Medical device –...
- Page 29 -line. Passive USB hubs without an internal or separate power supply do not work with the MB 11 BERAphone®. We recommend using a USB port directly on the PC or notebook computer. In most cases, these ports allow the use of high- powered functions/ devices.
- Page 30 ® Operation Manual MB 11 BERAphone /Classic Press Next> to proceed (Figure 14). Set the language for operating the MB 11 Software. Press Next> proceed (Figure 15). Figure 15 Figure 14 Press Browse… to choose another Press <Back if a review or change of the Destination Location and/or press Next>...
- Page 31 MAICO MB 11. 4.4.4.3 Computer Settings for Optimal Performance ® To get the best possible power for the MB 11 BERAphone /Classic, it might be necessary to change the properties of the used computer systems. A description of these settings is provided below for Windows 10 computers. These instructions can be applied in a similar way for Windows 7 or Windows 8.
- Page 32 ® Operation Manual MB 11 BERAphone /Classic DEVICE MANAGER OPTIONS In the Windows Search field, type in Device Manager and Enter. Select the Device Manager item from the matches list. Expand the Universal Serial Bus Controllers list to view the entire list.
- Page 33 ® Operation Manual MB 11 BERAphone /Classic Expand the Human Interface Devices list to view the entire list Right click on each item in the list select Power Management tab. Disable the checkbox Allow the computer to turn off the device to save power.
- Page 34 ® Operation Manual MB 11 BERAphone /Classic Set the value to None. Select OK button. POWER MANAGEMENT In the Windows Search field, type in Power and sleep and Enter. Select the Power & sleep settings item from the matches list.
- Page 35 ® Operation Manual MB 11 BERAphone /Classic Select High Performance. Select Change plan settings. Select Change advanced power settings. Expand the Hard disk item. Expand the Turn off hard disk after item. Set On battery (Minutes) to Never Set Plugged in: to Never.
- Page 36 ® Operation Manual MB 11 BERAphone /Classic Expand the USB settings. Expand selective suspend setting item. Set the values as follows: On battery/Plugged in: Disabled Select OK button. Expand the Processor power management item. Expand the sub-items. Set the values as follows:...
- Page 37 ® Operation Manual MB 11 BERAphone /Classic Expand the Battery item. Expand the sub-items. Set the values as follows: Critical battery notification On battery: On Plugged in: On Critical battery action On battery: Hibernate Plugged in: Do nothing Low battery level...
- Page 38 ® Operation Manual MB 11 BERAphone /Classic On battery: Sleep Plugged in: Sleep Select Apply. Select OK button. SHOW HIDDEN FILES & FOLDERS In the Windows Search field, type in Show Hidden Files and folders and Enter. Select the Show hidden files and folders item from the matches list.
-
Page 39: Storage
® Operation Manual MB 11 BERAphone /Classic Set the values as follows: Brightness and color Change brightness: Drag marking to the right. Night light: Off Scale and layout Changed the size of text, apps, and other items Default (Recommended) Resolution:... -
Page 40: Operating The Pc Software
Operation Manual MB 11 BERAphone /Classic 5 Operating the PC Software This section offers you information about: ▪ ® how to get started with the MB 11 BERAphone /Classic ▪ general information about the MB 11 software ▪ preparing for testing ▪... - Page 41 ® Operation Manual MB 11 BERAphone /Classic Start Screen of the MB 11 Software The start screen displays the buttons, fields and menu of all the major functions of the MB 11. See Figure 21 as well as Table 5 for explanation.
- Page 42 ® Operation Manual MB 11 BERAphone /Classic See Table 6 and Table 7 for explanation of shortcuts and function keys. Table 6 MB 11 Shortcuts SHORTCUT DESCRIPTION Common Alt + F Open File menu Alt + S Open Settings menu...
-
Page 43: Preparing For Testing
® Operation Manual MB 11 BERAphone /Classic New Patient Click on the button New or select New from the menu File to clear all patient information fields, if they contain information on a previously tested patient. To store the patient and measurements in the database or to print results it is required to enter the Last name and First name, date of birth (Born), gender (male/female) and Patient ID (Pat. - Page 44 ® Operation Manual MB 11 BERAphone /Classic Screening can be performed when the baby is lying in a crib, in a car seat or is being held by the screener or parent. The key is to make the baby comfortable and quiet for the screening.
- Page 45 ® Operation Manual MB 11 BERAphone /Classic The following can be sources of electrical noise: • other electrical equipment in the test room, especially devices attached to the baby such as other monitoring equipment. • nearby cell phones, tablets, computers, walkie-talkies.
- Page 46 When you start the test, the impedance test will show you if the electrodes are making good contact with the skin. After passing the impedance test, the measurement starts. ® IMPORTANT NOTE: The MB 11 BERAphone does not require pressure to hold it in ®...
- Page 47 ® Operation Manual MB 11 BERAphone /Classic Preparing the Patient for Testing with MB 11 Classic 5.2.3.1 General At the time of purchase you chose your preferred style of acoustic transducer. If insert earphones were selected you also chose your preferred ear coupling method, the EarCups...
- Page 48 ® Operation Manual MB 11 BERAphone /Classic NOTE: Skin preparation products vary in terms of abrasiveness. Be sure to follow the instructions on the product to avoid damage to the skin. Preparing the skin helps to achieve good contact (i.e. low impedance) between the skin and the electrode.
- Page 49 ® Operation Manual MB 11 BERAphone /Classic 5.2.3.3 Placing EarCups (with Insert Earphones) on the Patient (EarCups Only) Insert the EarCups adapter at the end of each of the insert earphone tubes into the hole in the foam at the top of the EarCup so that it is fully inserted (Figure 27).
-
Page 50: Starting The Mb 11 Software
Starting the MB 11 Software ® After starting the computer, launch the MB 11 BERAphone software by clicking the icon MB 11 USB Version on the desktop or direct from the program menu. The program launches with the start screen (see figure 22). -
Page 51: Automatic Testing In The Abr Screening Mode
® Operation Manual MB 11 BERAphone /Classic Device recognition: A pop-up window displays the connected instruments. If more than one MB 11 is connected, you can choose the device you want with a mouse click. To change the instrument during the measurement, press CTRL+U and the pop- up window opens. - Page 52 ® Operation Manual MB 11 BERAphone /Classic Figure 32 Next click on Measure: The measurement screen opens (see Figure 33). Prepare the baby as described in section 5.2. When the baby is quiet, start the test by clicking on the Start Measurement button. Before starting the measurement an automatic impedance test is performed.
- Page 53 ® Operation Manual MB 11 BERAphone /Classic Table 10 Function Buttons on Measurement Screen FUNCTION INFORMATION BUTTON Other Ear After the test is finished you can change the ear to be tested. Start Clicking on the Start Measurement button starts a new test. The Measurement function button changes to Stop Measurement.
- Page 54 ® Operation Manual MB 11 BERAphone /Classic Figure 34 Figure 35 The impedance values measured for Vertex / GND) and Mastoid / GND lines are shown in the status line in the lower left corner at the screen. In the case of a red light, the impedance must be corrected. This can be done by repeating the preparation with the electrode gel to lower the impedance of the skin.
- Page 55 As soon as the signal quality is better and the ® test starts, the signal quality indicator on the MB 11 BERAphone changes to green. If the signal quality decreases for a certain time the signal quality indicator on the ®...
- Page 56 ® Operation Manual MB 11 BERAphone /Classic Test Results 5.5.5.1 Test Result PASS During the test, a small segment of a line is drawn after each 1 second of data collection. The line displays as blue for a left ear test and red for a right ear test (MB 11 Classic only: Magenta for binaural test).
- Page 57 ® Operation Manual MB 11 BERAphone /Classic 5.5.5.3 Test Result ABORT A test can be aborted by selecting the Stop Measurement button. The test will be saved as an aborted test in the database. If tracking is enabled, a pop-up window with reasons appears (see Figure 41).
-
Page 58: Managing Test Results
® Operation Manual MB 11 BERAphone /Classic Quit a Measurement If you use the Quit button after testing one ear only, a dialogue box is displayed asking if you want to test the other ear. If you quit the program without performing a measurement, the baby will be stored in the database but without any tests. - Page 59 ® Operation Manual MB 11 BERAphone /Classic Figure 44 Table 12 Explanation of Search Options SEARCH INFORMATION OPTION Pat. ID Entering a patient ID will filter the database to show only patients with matching ID. Last Name Entry of a last name will filter the database to show only those with a matching last name.
- Page 60 ® Operation Manual MB 11 BERAphone /Classic SEARCH INFORMATION OPTION Data The Data Export controls allow you to set a date range using Export calendar controls and export tests performed in this date range to a (Unicode) file that can be read in a spreadsheet program such as MS Excel. A Windows browser will appear to allow you to define the path and filename to which the data will be saved.
- Page 61 ® Operation Manual MB 11 BERAphone /Classic Working with a Today’s List If several tests will be conducted in one day, it may be easier to enter the data of all patients before you start to test. In this case, click on the button New and enter the name, date of birth and sex, as described in section 5.6.
- Page 62 ® Operation Manual MB 11 BERAphone /Classic Label Printout You can print the screening results via an optional printer onto labels. For the Results to print options Best or Latest automatically the best or latest result is selected for each ear and printed combined on one label.
- Page 63 ® Operation Manual MB 11 BERAphone /Classic Figure 48 NOTE: Binaural screening results are displayed as combined result for left and right ear in the dialog to select a measurement and on the List printout. That means, if at least one ear had a REFER or ABORT result, this is displayed as the result.
- Page 64 ® Operation Manual MB 11 BERAphone /Classic Figure 49 The Results to print “Selected” option allows printing of several test results in one report. When a patient is loaded from the database and the print button is selected, the measurements can be selected from a list of stored results (Figure 50). By confirming with OK, the selected results will be printed in the format according to the setting Print Mode.
- Page 65 ® Operation Manual MB 11 BERAphone /Classic 5.6.5.2 Input of Tracking data If Hi*Track is activated in the Auto Tracking Settings area of the Options screen, the button Tracking appears on the start screen (Figure 51). Figure 51 Click on the Tracking button to open the input window (Figure 49). Patient data are automatically copied from the main screen (Figure 52).
- Page 66 ® Operation Manual MB 11 BERAphone /Classic 5.6.5.3 Advanced Tracking Data Press the advanced button in the Tracking data screen to open the next input window which contains additional fields (Figure 52). The Advanced tracking screen allows entry of Mother’s data, Alternate Contact information as well as documentation of the relevant Risk indicators for the baby.
-
Page 67: Settings
® Operation Manual MB 11 BERAphone /Classic 5.6.5.5 Export Functions of the MB 11 Database (Tracking enabled) The MB 11 software allows the export of patient and test data from the database into an OZ or HiTrack compatible format. To do this, the OZ or HiTrack Tracking option must be enabled in the Auto Tracking Settings area in the Options screen (see section 5.7). - Page 68 ® Operation Manual MB 11 BERAphone /Classic Figure 55 shows the Options dialog. Table 14 gives an explanation of the different options. Figure 55 Table 14 Explanation of Options OPTION INFORMATION Software The Software Settings area allows selection of the Language,...
- Page 69 ® Operation Manual MB 11 BERAphone /Classic OPTION INFORMATION Select the type of printout you prefer as your default: Print Mode • Label: prints to a supported label printer. • List: prints the results on a standard Windows printer with test data in rows in a table layout.
- Page 70 ® Operation Manual MB 11 BERAphone /Classic OPTION INFORMATION List Field The List Field Setup area allows you to add and delete entries in the drop Setup down fields. Use the Add control to add new entries to the drop down list.
- Page 71 ® Operation Manual MB 11 BERAphone /Classic OPTION INFORMATION Auto Track The Auto Track Settings area allows you to set your tracking Settings preference (Figure 59). Figure 59 Select one of the following tracking options: • No Tracking: no tracking file will be saved.
- Page 72 ® Operation Manual MB 11 BERAphone /Classic OPTION INFORMATION Encode If this option is enabled, all tracking files will be encrypted during Export export in order to make sure that exported data cannot be read or Data manipulated by any unauthorized person. A password is required to enable or disable this option.
- Page 73 ® Operation Manual MB 11 BERAphone /Classic OPTION INFORMATION MB 11 The MB 11 Classic area allows the user to set a preference related Classic to testing when the hardware being used is the MB 11 Classic rather ® than the BERAphone .
-
Page 74: About Menu
® Operation Manual MB 11 BERAphone /Classic OPTION INFORMATION Password If this feature is enabled, a password is required to store setting changes. Protected After clicking on OK in the Options screen, a password must be entered Settings to save settings changes. A password is also required to enable or disable this option. -
Page 75: Technical Data
General Information About Specifications The performance and specifications of the device can only be guaranteed if it is subjected to technical maintenance at least once per year. MAICO Diagnostics puts diagrams and service manuals at the disposal of authorized service companies. STANDARDS... - Page 76 ® Operation Manual MB 11 BERAphone /Classic DEVICE SPECIFICATIONS Operation Temperature +5 °C to +40 °C / + 41 °F to +104 °F environment Relative Humidity 15 % to 93 % (non-condensating) Ambient Pressure 98 kPa to 104 kPa Boot-up Time...
- Page 77 ® Operation Manual MB 11 BERAphone /Classic Elektrode Measurement 200 nA impedance current measurement Waveform Rectangular 0.25-15 kΩ Vertex, Acceptable 0.25-15 kΩ Nape (Classic) Impedance 0.25-10 kΩ Mastoid (BERAphone Range ® Accuracy of Sensitivity > 99.6 % Measurement Specificity 97.9 % TRANSDUCER ABR insert phones (50 Ω)
- Page 78 ® Operation Manual MB 11 BERAphone /Classic ® BERAPHONE 4.7 in x 3.4 in x 2.4 in Cable length 190 cm / 7.5 in Cradle Weight 270 g/ 9.5 oz Dimensions 119 mm x 160 mm x 74 mm / 4.7 in x 6.3 x 2.9 in...
-
Page 79: Pin Assignment
® Operation Manual MB 11 BERAphone /Classic Pin assignment USB A USB B 1. +5 VDC 1. +5 VDC 2. Data - 2. Data - 3. Data + 3. Data + 4. Ground 4. Ground Connecting plugs: Connection Specification USB socket:... -
Page 80: Calibration Values
The calibration values for eartips are according to PTB report from 2008-05-19, in compliance to the calibration procedure defined in standard EN 60645-3. Correction values for EarCup calibration values are defined as MAICO standard values. ® BERAphone with coupler 60318-3: TRANSDUCER CE-CHIRP®... - Page 81 7500 Hz. Screening Algorithm The MAICO’s MB 11 presents the CE-Chirp® stimulus periodically with a repetition rate of about 90 Hz. During stimulation, the EEG is continuously recorded and analyzed. The evoked ABR has the same periodicity as the fixed stimulus repetition rate. A statistical test [1] is performed to detect the response automatically.
-
Page 82: Electromagnetic Compatibility (Emc)
If adjacent or stacked use is necessary, the user should verify normal operation in the configuration. The use of accessories, transducers and cables other than those specified, with the exception of servicing parts sold by MAICO as replacement parts for internal components, may result in increased EMISSIONS or decreased IMMUNITY of the device. - Page 83 ® Operation Manual MB 11 BERAphone / Classic Guidance and manufacturer’s declaration — electromagnetic immunity The MB 11 is intended for use in the electromagnetic environment specified below. The customer or the user of the MB 11 should assure that it is used in such an environment, Electromagnetic environment –...
-
Page 84: Electrical Safety, Emc And Associated Standards
® Operation Manual MB 11 BERAphone / Classic To ensure compliance with the EMC requirements as specified in IEC 60601-1-2, it is essential to use only the following accessories (see Table 15). Table 15 EMC Requirements – Accessories ITEM MANUFACTURER... - Page 85 Specifications are subject to change without notice. MAICO Diagnostics GmbH Sickingenstr. 70-71 10553 Berlin MAICO Diagnostics Germany 10393 West 70 Street Tel.: + 49 30 / 70 71 46-50 Fax: + 49 30 / 70 71 46-99 Eden Prairie, MN 55344 E-mail: sales@maico.biz...
Need help?
Do you have a question about the MB 11 BERAphone and is the answer not in the manual?
Questions and answers