Table of Contents
Advertisement
Advertisement
Table of Contents

Related Manuals for Belmont CLESTA II CHAIR


Summary of Contents for Belmont CLESTA II CHAIR
- Page 1 DENTAL CHAIR (CONTOUR TYPE) INSTRUCTIONS FOR USE...
- Page 2 Dear Customers Dear Customers Thank you for purchasing our product. This booklet explains how to use DENTAL CHAIR (CONTOUR TYPE). Before using DENTAL CHAIR (CONTOUR TYPE), carefully read the operating instructions and make sure to use the product correctly. Using the product without reading these instructions may lead to an accident.
-
Page 3: Table Of Contents
2-3 EMC Information 2-4 Devices Connectable to the Product Precautions for Use 3-1 Operating Precautions 3-2 Precautions for Using Synthetic Leathers Specifications and Operation 4-1 CLESTA II CHAIR (EURUS TYPE) / CELEB CHAIR (EURUS TYPE) 4-1-1 Specifications 4-1-2 Dimensions 4-1-3 Name of Each Part 4-1-3-1 Chair 4-1-3-2 Headrest 4-1-3-3 Junction Unit... - Page 4 Table of Contents 4-2 CLESTA II CHAIR / CELEB CHAIR 4-2-1 Specifications 4-2-2 Dimensions 4-2-3 Name of Each Part 4-2-4 Operation 4-2-4-1 Preparation Before Use 4-2-4-2 After use 4-2-4-3 Raising/lowering the chair and raising/reclining the backrest (manual operation) 4-2-4-4 Moving the chair to the preset position (automatic operation) 4-2-4-5 Headrest 4-2-4-6 Double Articulating Headrest (Optional)
- Page 5 Table of Contents 4-4 PROGRES 4-4-1 Specifications 4-4-2 Dimensions 4-4-3 Name of Each Part 4-4-4 Operation 4-4-4-1 Preparation 4-4-4-2 After use 4-4-4-3 Raising/lowering the chair and raising/reclining the backrest (manual operation) 4-4-4-4 Moving the chair to the preset position (automatic operation) 4-4-4-5 Headrest 4-4-4-6 Chair Rotation 4-4-4-7 Cancellation function 4-4-4-8 Safety Look Device 4-4-4-9 Auto Mode Position Adjustment Maintenance and Cleaning by Dental Staff 5-1 Exterior...
-
Page 6: General Information
1 General Information Intended Use of the Product This product is an active therapeutic device intended for the exclusive use for diagnoses, treatments and relative procedures of dentistry. The product must be operated or handled by the qualified dentists or by dental staffs under the supervision of the dentist. -
Page 7: How To Dispose Of The Device
1 General Information How to Dispose of the Device When disposing of this product and parts replaced, carefully take infection control measures, pay attention to physical hazards such as from sharps, and handle them properly in accordance with the relevant laws and regulations (including local ordinances). In the EU area, EU Directive 2012/19/EU (Directive on Waste Electrical and Electronic Equipment [WEEE Directive]) applies to this product. -
Page 8: Symbols
1 General Information Symbols Stick switch for Stick switch for automatic operation manual operation Caution General warning sign Disassembly, repair Generally prohibited or modification activity prohibited Instructions for mandatory actions Follow instructions for use in general Type B Applied Parts contacting the Alternating current patient’s body... -
Page 9: Technical Description
1 General Information To Recline To lower the chair the backrest To raise Protective earthing the backrest Chair manual Functional earthing control Medical Device Product name Rated voltage Rated input ① ① Maximum activation time ② ② Product of Japan Non-continuous operation ③ ... -
Page 10: Safety Consideration
2 Safety Consideration 2-1 Risk Level Interpretation Precautions before use Make sure to carefully read the Safety Precautions and Operating Precautions and use the product correctly. These precautions are intended to ensure the safe use of the product and prevent harm or damage to users or other people. According to the magnitude of harm and damage and the degree of urgency, an incident that may be caused by misuse of the product is classified into one of the following categories: CONTRAIN-... - Page 11 2 Safety Consideration Classification by degree of CONTRAINDICATION harm or damage and urgency Use of the product without regard to this indication will create a hazardous condition that may result in death or serious injury. WARNING Improper handling of the product without regard to this indication will create a hazardous condition that may result in death or serious injury.
-
Page 12: Safety Precautions
HF surgical equipment may cause incorrect operation of this product. Never disassemble, repair or modify the product. Individuals other than your local authorized Belmont dealer should not disassemble or repair this product. This could lead to an accident, failure, electric shock, or fire. - Page 13 2 Safety Consideration WARNING Installing or transferring Precautions for installation Ask your local authorized Belmont dealer to install the product. the product Make sure to place the product on a firm and flat floor. Placing the equipment on a non-flat floor may cause it to fall.
- Page 14 2 Safety Consideration WARNING Use and maintenance Remove the patient’s glasses and any accessories (such as a necklace or bracelets) before treatment. of the product Failure to follow this instruction may hamper treatment and lead to an accident. Points to remember when a patient sits on the chair As shown in the figure on the left, instruct the patient to sit on the chair and make sure his/her body fits into the chair.
- Page 15 2 Safety Consideration WARNING Use and maintenance Precautions for getting on and off the product. of the product When the patient gets on or off the chair, the chair should always be at entry/exit position,which is the lowest position with the backrest fully raised. Before moving a patient from a wheelchair to the product or vice versa, ensure that no obstacles (e.g., foot controllers) are situated around the wheelchair or the caregiver.
- Page 16 Portable RF communications equipment (including peripherals such as antenna cables and external antennas) should be used no closer than 30 cm(12 inches) to any part of CLESTA II CHAIR (EURUS TYPE) / CELEB CHAIR (EURUS TYPE) / CLESTA II CHAIR / CELEB CHAIR / CLESTA eIII CHAIR / PROGRES, including cables specified by the...
- Page 17 2 Safety Consideration of the unit) Turn off the main switch (or the main switch during cleaning. Failure to follow this instruction may cause electric shock or ignition. The product may also move unexpectedly, causing injury. Action taken for power failure To prevent unexpected operation of the product after recovery from power failure, turn off the main switch (or the main switch of the unit).
- Page 18 If you feel something is wrong, immediately discontinue use of the product and turn off the main switch. Then, contact your local authorized Belmont dealer. Read the Instructions for use. Before use, make sure to carefully read the instructions for use and use the device correctly.
-
Page 19: Points To Remember When Operating The Product
2 Safety Consideration Immediately wipe off any drug solutions or water adhered to the product Adherence of drug solutions or water to the product may cause operational failure or electrical leak. If drug solutions or water are adhered, immediately turn off the main switch and wipe them off with a dry, soft cloth. - Page 20 2 Safety Consideration ⑤Pay attention to prevent body parts or objects from becoming caught in the rear link cover. Do not place the body parts or objects between the rear link cover and base plate. ③ ⑥Pay attention to prevent body parts or objects from becoming caught in the headrest moving part.
-
Page 21: Emc Information
2 Safety Consideration EMC Information This product complies with EMC Standard EN60601-1-2:2015. 1. Precautions regarding EMC and compliance with accompanying documents Medical electrical equipment requires special precautions regarding EMC and needs to be installed and put into service according to the EMC information provided in this booklet. 2. - Page 22 2 Safety Consideration 5. Electromagnetic immunity declaration 1 Guidance and manufacturer’s declaration—electromagnetic immunity This product is intended for use in the electromagnetic environment specified below.The customer or user of this product should ensure that it is used in such an environment.
- Page 23 WARNING as antenna cables and external antennas) should be used no closer than 30 cm(12 inches) to any part of CLESTA II CHAIR (EURUS TYPE) / CELEB CHAIR (EURUS TYPE) / CLESTA II CHAIR / CELEB CHAIR / CLESTA eIII CHAIR / PROGRES, including cables specified by the manufacturer.
- Page 24 2 Safety Consideration Near electromagnetic field caused by RF wireless communication devices Test frequency Modulation IEC 60601 IEC 60601 test level compliance level (MHz) Pulse modulation 27V/m 27V/m 18Hz Frequency modulation 28V/m 28V/m ±5kHz shift 1kHz sine wave Pulse modulation 9V/m 9V/m 217Hz...
-
Page 25: Devices Connectable To The Product
Devices Connectable to the Product Use this product in combination with the unit marked with a circle. Devices connectable CLESTA II CELEB CLESTA eIII TYPE CLESTA II CHAIR ○ (EURUS TYPE) CELEB CHAIR ○ (EURUS TYPE) ○ CLESTA II CHAIR ○... -
Page 26: Precautions For Use
3 Precautions for Use Operating Precautions Immediately wipe off any drug solutions adhered to the product. Otherwise, they may cause deterioration or discoloration. Do not apply heat to this product. This may cause deterioration or discoloration. Discoloration of resin Resin materials are used in external components of this product. Carefully selected materials are used;... -
Page 27: Precautions For Using Synthetic Leathers
3 Precautions for Use Precautions for Using Synthetic Leathers Adherence of clothing dye To clean and disinfect the synthetic leathers, wipe the surface with a soft cloth or paper towel moistened with FD360 manufactured by Dürr, and then wipe it with a dry cloth. Dye may migrate from clothes or belts to the synthetic leathers of the product. -
Page 28: Clesta Ii Chair (Eurus Type) / Celeb Chair (Eurus Type)
4 Specifications and Operation 4-1 CLESTA II CHAIR (EURUS TYPE) / CELEB CHAIR (EURUS TYPE) 4-1-1 Specifications Model AC-ERC2-CD* (* represents single or multiple strings or numbers.) Classification for protection Class I Equipment against electric shock Classification according to the... -
Page 29: Dimensions
4 Specifications and Operation 4-1-2 Dimensions Dimensional drawing (standard values are provided) 2010 5-18° 235° 170° 1380 Unit: mm Tolerance in dimensions: ±10%... -
Page 30: Name Of Each Part
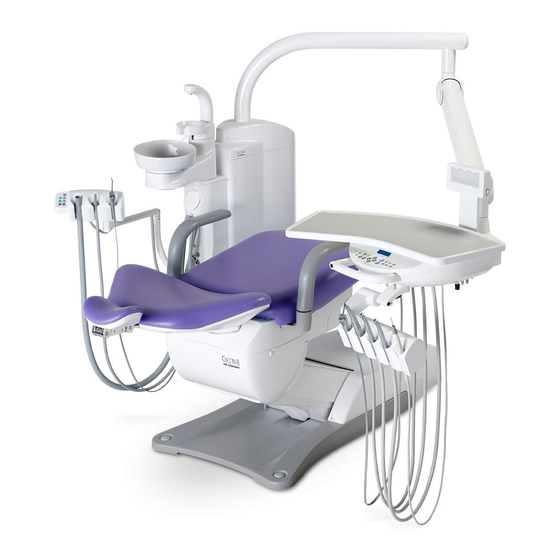
4 Specifications and Operation 4-1-3 Name of Each Part 4-1-3-1 Chair Headrest (manual) Backrest Armrest Rear link Seat cover Base Junction unit Stick switch (Two different stick switches are available: For the chair [manual], and for the chair [auto]) The position or availability of the stick switch may differ according to the specification selected. -
Page 31: Operation
4 Specifications and Operation 4-1-4 Operation 4-1-4-1 Preparation Before Use Turn on the power for chair ① Junction unit Junction cover ② Main switch for chair Junction unit CAUTION Operate the main switch for chair by hand. -
Page 32: After Use
4 Specifications and Operation 4-1-4-2 After use Turn off the power for chair Main switch for chair Junction unit CAUTION Operate the main switch for chair by hand. - Page 33 4 Specifications and Operation 4-1-4-3 R aising/lowering the chair and raising/reclining the backrest (manual operation) Stick switch Operation Pushing direction Label indication Stick switch for manual operation *The chair is operated while the stick switch is pushed down or the switch is pressed. WARNING Before raising/lowering the chair, ensure that the chair does not contact any body parts, hands, feet, or objects.
-
Page 34: Moving The Chair To The Preset Position (Automatic Operation)
4 Specifications and Operation 4-1-4-4 Moving the chair to the preset position (automatic operation) Stick switch Operation Label indication Pushing direction “Treatment position 1”. “Treatment position 2”. Stick switch for automatic operation “Entry/exit position”. “Mouth rinsing position”. “Previous position”. Do not press the stick switch for automatic operation for five seconds or longer. -
Page 35: Operating The Headrest (Manual Type)
4 Specifications and Operation 4-1-4-5 Operating the headrest (manual type) Adjustment of the headrest The headrest is capable of flexibly adjusting the inclination of the patient’s head for treatment in the upper/lower jaw. It is also possible to manually extend/fold the headrest in accordance with the patient’s height. -
Page 36: Turning The Armrest
4 Specifications and Operation 4-1-4-6 Turning the armrest If the armrest hinders entry/exit or diagnosis, it may be turned backward. Only the right armrest can be turned. CAUTION When turning the armrest, confirm that there is no obstruction. Operator must be careful not to get their hand or finger caught. Do not move the chair while the armrest has been turned backward. -
Page 37: Cancellation Function
4 Specifications and Operation 4-1-4-7 Cancellation function To stop the chair movement started by a switch for automatic opera- tion (preset switch, automatic return switch, last position switch, or stick switch for automatic operation), perform one of the following operations. Operate one of the stick switches (indicated with ○). -
Page 38: Setting The Treatment And Entry/Exit Positions
4 Specifications and Operation 4-1-4-9 Setting the treatment and entry/exit positions Set the treatment position Keep pressing 5seconds. by chair manual switch 1,2: Chair preset positon 0:Auto return position 4-1-4-10 Setting the mouth rinsing position Move the chair to rinsing Keep pressing 5seconds. -
Page 39: Clesta Ii Chair / Celeb Chair
4 Specifications and Operation CLESTA II CHAIR / CELEB CHAIR 4-2-1 Specifications Model AC-CL2-C230* AC-CL2-230* (* represents single or multiple strings or numbers.) 410mm Seat Initial Height 380mm Seat Lifting Stroke 0˚ ~ 80˚ above Horizontal Backrest Movement Classification for protection... -
Page 40: Dimensions
4 Specifications and Operation 4-2-2 Dimensions [Standard Base] Unit: mm Tolerance in dimensions: ±10% 1188 1813 [Compact Base] 1175 1813... -
Page 41: Name Of Each Part
4 Specifications and Operation 4-2-3 Name of Each Part [Standard Base] Headrest Backrest Armrest (Left) Seat Foot Control Pump Cover Main Switch Panel [Compact Base] Headrest Backrest Armrest (Left) Seat Foot Control Main Switch Panel Pump Cover... -
Page 42: Operation
4 Specifications and Operation 4-2-4 Operation 4-2-4-1 Preparation Before Use Turn on the power for chair FUSE Main Switch CAUTION Operate the main switch for chair by hand. 4-2-4-2 After use Turn off the power for chair FUSE Main Switch CAUTION Operate the main switch for chair by hand. - Page 43 4 Specifications and Operation 4-2-4-3 R aising/lowering the chair and raising/reclining the backrest (manual operation) Foot Switch Disc Switch Operation Preset-2 Preset-1 Last Position Auto Return Memory *The chair is operated while the switch is pushed down or the switch is pressed. WARNING Before raising/lowering the chair, ensure that the chair does not contact any body parts, hands, feet, or objects.
-
Page 44: Moving The Chair To The Preset Position (Automatic Operation)
4 Specifications and Operation 4-2-4-4 Moving the chair to the preset position (automatic operation) Foot Switch Disc Switch Operation Preset-2 Preset-1 “Treatment position 1”. Last Position Auto Return Memory “Treatment position 2”. “Entry/exit position”. “Mouth rinsing position”. “Previous position”. Do not press the stick switch for automatic operation for five seconds or longer. -
Page 45: Headrest
4 Specifications and Operation 4-2-4-5 Headrest Adjustment of the headrest The headrest is capable of flexibly adjusting the inclination of the patient’s head for treatment in the upper/lower jaw. It is also possible to manually extend/fold the headrest in accordance with the patient’s height. -
Page 46: Turning The Armrest
4 Specifications and Operation 4-2-4-7 Turning the armrest If the armrest hinders entry/exit or diagnosis, it may be turned backward. Only the right armrest can be turned. CAUTION When turning the armrest, confirm that there is no obstruction. Operator must be careful not to get their hand or finger caught. Do not move the chair while the armrest has been turned backward. -
Page 47: Auto Mode Position Adjustment
4 Specifications and Operation 4-2-4-10 Auto Mode Position Adjustment (1) Preset position Adjustment Foot Switch Disc Preset-2 Preset-1 Set the treatment position Keep pressing 5seconds. Last Position Auto Return by chair manual switch 1,2: Chair preset positon Memory 0:Auto return position (2) Mouth Rinsing Position Adjustment Move the chair to rinsing Keep pressing 5seconds. -
Page 48: Clesta Eiii Chair
4 Specifications and Operation CLESTA eIII CHAIR 4-3-1 Specifications Model AC-CL3-C230* (* represents single or multiple strings or numbers.) Seat height 400 ~ 780 mm (Electro-hydraulic system) Seat lifting stroke 380 mm Backrest movement 0° ~ 73° (Electro-hydraulic system) Classification for protection Class I Equipment against electric shock Tilting mechanism... -
Page 49: Dimensions
4 Specifications and Operation 4-3-2 Dimensions 8° * Values are the standard 50° values. (Unit: mm) Dimensional tolerance: ±10% 17° 73° 8° 10° 1767 4-3-3 Name of Each Part Headrest Backrest Armrest Seat Main Switch Sub Link Cover Pump Cover Foot Switch... -
Page 50: Operation
4 Specifications and Operation 4-3-4 Operation 4-3-4-1 Preparation Before Use Turn on the power for chair Main Switch FUSE CAUTION Operate the main switch for chair by hand. 4-3-4-2 After use Turn off the power for chair Main Switch FUSE CAUTION Operate the main switch for chair by hand. - Page 51 4 Specifications and Operation 4-3-4-3 R aising/lowering the chair and raising/reclining the backrest (manual operation) Foot Switch Disc Switch Operation Preset-2 Preset-1 Last Position Auto Return Memory *The chair is operated while the switch is pushed down or the switch is pressed. WARNING Before raising/lowering the chair, ensure that the chair does not contact any body parts, hands, feet, or objects.
-
Page 52: Moving The Chair To The Preset Position (Automatic Operation)
4 Specifications and Operation 4-3-4-4 Moving the chair to the preset position (automatic operation) Foot Switch Disc Switch Operation Preset-2 Preset-1 “Treatment position 1”. Last Position Auto Return Memory “Treatment position 2”. “Entry/exit position”. “Mouth rinsing position”. “Previous position”. Do not press the stick switch for automatic operation for five seconds or longer. -
Page 53: Headrest
4 Specifications and Operation 4-3-4-5 Headrest Adjustment of the headrest The headrest is capable of flexibly adjusting the inclination of the patient’s head for treatment in the upper/lower jaw. It is also possible to manually extend/fold the headrest in accordance with the patient’s height. -
Page 54: Turning The Armrest
4 Specifications and Operation 4-3-4-7 Turning the armrest If the armrest hinders entry/exit or diagnosis, it may be turned backward. Only the right armrest can be turned. CAUTION When turning the armrest, confirm that there is no obstruction. Operator must be careful not to get their hand or finger caught. Do not move the chair while the armrest has been turned backward. -
Page 55: Auto Mode Position Adjustment
4 Specifications and Operation 4-3-4-10 Auto Mode Position Adjustment (1) Preset position Adjustment Foot Switch Disc Preset-2 Preset-1 Set the treatment position Keep pressing 5seconds. Last Position Auto Return by chair manual switch 1,2: Chair preset positon Memory 0:Auto return position (2) Mouth Rinsing Position Adjustment Move the chair to rinsing Keep pressing 5seconds. -
Page 56: Progres
4 Specifications and Operation PROGRES 4-4-1 Specifications Model AC-PRO-230V* (* represents single or multiple strings or numbers.) Seat Initial Height 420mm Seat Lifting Stroke 400mm Backrest Movement -2˚ ~ 70˚ above Horizontal Classification for protection Class I Equipment against electric shock Auto Movements 2 Preset, 1Last Position Memory and 1 Auto Return... -
Page 57: Dimensions
4 Specifications and Operation 4-4-2 Dimensions Unit: mm Tolerance in dimensions: ±10% 1467 4-4-3 Name of Each Part Fuse Holder Main Switch Headrest Backrest Armrest (Left) Seat Rotation Lock Lever Main Switch Panel Foot Switch Foot Switch Base... -
Page 58: Operation
4 Specifications and Operation 4-4-4 Operation 4-4-4-1 Preparation Before Use Turn on the power for chair (ON) Main Switch (OFF) CAUTION Operate the main switch for chair by hand. 4-4-4-2 After use Turn off the power for chair (ON) Main Switch (OFF) CAUTION Operate the main switch for chair by hand. - Page 59 4 Specifications and Operation 4-4-4-3 Raising/lowering the chair and raising/reclining the backrest (manual operation) Foot Switch Disc Switch Operation Preset-2 Preset-1 Last Position Auto Return Memory *The chair is operated while the switch is pushed down or the switch is pressed. WARNING Before raising/lowering the chair, ensure that the chair does not contact any body parts, hands, feet, or objects.
-
Page 60: Moving The Chair To The Preset Position (Automatic Operation)
4 Specifications and Operation 4-4-4-4 Moving the chair to the preset position (automatic operation) Foot Switch Disc Switch Operation Preset-2 Preset-1 “Treatment position 1”. Last Position Auto Return Memory “Treatment position 2”. “Entry/exit position”. “Mouth rinsing position”. “Previous position”. Do not press the stick switch for automatic operation for five seconds or longer. -
Page 61: Headrest
4 Specifications and Operation 4 Specifications and Operation 4-4-4-5 Headrest Adjustment of the headrest The headrest is capable of flexibly adjusting the inclination of the patient’s head for treatment in the upper/lower jaw. It is also possible to manually extend/fold the headrest in accordance with the patient’s height. -
Page 62: Chair Rotation
4 Specifications and Operation Chair Rotation 4-4-4-6 Lock Release Rotaion Lock Lever 4-4-4-7 Cancellation function To stop the chair movement started by a switch for automatic opera- tion (preset switch, automatic return switch, last position switch, or stick switch for automatic operation), perform one of the following operations. -
Page 63: Auto Mode Position Adjustment
4 Specifications and Operation 4-4-4-9 Auto Mode Position Adjustment (1) Preset position Adjustment Foot Switch Disc Preset-2 Preset-1 Set the treatment position Keep pressing 5seconds. Last Position Auto Return by chair manual switch 1,2: Chair preset positon Memory 0:Auto return position (2) Mouth Rinsing Position Adjustment Move the chair to rinsing Keep pressing 5seconds. -
Page 64: Maintenance And Cleaning By Dental Staff
5 Maintenance and Cleaning by Dental Staff 5-1 Exterior 5-1-1 Cleaning and disinfecting the surfaces To clean and disinfect the exterior of the product, wipe the surface with a soft cloth or paper towel moistened with FD366 manufactured by Dürr, and then wipe it with a dry cloth. If the exterior is excessively dirty, moisten a soft cloth with water containing approx 10% of neutral detergent, and wipe the exterior with the cloth. -
Page 65: Leather Part
5 Maintenance and Cleaning by Dental Staff 5-2 Leather part Wipe the surface with a soft cloth or paper towel moistened with FD360 manufactured by Dürr, and then wipe it with a dry cloth. If it is excessively dirty, moisten a soft cloth with water containing ×... -
Page 66: Maintenance And Inspection
The product does not function If oil leaks out, please contact your Check for Check that no oil leaks out from consulting properly, preventing proper local authorized Belmont dealer. oil leaks the product. hours treatment or procedure. Check that no chemical solution... -
Page 67: Notes For Periodic Inspection
Wire for a movable part PC board 5 years 5 years Always entrust periodic inspection to your local authorized Belmont WARNING dealer. If you do not carry out periodic inspection, use of the product may cause injury or damage to nearby devices. -
Page 68: Maintenance By Service Engineers
Refer to ‘Troubleshooting’ before you check the device. If the problem persists, turn off the main switch (or the main switch of the unit), and contact your local authorized Belmont dealer to request a repair. Service life The service life of this product is 10 years on condition that maintenance and inspection are properly conducted [according to our self-certification (our data)]. -
Page 69: Troubleshooting
If the problem persists even after troubleshooting, stop using the product immediately, turn off the main switch (or the main switch of the unit), and contact your local authorized Belmont dealer. Phenomenon Please check Remedy Turn on the main switch. -
Page 70: Accessories And Consumables
8 Accessories and Consumables Accessories IFU Information Installation Instructions Consumables Consumables are parts that will normally wear or deteriorate, change their appearance, or become damaged after use. Please note that repair or replacement of consumables are not covered by the warranty and will be charged for. (* Degree of wear, deterioration or damage and timing for replacement depends on the use environment and conditions at the customer’s premises.) - Page 71 TAKARA COMPANY EUROPE GmbH Berner Strasse 18, 60437 Frankfurt am Main, Germany TEL : +49-69-506878-0 FAX : +49-69-506878-20 TAKARA BELMONT CORPORATION 2-1-1, Higashishinsaibashi,Chuo-ku,Osaka, 542-0083, Japan TEL : +81-6-6213-5945 FAX : +81-6-6212-3680...
Need help?
Do you have a question about the CLESTA II CHAIR and is the answer not in the manual?
Questions and answers
How can we remove seat so it can be recovered
How do we remove seat so it can be recovered