
Related Manuals for PureTools PT-SP-HD116DA

Summary of Contents for PureTools PT-SP-HD116DA
- Page 1 User Manual PT-SP-HD116DA User Manual HDMI V2.0 1x16 Splitter with Downscaling and AOC Supported Model PT-SP-HD116DA Designed in Germany © 2020 PureLink GmbH All rights reserved. V1.2...
- Page 2 User Manual PT-SP-HD116DA Preface Read this user manual carefully before using this product. Pictures shown in this manual are for reference only. Different model layouts and specifications are subject to the physical product. This manual is for operation instructions only, not for any maintenance usage.
- Page 3 PT-SP-HD116DA REACH | 1907/2006/EU ROHS | 2011/65/EU PureLink hereby declares that this product PureTools PT-SP-HD116DA complies with Directives 1907/2006/EU und 2011/65/EU. EMC / LVD (Electro Magnetic Compatibility / Low Voltage Directive) PureLink GmbH hereby declares that this product PureTools PT-SP-HD116DA complies with Directives 2014/30/EU and 2014/35/EU.
- Page 4 User Manual PT-SP-HD116DA SAFETY PRECAUTIONS To ensure the best from the product, please read all instructions carefully before using the device. Save this manual for further reference. Unpack the equipment carefully and save the original box and packing material for ...
-
Page 5: Table Of Contents
User Manual PT-SP-HD116DA Table of Contents 1. Product Introduction ..........................5 1.1 Features ............................... 5 1.2 Package List ............................5 2. Specification ..............................6 3. Panel Description ............................8 3.1 Front Panel ............................8 3.2 Rear Panel ............................9 4. System Connection ........................... 10 4.1 Usage Precaution .......................... -
Page 6: Product Introduction
PT-SP-HD116DA 1. Product Introduction Thank you for choosing the PT-SP-HD116DA HDMI V2.0 1x16 Splitter, which can distribute one HDMI input to sixteen HDMI outputs. The splitter supports 4K signals up to 4K@60Hz 4:4:4, HDR 10, Dolby Vision and features advanced EDID management option using 4-pin DIP switch on the front panel of the unit. -
Page 7: Specification
User Manual PT-SP-HD116DA 2. Specification Video Input (1) HDMI Input Connector (1) Type-A female HDMI Input Video Resolution Up to 4K@60Hz 4:4:4 8bit, HDR10, Dolby Vision Output (16) HDMI Output Connector (16) Type-A female HDMI Up to 4K@60Hz 4:4:4 8bit, HDR10, Dolby Vision, supports 4K to Output Video Resolution 1080p down-scaling. - Page 8 User Manual PT-SP-HD116DA General Bandwidth 18Gbps Operation Temperature -5℃ ~ +55℃ Storage Temperature -25℃ ~ +70℃ Relative Humidity 10%-90% External Power Supply Input: AC 100~240V, 50/60Hz; Output: 24V DC 1.25A Power Consumption 26W (Max) Dimension (W*H*D) 268mm x 40mm x 125mm Net Weight 1.14KG...
-
Page 9: Panel Description
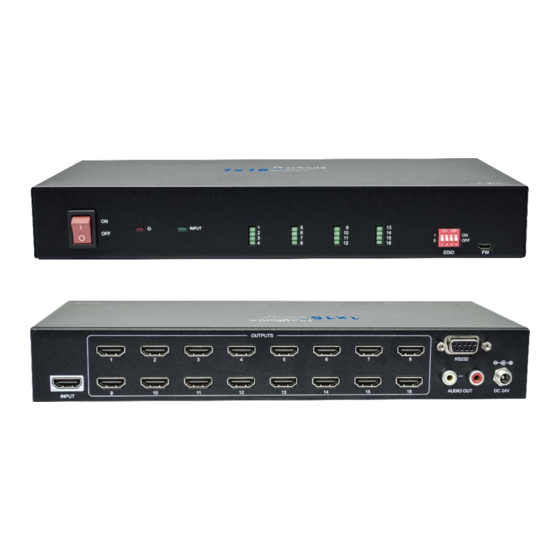
User Manual PT-SP-HD116DA 3. Panel Description 3.1 Front Panel INPUT 1 2 3 4 EDID ① POWER SWITCH: Power on/off the splitter. ② POWER LED: Illuminates red when the device is powered on. ③ INPUT LED: Illuminates green when there is HDMI input. -
Page 10: Rear Panel
User Manual PT-SP-HD116DA 3.2 Rear Panel OUTPUTS RS232 AUDIO OUT DC 24V INPUT ① INPUT: Connect HDMI source. ② OUTPUTS: Total sixteen HDMI outputs to connect HDMI displays. ③ AUDIO OUT: Connect audio device (e.g. Amplifier) for audio de-embedding from HDMI input. -
Page 11: System Connection
User Manual PT-SP-HD116DA 4. System Connection 4.1 Usage Precaution Make sure all components and accessories included before installation. System should be installed in a clean environment with proper temperature and humidity. All of the power switches, plugs, sockets, and power cords should be insulated and ... -
Page 12: Dip Switch Operation
User Manual PT-SP-HD116DA 5. DIP Switch Operation The 4-pin DIP switch on the front panel of the unit is used for EDID management and HDCP management. It represents “0” when in the lower (OFF) position, and it represents “1” while putting the switch in the upper (ON) position. -
Page 13: Rs232 Control
User Manual PT-SP-HD116DA 6. RS232 Control Connect the RS232 port to control device (e.g. PC) with RS232 cable. The splitter can be controlled by sending RS232 commands. 6.1 RS232 Control Software Here take the software docklight as an example. Installation ... - Page 14 User Manual PT-SP-HD116DA Click “OK” to close this window. The next pop-up window can also be closed with "Continue". An empty project is enough to send and receive commands easily (The default setting is always “Start with a blank project / blank script“) Click “Continue”...
- Page 15 User Manual PT-SP-HD116DA Now you are in the main view, where commands are sent and feedback is received. The next step is to select the correct COM port of the PC. To do this, double-click on "COM1" in the corresponding setup window.
- Page 16 User Manual PT-SP-HD116DA Select the right COM port. In order to be able to send commands, open communication with the device by clicking on "Play". (1) Then the keyboard function must be activated, so that commands can be written in the "communication window".
- Page 17 User Manual PT-SP-HD116DA Enable the keyboard Command type in function. sending area. Click “Play” to open the communication. Monitoring area, indicates if the command sent works.
-
Page 18: Rs232 Communication Commands
User Manual PT-SP-HD116DA 6.2 RS232 Communication Commands Communication protocol: RS232 Communication Protocol Baud rate: 9600 Data bit: 8 Stop bit: 1 Parity bit: none Note: All commands need to be ended with “<CR><LF>”. In the commands, “[”and “]” are symbols for easy reading and do not need to be typed in ... -
Page 19: Setting Commands
User Manual PT-SP-HD116DA 6.2.2 Setting Commands Command Example and Command Description Feedback <User edid ready,Please send edid data in 10s. Upload user-defined EDID. The EDID DIP <SetUpdateEdid_True/False >SetUpdateEdid switch must be set as “1111”. <Time out to send edid Set the EDID to [Param]. - Page 20 User Manual PT-SP-HD116DA [Param1],[Param2] [Param1]=1~16. Output port. [Param2]= EN, Dis <VideoOutput 1 True Dis - Disable En - Enable Get video output status. >GetVideoOutput 1 >GetVideoOutput [Param] <VideoOutput 1 True [Param]=1~16.Output port. Enable/disable 4K to 1080p down-scaling >SetAutoDownScaler EN function.
-
Page 21: Firmware Upgrade
User Manual PT-SP-HD116DA 7. Firmware Upgrade Please follow the below steps to upgrade firmware by the Micro-USB port: 1) Prepare the latest upgrade file (.bin) and rename it as “FW_MERG.bin” on PC. 2) Power off the splitter and connect the Micro-USB (FW) port of splitter to the PC with USB cable. -
Page 22: After-Sales Service
User Manual PT-SP-HD116DA 8. After-Sales Service If problems occur while operating the product, please use the troubleshooting and maintenance information in this manual to deal with these problems. Any transport costs are borne by the user during the warranty period. - Page 23 User Manual PT-SP-HD116DA...
- Page 24 User Manual PT-SP-HD116DA Asking for Assistance Technical Support: Phone: +49 5971 800299 -0 Fax: +49 5971 800299 -99 Technical Support Hours: 8:30 AM to 5:00 PM Monday thru Thursday 8:30 AM to 4:00 PM Friday Write to: PureLink GmbH Von-Liebig-Straße 10 D - 48432 Rheine www.purelink.de...
Need help?
Do you have a question about the PT-SP-HD116DA and is the answer not in the manual?
Questions and answers