Table of Contents
Advertisement
Quick Links
SOLAIRE BY SUNPOWER SOLAR CARPORT STRUCTURES
Canopy Maintenance Guidelines 2016 (R1.5)
In order to maintain the appearance and proper function of Solaire By SunPower solar carport structures, Solaire recommends
following these general maintenance guidelines at least (2) times per year for inland locations, (3) times per year in coastal
regions. Please note that these guidelines illustrate maintenance guidelines for only the support structure and related
components. Maintenance requirements for the solar and/or electrical components of the system are provided by others.
1.
CONCRETE PIER INSPECTION
a.
Visually inspect exposed portions of the concrete pier for vehicle damage.
i. Pier vehicle damage exceeding 1.5" of depth and/or significant enough to expose reinforcing bar should
be patched and parged immediately to prevent corrosion of reinforcing steel.
2.
BOLT INSPECTION
a.
Baseplate Connection. Visually inspect exposed baseplate bolts to confirm that all nuts and bolts are present
and that no visible gaps appear between the bolt and the structural member.
b.
Structural Steel Connections. Visually inspect exposed bolts at the column/crossbeam to confirm that all nuts
are present and that no visible gaps appear between the bolt and the structural member.
3.
STRUCTURAL STEEL FINISH INSPECTION
a.
Visually inspect painted and/or galvanized finishes at exposed structural steel
i. Vehicle and or equipment damage that exposes bare metal must be touched up immediately in order to
limit corrosion. Any other areas of bare metal must be touched up immediately.
4.
DRAINAGE INSPECTION (Water Management projects only)
a.
During rain or snow melt conditions, visually inspect drain outlets to confirm water is flowing out consistent with
outflow at all other drain outlets.
i. If flow is diminished at any location, gutter and/or downspout may require cleaning.
ii. Downspout pipes may be cleaned from below with a plumber's snake or similar tool.
iii. If required, upper portions of the downspout and cleanout fittings are directly accessible by removing
the gutter cover located below the gutter at each column. The downspout on the uphill side of the
column typically receives most water flow and should be cleaned first.
iv. If required, clean the gutter and drain assembly directly from above. Follow PV panel manufacturer
guidelines when walking on or around the PV panels.
v. During winter conditions, any accumulation of snow or ice at the drain outlet must be cleared in order to
maintain drain flow and prevent downspout pipe freezing.
5.
LIGHT GAUGE METAL PANEL INSPECTION (Water Management projects only)
a.
Visually inspect metal gutter, decking and fascia panels to confirm that panels align and seams are generally
tight.
b.
Visually inspect metal panel components for vehicle or equipment damage.
i. Vehicle and or equipment damage that exposes bare metal should be touched up in order to limit
corrosion. Any other areas of bare metal must be touched up immediately.
6.
LIGHT FIXTURE INSPECTION
a.
Visually inspect light fixture to confirm that fixture is operating and that fixture aiming is consistent with adjacent
fixtures.
b.
Relamp fixtures as required according to manufacturer recommendations.
7.
CLEANING
a.
Cleaning requirements will vary based on local conditions and individual owner maintenance programs. Solaire
generally recommends a cleaning interval of 18 - 24 months.
i. Consult PV panel manufacturer and installer prior to start of work for cleaning and maintenance
guidelines on and around PV panels and related equipment.
ii. Consult light fixture manufacturer prior to start of work for cleaning and maintenance guidelines for light
fixtures.
iii. Clean exposed areas of the canopy using water and mild soap.
iv. Use of pressure washers for cleaning is discouraged. Excess water pressure can damage canopy
finishes and components.
END OF MAINTENANCE GUIDELINES
Solaire By SunPower_Canopy Maintenance Guidelines 2016 R1.5 - 160209
02/09/16
Advertisement
Chapters
Table of Contents
Troubleshooting

Related Manuals for Solectria Renewables PVI 23TL


Summary of Contents for Solectria Renewables PVI 23TL
- Page 1 SOLAIRE BY SUNPOWER SOLAR CARPORT STRUCTURES Canopy Maintenance Guidelines 2016 (R1.5) In order to maintain the appearance and proper function of Solaire By SunPower solar carport structures, Solaire recommends following these general maintenance guidelines at least (2) times per year for inland locations, (3) times per year in coastal regions.
- Page 2 PVI 23TL PVI 28TL INSTALLATION AND OPERATION MANUAL Revision E [Generation II (SN Prefixes 1223 and 1224)] ©2014, Solectria Renewables, LLC ...
- Page 3 PVI 23TL & PVI 28TL Installation and Operation Manual PVI Series Inverters IMPORTANT REGISTRATION AND WARRANTY INFORMATION For warranty to become active, this inverter must be registered. To activate warranty and register inverter, please visit the link below. www.solectria.com/registration DOCR‐070365‐E Page 2 of 57 ...
- Page 4 PVI 23TL & PVI 28TL Installation and Operation Manual PVI Series Inverters IMPORTANT SAFETY INSTRUCTIONS In this manual, “inverter” or “inverters” refers to the inverter models: PVI 23TL and PVI 28TL, unless one of the specific models is noted. This manual contains important instructions that shall be followed during installation and maintenance of the inverter. To reduce the risk of electrical shock, and to ensure the safe installation and operation of the inverter, the following safety symbols are used to indicate dangerous conditions and important safety instructions: WARNING: This symbol, along with the word “WARNING”, indicates a fact or feature important for the safety of the user and/or which can cause serious hardware damage if not applied appropriately. Use extreme caution when performing this task. NOTE: This indicates a feature that is important either for optimal and efficient use or system operation. EXAMPLE: This indicates an example. SAVE THESE INSTRUCTIONS DOCR‐070365‐E ...
- Page 5 PVI 23TL & PVI 28TL Installation and Operation Manual PVI Series Inverters IMPORTANT SAFETY INSTRUCTIONS All electrical installations shall be performed in accordance with all applicable local, American, or Canadian electrical codes. The inverter contains no user‐serviceable parts. Please contact Solectria Renewables or a Solectria Renewables authorized system installer for maintenance. See Appendix C for Solectria Renewables contact information and Appendix D for information regarding authorized system installers. ...
-
Page 6: Table Of Contents
PVI 23TL & PVI 28TL Installation and Operation Manual PVI Series Inverters Table of Contents 1.0 Introduction .......................... 7 1.1 PVI 23‐28TL Inverter Enclosure .................... 9 1.2 PVI 23‐28TL Inverter Main Parts and Accessories .............. 10 2.0 Site Preparation and Inverter Placement ................ 12 2.1 Criteria for Device Mounting .................... 12 3.0 Inverter Mounting ........................ 14 3.1 Checking for Shipping Damage .................... 14 3.2 Unpacking and Moving the Inverter into Place ................ 14 3.3 Inverter Positioning and Mounting ................... 15 3.4 Installing the Mounting Bracket .................... 18 4.0 Grounding Connections ...................... 21 4.1 Inverter Knockouts ........................ 21 4.2 DC/AC Grounding ........................ 22 5.0 ... - Page 7 PVI 23TL & PVI 28TL Installation and Operation Manual PVI Series Inverters 11.0 Product Maintenance ...................... 47 11.1 Check the Electrical Connection .................... 47 11.2 Clean the Air Vent Filter ...................... 47 12.0 Product Warranty and RMA Policy .................. 48 12.1 Warranty and Registration ...................... 48 13.0 Technical Data ........................ 49 13.1 Output AC Specifications ...................... 49 13.2 Input DC (PV) Specifications ...................... 50 13.3 Other Specifications ........................ 50 13.4 Temperature Derating Curve .................... 51 13.5 Power Derating Curve Out of MPPT Zone ................ 51 13.6 Altitude Derating Curve ...................... 52 13.7 Internal Circuit Diagram ...................... 52 14.0 ...
-
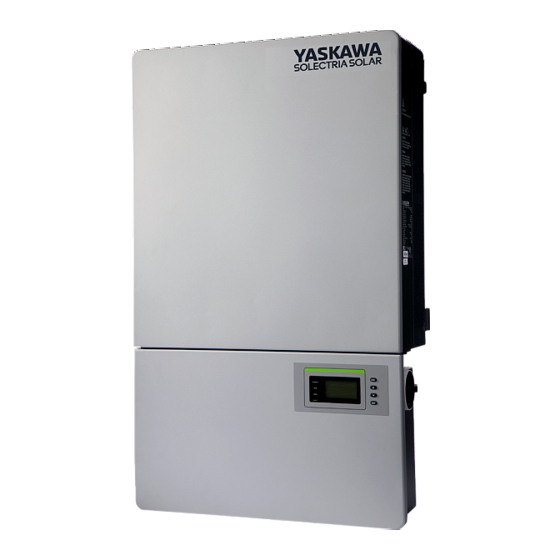
Page 8: Introduction
PVI 23TL & PVI 28TL Installation and Operation Manual PVI Series Inverters 1.0 Introduction The PVI 23TL and 28TL are commercial, dual MPPT, three‐phase utility‐interactive, transformerless PV inverters designed to be interconnected to the electric utility grid. The inverter is listed for use with ungrounded PV arrays only. By following this manual, the inverter can be installed and operated safely. This installation guide is used as a reference for commissioning and as a guideline on how to use the inverter most effectively. ... - Page 9 PVI 23TL & PVI 28TL Installation and Operation Manual PVI Series Inverters Feeding power back to the grid involves the conversion of DC voltage from the PV array to grid compatible AC voltage by inverting DC to AC. This unit feeds power into a standard, three‐phase commercial, industrial, institutional, or electrical utility facility’s electrical system which is connected to the electrical grid. If the PV system and inverter are providing the same amount of electrical power that the facility is using, then no power is taken from or fed into the utility grid. If the facility is using more power than the PV system is providing, then the utility grid provides the balance of power. If the facility is using less power than the PV system is generating, then the excess is fed into the utility grid. Be sure to follow local regulations regarding net metering and interconnection in your local area. Note that some utilities need to change their kWh meter for proper net metering measurement and billing. Electrical Photovoltaic PVI 23TL Grid Array ...
-
Page 10: Pvi 23-28Tl Inverter Enclosure
PVI 23TL & PVI 28TL Installation and Operation Manual PVI Series Inverters 1.1 PVI 23‐28TL Inverter Enclosure ① Inverter Main Housing Does not contain any serviceable parts; opening this section voids the inverter warranty. ② Wiring Box For customer’s AC and DC wire connections. ③ Moun ng Bracket ④ Cooling Fans ⑤ LED Indicators There are four LED indicators used to signal the operating status of the inverter. ⑥ LCD The LCD displays all measured values and parameters. ⑦ Control Keys There are 4 control keys, to switch between display menus and to configure the settings of the inverter. ⑧ DC Disconnect Switch ... -
Page 11: Pvi 23-28Tl Inverter Main Parts And Accessories
PVI 23TL & PVI 28TL Installation and Operation Manual PVI Series Inverters 1.2 PVI 23‐28TL Inverter Main Parts and Accessories Every PVI 23‐28TL inverter comes equiped with the following: Item Quantity Description Inverter Main Housing 1 The upper section of the inverter. It contains no serviceable parts and the opening of this section voids the inverter warranty. Wiring Box 1 The lower section of the inverter, intended for customer’s AC and DC wire connections. Mounting Bracket 1 Used to mount an inverter to the wall. Installation and Operation 1 Please read carefully before attempting to install the Manual inverter. M8 Expansion Tubes 8 Used for mounting bracket installation. M8*25 Assembly Bolt 8 Used for mounting bracket installation. M6*16 Screw 6 Four are used to connect the main housing of the inverter to the wiring box (2 are spares). M5*10 Screw 8 ... - Page 12 PVI 23TL & PVI 28TL Installation and Operation Manual PVI Series Inverters DC DISCONNECT Figure 1.3 – PVI 23‐28TL Inverter Dimensions DOCR‐070365‐E Page 11 of 57 ...
-
Page 13: Site Preparation And Inverter Placement
PVI 23TL & PVI 28TL Installation and Operation Manual PVI Series Inverters 2.0 Site Preparation and Inverter Placement The inverter is comprised of a NEMA 4 enclosure, containing electrical and electronic components as well as AC and DC integrated disconnects. NOTE: If the inverter is mounted outside, ensure that the wiring box remains closed during the installation process until access to the box is needed. This precaution will help to avoid damage due to rain, snow, or condensation. Damage ... - Page 14 PVI 23TL & PVI 28TL Installation and Operation Manual PVI Series Inverters The ambient temperature must be between ‐25°C and +45°C for full power and continuous operation. The inverter will automatically reduce power or may shut down to protect itself if ambient air temperature is outside the normal operating range. The National Electrical Code (NEC) requires the inverter to be connected to a dedicated circuit with no other outlets or devices connected to this circuit (see NEC Articles 690 and 705). The NEC also imposes limitations on the size of the inverter and the manner in which it is connected to the utility grid (see NEC Articles 690 and 705 for guidance within the US). The cooling air exhausts are at the right of the inverter. As the air intake is on the left side of the inverter section of the unit, there should be at least 12 inches of clear space at the left of the enclosure. Air should be able to flow all around the unit for proper ventilation. It is also recommended to have at least 24 inches of clearance at the bottom side for the Inverter LCD to be at eye level (see Figure 3.3 for details). ...
-
Page 15: Inverter Mounting
PVI 23TL & PVI 28TL Installation and Operation Manual PVI Series Inverters 3.0 Inverter Mounting WARNING: Any lifting or moving of the inverter requires at least two people. Lifting of the crate/pallet requires at least three people. 3.1 Checking for Shipping Damage The inverter is thoroughly checked and tested rigorously before it is shipped. Although the shipping container is adequately designed to protect the inverter during shipment, the product may be damaged by poor handling, trucking, or transfer station activity. Please inspect the inverter thoroughly after it is delivered. If any damage is present, immediately notify the shipping company to make a claim. If there is any question about potential shipping damage, contact Solectria Renewables but do not remove the unit from pallet/packaging. Photos ... -
Page 16: Inverter Positioning And Mounting
PVI 23TL & PVI 28TL Installation and Operation Manual PVI Series Inverters 3.3 Inverter Positioning and Mounting The Inverter can be mounted vertically or with a 15°‐90° horizontal angle, as shown in Figure 3.1a below. Figure 3.1a – Allowable Inverter Mounting WARNING: Do not install the inverter tilted forward, lying on its back, or upside down as shown in Figure 3.1b. Figure 3.1b – Unallowable Inverter Mounting ... - Page 17 PVI 23TL & PVI 28TL Installation and Operation Manual PVI Series Inverters 3.3.1 Wall Mounting The minimum distances that should be met for wall mounting are shown in Figure 3.2 below. For adequate cooling, there should be a minimum of ≥ 20 inches of space available between two adjacently mounted inverters. A minimum of 12 inches from the left side and 12 inches from the top are needed for adequate access and cooling. A distance of 24 inches from the bottom is recommended for the inverter’s LCD to be at eye level. If needed, this distance can be lowered to 10 inches. 12.0in (305mm) 12.0in 20.0in (305mm) (508mm) 24.0in (610mm)
- Page 18 PVI 23TL & PVI 28TL Installation and Operation Manual PVI Series Inverters 3.3.2 Wall Mounting/Mounting Bracket Clearance Figure 3.3 – Wall Mounting Clearance Requirements of Mounting Bracket 3.3.3 Pillar Mounting The minimum inverter mounting dimensions on a pillar are shown in Figure 3.4 below. 7.9in ¡ Ý 2 00mm 23.6in ¡ Ý 6 00mm 11.8in ¡ Ý 3 00mm 11.8in 11.8in ¡ Ý 3 00mm ¡ Ý 3 00mm Figure 3.4 – Inverter Pillar Mounting Dimensions ...
-
Page 19: Installing The Mounting Bracket
PVI 23TL & PVI 28TL Installation and Operation Manual PVI Series Inverters 3.4 Installing the Mounting Bracket NOTE: Always use all (8) mounting plate fasteners. 1. Mark the 8 holes on the load‐bearing surface using the available mounting bracket as a template (see Figure 3.5). 2. Drill 8 holes with a 13/32‐inch drill bit and install eight “M8 expansion tubes” (available in accessory box). ... - Page 20 PVI 23TL & PVI 28TL Installation and Operation Manual PVI Series Inverters 6. Using a #2 Philips screw driver, remove cover plate on the bottom of main housing. Figure 3.7 – Remove Cover Plate of Main Housing 7. Using a #2 Philips screw driver, remove cover of wiring box and keep the cover (it can be re‐secured later onto the enclosure). Figure 3.8 – Remove Cover of Wiring Box 8. Connect the wiring box to the main housing ...
- Page 21 PVI 23TL & PVI 28TL Installation and Operation Manual PVI Series Inverters 9. Connect the main housing and wiring box to the mounting bracket using a #2 Philips screwdriver and six M5*10 bolts (available in accessory box). Torque = 14in‐lbs Figure 3.10 – Fasten the Main Housing and Wiring Box onto the Bracket 10. The previously removed cover box can be reattached to the left side of the ...
-
Page 22: Grounding Connections
PVI 23TL & PVI 28TL Installation and Operation Manual PVI Series Inverters 4.0 Grounding Connections WARNING: All electrical installations must be performed in accordance with all applicable local electrical codes, and must be done by electrically qualified personnel. Only make AC and DC grounding connections directly to the terminals within the wiring box. 4.1 Inverter Knockouts The inverter comes equipped with identified knockouts at the bottom and the side of the electrical ... -
Page 23: Dc/Ac Grounding
PVI 23TL & PVI 28TL Installation and Operation Manual PVI Series Inverters WARNING: Solectria’s side AC knockout can’t be utilized 100%. It is blocked by a barrier that separates High Voltage AC cables from Communication wires. One loses about 25% of the area of the knockout due to this issue. Figure 4.2 – AC Side Knockout Partially Blocked 4.2 DC/AC Grounding PVI 23‐28TL inverters have a DC ground bar with four terminals that can be used to terminate the DC equipment ground, each terminal can accept a single copper conductor ranging from 6‐ 10AWG (Torque = 14in‐lbs). As shown in Figure 4.3 below. ... - Page 24 PVI 23TL & PVI 28TL Installation and Operation Manual PVI Series Inverters WARNING: Install grounding conductors per local codes and standards. Figure 4.4 – AC Ground Wiring Connection DOCR‐070365‐E ...
-
Page 25: Dc Connections From The Pv Array
PVI 23TL & PVI 28TL Installation and Operation Manual PVI Series Inverters 5.0 DC Connections from the PV Array WARNING: All wiring connections at the inverter must be performed with the building AC source circuit panel/breaker off and the PV module strings disconnected. AC and DC disconnect switches at the inverter must also remain off during termination. WARNING: All electrical wiring must be done by electrically qualified personnel in accordance to local and national electrical code. WARNING: Remove all fuses. Before connecting the DC conductors of the PV array to the inverter, verify and mark the polarity of the conductors. Verify the correct polarity and voltage before installing fuses. ... - Page 26 PVI 23TL & PVI 28TL Installation and Operation Manual PVI Series Inverters Figure 5.1 – Standard String Configurations NOTE: Verify that any wire size choices meet local codes. NOTE: Always connect an equal number of wires to PV1 and PV2 connectors for dual MPPT zone operation. If an odd number of connections are required, we recommend setting the inverter to single (combined) MPPT zone. See Section 5.2 for a detailed explanation on the difference between operating in combined or independent MPPT modes. The wiring box design has been updated (see “Gen II” below) with fuse holders added for ease of ...
-
Page 27: Dual Maximum Power Point Tracking
PVI 23TL & PVI 28TL Installation and Operation Manual PVI Series Inverters Conductors Max. DC Recommend Fuse DC Inputs Configuration Torque Wire Size PV Fuse Type (ALL) Standard use of Integrated 12A/1000V for 8 Inputs 4AWG 30in‐lbs PV Fuse String Combiner Box PVI 23‐28TL Standard use of Integrated 15A/1000V for 7 Inputs* 4AWG 30in‐lbs PV Fuse String Combiner Box PVI 23‐28TL 15A/1000V Standard use of Integrated for PVI 23TL 6 Inputs 4AWG 30in‐lbs PV Fuse String Combiner Box 20A/1000V ... - Page 28 PVI 23TL & PVI 28TL Installation and Operation Manual PVI Series Inverters The second option is two MPP Trackers that operate separately, which can be very helpful for sites with shading. However, this also means that one must consider these two zones as two separate inverters and power must be balanced as much as possible between the two MPPT zones. ...
- Page 29 PVI 23TL & PVI 28TL Installation and Operation Manual PVI Series Inverters 5.2.1 Setting the Inverter to Operate with Two Independent MPPTs The two MPPT zones can be separated using the following steps: 1. Disconnect all AC and DC sources to the inverter. 2. Remove the Lexan cover of the wiring box. 3. Use a #2 Philips head screwdriver and remove the busbar that connects INV 1 + & INV 2+ at the top (see Figure 5.4 below). Figure 5.5 – Busbar Connection Used for Single (Combined) MPPT Option Removed 4. Set the S401 switch to Independent (IND) mode. Figure 5.6 – Switch Configuration for Two Individual (Dual) MPPT Zones NOTE: The S401 switch is located under the “Enter” control key inside of the wiring box. Dual tracking MPPT might seem overwhelming at first, so contact Solectria Renewables at support@solectria.com if you have further questions. ...
-
Page 30: Fuse Bypass Opt-Fusebypass-Pvi-23-28
PVI 23TL & PVI 28TL Installation and Operation Manual PVI Series Inverters 5.3 Fuse Bypass OPT‐FUSEBYPASS‐PVI‐23‐28 Fuse bypass is an option for customers that are interested in combining strings and fusing them outside the inverter. One can do so by ordering the fuse bypass accessory kit from Solectria Renewables. This allows for one to bypass the fuse holders. WARNING: DC fuses inside the wiring box must be removed before any of the configurations in Table 5.2 are attempted. ... -
Page 31: Ac Connections At The Inverter
PVI 23TL & PVI 28TL Installation and Operation Manual PVI Series Inverters 6.0 AC Connections at the Inverter Both the PVI 23TL and PVI 28TL 3‐phase AC wiring is recommended to be installed with five conductors, one per phase along with a neutral and an AC equipment ground as per local requirements. ... -
Page 32: Ac Interconnections To Grid
PVI 23TL & PVI 28TL Installation and Operation Manual PVI Series Inverters 6.1 AC Interconnections to Grid Description Configuration Inverter Compatibility 4 Wire WYE (3 phase + Compatible with 23TL Neutral +GND) Compatible with 28TL Other All other configurations not mentioned in this Not compatible with 23TL Configurations document, such as Corner Grounded Delta Not compatible with 28TL Table 6.2 – Allowable AC Interconnections to Grid WARNING: Do not use power tools to reinstall the wiring box cover. ... -
Page 33: Communication Connections
PVI 23TL & PVI 28TL Installation and Operation Manual PVI Series Inverters 7.0 Communication Connections PVI 23‐28TL inverters support industry standard RS‐485 Modbus communication. Below is information on the available communication interfaces. S401 S402 Communication board P203 P204 P207 P208 P205 Figure 7.1 – Communication Section of the Inverter ... - Page 34 PVI 23TL & PVI 28TL Installation and Operation Manual PVI Series Inverters Item Port Item Port Image Configuration Description # Name Name Remote alarm option. Contact us at 1 P205 Dry Contact inverters@solectria.com for possible configuration. Port used for firmware upgrade. 2 P207 USB Port Not available for customer use. There are two RS‐485 signal ports on the inverter. Color Function 1 White Orange 485+ 2 Orange N.C. P203 RS‐485 3 ...
-
Page 35: Connecting Tl Inverters With Third Party Data Acquisition Systems
PVI 23TL & PVI 28TL Installation and Operation Manual PVI Series Inverters 120 Ω resistor that can be added for 120Ω impedance matching on the Termination Modbus (RS‐485). Switch for 6 S402 This switch should only be turned on RS‐485 for the last inverter in the daisy Communication chain. Used for changing between Dual MPPT Zone 7 S401 and Single MPPT configuration. Configuration Covered in detail in Chapter 5. Table 7.1 – Available Communication Options in PVI 23‐28TL Inverter 7.1 Connecting TL Inverters with Third Party Data Acquisition Systems For multiple inverters at one location it is possible to use one Data Acquisition System for up to 32 inverters. Capability of connecting 32 inverters is available after inverters with S/N 12241447010 and 12231447001. For any prior S/N you are able to use up to 16 inverters. Connect the inverter’s RS‐485 together can be done using standard RJ‐45 Ethernet patch cords and plugging these into RJ‐45 jacks at each inverter on the right side of the wiring board. Alternatively one can utilize the 5 pin connector (P208) and a shielded twisted pair cable. ... -
Page 36: Connecting Tl Inverters Using Solrenview Monitoring Option
PVI 23TL & PVI 28TL Installation and Operation Manual PVI Series Inverters 7.2 Connecting TL Inverters using SolrenView Monitoring Option Solectria offers SolrenView monitoring option for the PVI 23‐28 TL inverters. This option includes the SolrenView data logger which can be integrated with the inverter’s wiring box. The SolrenView logger is used to connect the TL inverters to the Solectria SolrenView web based monitoring site. The SolrenView gateway can be factory installed, distributor installed, or field installed and is installed out of view inside of the inverter. ... -
Page 37: Commissioning The Inverter Pv System
PVI 23TL & PVI 28TL Installation and Operation Manual PVI Series Inverters 8.0 Commissioning the Inverter PV System Before commissioning, ensure that the inverter is mounted, all connections are made, and the inverter is ready to power up. NOTE: Make sure all tools, parts, etc., are removed from the vicinity of the inverter before turning it on. WARNING: Make a final check of all AC and DC wiring to the inverter and in the system before turning on. WARNING: Connecting the inverter to the electric utility grid must only be completed ... -
Page 38: Lcd And Led Indicators
PVI 23TL & PVI 28TL Installation and Operation Manual PVI Series Inverters 9.0 LCD and LED Indicators The inverter operates automatically without the need for user interaction. The LCD and LED indicators on the front of the inverter provide valuable operating information. 9.1 LCD POWER GRID FAULT Figure 9.1 – LCD The four touch keys below are available to help the customer scroll through the information. Key Description Function Escape key ... - Page 39 PVI 23TL & PVI 28TL Installation and Operation Manual PVI Series Inverters The LEDs on the left indicate the operational status of the inverter. LED Light Status Indication Troubleshooting DC voltage available at the Light on No need, Standard Operation inverter Power 1. Check DC input polarity is correct. Low DC or possible power Light off 2. Verify DC voltage above 180VDC. supply problem 3. Verify DC disconnect switch is on. Light on Inverter is producing power No need, Standard Operation Verify Inverters ambient temperature isn’t above 45°C. Derating Flash NOTE: If the input power is above the (light on 0.5s, light off 1.5s) rated output power the inverter will RUN derate. 1. Verify that there is no Snow on the Inverter is not producing array. Light off power 2. Check if Error light is on or flashing; if so skip to Section 10. ...
-
Page 40: Screen Descriptions
PVI 23TL & PVI 28TL Installation and Operation Manual PVI Series Inverters 9.2 Screen Descriptions 9.2.1 Main Screen (Default) Press ESC to move from the Main (Default) screen into the Start Menu. 9.2.2 Start Menu 1. Operation Info 2. Alarm 3. History 4. Settings 5. Power Dispatch 9.2.3 Operation Info Menu The Info Menu displays the data stored in the inverter memory. Use the buttons to scroll UP and DOWN through the list. Pressing will take the screen back to the Start Menu. AC Energy (EDay) Cumulative AC Energy (kWh) ... - Page 41 PVI 23TL & PVI 28TL Installation and Operation Manual PVI Series Inverters 9.2.4 Alarm Menu The Alarm Menu displays inverter alarms and faults, some of which may be modified with the keypad. Use the and buttons to scroll up and down through the list. Pressing will take the screen back to the Start Menu. Any fault message will be indicated in the Alarm Menu. NoError 2 Alarm EepromErr Protect0010 … Figure 9.2 – Present Fault Information 9.2.5 History Menu The ...
- Page 42 PVI 23TL & PVI 28TL Installation and Operation Manual PVI Series Inverters 9.2.6 Settings Menu The inverter parameters can be adjusted by using commands in the Settings Menu as shown in Figure 9.7 below. Options such as Power ON/OFF, Language, Sounds, Date, Communications, and MPPT can simply be changed/set from the Settings Menu. NOTE: When prompted for a password, enter the following: UP, DOWN, UP, DOWN, then ENT. → ON ON State → 中文 → Francaise → Italiano 1 ON/OFF English Deutsch 2 Language 4 Setting 3 Buzzer →4 SysTime...
- Page 43 PVI 23TL & PVI 28TL Installation and Operation Manual PVI Series Inverters 9.2.7 Power Dispatch “ActivePower” and “PowerFactor” parameters can be set up through the LCD as well as remotely. NOTE: These parameters are only adjustable with permission from the local utility. Figure 9.5 – Active Power and Power Factor Settings NOTE: When prompted for a password, enter the following: UP, DOWN, UP, DOWN, then ENT. NOTE: It is often common at sites with High AC voltage above 1.05p.u that the Utility would like to modify the power factor to reduce the voltage at the point of ...
-
Page 44: Troubleshooting And Inverter Messages
PVI 23TL & PVI 28TL Installation and Operation Manual PVI Series Inverters 10.0 Troubleshooting and Inverter Messages Although the inverter is designed for many years of power production, there may be instances where error messages are displayed on the LCD. This table can be used to help identify the error and resolve it. Type Name Definition Possible Causes Recommended Solutions 1. Verify temperature 1. Internal reading off of the display. temperature sensor 2. Switch off the inverter’s is making poor Abnormal internal disconnects. contact. Alarm 1. TempSensorErr temperature 3. Switch the Inverter reading back on. 2. Temperature 4. If error does not clear, sensor is damaged. contact Solectria Customer Service. 1. Observe for 5min and see whether the alarm is cleared automatically. 1. Poor connection of ... - Page 45 PVI 23TL & PVI 28TL Installation and Operation Manual PVI Series Inverters 4. Switch the Inverter 2. Fan service life has back on. ended. 5. If error does not clear, contact Solectria 3. Fan socket Customer Service. connecter is making a poor connection. 1. Observe for 5min and see whether the alarm is 1. A problem with Incorrect cleared automatically. Alarm 5. EepromErr the inverter’s memory reading 2. If error does not clear, internal memory. contact Solectria Customer Service. 1. Possible 1. Observe for 5min and communication error see whether the alarm is Internal Arc 1. Arc Board between Arc board cleared automatically. Protection board self‐check Error and Inverter. 2. If error does not clear, ...
- Page 46 PVI 23TL & PVI 28TL Installation and Operation Manual PVI Series Inverters 1. Observe for 10min and 1. Grid frequency is see whether the alarm is out of range. cleared automatically. Grid voltage 2. Verify grid frequency is Protection 4. GridF.OutLim frequency is within range. abnormal 3. Verify proper AC wiring. 4. If error does not clear, 2. Loose AC Contact Solectria connections. Customer Service. 1. Observe for 30min and see whether the alarm is cleared automatically. 2. Verify DC open circuit input voltage is within DC input specified range. 5‐ PV1 (2) voltage exceeds Protection 1. DC over‐voltage. 3. Switch off the inverter’s VoltOver the specified internal disconnects. value Switch the Inverter back on. ...
- Page 47 PVI 23TL & PVI 28TL Installation and Operation Manual PVI Series Inverters 1. One of the 1. Observe for 10min and inverter’s internal see whether the alarm is Internal 9. IntProtect protection features cleared automatically. Protection problem within 0010‐0260 was triggered 2. If error does not clear, the inverter causing the inverter contact Solectria to shut down. Customer Service. 1. Have qualified Electrical 1. An internal Arc Inverter shuts Personnel inspect wiring fault occurred on the down due to a section of Inverter. DC side. Protection 10. Arc Protect possible Arc 2. If no issues are found, fault concern contact Solectria 2. Fault with the Arc Customer Service. board. 1. The inverter will restart ...
-
Page 48: Product Maintenance
PVI 23TL & PVI 28TL Installation and Operation Manual PVI Series Inverters 11.0 Product Maintenance Regular maintenance helps extend product lifetime and performance. 11.1 Check the Electrical Connection Check all the cable connections once every 6 months, by performing the following steps: 1. Turn off inverter DC disconnect. 2. Turn off inverter AC disconnect. 3. Lock out all DC and AC sources to the inverter. 4. Verify absence of DC and AC voltages at the wiring box. 5. Check for loose or untightened cables; follow torque and safety instructions in the manual. 6. Check for cable damage, especially whether the cable surface is scratched or smooth. Repair or replace the cables if necessary. 11.2 Clean the Air Vent Filter On average, it is recommended to check the air vent of the fans once every 6 months. Do so by performing the following steps: 1. Turn off inverter DC disconnect. 2. Turn off inverter AC disconnect. 3. Lock out all DC and AC sources to the inverter. 4. Verify absence of DC and AC voltages at the wiring box. 5. Use Philips Screw driver to remove Vent covers. 6. -
Page 49: Product Warranty And Rma Policy
PVI 23TL & PVI 28TL Installation and Operation Manual PVI Series Inverters 12.0 Product Warranty and RMA Policy 12.1 Warranty and Registration The warranty and RMA statements for this product are available online at http://www.solectria.com//site/assets/files/1091/inverter_warranty‐1.pdf. If you do not have access to the internet or would like to request a copy to be mailed to you, please contact the Solectria Renewables Customer Service Department at 978‐683‐9700. ... -
Page 50: Technical Data
PVI 23TL & PVI 28TL Installation and Operation Manual PVI Series Inverters 13.0 Technical Data 13.1 Output AC Specifications The inverters are designed to feed power into a standard 60Hz, three‐phase AC utility service provided within a facility with a rating of not less than the rating of the inverter(s) connected to it. The inverter is designed to work with the range of AC voltages for a three‐phase service defined by IEEE 1547‐2003 and ANSI C84.1. PVI 23TL PVI 28TL Unit Nominal Output Voltage 480 480 VAC Operating AC Voltage Range ... -
Page 51: Input Dc (Pv) Specifications
PVI 23TL & PVI 28TL Installation and Operation Manual PVI Series Inverters 13.2 Input DC (PV) Specifications PVI23TL PVI 28TL Units Absolute Maximum Input Voltage 1000 VDC 15.5 per MPPT 19 per MPPT Maximum PV Power kW (31) (38) 300‐900 Operating Input Voltage VDC 330VDC/300W Strike (Startup Voltage/Power) MPPT Input Voltage Range 480‐800 500‐800 VDC MPPT Trackers 2 with 4‐Fused Inputs per Zone 25 per MPPT 29 per MPPT Maximum Operating Input Current Amps (50) (58) 41 per MPPT ... -
Page 52: Temperature Derating Curve
PVI 23TL & PVI 28TL Installation and Operation Manual PVI Series Inverters 13.4 Temperature Derating Curve Figure 13.1 shows the standard power derating curve for a PVI 23‐28TL inverter. The inverter operates at full power up to 45°C and derates linearly until 60°C where it shuts down to protect itself. Figure 13.1 – Temperature Derating Curve 13.5 Power Derating Curve Out of MPPT Zone Figure 13.2 below shows the standard derating curve outside of the MPPT zone. Inverters derate linearly outside their rated MPPT range. Figure 13.2 – Power Derating Outside of MPPT Range DOCR‐070365‐E ... -
Page 53: Altitude Derating Curve
PVI 23TL & PVI 28TL Installation and Operation Manual PVI Series Inverters 13.6 Altitude Derating Curve Po/Pn Figure 13.3 – Derating at High Altitudes 13.7 Internal Circuit Diagram The basic power flow within the PVI 23‐28TL series of inverters is below. Note that the GFDI circuit is not depicted. PV FUSE DC Switch MPPT1 AC Output Three level PV1+ PV1+ inverter PV1+ PV1+... -
Page 54: Accessory Options
PVI 23TL & PVI 28TL Installation and Operation Manual PVI Series Inverters 14.0 Accessory Options The PVI 23‐28TL comes with several options that allow the inverter to support a wide range of real life applications. 14.1 Fuse Bypass OPT‐FUSEBYPASS‐PVI‐23‐28, as discussed in Section 5.3, allows customers to combine the DC inputs outside the inverter and enter with only one or two combined inputs. Figure 14.1 – Fuse Bypass Two Inputs (Two Independent MPPTs) Figure 14.2 – Fuse Bypass Single Input (Combined MPPT) DOCR‐070365‐E Page 53 of 57 ... -
Page 55: Solrenview Monitoring
PVI 23TL & PVI 28TL Installation and Operation Manual PVI Series Inverters 14.2 SolrenView Monitoring OPT‐SRV‐LCD, as discussed in Section 7.2, allows customers to purchase the only monitoring system that is designed to support PVI 23‐28TL to the fullest. SolrenView can be placed inside the inverter so no external enclosure is needed. RS‐485 and DC wires can be fed into SolrenView directly off of the inverter. Figure 14.3 – SolrenView Monitoring Installed Inside Wiring Box ... -
Page 56: Ac & Dc Disconnect Covers
PVI 23TL & PVI 28TL Installation and Operation Manual PVI Series Inverters Figure 14.4 below shows an inverter installed rack mounted with the Solectria Shade cover. Figure 14.4 – Inverter With Shade Cover Installed 14.4 AC & DC Disconnect Covers OPT‐DISCOCOVER‐PVI‐23‐28 is a tamper resistant cover for the AC and DC disconnects. It is for customers that have inverters in public places so the disconnects cannot be turned while the inverter is running. Figure 14.5 – Temper Proof Cover DOCR‐070365‐E Page 55 of 57 ... -
Page 57: Appendices
PVI 23TL & PVI 28TL Installation and Operation Manual PVI Series Inverters 15.0 Appendices Appendix A – PVI 23‐28TL Datasheet http://www.solectria.com/datasheets/PVI_14‐28TL_Datasheet.pdf Appendix B – String Sizing Tool http://solectria.com/support/string‐sizing‐tool/ Appendix C – Contact Information Solectria Renewables, LLC 360 Merrimack Street Lawrence, Massachusetts 01843 USA Tel: 978.683.9700 Fax: 978.683.9702 Sales Support: inverters@solectria.com Customer Support: service@solrectria.com Website: www.solectria.com Appendix D – Authorized Distributors Please visit: http://www.solectria.com/products/how‐to‐buy/ ... -
Page 58: Appendix E - Ul 1741 / Ul 1699B/ Ieee 1547 / Csa 22.2#107.1 Authorization To Mark
PVI 23TL & PVI 28TL Installation and Operation Manual PVI Series Inverters Appendix E – UL 1741 / UL 1699B/ IEEE 1547 / CSA 22.2#107.1 Authorization to Mark DOCR‐070365‐E Page 57 of 57 ... - Page 59 Installation Manual SUNNY TRIPOWER 12000TL-US / 15000TL-US / 20000TL-US / 24000TL-US STP12-24TL-US-IA-en-16 | Version 1.6 ENGLISH...
- Page 60 Legal Provisions SMA Solar Technology AG Legal Provisions Copyright © 2015 SMA America, LLC. All rights reserved. No part of this document may be reproduced, stored in a retrieval system, or transmitted, in any form or by any means, be it electronic, mechanical, photographic, magnetic or otherwise, without the prior written permission of SMA America, LLC.
- Page 61 SMA Solar Technology AG Important Safety Instructions Important Safety Instructions SAVE THESE INSTRUCTIONS This manual contains important instructions for the following products: • STP 12000TL-US-10 (Sunny Tripower 12000TL-US) • STP 15000TL-US-10 (Sunny Tripower 15000TL-US) • STP 20000TL-US-10 (Sunny Tripower 20000TL-US) •...
- Page 62 Important Safety Instructions SMA Solar Technology AG Observe the operating instructions Read the documentation of the product before working on it. Follow all safety precautions and instructions as described in the documentation. STP12-24TL-US-IA-en-16 Installation Manual...
- Page 63 SMA Solar Technology AG General Warnings General Warnings All electrical installations must be made in accordance with the local and National Electrical ® ® Code ANSI/NFPA 70 or the Canadian Electrical Code CSA C22.1. This document does not and is not intended to replace any local, state, provincial, federal or national laws, regulations or codes applicable to the installation and use of the product, including without limitation applicable electrical safety codes.
- Page 64 Table of Contents SMA Solar Technology AG Table of Contents Information on this Document ..........Validity ....................9 Target Group..................9 Additional Information ............... 9 Symbols ....................10 Nomenclature..................10 Safety..................11 Intended Use ..................11 Safety Information................12 Scope of Delivery..............14 Product Description..............
- Page 65 SMA Solar Technology AG Table of Contents Configuration ................38 Integrating the Inverter into the Network.......... 38 Changing Operating Parameters............38 Setting the Active Power Limitation in case of PV System Control Failure ....................39 Deactivating the Arc-Fault Circuit Interrupter (AFCI)......39 Setting SMA OptiTrac Global Peak ..........
- Page 66 Table of Contents SMA Solar Technology AG 15 Spare Parts and Accessories............ 75 16 Compliance Information............76 17 Contact..................77 STP12-24TL-US-IA-en-16 Installation Manual...
-
Page 67: Information On This Document
SMA Solar Technology AG 1 Information on this Document Information on this Document Validity This document is valid for the following device types: • STP 12000TL-US-10 (Sunny Tripower 12000TL-US) • STP 15000TL-US-10 (Sunny Tripower 15000TL-US) • STP 20000TL-US-10 (Sunny Tripower 20000TL-US) •... -
Page 68: Symbols
1 Information on this Document SMA Solar Technology AG Document title Document type "Shade Management" Technical Information Efficient operation of partly shaded PV systems with OptiTrac Glob- al Peak "Module Technology" Technical Information Use of Thin-Film and Back-Contact Modules Symbols Symbol Explanation Information that is important for a specific topic or goal, but is not safety-relevant Indicates a requirement for meeting a specific goal... -
Page 69: Safety
SMA Solar Technology AG 2 Safety Safety Intended Use The Sunny Tripower is a transformerless PV inverter with two MPP trackers which converts the direct current of the PV array to grid-compliant three-phase current and feeds it into the utility grid. No galvanic isolation •... -
Page 70: Safety Information
2 Safety SMA Solar Technology AG Alterations to the product, e.g. changes or modifications, are only permitted with the express written permission of SMA. Unauthorized alterations will void guarantee and warranty claims and usually void the operating license. SMA shall not be held liable for any damage caused by such changes. Any use of the product other than that described in the Intended Use section does not qualify as appropriate. - Page 71 SMA Solar Technology AG 2 Safety Risk of burns from hot surfaces The surface of the inverter can get very hot. Touching the surface can result in burns. • Mount the inverter in such a way that it cannot be touched inadvertently. •...
-
Page 72: Scope Of Delivery
3 Scope of Delivery SMA Solar Technology AG Scope of Delivery Check the scope of delivery for completeness and any externally visible damage. Contact your distributor if the scope of delivery is incomplete or damaged. Figure 1: Components included in the scope of delivery Position Quantity Designation... -
Page 73: Product Description
SMA Solar Technology AG 4 Product Description Product Description Sunny Tripower The Sunny Tripower is a transformerless PV inverter with two MPP trackers which converts the direct current of the PV array to grid-compliant three-phase current and feeds it into the utility grid. No galvanic isolation •... - Page 74 4 Product Description SMA Solar Technology AG Position Designation Additional label with details for registration in Sunny Portal: • Internet address of the PV System Setup Assistant • Identification key (PIC) • Registration ID (RID) Ventilation grid Recessed grips LEDs The LEDs indicate the operating state of the inverter: •...
-
Page 75: Interfaces And Functions
SMA Solar Technology AG 4 Product Description Symbol Explanation Danger to life due to electric shock The product operates at high voltages. All work on the product must be carried out by qualified persons only. Risk of burns due to hot surfaces The product can get hot during operation. - Page 76 4 Product Description SMA Solar Technology AG RS485 Interface The inverter can communicate via cables with special SMA communication products via the RS485 interface (information on supported SMA products at www.SMA-Solar.com). The RS485 interface can be retrofitted and can be used in place of the SMA Speedwire/Webconnect interface in the inverter.
-
Page 77: Mounting
SMA Solar Technology AG 5 Mounting Mounting Requirements for Mounting Requirements for the mounting location: Danger to life due to fire or explosion Despite careful construction, electrical devices can cause fires. • Do not mount the inverter in areas containing highly flammable materials or gases. •... - Page 78 5 Mounting SMA Solar Technology AG Dimensions for mounting: Figure 3: Position of the anchoring points Recommended clearances: To guarantee optimal operation and adequate heat dissipation for the inverter, the following requirements for clearances should be observed. This will prevent the inverter power output from being reduced due to excessive temperatures.
- Page 79 SMA Solar Technology AG 5 Mounting ® Prescribed clearances in accordance with the National Electrical Code ® Under certain conditions, the National Electrical Code specifies greater clearances. ® • Ensure that the prescribed clearances in accordance with the National Electrical Code ®...
-
Page 80: Mounting The Inverter
5 Mounting SMA Solar Technology AG Figure 4: Permitted and prohibited mounting positions: Mounting the Inverter Additionally required mounting material (not included in the scope of delivery): ☐ At least two screws suitable for the support surface (diameter: 10 mm at maximum) ☐... - Page 81 SMA Solar Technology AG 5 Mounting Risk of injury when lifting the inverter, or if it is dropped The inverter weighs 55 kg (121 lb). There is risk of injury if the inverter is lifted incorrectly or dropped while being transported or when attaching it to or removing it from the wall mounting bracket.
- Page 82 5 Mounting SMA Solar Technology AG 5. Insert screw anchors into the drill holes if the support surface requires them. 6. Secure the wall mounting bracket horizontally using screws and washers. 7. Hook the inverter into the wall mounting bracket. 8.
-
Page 83: Electrical Connection
SMA Solar Technology AG 6 Electrical Connection Electrical Connection Safety during Electrical Connection Danger to life due to high voltages of the PV array When exposed to sunlight, the PV array generates dangerous DC voltage which is present in the DC conductors and the live components of the inverter. - Page 84 6 Electrical Connection SMA Solar Technology AG Damage to the inverter due to moisture ingress during electrical installation • Never open the inverter when it is raining or snowing, or the humidity is over 95%. • For attaching the conduits to the enclosure, only use UL-listed rain-tight conduit fittings or UL- listed conduit fittings for wet locations complying with UL514B.
-
Page 85: Overview Of The Connection Area
SMA Solar Technology AG 6 Electrical Connection Overview of the Connection Area 6.2.1 View from Below Figure 5: Enclosure openings at the bottom of the inverter Position Designation Enclosure opening with filler plug for communication connection (diameter: 27.8 mm to 28.0 mm (1.09 in to 1.1 in)) Enclosure opening with filler plug for Ethernet connection (diameter: 27.8 mm to 28.0 mm (1.09 in to 1.1 in)) Enclosure opening for AC connection... -
Page 86: Interior View
6 Electrical Connection SMA Solar Technology AG 6.2.2 Interior View Figure 6: Connection areas in the interior of the inverter Position Designation Connecting terminal plate for AC connection Switch for changing the language to English for service purposes Screw to release and attach the communication board Slot for the SD memory card, for service purposes only Terminal for equipment grounding and grounding electrode conductor Connecting terminal plate for DC connection... -
Page 87: Connecting The Inverter To The Utility Grid
SMA Solar Technology AG 6 Electrical Connection Load-break switch and cable protection: Damage to the inverter through the use of fuses as disconnecting units in the output circuit of the inverter Fuses must not be used as disconnecting units, even if they are installed in a fuse holder listed as being a load-break switch. - Page 88 6 Electrical Connection SMA Solar Technology AG 2. Release all screws of the lower enclosure lid using an Allen key (AF 3). 3. Lift and remove the lower enclosure lid from below. 4. Remove the adhesive tape from the enclosure opening for the AC connection. Damage to the inverter due to moisture and dust intrusion Electronic components in the inverter can be destroyed or damaged as a result of dust or moisture intrusion.
-
Page 89: Connecting Additional Grounding
SMA Solar Technology AG 6 Electrical Connection 13. Connect the conductor N to the terminal N. 14. Connect the conductors L1, L2 and L3 to the terminals L1, L2 and L3 according to the label. Ensure that the assignment is correct. Danger of crushing when locking levers snap shut The locking levers close by snapping down fast and hard. -
Page 90: Dc Connection
6 Electrical Connection SMA Solar Technology AG Procedure: Danger to life due to electric shock • Disconnect the inverter from all voltage sources (see Section 9, page 41). 2. If the protective cover is mounted, loosen the screws of the DC protective cover using an Allen key (AF 3) and remove the DC protective cover. -
Page 91: Connecting The Pv Array
SMA Solar Technology AG 6 Electrical Connection Additionally required material (not included in the scope of delivery): ☐ Depending on the number of strings, one or two conduits made of metal: 25.4 mm (1 in) ☐ Depending on the number of conduits, one or two UL-listed rain-tight conduit fittings for wet locations complying with UL514B: 25.4 mm (1 in) ☐... - Page 92 6 Electrical Connection SMA Solar Technology AG 3. Release the screws of the DC protective cover using an Allen key (AF 3) and remove the DC protective cover. Damage to the inverter due to moisture and dust intrusion Electronic components in the inverter can be destroyed or damaged as a result of dust or moisture intrusion.
-
Page 93: Connecting The Inverter To The Network
SMA Solar Technology AG 6 Electrical Connection 15. If no additional grounding is to be connected, reattach the DC protective cover. Tighten all four screws with an Allen key (AF 3) in the order 1 to 4 (torque: 3.5 Nm (31 in-lb)). Connecting the Inverter to the Network Cable requirements: The cable length and quality affect the quality of the signal. - Page 94 6 Electrical Connection SMA Solar Technology AG 3. Connect the other end of the network cable directly to the computer or router or connect it to another node. You can only connect the inverter to other nodes via star topology. 4.
-
Page 95: Commissioning The Inverter
SMA Solar Technology AG 7 Commissioning the Inverter Commissioning the Inverter Requirements: ☐ The circuit breaker must be correctly rated. ☐ A means of disconnecting the inverter from the PV array must be present. ☐ The inverter must be correctly mounted and closed. ☐... -
Page 96: Configuration
8 Configuration SMA Solar Technology AG Configuration Integrating the Inverter into the Network If the router supports DHCP and DHCP is enabled, the inverter will automatically be integrated into the network. You will not need to carry out network configuration. If the router does not support DHCP, automatic network configuration will not be possible and you will need to use the SMA Connection Assist to integrate the inverter into the network. -
Page 97: Setting The Active Power Limitation In Case Of Pv System Control Failure
SMA Solar Technology AG 8 Configuration Setting the Active Power Limitation in case of PV System Control Failure You will need to set the active power limitation in case of PV system control failure if the active power limitation of the inverter is controlled by a communication product. By setting the active power limitation in case of PV system control failure, you ensure that the inverter will still feed the maximum permissible PV power into the utility grid, even if communication between inverter and communication product has failed. - Page 98 8 Configuration SMA Solar Technology AG Name Value/range Default value 138.5 V to 277.0 V 243.8 V Voltage monitoring upper minimum threshold (Un- dervoltage/Slow) Voltage monitoring of median minimum threshold 138.5 V to 277.0 V 138.5 V (Undervoltage/Fast) 0.1 s to 6,000 s 0.16 s Voltage monitoring median max. threshold trip.time (Overvoltage/Fast, maximum time) Voltage monitoring lower max.
-
Page 99: Disconnecting The Inverter From Voltage Sources
SMA Solar Technology AG 9 Disconnecting the Inverter from Voltage Sources Disconnecting the Inverter from Voltage Sources Prior to performing any work on the inverter, always disconnect it from all voltage sources as described in this section. Always adhere to the prescribed sequence. Damage to seals on the enclosure lids in subfreezing conditions If you open the upper and lower enclosure lids when temperatures are below freezing, the enclosure seals can be damaged. - Page 100 9 Disconnecting the Inverter from Voltage Sources SMA Solar Technology AG 5. Loosen the screws of the DC protective cover using an Allen key (AF 3) and remove the DC protective cover. 6. Use a suitable measuring device to ensure that no voltage is present at the DC terminals. 7.
-
Page 101: Troubleshooting
SMA Solar Technology AG 10 Troubleshooting 10 Troubleshooting 10.1 Cleaning the Inverter Damage to the inverter due to the use of cleaning agents • If the inverter is dirty, clean the enclosure, the enclosure lid, the type label and the LEDs using only clean water and a cloth. - Page 102 10 Troubleshooting SMA Solar Technology AG Event number Message, cause and corrective measures Grid fault The ten-minute average value of the grid voltage is no longer within the per- missible range. The grid voltage or grid impedance at the connection point is too high.
- Page 103 SMA Solar Technology AG 10 Troubleshooting Event number Message, cause and corrective measures Grid fault The inverter has detected an excessively high proportion of direct current in the grid current. Corrective measures: 1. Check the grid connection for direct current. 2.
- Page 104 10 Troubleshooting SMA Solar Technology AG Event number Message, cause and corrective measures 3301 Unstable operation > Generator output too low There is not enough power at the DC input of the inverter for stable operation. This may be caused by snow on the PV modules or insufficient irradiation. The inverter interrupts feed-in operation and can no longer connect to the utility grid.
- Page 105 SMA Solar Technology AG 10 Troubleshooting Event number Message, cause and corrective measures 3401 to 3402 DC overvoltage > Disconnect generator Overvoltage at the DC input. This can destroy the inverter. Corrective measures: 1. Immediately disconnect the inverter from all voltage sources (see Section 9, page 41).
- Page 106 10 Troubleshooting SMA Solar Technology AG Event number Message, cause and corrective measures 3901 to 3902 Waiting for DC start conditions > Start cond. not met The feed-in conditions for the utility grid are not yet fulfilled. Corrective measures: 1. Wait for higher irradiation. 2.
- Page 107 SMA Solar Technology AG 10 Troubleshooting Event number Message, cause and corrective measures 6701 to 6702 Communication disturbed The cause must be determined by the SMA Service Line. Corrective measures: • Contact the SMA Service Line. 6801 to 6802 Self-diagnosis > Input A defective The cause must be determined by the SMA Service Line.
- Page 108 10 Troubleshooting SMA Solar Technology AG Event number Message, cause and corrective measures 7102 Parameter file not found or defective The parameter file was not found or is defective. The update failed. The in- verter continues feeding power into the grid. Corrective measures: •...
- Page 109 SMA Solar Technology AG 10 Troubleshooting Event number Message, cause and corrective measures 7326 Webconnect update failed Update of Webconnect module failed. Corrective measures: • Retry update. • If the error recurs, contact the SMA Service Line. 7508 External fan fault > Replace fan One of the fans is blocked.
- Page 110 10 Troubleshooting SMA Solar Technology AG Event number Message, cause and corrective measures 8206 Electr. arc detected > Please confirm by tapping The inverter has detected an electric arc and was recommissioned after a dis- connection. By tapping, you are confirming that you have repaired any possi- ble damage to PV modules, cables or plugs in the PV system.
- Page 111 SMA Solar Technology AG 10 Troubleshooting Event number Message, cause and corrective measures 9003 Grid parameter locked The parameters are now locked. You cannot change the parameters. Corrective measures: • Unlock the parameters with the SMA Grid Guard code. 9005 Changing of grid parameters not possible > Ensure DC supply. PV power is too low for setting the country data set.
-
Page 112: Cleaning The Fans
10 Troubleshooting SMA Solar Technology AG Event number Message, cause and corrective measures 29001 Grid Guard code valid The entered SMA Grid Guard code is valid. Protected parameters have now been unlocked and you can adjust the parameters. The parameters will be au- tomatically locked again after ten feed-in hours. -
Page 113: Cleaning The Fan On The Left-Hand Side Of The Enclosure
SMA Solar Technology AG 10 Troubleshooting 6. Release and remove the fan plug. Damage to the fan due to compressed air • Clean the fan only with a soft brush, a paint brush, or a damp cloth. 8. After cleaning, insert the fan plug back into the pin connector until it snaps into place. - Page 114 10 Troubleshooting SMA Solar Technology AG • Remove the ventilation grid. Use a screwdriver to gently lever open the ventilation grid. • Clean the ventilation grid with a soft brush, a paint brush, or compressed air. Damage to the inverter due to foreign bodies •...
-
Page 115: Checking The Function Of The Fans
SMA Solar Technology AG 10 Troubleshooting • Reinsert the ventilation grid until it snaps into place. • Turn the rotary lock of the ventilation grid with a flat-blade screwdriver until the slot is in a horizontal position and the arrows point to the right. - Page 116 10 Troubleshooting SMA Solar Technology AG Danger to life due to electric shock In the event of a ground fault, high voltages can be present. • Touch the cables of the PV array on the insulation only. • Do not touch any parts of the substructure or frame of the PV array. •...
- Page 117 SMA Solar Technology AG 10 Troubleshooting Example: Location of the ground fault The example shows a ground fault between the second and third PV module. 3. If a definite ground fault cannot be measured and the message is still displayed, measure the insulation resistance.
-
Page 118: Resetting The Operation Inhibition After Detection Of An Arc Fault
10 Troubleshooting SMA Solar Technology AG 10. Reconnect to the inverter only those strings from which the ground fault has been eliminated. 11. Reconnect all other strings to the inverter. 12. Recommission the inverter (see Section 11, page 61). 13. If the inverter still displays an insulation error, contact the Service (see Section 17 "Contact", page 77). -
Page 119: Recommissioning The Inverter
SMA Solar Technology AG 11 Recommissioning the Inverter 11 Recommissioning the Inverter If you have disconnected the inverter from all voltage sources (e.g. for configuration purposes) and want to recommission it, proceed as follows. Requirements: ☐ The inverter must be correctly mounted. ☐... - Page 120 11 Recommissioning the Inverter SMA Solar Technology AG 6. Switch on all DC disconnectors between the inverter and the PV array. 7. Switch on the circuit breaker and all AC disconnectors. ☑ The green LED is glowing. Feed-in operation begins. ✖...
-
Page 121: Decommissioning The Inverter
SMA Solar Technology AG 12 Decommissioning the Inverter 12 Decommissioning the Inverter To decommission the inverter completely upon completion of its service life, proceed as described in this Section. If the inverter is defective and you have received a replacement device, observe the information on how to proceed when receiving a replacement device (see Section 13 "Procedure for Receiving a Replacement Device", page 65). - Page 122 12 Decommissioning the Inverter SMA Solar Technology AG 7. If other cables (e.g. data cables or network cables) are connected, remove them from the inverter. 8. Remove all conduits with cables from the inverter. 9. Close all enclosure openings. Risk of burns due to hot enclosure parts •...
-
Page 123: Procedure For Receiving A Replacement Device
SMA Solar Technology AG 13 Procedure for Receiving a Replacement Device 13 Procedure for Receiving a Replacement Device Under fault conditions, the inverter may need to be replaced. If this is the case, you will receive a replacement device from SMA. If you received a replacement device, replace the defective inverter with the replacement device as described in this section. - Page 124 13 Procedure for Receiving a Replacement Device SMA Solar Technology AG 4. Press down the locking levers of the connecting terminal plate for the AC cable. 5. Remove all connected grounding cables from the grounding terminal. 6. If the multi-function relay or the SMA Power Control Module are used, remove the connection cable from the inverter.
- Page 125 SMA Solar Technology AG 13 Procedure for Receiving a Replacement Device 1. Mount the replacement device (see Section 5, page 19) and make the electrical connections (see Section 6, page 25). 2. If needed, install interfaces in the replacement device and connect the interfaces (see the interface manual).
- Page 126 13 Procedure for Receiving a Replacement Device SMA Solar Technology AG 3. Tighten all six screws in the lower enclosure lid with an Allen key (AF 3) in the order 1 to 6 (torque: 2 Nm ± 0.3 Nm). By tightening the screws in the prescribed order, you avoid warping the lid, which would keep it from sealing correctly.
-
Page 127: Technical Data
SMA Solar Technology AG 14 Technical Data 14 Technical Data 14.1 DC/AC 14.1.1 Sunny Tripower 12000TL-US / 15000TL-US / 20000TL-US DC Input STP 12000TL- STP 15000TL- STP 20000TL- US-10 US-10 US-10 Maximum DC power at cos φ = 1 12,250 W 15,300 W 20,400 W Maximum input voltage 1,000 V 1,000 V 1,000 V... - Page 128 14 Technical Data SMA Solar Technology AG STP 12000TL- STP 15000TL- STP 20000TL- US-10 US-10 US-10 Total harmonic distortion of the output ≤ 3% ≤ 3% ≤ 3% current with total harmonic distortion of the AC voltage < 2%, and AC power > 50% of the rated power Maximum residual output current 142.5 A...
-
Page 129: Sunny Tripower 24000Tl-Us
SMA Solar Technology AG 14 Technical Data Efficiency STP 12000TL- STP 15000TL- STP 20000TL- US-10 US-10 US-10 Maximum efficiency, η 98.2% 98.2% 98.5% CEC efficiency, η 97.5% 97.5% 97.5% 14.1.2 Sunny Tripower 24000TL-US DC Input STP 24000TL-US-10 Maximum DC power at cos φ = 1 24,500 W Maximum input voltage 1,000 V... -
Page 130: General Data
14 Technical Data SMA Solar Technology AG STP 24000TL-US-10 Maximum residual output current 142.5 A Duration of the maximum residual output current 0.0131 s Line synchronization characteristics / In-rush current Method 2 Rated power frequency 60 Hz Operating range at AC power frequency 60 Hz 59.3 Hz to 60.5 Hz Maximum utility backfeed current to utility –... -
Page 131: Protective Devices
SMA Solar Technology AG 14 Technical Data Storage temperature −40°C to +60°C (−40°F to +140°F) Maximum permissible value for relative humid- 100% ity, non-condensing Maximum operating altitude above mean sea 2,000 m (6,562 ft) level Typical noise emission ≤ 51 dB(A) Power loss in night mode <... -
Page 132: Climatic Conditions
14 Technical Data SMA Solar Technology AG 14.4 Climatic Conditions Extended temperature range −25°C to +60°C (−13°F to +140°F) Extended humidity range 0% to 100% Extended air pressure range 79.5 kPa to 106 kPa 14.5 Equipment DC connection Screw terminals AC connection Spring-cage terminal SMA Webconnect Data Module RJ45, as standard 14.6 Torques Upper enclosure lid screws... - Page 133 SMA Solar Technology AG 15 Spare Parts and Accessories 15 Spare Parts and Accessories You will find the corresponding accessories and spare parts for your product in the following overview. If required, these can be ordered from SMA or your distributor. Designation Brief description SMA order number...
- Page 134 16 Compliance Information SMA Solar Technology AG 16 Compliance Information FCC Compliance This device complies with Part 15 of the FCC Rules. Operation is subject to the following conditions: 1. This device may not cause harmful interference, and 2. This device must accept any interference received, including interference that may cause undesired operation.
- Page 135 SMA Solar Technology AG 17 Contact 17 Contact If you have technical problems with our products, please contact the SMA Service Line. We need the following information in order to provide you with the necessary assistance: • Inverter device type • Inverter serial number •...
- Page 136 SMA Solar Technology www.SMA-Solar.com...
Need help?
Do you have a question about the PVI 23TL and is the answer not in the manual?
Questions and answers