Table of Contents
Advertisement
Quick Links
MLC Plus 84 D • Setup Guide
O P
P T
L A
C A
C
Y
D O
L A
S P
D I
F
O F
P C
O N
M E
L U
V O
D
D V
I D E
X V
A U
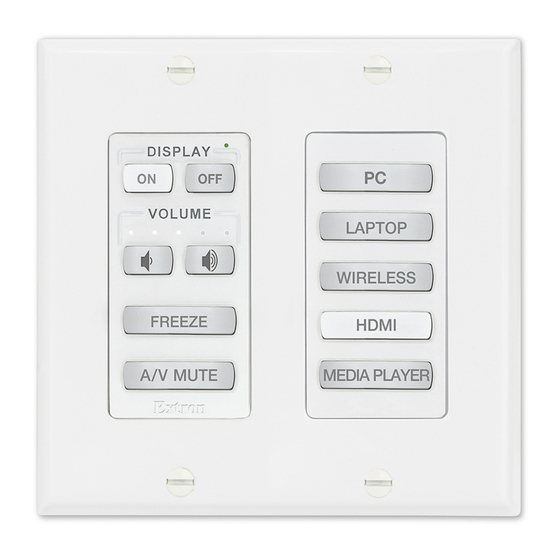
Figure 1.
MLC Plus 84 D
Front Panel
Installation
Step 1: Get Ready
Use the following check list to prepare for the installation.
•
Download and install the latest version of the following:
•
Toolbelt software — for discovering the controller and other control products on the network, for managing core
settings, and for upgrading firmware if the need arises.
•
Global Configurator (GC) software — for configuring the controller.
•
IP Link Pro device drivers — for use with GC, to make control of AV devices possible.
All are avail able from
•
Obtain network information for the unit from the network administrator. You need the following details for each IP Link Pro
device:
•
DHCP setting (on or off)
•
Device (MLC Plus 84) IP address
•
Write down the MAC address of each IP Link Pro device (such as the MLC Plus 84) to be used.
•
Obtain model names and setup information for devices the MLC Plus 84 will control or monitor.
•
Each controller comes with a factory-installed Secure Sockets Layer (SSL) security certificate. If you intend to install a
different SSL certificate, contact your IT department to obtain the certificate or for instructions on how to obtain one. See
"Secure Sockets Layer (SSL) Certificates" in the MLC Plus 84 Series User Guide for requirements and guidelines regarding
SSL certificates. IEEE 802.1X authentication is also supported once enabled (see "IEEE 802.1X Certificates" in the
MLC Plus 84 Series User Guide for details).
The Extron MLC Plus 84 D MediaLink
connection into AV systems to allow users to remotely control, monitor, and troubleshoot AV
equipment, including display devices and switchers. The controller includes an embedded
web server and support for Power over Ethernet (PoE). It also includes ports for bidirectional
serial control, IR output, relays, digital input, and volume control.
M
The MLC Plus 84 D fits a standard US two-gang electrical junction
box or mud ring. It includes a two-gang decorator-style
wallplate and a two-gang mud ring.
O
This guide provides instructions for an experienced
installer to install an MLC Plus 84 Series controller
and to create a basic configuration. Use Extron
Toolbelt software to discover and manage the
MLC Plus controller and other Extron control
products. Configure the controller using Extron
Global Configurator
Configurator Professional (GC Professional) or
Global Configurator Plus (GC Plus) mode. The MLC
integrates with Extron GlobalViewer
software and the Extron Control apps for remote
control applications.
www.extron.com
Locating Software, Firmware, and Driver Files on the Extron Website
(see
Controller with IP Link
®
software running in Global
®
Enterprise (GVE)
®
•
Subnet mask
•
Gateway IP address
Pro integrates Ethernet
®
L
V O
IR
G
C
V
2
M
C O
G
S
1
G
M
R x
C O
T x
R
W E
G
P O
R x
V
A X
1 2
T x
A M
0 .4
Figure 2.
MLC Plus 84 D
Rear Panel
on page 11).
•
User name
•
Passwords
Y S
L A
R E
IN
C
D
2
1
G
IN
1
Advertisement
Table of Contents

Related Manuals for Extron electronics MLC Plus 84 D


Summary of Contents for Extron electronics MLC Plus 84 D
- Page 1 MLC Plus 84 D • Setup Guide The Extron MLC Plus 84 D MediaLink Controller with IP Link Pro integrates Ethernet ® ® connection into AV systems to allow users to remotely control, monitor, and troubleshoot AV equipment, including display devices and switchers. The controller includes an embedded web server and support for Power over Ethernet (PoE).
-
Page 2: Step 2: Prepare The Installation Site
MLC Plus 84 D • Setup Guide (Continued) Step 2: Prepare the Installation Site ATTENTION: • Installation and service must be performed by authorized personnel only. • L’installation et l’entretien doivent être effectués uniquement par un technicien qualifié. • Extron recommends installing the MLC Plus 84 into a grounded, UL Listed electrical junction box. - Page 3 Step 3: Change Buttons or a Faceplate (optional) If desired, replace one or more buttons or button pairs using available additional buttons. Optional button kits are available in various languages, and replacement faceplates are available, as well. NOTE: A custom button builder tool is available at https://www.extron.com/product/custombuttonbuilder/index.aspx where you can order custom-labeled buttons for the MLC Plus 84.
-
Page 4: Front Panel Features
MLC Plus 84 D • Setup Guide (Continued) Step 4: Cable All Devices Cable devices to the controller (see the features sections below and Cabling and Features on the next page). Connect power cords and power on all the devices. -
Page 5: Cabling And Features
Cabling and Features Attach cables using the following wiring diagrams as a guide. Full details are available in the MLC Plus 84 Series User Guide. Power The MLC Plus 84 supports Power over Ethernet (PoE) (see “Control and Power — LAN (Ethernet) and PoE” below). Alternatively, you can power the controller using an optional Extron 12 VDC, 0.5 A desktop power supply, as shown below. -
Page 6: Control, Bidirectional - Serial (Com)
MLC Plus 84 D • Setup Guide (Continued) Control, Bidirectional — Serial (COM) Serial (COM) Ports COM 1 COM 2 POWER x.xA MAX Select protocol via software. Tx Rx G Tx Rx G COM port default protocol: 3-pole COM • 9600 baud... -
Page 7: Control - Volume Control
Control — Volume Control Reference voltage: ≤10 VDC Control voltage output: 0 - 10 VDC Rear Panel Volume Control D IN This port can be used to control the volume and mute or unmute the audio for some Extron audio ampli ers with remote volume capability. •... -
Page 8: Step 7: Test And Troubleshoot
MLC Plus 84 D • Setup Guide (Continued) Step 5: Set up the MLC Plus 84 for Network Communication Connect the PC that you will use for setup and the Network Communication Setup MLC Plus 84 to the sam e Ethernet subnetwork. For LAN connections for the MLC, see Control and Connect the controller and PC to the same network. - Page 9 Junction • Do not overtighten the screws. • I D E Veillez à ne pas trop serrer les vis. MLC Plus 84 D Wall 2 2 2 3 3 3 Figure 11. Installing the MLC Plus 84 Wallplate in a Junction Box...
-
Page 10: Reset Modes: A Brief Summary
MLC Plus 84 D • Setup Guide (Continued) Reset Modes: a Brief Summary The MLC Plus 84 Series controllers offer the following reset modes: • Use Factory Firmware: Press and hold the rear panel Reset button while applying power to the unit. Keep holding the button down until the Reset LED blinks twice, or for 6 seconds, then release the button. -
Page 11: Locating Software, Firmware, And Driver Files On The Extron Website
Locating Software, Firmware, and Driver Files on the Extron Website There are three main ways to find software, firmware, and device drivers within www.extron.com: • Via links from the web page for the specific product • Via the Download page (Click on the Download tab at the top of any page within www.extron.com.) •... -
Page 12: Overall Configuration Procedure For The Controller
MLC Plus 84 D • Setup Guide (Continued) Overall Configuration Procedure for the Controller Step 1: Get ready. Step 2: Prepare the installation site. Step 3: Change buttons or faceplates, if desired. Step 4: Cable the MLC Plus 84, then apply power.
Need help?
Do you have a question about the MLC Plus 84 D and is the answer not in the manual?
Questions and answers