Table of Contents
Troubleshooting

Subscribe to Our Youtube Channel
Related Manuals for 3Com Fast EtherLink 3C515-TX


Summary of Contents for 3Com Fast EtherLink 3C515-TX
-
Page 1: User Guide
Part No. 09-0923-001 Published May 1999 Fast EtherLink 10/100BASE-TX Network Interface Card User Guide A member of the 3Com of network interface cards ® Fast EtherLink family ®... - Page 2 3Com Corporation. 3Com Corporation reserves the right to revise this documentation and to make changes in content from time to time without obligation on the part of 3Com Corporation to provide notification of such revision or change.
-
Page 3: Table Of Contents
ONTENTS BOUT UIDE How to Use This Guide Conventions NTRODUCTION Features 10/100 Auto Negotiation (NWay) Remote NIC Management System Requirements 3C515-TX NIC Operation Tips Compaq 386/20e PC Compaq DeskPro 433/L PC IBM 486 SLC and IBM 386 SLC PCs Network Driver Installation Options NSTALLING THE Getting Started Installing the NIC... - Page 4 Windows NT 4.0 Windows NT 3.51 NSTALLING THE Before You Begin Installing the NDIS 2.01 Driver Windows 3.x Windows for Workgroups Windows 95 IBM LAN Server 4.0 for DOS and OS/2 LAN Services v4.0 for DOS OS/2 LAN Server DEC PATHWORKS, Banyan VINES Client, Microsoft LAN Manager, or Artisoft LANtastic Updating the NDIS 2.01 Driver DOS or Windows 3.x Update...
- Page 5 Online Technical Services World Wide Web Site 3Com FTP Site 3Com Bulletin Board Service Access by Analog Modem Access by Digital Modem 3Com Facts Automated Fax Service Support from Your Network Supplier Support from 3Com Returning Products for Repair NDEX ORPORATION...
- Page 7 IGURES 3C515-TX NIC Removing the Cover Removing the Screw and Backplate Inserting the NIC Connecting the Network Cable to the RJ-45 Connector 3C515-TX NIC and LEDs Select an Adapter Screen Changing Adapter Configuration Screen RJ-45 Connector Pin Assignments...
- Page 8 ABLES Notice Icons Text Conventions LED Descriptions NIC and Diagnostic Program Names Option Settings...
-
Page 9: About This Guide
BOUT This guide describes how to install, configure, and troubleshoot the 3Com 10/100BASE-TX network interface card (called the 3C515-TX adapter in this guide). How to Use This Guide This table shows where to find specific information in this guide. If you are looking for... -
Page 10: Conventions
BOUT UIDE Conventions Table 1 and Table 2 list conventions that are used throughout this guide. Table 1 Notice Icons Icon Notice Type Information note Caution Warning Table 2 Text Conventions Convention Screen displays The words “enter” and “type” Menu commands and buttons Words in italicized type... -
Page 11: Introduction
Microsoft Windows 95 and Windows NT support, which automatically senses the presence of the 3C515-TX NIC and installs the correct network driver from the 3Com EtherDisk Intelligent Auto Install installation software, which automatically installs all Novell NetWare DOS ODI client... -
Page 12: 10/100 Auto Negotiation (Nway)
6 KB of memory, allow network management of the 3C515-TX NIC and the PC in which it is installed. You can get the driver agents from 3Com’s Transcend PC Link SmartAgent software or from 3Com’s bulletin board service (BBS). See Appendix B for information on the BBS. -
Page 13: 3C515-Tx Nic Operation Tips
The 3C515-TX NIC was designed for maximum performance and compatibility in ISA-only machines. For PCI/ISA hybrid or EISA PCs, use the 3Com 3C905-TX Fast EtherLink XL PCI NIC or the 3Com 3C597-TX Fast EtherLink EISA NIC. -
Page 14: Network Driver Installation Options
1: I HAPTER NTRODUCTION Network Driver Installation Options You must install the network driver provided on the EtherDisk diskette that allows the 3C515-TX NIC to work with the following network operating systems, including: Novell NetWare (16-bit client only) NDIS network operating systems including: Windows 95 Windows NT Microsoft Windows for Workgroups... -
Page 15: Installing The Nic
Inform your network supplier and package delivery carrier of any missing or damaged items. If you need to return the NIC to 3Com, you must pack it in the original (or equivalent) packing material, or the warranty will be voided. - Page 16 2: I HAPTER NSTALLING THE Installing the NIC To install the 3C515-TX NIC, follow these instructions: WARNING: The NIC is installed in a PC that operates with voltages that can be lethal. Before you remove the cover of your PC, you must observe the following steps to protect yourself and prevent damage to the system’s components.
- Page 17 6 After you have unpacked the NIC, complete the Product Registration Card and return it to 3Com. Or call 1-800-NET-3Com for immediate registration. Figure 2-2 Removing the Cover 7 Remove the PC’s cover, as shown in Figure 2-2, and choose an empty ISA expansion slot.
- Page 18 2: I HAPTER NSTALLING THE Mounting screw Expansion slot cover Figure 2-3 Removing the Screw and Backplate 9 Insert the 3C515-TX NIC into the empty expansion slot, as shown in Figure 2-4, and secure it with the screw you removed earlier. Figure 2-4 Inserting the NIC Make sure the board is firmly seated in the slot.
-
Page 19: Connecting To The Network
10 Replace the PC cover and reconnect all previously connected cables. These are general instructions that apply to most PCs. Refer to the manual that accompanied your PC for detailed instructions on installing boards in your PC. 11 Turn the power to the PC back on. 12 Proceed to the next section, “Connecting to the Network.”... - Page 20 2: I HAPTER NSTALLING THE Figure 2-5 Connecting the Network Cable to the RJ-45 Connector 2 Connect the other end of the network cable to a 10BASE-T or a 100BASE-TX network port. 3 Check the LEDs, shown in Figure 2-5. After installation, and before you install the network driver, the LEDs indicate the following: 10 LNK LED lights green to show 10 Mbps...
-
Page 21: Installing The Novell Net Ware Driver
This chapter describes how to install the NetWare driver on your PC. The NetWare DOS ODI client driver allows your PC to connect to a Novell NetWare network as a client. To operate the 3C515-TX NIC in any other network environment, see Chapter 4. -
Page 22: Installing The Novell Netware Client Driver
This section describes how to install the NetWare driver for a PC running DOS or Windows 3.x. You can use the 3Com Intelligent Auto Install software program to install the NetWare DOS ODI client software automatically, including the driver, and to modify the CONFIG.SYS and AUTOEXEC.BAT files. -
Page 23: Os/2
4 The first time you use the EtherDisk diskette, the 3Com software license appears. To accept its terms, type . (To view all the license text, press [F1].) Several messages appear while the Intelligent Auto Install program is running. A final message indicates successful installation. - Page 24 3: I HAPTER NSTALLING THE 5 Remove the EtherDisk diskette. 6 Boot OS/2 Warp. 7 Insert the WSOS2_1 NetWare Requester diskette in the floppy drive. 8 Click the Drives icon and double-click Drive A. 9 Double-click the INSTALL.EXE icon. 10 Select Installation from the file bar and click Requester on workstation...
-
Page 25: Windows For Workgroups
23 Continue disk swapping as requested. A message screen now appears, indicating that the installation is complete. 24 Select Configuration from the file bar and click This workstation. 25 Enter the default NET.CFG location of C:\NET.CFG and click Edit. 26 Type the following in the Current NET.CFG File Contents dialog box: link driver 3C515 frame ethernet_802.2... - Page 26 3: I HAPTER NSTALLING THE 2 Gather the information described in “Before You Begin” at the beginning of this chapter. 3 Using Windows for Workgroups, click the Network icon. 4 If you are using the Microsoft Windows Network in combination with Novell NetWare, do the next step. If not, go to the next section.
-
Page 27: Netware Shell Support For Windows For Workgroups
NetWare Shell Support for Windows for Workgroups If you are installing only NetWare shell support for Windows for Workgroups, complete the following steps. For more information, ask your system administrator. 1 Using Windows for Workgroups, locate the Network icon and click it. 2 Click Network and select Install Windows Support for the Following Network Only, for example: Novell NetWare (Workstation shell 3.x or 4.x) - Page 28 Microsoft Client for Microsoft Network NetBEUI The network components should now include: Client for NetWare Networks 3Com Fast EtherLink ISA Parallel Tasking NIC IPX/SPX Compatible Protocol 11 Click Client for NetWare Networks. 12 Click Properties. 13 Under the General tab, set your preferred server and the first network drive.
-
Page 29: Confirming Installation
4 Click the Device Manager tab. A list of devices appears, arranged by type. 5 Double-click the Network Adapters icon. The name of the installed 3Com NIC appears: Fast EtherLink ISA This confirms the 3C515-TX NIC’s installation. 6 Double-click the 3C515-TX NIC name to display a description of the 3C515-TX NIC and its current status. -
Page 30: Windows Nt 4.0
3-10 3: I HAPTER NSTALLING THE Windows NT 4.0 The following steps describe how to install the network driver in a PC running Windows NT 4.0. 1 Start Windows NT. 2 In the Control Panel, double-click the Network icon. 3 Click the Adapters tab in the Network Control Panel. If networking has not been installed in your system, when you open the Network Control Panel, Windows NT will ask you if you want to install networking. -
Page 31: Windows Nt 3.51
PC running Windows NT 3.51. 1 Start Windows NT. 2 In the Control Panel, double-click the Network icon. In the Network Settings window, select the existing 3Com driver in the Installed Adapters group. 3 Click Remove. 4 Click Yes in the Network Settings dialog box. -
Page 33: Installing The Ndis Network Driver
Microsoft Windows 95 Windows NT The Network Driver Interface Specification (NDIS) software specification was developed by Microsoft and 3Com. This specification is used to develop drivers for NICs like the 3C515-TX NIC. The NDIS drivers allow your PC to connect to a supported network as a client. -
Page 34: Before You Begin
4: I HAPTER NSTALLING THE Before You Begin Before installing the NDIS network driver, make sure you have the EtherDisk diskette. Ask your system administrator for the following information you need to complete the driver installation. Operating system of your PC OS/2 Windows 3.x Windows for Workgroups... -
Page 35: Windows For Workgroups
Driver Type and select Real Mode NDIS Driver. 11 Click OK. The Network Setup screen lists the 3Com Fast EtherLink ISA NIC (3C515) (NDIS2) and the default protocol stacks. The Windows setup program asks if you want to replace the Enhanced Mode Protocol Manager with the version you are installing now. -
Page 36: Windows 95
Microsoft Windows for Workgroups 3.11 Disk 7 and click OK. 14 If prompted for the EL515.DOS driver, remove any diskette in drive A and insert the 3Com EtherDisk diskette in drive A. To load the NDIS 2 driver, type this path: a:\ndis2\dos [Enter] 15 Click OK. -
Page 37: Ibm Lan Server 4.0 For Dos And Os/2
9 Restart your PC when prompted. The NDIS 2 driver installation is complete. IBM LAN Server 4.0 for DOS and OS/2 To install the 3Com NDIS 2 driver for IBM LAN Server 4.0, follow these procedures, which are provided for both DOS and OS/2 installations. -
Page 38: Os/2 Lan Server
NSTALLING THE 6 Remove the DOS LAN Services Disk 1 diskette and insert the EtherDisk diskette. The next menu displays the 3Com Fast EtherLink ISA NIC. Additional menus will appear. 7 Select the appropriate options for your network environment and complete the installation. -
Page 39: Dec Pathworks, Banyan Vines Client, Microsoft Lan Manager, Or Artisoft Lantastic
3Com NDIS drivers. For example, type: a:\ndis2\os2 [Enter] 13 Click OK. 14 Select 3Com Fast EtherLink ISA NIC for OS/2 and click Add. 15 Under Current Configuration, select 3Com Fast EtherLink ISA NIC for OS/2 and then click Edit. -
Page 40: Updating The Ndis 2.01 Driver
2 Insert the EtherDisk diskette in drive A and at the DOS prompt, type: a:\install [Enter] If the 3Com license screen appears, type terms and conditions. 3 On the main menu screen, select Driver Installation and Update and press [Enter]. -
Page 41: Installing The Ndis 3.X Driver
6 Click Start, then Settings. 7 Select Control Panel. 8 In the Control Panel, click Network and Add. 9 Select Adapters and 3Com. 10 Click Have Disk. 11 Insert the EtherDisk diskette in the floppy drive. 12 Enter the letter of the floppy drive location. -
Page 42: Windows 95
Microsoft Windows for Workgroups 3.11 Disk 7 and click OK. 10 If prompted for the EL515.386 driver, remove any diskette from drive A and insert the 3Com EtherDisk diskette in drive A. 11 Type the following path to load the NDIS 3 driver: a:\wfw311 [Enter] 12 Click OK. -
Page 43: Confirming Installation
4 Click the Device Manager tab. A list of devices appears, arranged by type. 5 Double-click the Network Adapters icon. The name of the installed 3Com NIC appears: Fast EtherLink ISA This confirms the 3C515-TX NIC’s installation. Installing the NDIS 3.x Driver... -
Page 44: Windows Nt 4.0
4-12 4: I HAPTER NSTALLING THE 6 Double-click the 3C515-TX NIC name to display a description of the 3C515-TX NIC and its current status. The next dialog box confirms that the 3C515-TX NIC is working properly. If you have a problem, go to Chapter 5, “Troubleshooting.” 7 Click Cancel to leave each dialog box and return to the Control Panel. -
Page 45: Windows Nt 3.51
PC running Windows NT 3.51. 1 Start Windows NT. 2 In the Control Panel, double-click the Network icon. In the Network Settings window, select the existing 3Com driver in the Installed Adapters group. 3 Click Remove. -
Page 47: Troubleshooting
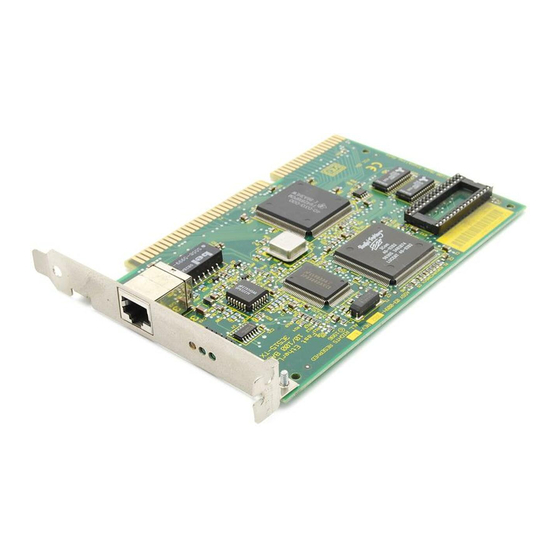
This chapter explains how to isolate and solve 3C515-TX NIC problems. Troubleshooting with the NIC LEDs The 3C515-TX NIC has three status LEDs, as shown in Figure 5-1 and described in Table 5-1. Figure 5-1 3C515-TX NIC and LEDs Before the LEDs can be used for troubleshooting, the NIC must be connected to the network (see Chapter 2) and the network drivers must be installed (see Chapter 3 for NetWare drivers or Chapter 4 for NDIS drivers). -
Page 48: Troubleshooting With The Diagnostic Tests
5: T HAPTER ROUBLESHOOTING Table 5-1 LED Descriptions 10 LNK 100 LNK Troubleshooting with the Diagnostic Tests The two diagnostic tests on the EtherDisk diskette check the NIC’s overall operation and isolate faults. You can run the diagnostic tests after installing a NIC, or you can run them when a fault is suspected. -
Page 49: Running The Diagnostic Tests
Running the Diagnostic Tests To run the tests, proceed as follows: 1 Check that the NIC is installed and connected to the network correctly (see Chapter 2). 2 Boot the computer under DOS. The Configuration and Diagnostic Program will not run if memory managers or other device drivers have been loaded. -
Page 50: Running The Group 3 Test
NIC being tested and echo them back to the NIC. The computer being used as an echo server must have a 3Com NIC running at the same speed (10 or 100 Mbps) as the 3Com 3C515-TX NIC. Testing 10BASE-T NIC Operation To test 10 Mbps NIC operation, use a computer as an echo server that contains a NIC listed in Table 5-2. - Page 51 Start button to make the computer an echo server. If you are setting up an echo server on a computer with a 10 Mbps 3Com NIC other than a 3C515-TX NIC, follow these steps: 1 Select a computer to use as an echo server.
-
Page 52: Testing 100Base-Tx Nic Operation
5: T HAPTER ROUBLESHOOTING Testing 100BASE-TX NIC Operation To test 100BASE-TX NIC operation, use a computer as an echo server that contains a 3C515-TX NIC or a Fast EtherLink XL NIC. Select Echo Server under the Test menu, and click Start to make the computer an echo server. - Page 53 If a test fails, the NIC may not be defective. The problem may be incorrect option settings, option settings that conflict with the settings of other boards, or improper installation. If you need to test the NIC further, use the following troubleshooting tips: CAUTION: Before inserting or removing the NIC from the computer, turn the computer’s power off.
-
Page 54: Changing The Test Setup
5: T HAPTER ROUBLESHOOTING Remove all other NICs from the computer and run the tests again. If the tests pass, the other NICs may be causing contention. Check the configuration settings and change them if they conflict with another device. See Chapter 6. Make sure you are running the latest BIOS for your PC. - Page 55 This chapter describes how to change configuration settings for the 3C515-TX NIC. You can change the 3C515-TX default configuration settings using the 3Com EtherDisk diskette Configuration and Diagnostic Program. Before you change the configuration settings, contact your system administrator. By changing configuration settings, you can:...
-
Page 56: Changing Configuration Settings
6: C HAPTER HANGING Table 6-1 Option Settings Option I/O Base Address Interrupt Request Level Boot ROM Transceiver Type Network Driver DMA Channel Type Media Type Network Driver Optimization Full Duplex * This option specifies whether to optimize the network driver for a normal environment, a minimized CPU utilization environment, or a maximized network performance environment. - Page 57 EtherDisk-3C515 Fast EtherLink ISA 10/100 Base TX Adapter v1.0 Quit Install Test View Initial Adapter Selection 3Com 3C515-TX: Ethernet Address = 0060C0BC00D1 3Com 3C509B-TP: Ethernet Address = 00600C34C320 Select the adapter to be configured and/or tested. [ENTER]=<Select> [Alt]+<Highlighted Key>=Execute Function [ ]=Scroll [TAB]=Next Field [SHIFT+TAB]=Previous Field [F1]=Help [ESC]=<Quit>...
-
Page 58: For More Information
6: C HAPTER HANGING Configuration and Diagnostic Program Quit Install Test EtherLink III Adapter Configuration Network Driver Optimization Full Duplex Media Type Boot PROM I/O Port Address Interrupt Level DMA Channel Auto Configure [ENTER]=<Auto Configure> Automatically Configures the Adapter [Alt]+<Highlighted Key>=Execute Function [TAB]=Next Field [SHIFT+TAB]=Previous Field [F1]=Help [ESC]=Cancel Figure 6-2 Changing Adapter Configuration Screen 5 Press [Tab] to select the main dialog box. - Page 59 7 Continue this procedure with any of the other options. CAUTION: If you select a DMA channel that conflicts with another device, the PC may crash when the setting is changed. Reboot and reconfigure the DMA channel to another channel. See the online help for more information about each setting (press [F1] when the option is selected).
-
Page 61: Specifications
This appendix lists the specifications, cable requirements, and connector pin assignments for the 3C515-TX NIC. NIC Specifications Network Interface 10 Mbps Ethernet 10BASE-T 100 Mbps Ethernet 100BASE-TX Physical Dimensions Length: Height: Environmental Operating Range Operating temperature: Humidity: Power Requirements Operating voltage: PECIFICATIONS Ethernet IEEE 802.3 industry standard for a 10 Mbps... -
Page 62: Cabling Requirements
A: S PPENDIX PECIFICATIONS Cabling Requirements When connected to a 10BASE-T network, the 3C515-TX NIC operates in 10BASE-T mode and supports standard 10BASE-T cable topologies and types, including Category 3, 4, or 5 UTP cable for 10 Mbps. When connected to a 100BASE-TX network, the NIC operates in 100BASE-TX mode and supports Category 5 UTP cable. -
Page 63: B Technical Support
3Com FTP Site Download drivers, patches, software, and MIBs across the Internet from the 3Com public FTP site. This service is available 24 hours a day, 7 days a week. ECHNICAL automated fax service... -
Page 64: 3Com Bulletin Board Service
U.K. U.S.A. Access by Digital Modem ISDN users can dial in to the 3Com BBS using a digital modem for fast access up to 64 Kbps. To access the 3Com BBS using ISDN, use the following number: 1 847 262 6000 UPPORT ftp.3com.com... -
Page 65: 3Com Facts Automated Fax Service
If you are unable to contact your network supplier, see the following section on how to contact 3Com. Support from 3Com If you are unable to obtain assistance from the 3Com online technical resources or from your network supplier, 3Com offers technical telephone support services. To find out more about your support options, please call the 3Com technical telephone support phone number at the location nearest you. - Page 66 B: T PPENDIX ECHNICAL Below is a list of worldwide technical telephone support numbers: Country Asia Pacific Rim Australia Hong Kong India Indonesia Japan Malaysia New Zealand Pakistan Philippines P.R. of China Singapore S. Korea From anywhere in S. Korea: From Seoul: Taiwan, R.O.C.
-
Page 67: Returning Products For Repair
Venezuela North America Returning Products for Repair Before you send a product directly to 3Com for repair, you must first obtain a Return Materials Authorization (RMA) number. Products sent to 3Com without RMA numbers will be returned to the sender unopened, at the sender’s expense. - Page 68 B: T PPENDIX ECHNICAL Country Latin America U.S.A. and Canada UPPORT Telephone Number 1 408 326 2927 1 800 NET 3Com (1 800 638 3266) Fax Number 1 408 326 3355 1 408 326 7120...
-
Page 69: Index
NDEX Numbers 100BASE-TX network port 1-1 10BASE-T network port 1-1 3C515.SET file 6-5 3Com bulletin board service (3Com BBS) B-2 3Com URL B-1 3ComFacts B-3 Artisoft LANtastic driver installation 4-7 Banyan VINES driver installation 4-7 boot ROM 1-2, 6-2 bulletin board service B-2... - Page 70 3-1, 4-1 NIC 2-2 Intelligent Auto Install auto installation requirements 3-2 software 1-1 LEDs 2-6, 5-1 license, 3Com software 3-3 managing the NIC and its PC remotely 1-2 Media Type option description 6-2 MIBs B-1 Microsoft LAN Manager driver...
- Page 71 3Com URL B-1 bulletin board service B-2 fax service B-3 network suppliers B-3 product repair B-5 test setup, changing the 5-8 troubleshooting 5-2, 6-1 cable 5-7 diagnostic tests 5-2 LEDs 5-1 tips 5-7 URL B-1 NDEX Windows 3.x driver installation NDIS 2.01 4-2...
-
Page 73: Warranty
Fast EtherLink ISA 10/100BASE-TX NIC ARDWARE 3Com warrants this hardware product to be free from defects in workmanship and materials, under normal use and service, for the following length of time from the date of purchase from 3Com or its authorized reseller: Limited Lifetime 3Com’s sole obligation under this express warranty shall be, at 3Com’s option and expense, to... - Page 74 (48) hours of installation but no later than thirty 30) days after the date of purchase, and this is verified by 3Com, it will be considered dead- or defective-on-arrival (DOA) and a replacement shall be provided by advance replacement. The replacement product will normally be shipped not later than three (3) business days after 3Com’s...
-
Page 75: Fcc Classa V Erification Statement
This booklet is available from the U.S. Government Printing Office, Washington, D.C. 20402. Stock No. 004-000-00345-4. NOTE: In order to maintain compliance with the limits of a Class B digital device, 3Com requires that you use quality interface cables when connecting to this device. Changes or modifications not expressly approved by 3Com could void the user’s authority to operate this equipment. - Page 76 TRADE SECRETS; TITLE: You acknowledge and agree that the structure, sequence and organization of the Software are the valuable trade secrets of 3Com and its suppliers. You agree to hold such trade secrets in confidence. You further acknowledge and agree that ownership of, and title to, the Software and all subsequent copies thereof regardless of the form or media are held by 3Com and its suppliers.
-
Page 77: Product Registration
ENTIRE AGREEMENT: This License Agreement sets forth the entire understanding and agreement between you and 3Com, supersedes all prior agreements, whether written or oral, with respect to the Software, and may be amended only in a writing signed by both parties. - Page 78 NOTES...
- Page 79 NOTES...
- Page 80 NOTES...
Need help?
Do you have a question about the Fast EtherLink 3C515-TX and is the answer not in the manual?
Questions and answers